Five Tactics Towards Achieving Zero Trust with Azure Active Directory

For any modern enterprise that uses Azure Active Directory (now Microsoft Entra ID) to manage user and service access to cloud resources, it’s hard to escape the term Zero Trust (ZT), which implies that your organization must have a layered approach to security. In this article, you’ll learn about five Microsoft Zero Trust tactics for securing Azure AD while also considering how to achieve a better administrator and end-user experience. Let’s kick off with the most important driver of Azure AD security: Conditional Access.
Control authentication with Conditional Access
Conditional Access (CA) can be described as an if this, then that processor for authentication in Azure AD. Administrators specify assignments (if this), that if all are satisfied, are treated with access controls (then that). It requires Azure AD Premium P1.
For example, you can have policies that achieve the following:
| Assignments (if…) | Access controls (then…) |
| Users sign in under any conditions | Require Multi-Factor Authentication (MFA) |
| Users sign in from geo-IPs or OSs we do not support | Block access |
| Administrators sign in | Require a compliant privileged access workstation (PAW) and FIDO2 authentication |
| Users sign in to Microsoft 365 on BYOD phones | Require app protection policies to protect organizational data |
| Users sign in to Microsoft 365 on BYOD desktops | Limit access to the web apps (no desktop apps) and block downloads |
This is visualized in Figure 1.1 below
| Conditions / assignments | Access controls | |
| User App Device Location Risk | => | MFA type Managed device Managed app Force password reset |
Now that you know what Conditional Access is, consider the following important points for implementation:
- Conditional policies apply after the initial form of authentication. For example, if you block a certain country, you’ll only prevent the sign-in after the authentication takes place.
- All assignments (conditions) must be matched in a policy for it to apply. Think of it as using AND logic.
- All policies in the scope of a sign-in are processed and without a specific order. Therefore, the most restrictive result applies, which allows you to implement many fine-grained policies instead of a few all-encompassing policies.
- You can implement policies in report-only mode to track what would happen if it were enabled. You can extend the monitoring capabilities like this by integrating with Log Analytics.
The Zero Trust for Conditional Access framework by Claus Jespersen is a great way to get started. Following this framework will help you deploy Conditional Access in a manageable, scalable, and customizable way. You can supplement it with additional community tools such as Microsoft365DSC for configuration drift tracking and management, and CA Optics for analyzing gaps in your implementation.
Next up in our review of Microsoft Zero Trust tactics, we dive into Identity Protection.
Identity Protection
One of the principles of Zero Trust is using as many signals as possible to manage access. As you now know, Conditional Access can be used to control what types of access we allow, but how do we know our users and sign-ins are still safe, even when they satisfy those Conditional Access requirements?
This is where Identity Protection steps in for Azure AD Premium P2 customers. Azure AD sign-ins are given a sign-in risk, and all users are allocated a user risk. The risk level for both of these may be none, low, medium, or high. Then, you can integrate with Conditional Access to apply access controls.
For example:
- If a high-risk user signs in, this is likely indicative of their credentials being in an online data dump. So, require MFA and force a self-service password reset (or block and require administrator-driven password resets).
- If an administrator signs in with any risk level, sign-in or user-level, block the authentication, due to the risk their account poses.
- If a low or medium-risk user signs in, allow it, but only from a compliant corporate device, while blocking all high-risk sign-ins.
In addition to this proactive control over risk events, all risky users and sign-ins are audited and available for administrators to investigate or respond to themselves.
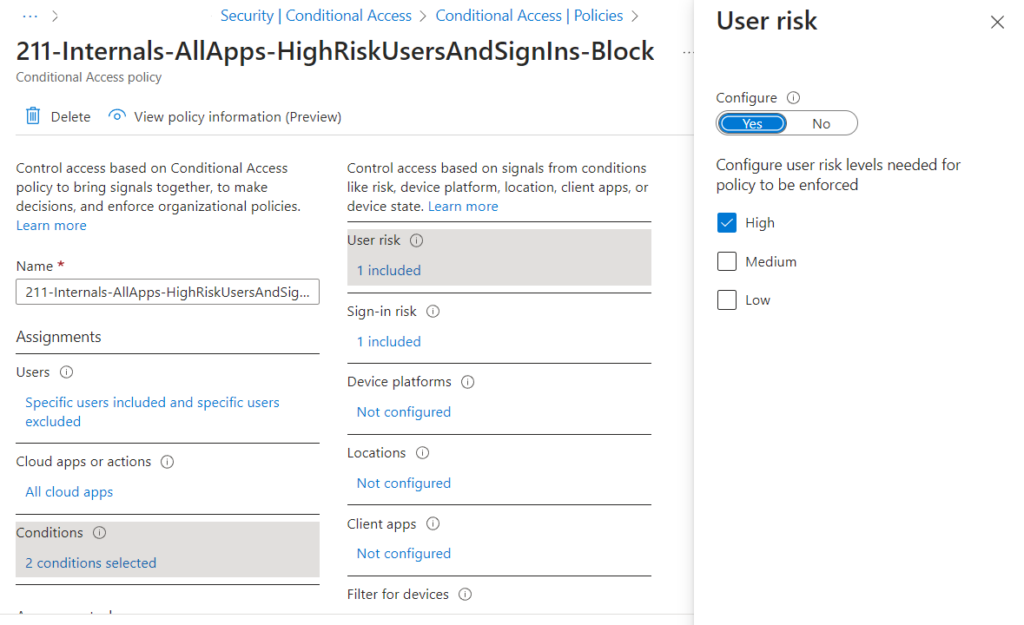
The current guidance for implementing Identity Protection is to do it using Conditional Access policies. And thanks to the fine-tuning abilities of these policies, you can gradually implement Identity Protection without too much risk of disruption.
Start with quick wins by controlling and remediating high-risk users and sign-ins for those with privileged or VIP access. Then expand to the rest of your organization, with longer-term goals to also include low or medium risk.
As you can see in Figure 2.1 below, configuring Identity Protection in CA policies is as easy as updating the assignment controls.
Now that you’re familiar with Identity Protection, let’s look at minimizing our identity’s access to what they need and when, and doing so over the lifecycle of the account.
Identity Governance
Identity Governance is a stack of capabilities in Azure AD Premium P2. Let’s review the three main pillars that we’ll review in this article:
- Privileged Identity Management
- Entitlement management
- Access reviews
Privileged Identity Management
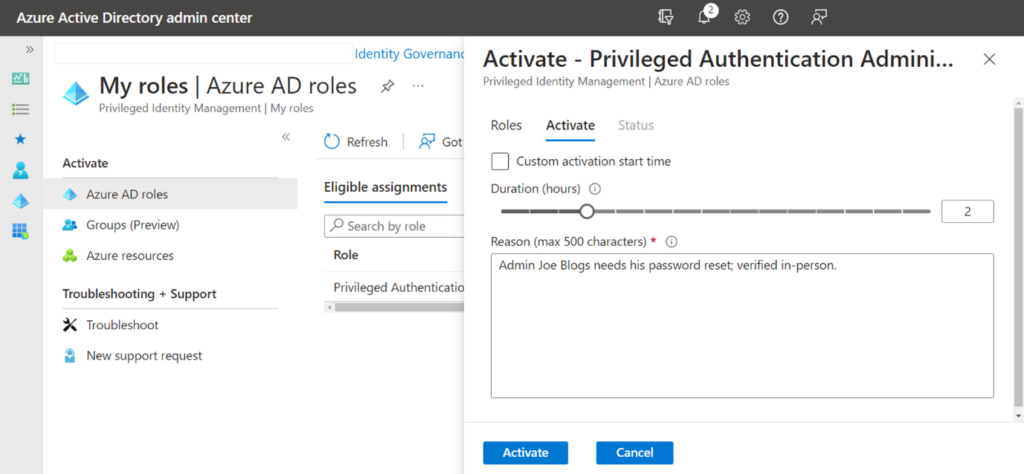
First up, we have Privileged Identity Management (PIM). PIM is all about just-in-time access that can additionally require justifications, approval processes, and or specific authentication contexts.
PIM is primarily used to limit access to Azure AD roles and Azure resources. For example, your account is eligible to become a Global Administrator, but it has no standing access. Then, you elevate to become Global Administrator for only a few hours to get the job done, maybe even needing a colleague to approve your access. The experience is depicted in Figure 3.1 below:
However, we can really manage access to anything controlled by a group with the PIM for Groups capability. For example, some Microsoft admin centers – like Intune, Purview, Defender, and Exchange – do not allow role-based access control (RBAC) with Azure AD roles. They use their own permission models based on groups.
Or maybe we want to allow time-bound access to confidential SharePoint document libraries, or files protected by sensitivity labels. Using Privileged Identity Management for Groups, users are eligible to join the group, and their membership in this group is automatically revoked after the time limit is reached.
In short, Privileged Identity Management is the tool in Azure AD for minimizing standing access to privileged roles and resources.
Entitlement Management
The next pillar of identity governance we want to consider is Entitlement Management. You can think of this as an automated way of deciding and authorizing who gets what.
Users apply for access packages, which are bundles of resources. It may be one thing, like membership in a group. Or it may be several things, such as group membership + app assignments + SharePoint sites. As with Privileged Identity Management, if you can control it with a group, you can layer entitlement management on it.
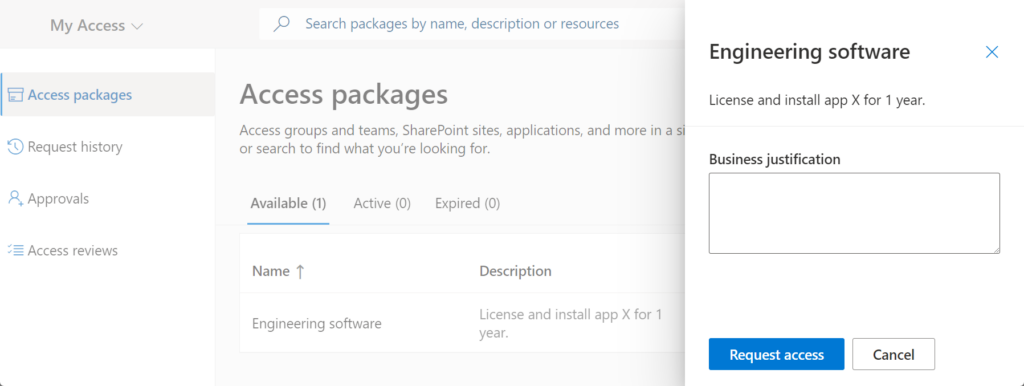
Let’s explore this with an example. A new member of staff has joined the engineering department. Your business is cost-conscious and it only buys licenses for its expensive engineering software if it’s absolutely needed. You manage these licenses and the deployment of the app using an Azure AD group assigned to the Intune app.
Using an access package for this group, the end-user simply applies for the software, fills out a questionnaire, and then their manager is delegated to approve or deny the request. Optionally, access can expire automatically after a given time. You can see what this looks like in Figure 3.2 below
Using your imagination, you can see how this principle can apply to access almost anything in Azure AD.
Access reviews
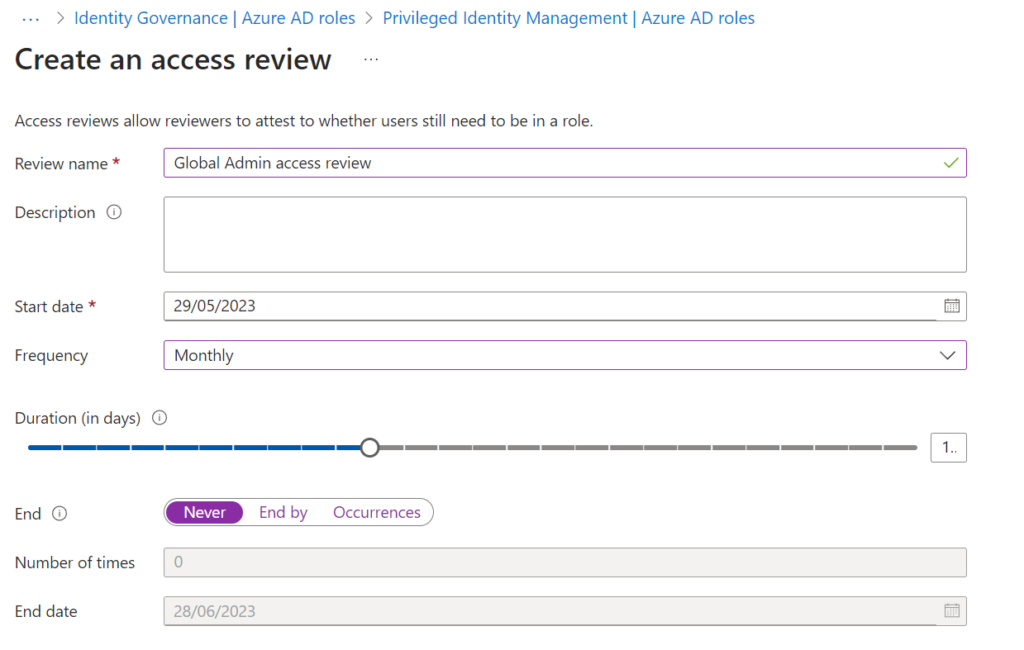
Lastly, we round off with access reviews. Consider these the layers on top of Privileged Identity Management and Entitlement Management that keep access rights accurate. This means that after we give access rights, we use access reviews to stay on top of it, with scheduled manual or automatic reviews to reaffirm or revoke access.
Consider the Global Administrator Azure AD role. This is the most powerful level of privilege available to your tenant, and therefore access should be closely protected. Figure 3.3. below depicts how you could automatically review who has these permissions once per month.
Alternatively, consider the expensive software referenced in the earlier entitlement management example. Remember: using access reviews, membership of the groups, roles, sites, and apps we have issued can be reviewed and controlled on a schedule, so there are a lot of use cases available.
That wraps up our analysis of Identity Governance as a tool for achieving Zero Trust; primarily, reducing standing permissions and staying on top of who can access sensitive resources. Next, we’ll look at authentication methods and why not all MFA technologies are created equal.
Authentication strengths
By now, we all know the importance of Multi-Factor Authentication. What’s less known is that not all MFA solutions are equally secure. SMS and phone calls are usually understood to be the most vulnerable, but even the Microsoft Authenticator app isn’t the best we can do.
Consider the adversary-in-the-middle (AiTM) attack. Using low-cost infrastructure and open-source tools such as Evilginx, an attacker can lure a victim to a phishing website, reverse proxy that traffic, and steal the victim’s MFA claim in the form of cookies. That’s because, at the time of writing, the Microsoft Authenticator app does not care about the domain name you access.
If my-evil-domain.com proxies Azure AD to a victim, Microsoft Authenticator doesn’t know to stop the push notification or invalidate the rotating time-based one-time pass (TOTP).
The next step up in the authentication method chain is a FIDO2 security key. You may most commonly have seen this as USB devices, but Windows Hello for Business (WHfB) also satisfies FIDO2.
This type of authentication method uses hardware-based security and a cryptographic key exchange to secure the authentication, rather than a traditional password. Your user registers a FIDO2 security key to their account, which satisfies MFA requirements on sign-in.
Where FIDO2 improves over the conventional Microsoft Authenticator MFA is that authentication only works against the original Relying Party Identifier it was registered with. For example, a key registered to login.microsoft.com simply won’t engage in the cryptographic exchange required for authentication if you use my-email-domain.com.
There’s a gotcha, though. To enforce FIDO2 rather than any MFA in Azure AD, you’ll need to use Azure AD Premium P1’s Conditional Access capabilities. However, this is where Azure AD authentication strengths enter the picture.
Authentication strengths
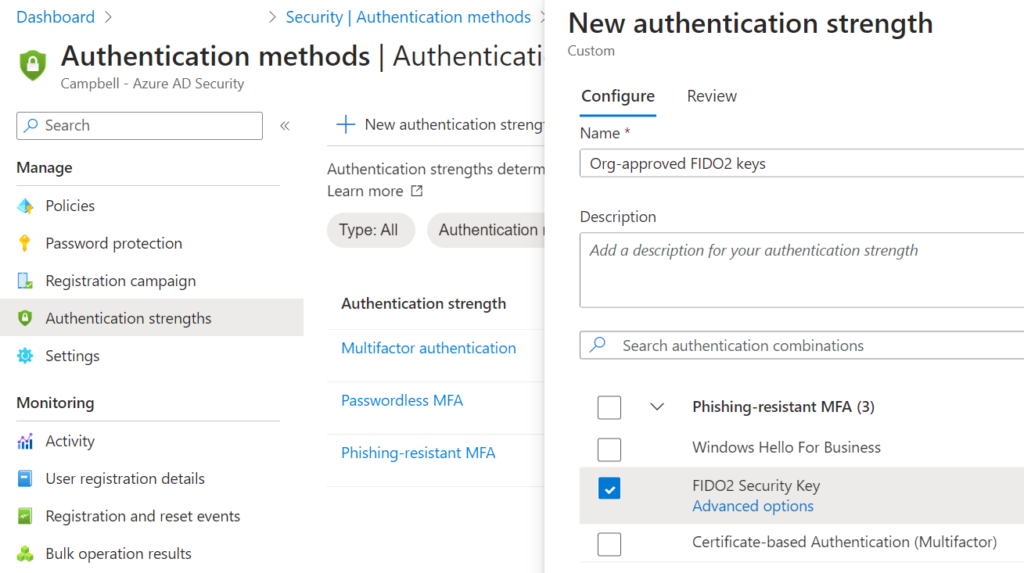
Authentication strengths are collections of authentication methods. For example, out of the box, you’ll find an authentication strength called Phishing-resistant MFA, which lists Windows Hello for Business, FIDO2 security keys, or certificate-based authentication (CBA).
Or, as seen in Figure 4.1 below, you could create your own, such as Org-approved FIDO2 keys, which is limited to Authenticator Attestation Global Unique Identifiers (AAGUIDs) your organization issues.
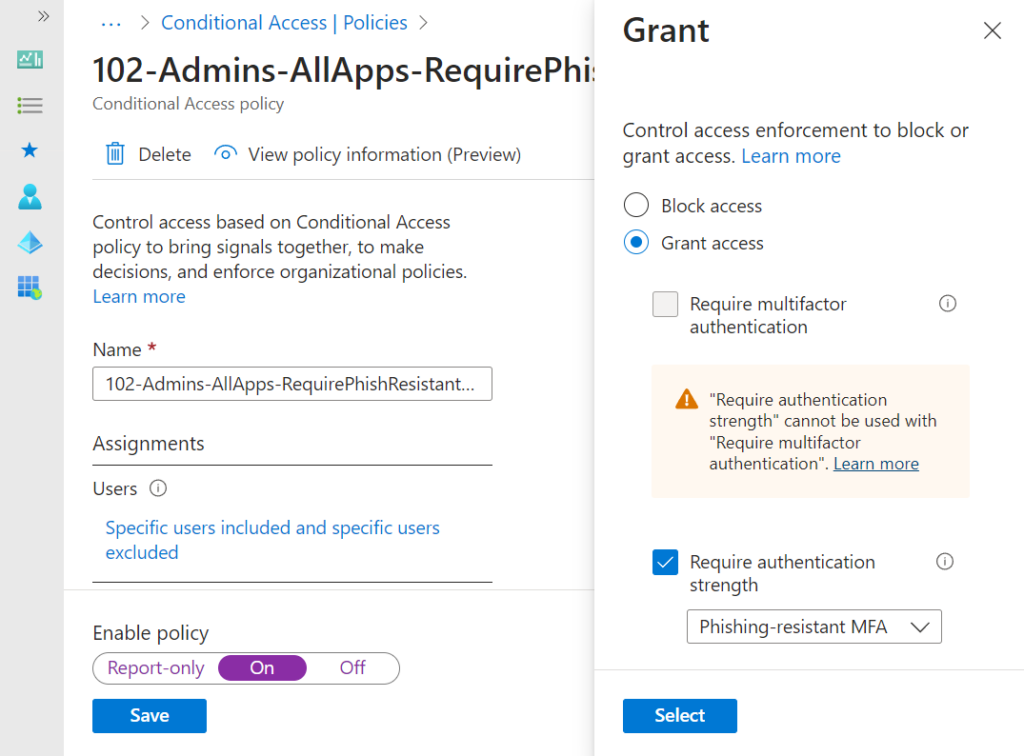
Finally, we enforce this authentication strength in a Conditional Access policy, as seen in Figure 4.2 below. Without this, Azure AD effectively treats all types of MFA as the same, but for your most sensitive users, you should be looking at FIDO2 as a minimum level of strength.
Now that you are protecting users against a common type of attack and raising the cost to adversaries, let’s wrap up our Microsoft Zero Trust tactics by addressing some of the defaults in Azure AD.
Changing Azure AD’s defaults
Considerably open by default, Azure AD’s security can be improved with the tools you’ve learned so far. Veterans of enterprise IT probably won’t be surprised to see that Azure AD has default settings you’ll want to harden too. Let’s look at three of these.
Review user consent
Our first default setting to review is user consent. Azure AD has the concept of enterprise apps – service principals for defining an app in your tenant.
Of specific interest are enterprise app permissions – what resources the app can access. If you’ve ever signed in to an app with your Azure AD account and consented to let it access your account, mailbox, files, and so on, you’ve handed that app consent.
Out-the-box, anyone in your tenant can consent to permissions at the user level. For example, they can give a third-party file browsing app consent to files they can access, but not files they can’t access. The risk here is obvious: How can we trust the app?
While Microsoft does have some measures in place to reduce abuse (tenant age checks for multi-tenant apps, developer verification systems), those aren’t perfect, and wouldn’t prevent non-malicious but still unsanctioned shadow IT.
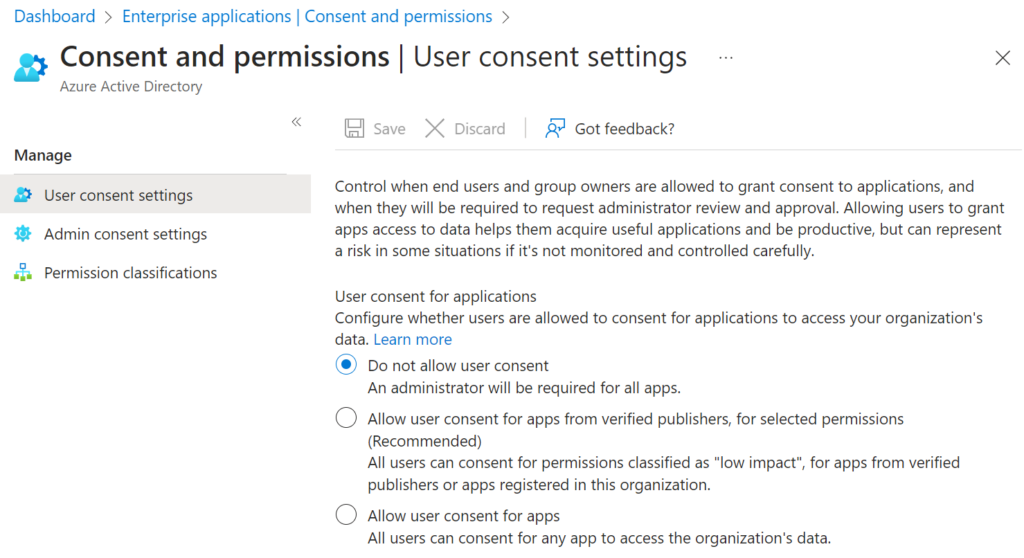
Therefore, one of the first places an Azure AD defender should head to is Enterprise applications > Consent and permissions > User consent settings. By setting user and group owner consent to Do not allow, followed by configuring the Admin consent settings, you set yourself up with a safer approval system.
External collaboration settings
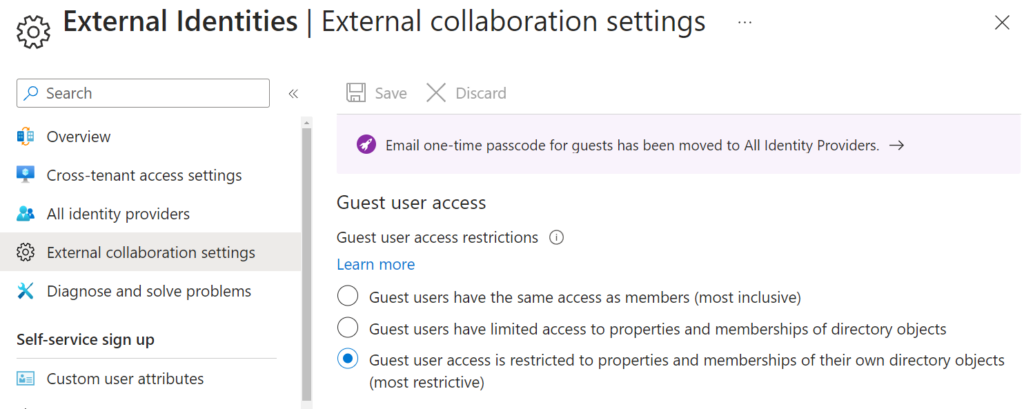
The next setting you should review sits in External Identities > External collaboration settings. If your tenant allows guest users, those guests by default will be able to enumerate membership of other groups, which may be confidential, sensitive, or otherwise risky information to expose.
It is highly unlikely you expect or need this behavior, so consider amending Guest user access to the most restrictive option.
Restrict access to the Azure AD administration portal
The third setting we’ll review requires a bit more work than just changing one option. In the User settings blade of Azure AD, you’ll find that, by default, the Restrict access to Azure AD administration portal option is not enabled, meaning any user in your tenant has access to the Azure AD portal to perform many unexpected read operations, such as browsing users and groups.
You can enable this to stop standard users accessing the Azure AD web portal, but you’ll find that it doesn’t really go far enough – those users could still perform the same read operations using services such as the Microsoft Graph AI or PowerShell. Therefore, you’ll want to supplement this with a Conditional Access policy targeted against the Microsoft Azure Management cloud app, ideally blocking anyone who isn’t an admin.
Use these Microsoft Zero Trust tactics as a guiding light
Zero Trust isn’t a set-it-and-forget-it setting or a tool that you can just deploy in Azure AD. It’s more of a guiding light, and a way of constantly provoking you to question yourself:
- If an attacker got past this defense, what’s the next defense they’ll have to get past, and the one after that, and the one after that?
- How can I minimize the attack surface, in the form of phishing protection, permission sprawl, unnecessary objects, access rights, and unintended consequences?
Thinking about these questions as an Azure AD administrator is a tactic towards a Zero Trust strategy. As you go forward with your Azure AD journey, leveraging the Microsoft Zero Trust tactics outlined in this article will contribute towards a well-maintained and well-secure tenant.


