- Blog
- PowerShell
- Post
What is PowerShell and How to Get Started With It?

PowerShell is a cross-platform object-oriented language and shell that IT pros can use to manage computers running Windows, Linux, and macOS. PowerShell can automate tasks across thousands of computers simultaneously. If you’ve ever wondered what PowerShell is and what it’s for, this article aims to answer some of the most common questions you may have about Microsoft’s versatile command-line shell.
PowerShell’s roots lie in system administration, and it’s a favorite tool among IT pros to manage computers and their resources. However, we’ll explain in this post how you can use PowerShell for many other tasks as well.
What is PowerShell?
PowerShell is a program, but the “PowerShell” name actually designates multiple things. First, it’s the name of the familiar blue-colored shell you use to execute commands.
This shell is the interface used to interact with the PowerShell language. It also supports many modern programming concepts like object orientation, tab completion for parameters, command-line history, and the use of a “pipeline” to send data from one command to another.
PowerShell is also the name of the cross-platform language that IT pros can use to manage computers running Windows, Linux, and macOS. The PowerShell scripting language is used to automate tasks, and we’ll share more details about that later.
What’s the difference between Powershell and command prompt?
PowerShell is much more than a simple replacement for the Command Prompt (Cmd.exe) you see in Windows or Linux operating systems. PowerShell is a robust automation solution that comprises three main parts:
- A command-line shell
- A scripting language
- An automation platform
It can also be extended through modules to interact with many other technologies.
One of the greatest strengths of PowerShell is that data returned in the shell is not just simple text, but actual .NET objects with metadata. PowerShell’s language is open-source and built on top of the Microsoft .NET platform. Today, the PowerShell scripting language is at version 7, and each release of PowerShell has expanded its capabilities and allowed its usage to expand to more areas of information technology.
What is PowerShell used for?
PowerShell is mainly used to manage computer systems. Hardware, software, registry settings, file management, and network configuration are all examples of things PowerShell can manage. In short, PowerShell can manage almost any aspect of a computer system.
PowerShell’s popularity is due to its simplicity to get started with, but also its versatility. You can manage your computer with PowerShell, but you can also manage hundreds or thousands of other computers in a computer network at the same time using the exact same interface.
System administrators have traditionally been the main users of PowerShell. Sysadmins like it because it helps them perform tasks and do their jobs easier and faster than if they had to work in a GUI application. PowerShell also allows repetitive tasks to be automated by creating scripts, and we’ll have more on that later.
A history lesson on PowerShell
PowerShell v1 was first released in November 2006 with Windows XP SP2, Windows Server 2003 SP1, and Windows Vista. The first iteration contained a meager 129 cmdlets and only ran on the aforementioned versions of Windows.
If the first five versions of PowerShell were only available on Windows, PowerShell 6 in 2016 introduced the ability to manage Windows, macOS, and Linux computers all from the same shell. Today, PowerShell is at version 7, and it has grown to have thousands of built-in cmdlets that can execute instructions.
As I previously mentioned, you can also extend the reach of PowerShell by installing modules to manage other products including AWS and Azure. For example, the module to manage AWS cloud services contains close to 10,000 cmdlets alone!
Windows PowerShell and .NET
When PowerShell was initially released in 2006, it only supported Windows. That’s because PowerShell runs on top of the .NET framework. For those unfamiliar, this is a software development framework for building and running applications on Windows.
Initially, Microsoft used to name the product Windows PowerShell in all versions of Windows, though most IT pros didn’t call it that way. Instead, it was just known as PowerShell, even though it was a “Windows-only” product.
As we just mentioned, the relationship between PowerShell and the .NET framework resulted in the five major versions of “Windows PowerShell” concluding with version 5.1 being restricted to Windows. However, things changed a few years back as Microsoft embraced cross-platform support for its products.
In 2016, Microsoft released .NET Core, which is a new version of the .NET framework. It is a free, open-source framework designed to run on Windows, Linux, and macOS. Once .NET Core became available, this gave the PowerShell team the opportunity to develop a cross-platform version of PowerShell.
In 2018, Microsoft released PowerShell v6, which was built on top of .NET Core and introduced cross-platform support for PowerShell. The product name changed from Windows PowerShell to Microsoft PowerShell (aka PowerShell Core).
However, PowerShell 6 and its follow-up version (PowerShell v7) are still not installed by default in Windows to this day. This is because Windows is a giant product running on over a billion different computers.
All these Windows PCs run applications using the .NET framework, not .NET Core. And these applications depend on a stable version of the .NET framework in Windows to function until developers can write them to use other frameworks available.
To solve this dilemma, the PowerShell team has kept Windows PowerShell (v5.1) as the default version in Windows. However, the team has said that there will be no new development of Windows PowerShell from now on, meaning it will exist only for legacy compatibility.
What is the PowerShell ISE?
The Windows PowerShell Integrated Scripting Environment (aka PowerShell ISE) is an application included in Windows that allows users to run PowerShell code. Users can use the ISE to write, test, and debug multi-line commands and scripts. It supports syntax highlighting, tab completion, and other features normally found in an integrated development environment (IDE).
Microsoft introduced the ISE in PowerShell v2. They support it in all versions of Windows PowerShell up to PowerShell v5.1.
The ISE is now considered a legacy product and will not receive any further development. Users of PowerShell should switch to using the Visual Studio Code editor.
The product will continue to be included in Windows, just like the command prompt. However, the official Microsoft documentation provides this note regarding the future of the PowerShell ISE.
“The PowerShell ISE is no longer in active feature development. As a shipping component of Windows, it continues to be officially supported for security and high-priority servicing fixes. We currently have no plans to remove the ISE from Windows.
There is no support for the ISE in PowerShell v6 and beyond. Users looking for a replacement for the ISE should use Visual Studio Code with the PowerShell Extension.”
What is PowerShell Core?
The way forward for PowerShell now is Microsoft PowerShell v7 (aka PowerShell Core) which runs on .NET Core. However, as we explained previously, PowerShell v7 isn’t installed by default on Windows because .NET Core isn’t installed on Windows computers by default either.
So where does this leave us? Windows PowerShell is the default version of PowerShell installed in Windows, but v5.1 is the last version of it. Microsoft PowerShell (aka PowerShell Core) is the future of PowerShell, but the app and its required framework are add-ons you set up after Windows is installed on a computer.
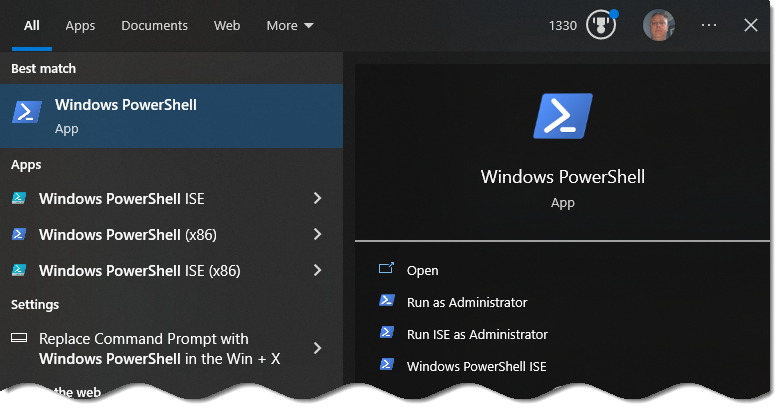
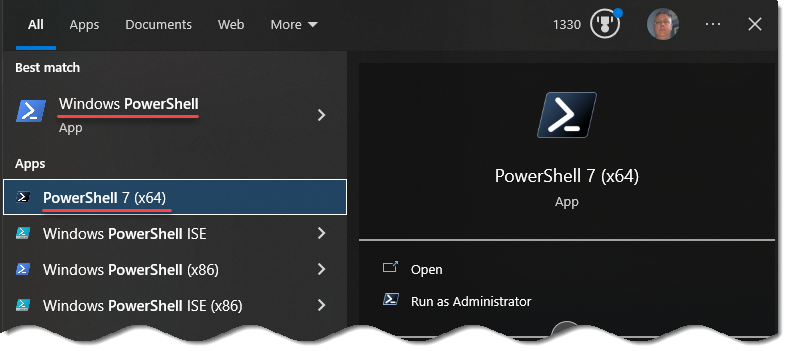
Windows PowerShell and PowerShell Core (v7) can run side by side on a Windows PC. To help tell the two programs apart, the executable for Windows PowerShell is PowerShell.exe and the icon still uses the familiar PowerShell blue color. The executable for Microsoft PowerShell is PWSH.exe and the icon now has a black background.
How can I install PowerShell?
The Windows operating system includes the legacy Windows PowerShell (v5.x) client. And PowerShell Core (v6 and above) is available as an add-on for Windows, Linux, and macOS.
There are a few different ways to download and install the latest version of PowerShell on your computer. The Microsoft Docs website details five different installation methods on Windows, and the company recommends using the winget command line tool to install PowerShell.
However, you can just use the following links to download the PowerShell 7.2 install package from GitHub.
One additional method to install PowerShell that’s not included in the Microsoft documentation is the Chocolatey package manager. Chocolatey is an open-source command-line package manager that works with PowerShell to automate the download and installation of software. Admins prefer this method because they can invoke the installation from a familiar syntax and automate the installation process. Chocolatey installs subsequent updates as well.
Linux users can install PowerShell using the package manager installed in the operating system. As for macOS users, they can install PowerShell using HomeBrew, the preferred package manager for macOS, but there are also direct download links on Microsoft’s website. We have a more comprehensive article on how to install PowerShell on Petri.com if you would like to check it out.
How to use PowerShell commands
There are a few key points to understand what makes PowerShell so powerful. Maybe the most fundamental concept to understand about PowerShell is that the data returned is not just simple text.
When you query data from PowerShell, the data returned is a rich object with many properties available to explore. PowerShell uses .NET to communicate with the systems it manages, and the data returned includes .NET objects.
PowerShell command examples
A simple example of a PowerShell command would be a query of a service in Windows. The Get-Service cmdlet shows information about Windows services. Moreover, the Get-Service bits cmdlet will return information about the Background Intelligent Transfer Service (BITS).
Get-Service bits
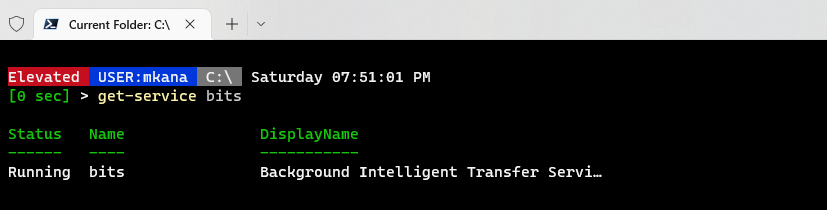
This cmdlet returns basic information about the status of the service. However, the data presented in the console window is a filtered view designed to show you the most relevant information that’s needed about the BITS service.
However, there is more data about the BITS service than what we see on screen. We just need to know how to view the extra data.
Modules
Cmdlets are grouped together in PowerShell Modules. For example, you might install a module for managing Azure virtual machines. You can list all the install modules on a device using Get-Module:
Get-Module -ListAvailable
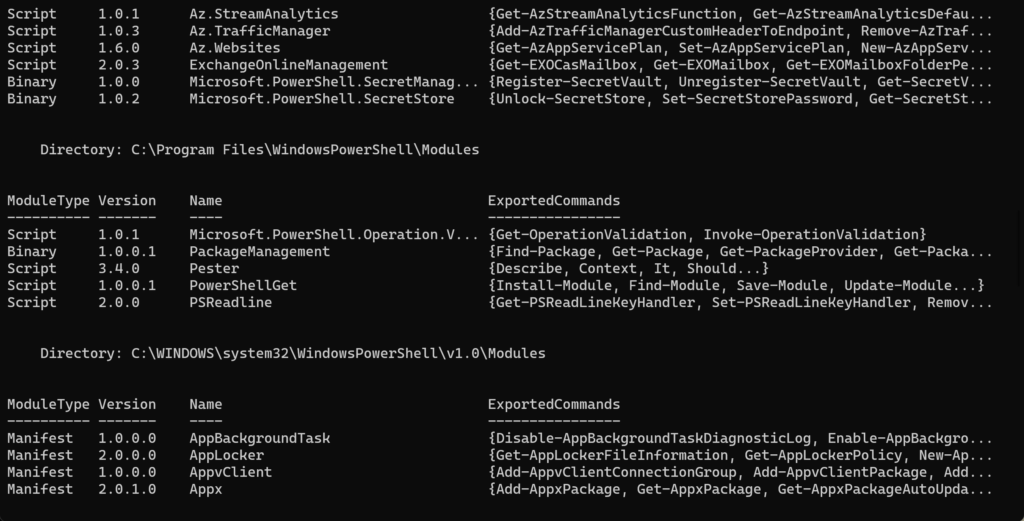
By default, PowerShell comes with several modules installed out-of-the-box. But there are many more that you download and install to manage third-party services and products. Adding the -ListAvailable switch to Get-Module tells the command to list all modules installed on your system, regardless of whether they are imported into the current PowerShell session.
Objects
As I mentioned earlier, PowerShell sets itself apart from other scripting languages because the data queried by PowerShell is returned as an object. You can think of an object as a collection of data about a topic.
In this example, the object is the BITS service. We can see more information about the BITS service by using additional cmdlets to present different views of the object data.
Properties and methods
The additional data items of an object are called members, which are the properties and methods of the object retrieved by PowerShell.
Let’s take another look at the bits service using the Get-Member cmdlet.
get-service bits | get-member
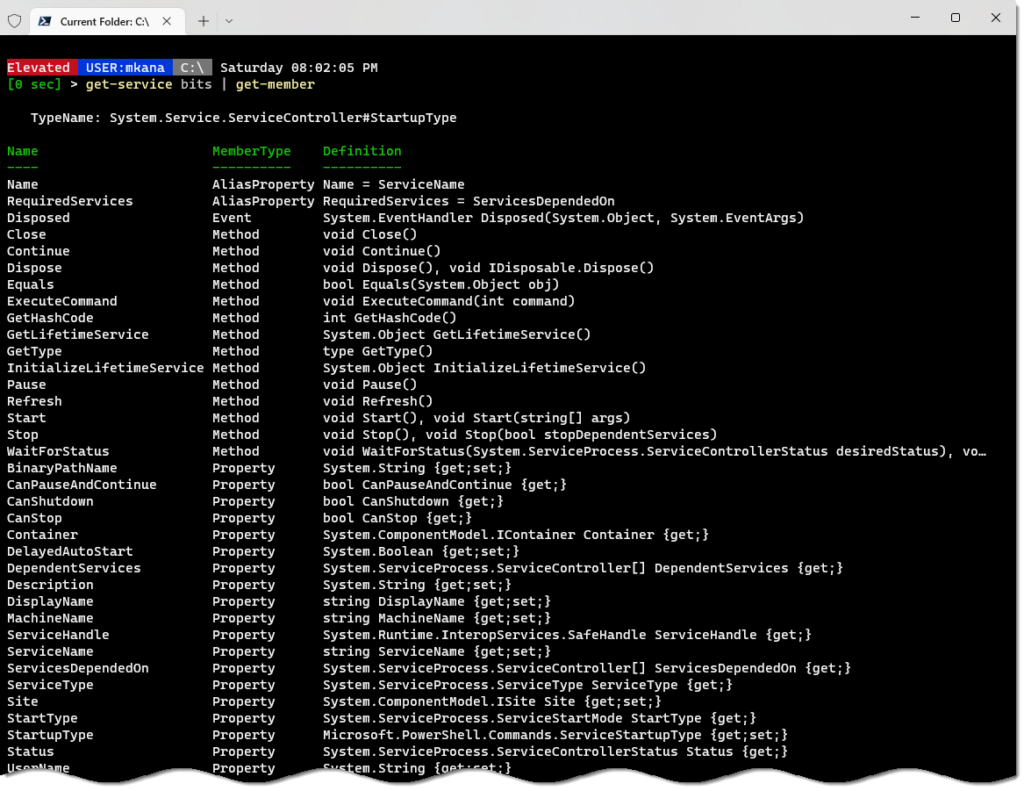
Now, I can see the additional data that is potentially available for the BITS service. All this additional data that is available makes PowerShell powerful and useful. PowerShell has already retrieved all this information and I just need to decide what information is useful to see.
Now, armed with this extra knowledge of the properties available for the BITS service, I can change the query that I execute to pull back different aspects that I am interested in. In this example, I am taking the names of properties I found in the previous example and adding them to my query.
Get-service bits | select-object Servicename, Description, StartUptype, Status, UserName, CanStop, DependentServices
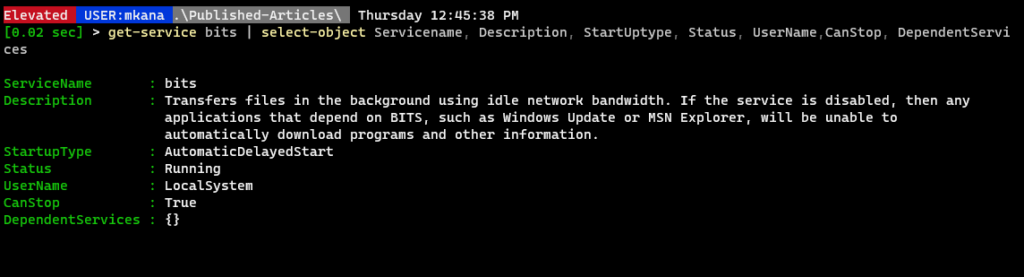
Finding the properties was a trivial task. Adding those additional properties to my original query was also a trivial task. However, because of the extra information available to me, I am able to make a query of the exact information I may need to perform a task without much effort.
The pipeline
Another feature of PowerShell that makes it so useful is the pipeline which is used to chain commands together. In this example, I am querying the status of the BITS service with Get-Service, and then passing the results from the first cmdlet to the second cmdlet, Stop-Service.
Get-Service Bits | Stop-Service -passthru

Notice that I did not need to type the name of the service for the Stop-Service cmdlet: PowerShell passed the name to the cmdlet from the results of the Get-Service bits cmdlet.
This occurs because PowerShell uses a pipeline for its results. Each cmdlet makes the data that has been queried available to the pipeline for possible usage by the next cmdlet. Then, the last cmdlet in the pipeline sends the data to the console.
In this example, the data returned from the Get-Service bits query is passed to the Stop-Service cmdlet, which finds the name and then executes the cmdlet. After completion of that cmdlet, the data from Stop-Service is then passed to “the console”, which is what we see when we look at the data.
PowerShell syntax
One thing that makes PowerShell such an easy language to learn is that the cmdlets all follow a standard syntax. All PowerShell cmdlets released by Microsoft follow a Verb-Noun syntax. Microsoft has also imposed strict guidelines for third-party publishers to follow so that their modules will adhere to the company’s standards.
Verbs
The PowerShell language has many standard keywords. We saw earlier that Get-Service is used to get information about Windows services. The Get keyword is used to read information.
Below is a list of some common “get-” commands built into PowerShell.
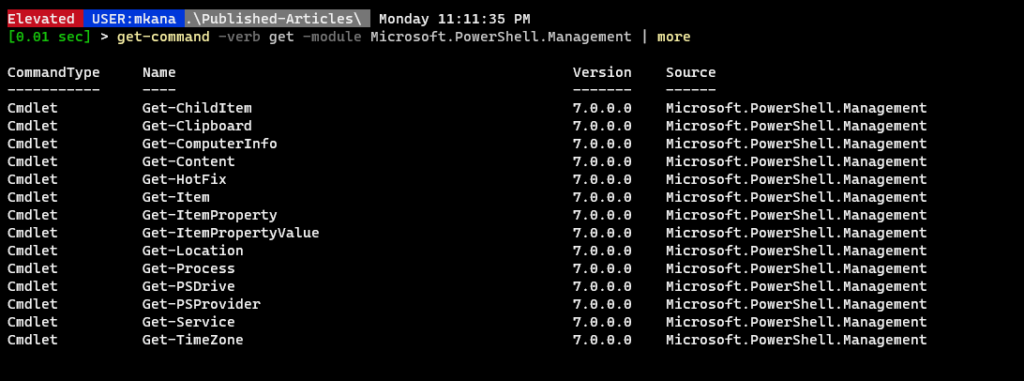
The most common keywords are New, Set, Remove, Clear, Test, Start, Find, Open, Show, and Select, but there are many others as well. Each keyword has a specific meaning and usage. Microsoft has detailed documentation that explains when each keyword should be used, and the company also defined the meaning of each word as it relates to PowerShell.
Nouns
A noun is a ‘thing’ that the verb takes action on. There are no approved nouns in PowerShell. But you can run a search to understand the available nouns for any given verb. For example, you can find all the cmdlets that can use ‘file’ as a noun using Get-Command:
Get-Command -Noun file

PowerShell Help
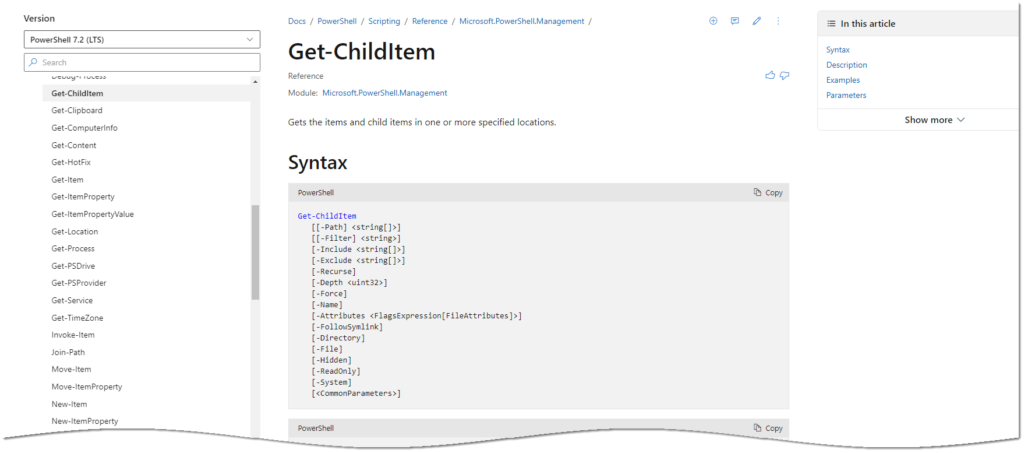
There is an excellent help system included in PowerShell that contains robust information to help users understand the syntax and usage of PowerShell cmdlets. Help for any PowerShell cmdlet can be found by typing Get-Help (cmdletname).
As an example, getting help for the get-childitem cmdlet is a simple one-line of text:
Get-Help Get-Childitem
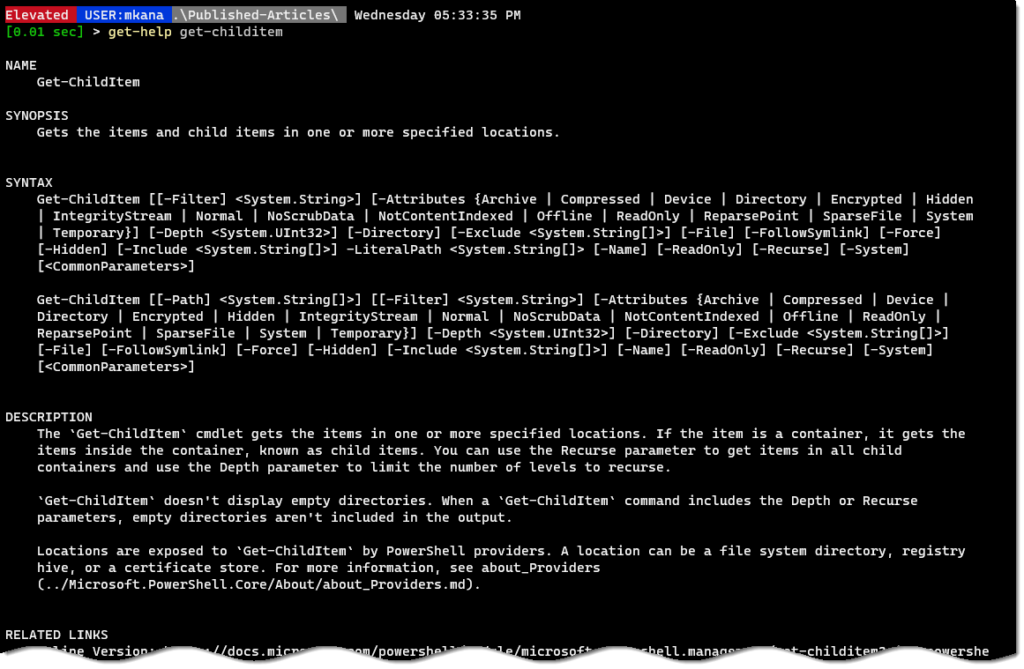
The help system built into PowerShell has many different options to help someone find more information about PowerShell cmdlets. This help system uses the same source of information as what can be found online at the Microsoft docs website.
You can access the online help directly from your PowerShell command prompt by using the -online parameter. This parameter will take you directly to the relevant Microsoft documentation for the cmdlet.
get-help get-childitem -online
PowerShell also has helpful information for more than just PowerShell cmdlets. The help system includes information about PowerShell concepts such as aliases, functions, logging, loops, environment variables, modules, and operators, just to name a few. As of this writing, PowerShell contains 147 topics that you can reference.
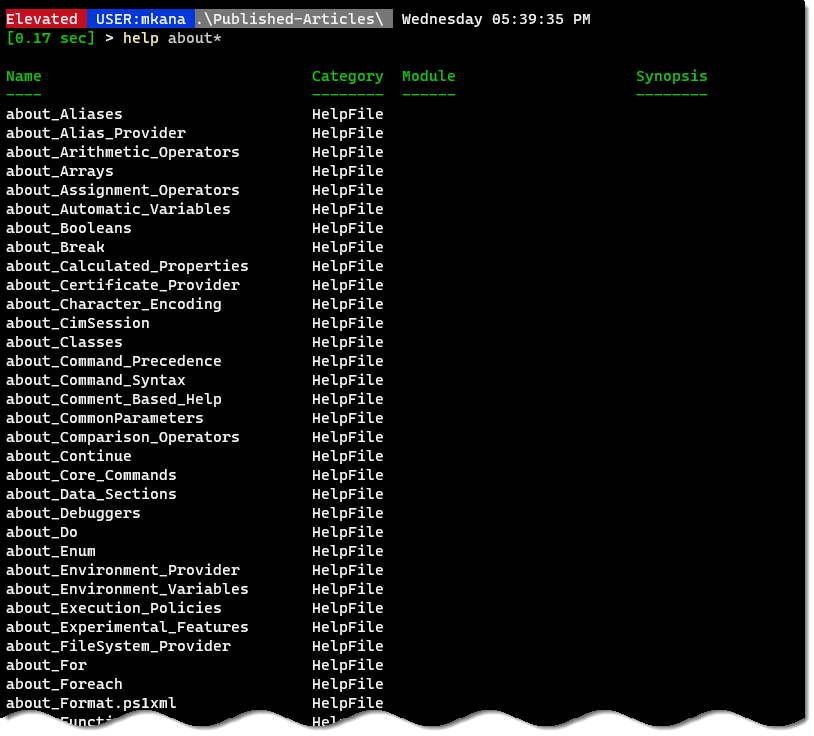
These topics are called “About topics” and can be accessed by typing Get-help About_ and adding in the topic you wish to see. The topics included contain information to help you understand these different PowerShell concepts.
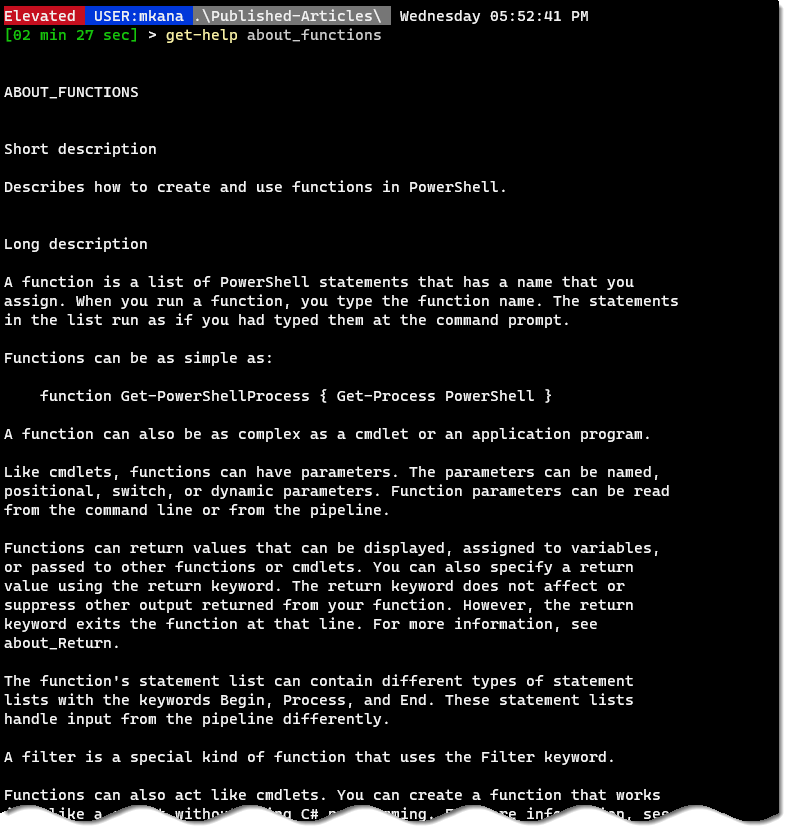
For example, the About_Functions topic explains what PowerShell functions are, how you would create a function, and when you should use functions in PowerShell.
get-help About_Functions
What is PowerShell scripting?
PowerShell scripting is the process of executing a series of PowerShell cmdlets from a file. IT professionals write PowerShell scripts for several scenarios, but scripts are most often created to run a set of code repeatedly or to automate a task.
An example of this would be creating a script to back up the data on your computer to a backup directory. You could create a script with the cmdlets and the file paths needed to perform a daily backup. By putting the information into a script, you wouldn’t have to retype the same cmdlets every day to perform the task.
Writing scripts allows PowerShell users to write code on multiple lines, assign variables for the output, and include code to handle possible errors when the script is executed. Scripts can be just a few lines of code to handle a simple task, but they can also grow to be many hundreds of lines of code that perform a series of actions in an orchestrated manner.
PowerShell scripts do not require a high skill level to get started. Administrators often implement them to automate routine tasks that admins perform regularly.
What is PowerShell remoting?
PowerShell remoting is a method to run commands against remote computers using the Windows Remote Management (aka WinRM) service, or via SSH for macOS and Linux computers. PowerShell can make connections to remote computers and execute code on those machines as if the code was being run locally on these computers. You can either connect to a single remote computer, or you can connect to many computers at a time from one PowerShell command prompt.
On Windows, the WinRM service manages connections between the computers. WinRM is Microsoft’s implementation of the WS-Management protocol, which is an industry standard. SSH is also an option for connecting to remote Windows computers.
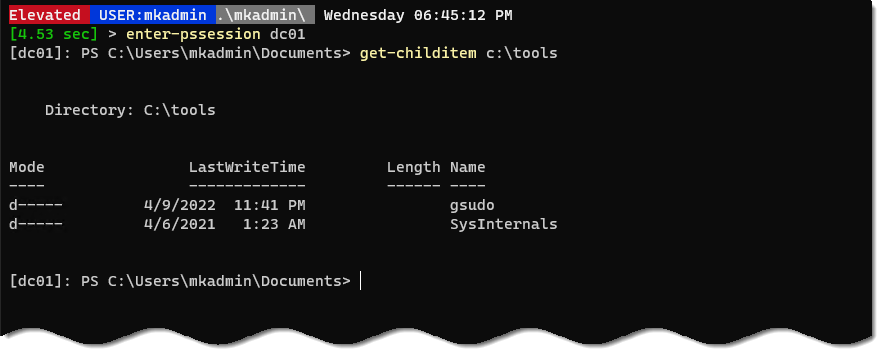
Connecting to one remote computer can be established using the Enter-PSSession cmdlet. Once connected, your PowerShell prompt will change to show that it connected you to a remote computer.
Any cmdlets typed in the console are executed on the remote computer interactively. Once you connect with Enter-PSSession, your shell is connected to that one computer until you disconnect with the Exit-PSSession cmdlet.
In this example, we have connected to a remote computer named DC01 and browsed the C: directory using the Get-Childitem cmdlet. Notice the different command prompt labels once the remote session is established.
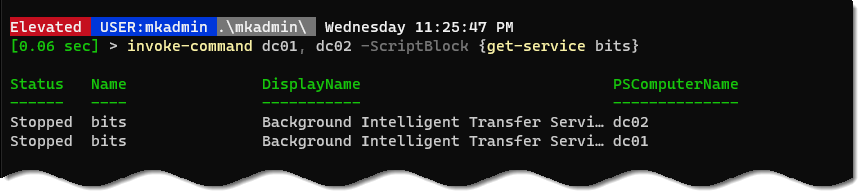
Running commands against multiple computers at once is also possible with the Invoke-Command cmdlet. In the previous example, we connected to one computer and entered an interactive remote session. This session stays connected until the session ends. The Invoke-Command cmdlet can connect to many computers from one console, but the connections are not interactive.
The Invoke-Command cmdlet sends code to remote computers in parallel for processing. The data is processed on the remote computers and then sent back securely to the host computer. PowerShell establishes the connections, sends the code to the remote machines, receives the results back, and sorts out the results into a readable format.
In the example below, the Invoke-Command cmdlet is sending a block of code to two computers named DC01 and DC02. Those computers receive the block of code, run it locally, and then send the results back to the host machine. The data is assembled and displayed in the terminal. The connection to each computer is only active for the time to process the code block and return the results.
Microsoft has documentation online that covers the options available for Remoting. My blog, CommandlineNinja, has an excellent guide to help master the basics of PowerShell remoting.
Conclusion
Overall, PowerShell is a really versatile application for IT pros interested in automating certain tasks. PowerShell basics are quite easy to learn, but there are a lot of advanced options for power users as well. If you would like to learn more about PowerShell, we have an extensive collection of articles written by industry experts and Microsoft MVPs on Petri. We focus our articles on explaining PowerShell concepts with real-world implementations that you can use in your environment.
You can also consider these sources to continue your education:
- Microsoft Learn – A site provided by Microsoft that offers a structured learning path to help you master concepts.
- Petri.com – Petri has lots of tutorials on how to use PowerShell, from understanding basic concepts to real-world uses you can deploy at work.
- PlanetPowerShell – An RSS feed of the most popular PowerShell blogs on the internet. Blog writers in this feed are active community members and industry experts.
- CommandLineNinja – My personal blog exploring PowerShell core concepts, with a focus on the automation of Azure, Azure AD, and Microsoft topics.

Mike Kanakos is a 5-time Microsoft MVP (PowerShell) and Manager of the Enterprise Identity and Access Services team at Invisalign, where he leads an engineering team that specializes in enterprise identity and access management and automation. Mik...


