Using Connect-PnPOnline to Manage SharePoint Online with PowerShell
Seamless SharePoint Online site administration and automation using Connect-PnPOnline.
Learn how to harness the power of PowerShell to manage a specific SharePoint Online site with Connect-PnPOnline. This guide walks you through installing the Connect-PnPOnline PowerShell module, connecting to SharePoint Online using the Connect-PnPOnline command, and exploring the capabilities of the SharePoint Online PowerShell module for seamless site administration and automation.
What is PnP PowerShell?
The ‘SharePoint Patterns and Practices’ (PnP) PowerShell module for SharePoint Online is a set of PowerShell cmdlets, community-written to manage SharePoint Online efficiently using Microsoft Graph information. The module allows IT Pros and admins to remotely access their SharePoint Online tenant from their favorite terminal program. This lets them manage almost everything in their SharePoint Online (SPO) environment – especially useful in a pinch when the SharePoint Admin Center website may have issues from time to time.
Once connected to your SPO tenant, you’ll be able to create SharePoint sites of varying types, make changes to existing sites, run a lot of reporting modules, and delete SharePoint sites. This just touches the surface of what you can do.
What’s the difference between SharePoint Online management shell commands and Microsoft 365 PowerShell commands?
The major and obvious difference is the nouns they use. Every SharePoint Online cmdlet will start with SPO as its noun. Conversely, Microsoft 365 will start with MSO as its noun. Here are the other main differences:
- SharePoint Online Management Shell commands manage SharePoint settings and site collections, including SharePoint users and groups.
- Microsoft 365 PowerShell commands manage Microsoft 365 actions like creating users, licenses, organization information, etc.
- Microsoft 365 PowerShell commands manage users and groups for all Microsoft 365 services.
- SharePoint Online commands manage only SharePoint users and groups.
Check out this article on Petri for more information on using Connect-SPOService to manage SharePoint Online.
How to install the PnP PowerShell module
Before we proceed, we need to install (or upgrade) the latest version of the PnP PowerShell module. I’ll fire up an admin instance of Windows Terminal. I’ll be able to manipulate my Microsoft 365 SharePoint Online instance from here.
Prerequisites for installing the PnP module
The only prerequisite is a computer with an administrative session/shell and Internet access.
Step-by-step guide to installing the PnP module
Let’s get started and install the module.
- Right-click on the Start button and select ‘Terminal (Admin)’.
- Optionally, we can first check if the PnP PowerShell module’ is installed by typing this command.
Get-Module -Name PnP.PowerShell -ListAvailable | Select Name,Version- I received no output meaning it is NOT installed.
- Next, we’ll install the module using this command:
Install-Module -Name PnP.PowerShell- You will get prompted to install the module from an untrusted repository. This is common when installing modules from the ‘PSGallery’ online.
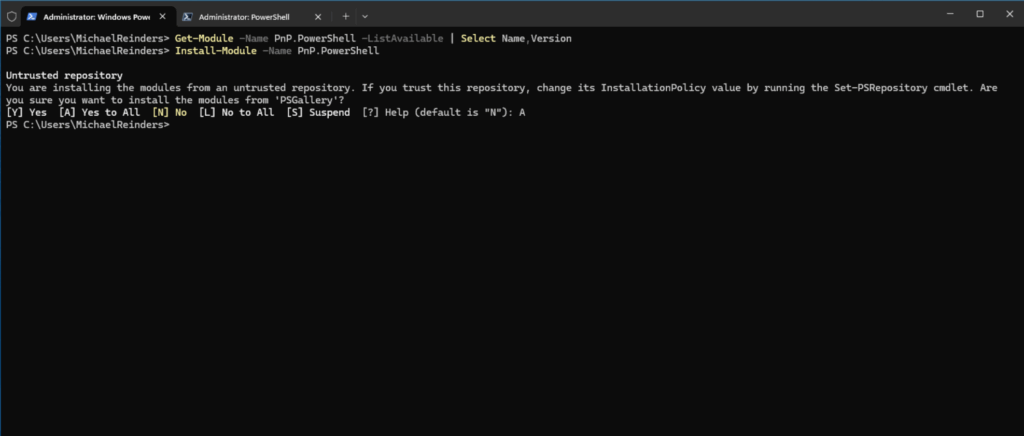
- Another optional check is if we have all the available cmdlets installed. We can determine this by running this command:
Update-Module -Name PnP.PowerShellBecause I just installed it, there again was no output. We should be all set.
Granting permissions to SharePoint Online and ongoing maintenance
Because this module isn’t officially supported by Microsoft, inherent permissions into our Entra ID tenant are NOT implied; we need to grant them explicitly. You’ll also see a consent window to grant permissions on behalf of your tenant. No need for a certificate or secret at this point.
- Run this command from the same Windows Terminal session, replacing ‘x3v6p.onmicrosoft.com’ with the name of your tenant.
Register-PnPEntraIDApp -ApplicationName "PnP PowerShell" -Tenant x3v6p.onmicrosoft.com -InteractiveThis will create the app registration in Entra ID (formerly an Azure AD application).
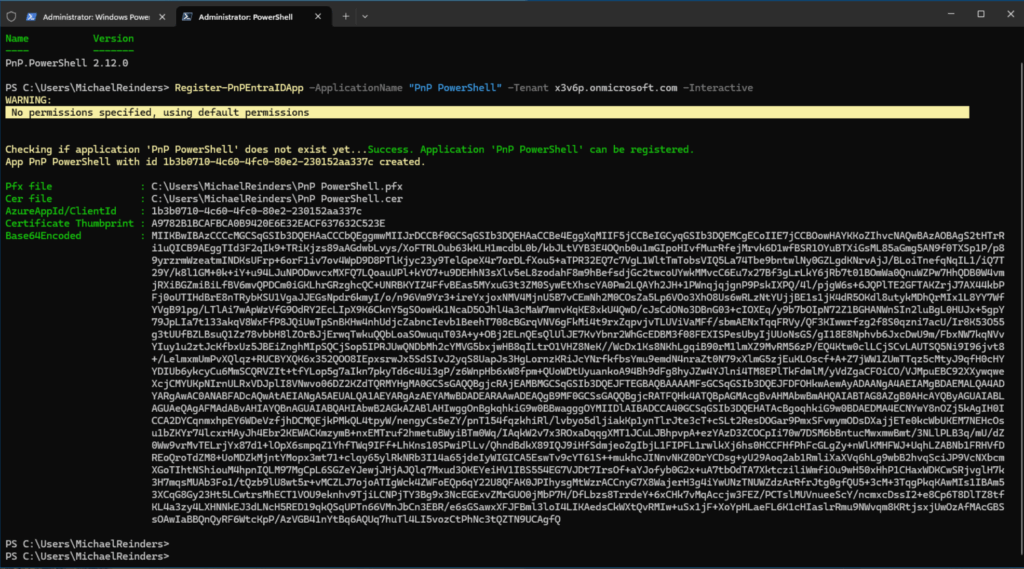
I already mentioned these steps, but I wanted to include the subset of steps here for ongoing maintenance. We should routinely check for updates for the PnP.PowerShell module. This will ensure you have access to all the latest cmdlets and security updates. A tip of sorts – you can add all of this prerequisite content into a script file to run on multiple systems if you need.
How to connect to the ‘PnP.PowerShell’ module
Now that we have the appropriate modules installed, we can make the connection to the Microsoft 365 SPO instance. Let’s continue.
How to use the Connect-PnPOnline cmdlet
There are a few varieties of the connect command based on your security requirements and/or how complicated your environment(s) is/are. The most common command is this.
Connect-PnPOnline -Url https://x3v6p.sharepoint.com -Interactive -ClientId "1b3b0710-4c60-4fc0-80e2-230152aa337c"This includes the URL for my instance of the SharePoint Admin Center. It also includes the Client App ID for the app we just created in Entra ID. You’ll be prompted for your credentials. This will include the username and password for a SharePoint Administrator or Global Administrator in your tenant. You can optionally use the Get-Credential cmdlet to prompt you for your Global Administrator credentials.
And yes, that’s it. You may occasionally see notice banners about newer versions of the module being available. You can follow the directions to update at your leisure.
We now have full access to all the SPO cmdlets.
Note: to be compatible with modern authentication and multifactor authentication (MFA) requirements, you can tack on the ‘-interactive’ switch to validate compliance rules for this event.
For full security, make sure you type this command when you’re done with your session. Also, add it to the bottom of all your scripts. This will disconnect your session.
Disconnect-PnPOnlineAdding the Entra App ID to your PC’s environment variable
Instead of needing to use the Client ID in all of your PowerShell scripts, you can add the string to your device’s environment variable. This way, it’s permanently known to each device you run these commands:
$EntraID_App_ID = "b3b0710-4c60-4fc0-80e2-230152aa337c"

[System.Environment]::SetEnvironmentVariable("ENTRAID_CLIENT_ID", $ENTRAID_APP_ID, [EnvironmentVariableTarget]::User)
What can I do with the PnPOnline module?
I could write more than several thousand words about all the PnP PowerShell cmdlets. There are hundreds of base commands available to you. Instead of writing an exhaustive list, let me go through some of the most common you’ll encounter.
Common Connect-PnPOnline tasks and commands
Let’s have a look at some of the most common uses of Connect-PnPOnline.
List SharePoint Online sites
Let’s find out what SharePoint sites exist in our tenant. Kind of like a folder list of your sites. You can do this at the most basic level:
Get-PnPTenantSite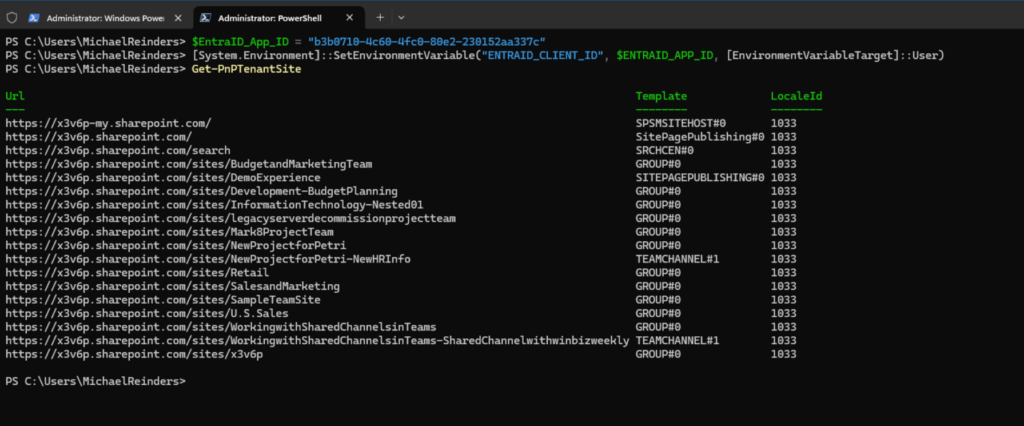
As you are probably well aware, there are many switches and parameters for each of the hundreds of cmdlets in SPO. We can use the -Identity switch to pinpoint a single site and get all its attributes with the –Detailed switch and piping the results to the Format-List (fl) command:
Get-PnPTenantSite -Identity https://x3v6p.sharepoint.com/sites/SalesandMarketing -detailed | fl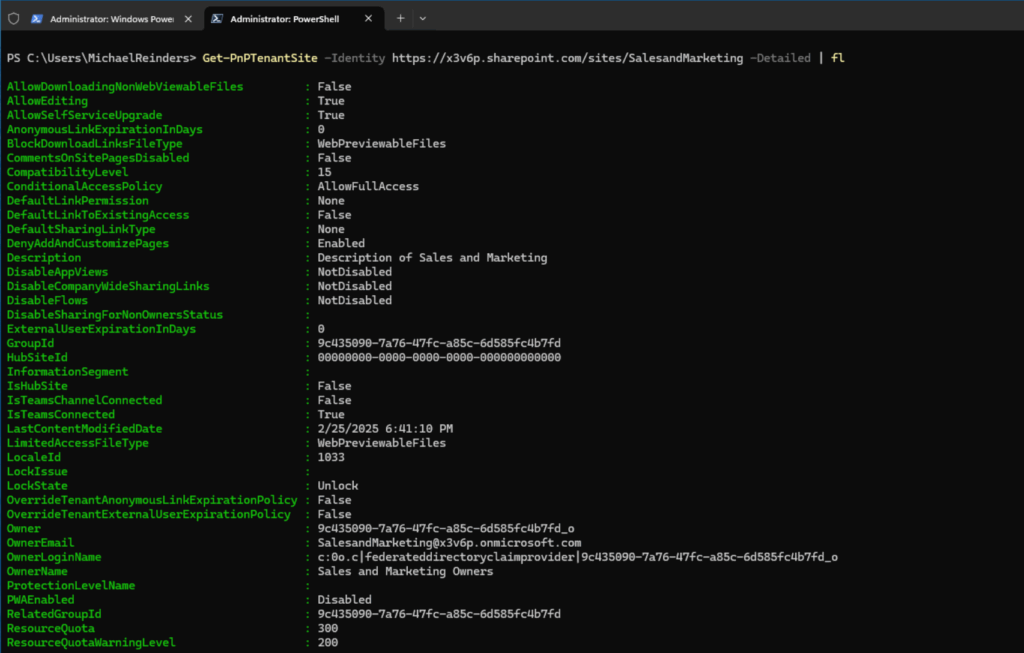
There are more attributes than fit in the screenshot above. This is very useful for generating reports in CSV format to filter in Excel, or even batch creating a lot of sites, or deleting a lot of sites.
Create a new SharePoint Online site (site collection)
To create a new SharePoint Online site (site collection), we’ll use the ‘New-PnPTenantSite’ command like so.
New-PnpTenantSite -Url https://x3v6p.sharepoint.com/sites/NewDemoSite -Owners [email protected] -Title "New Demo Site" -Template GROUP#0 -TimeZone 6 -StorageQuota 2048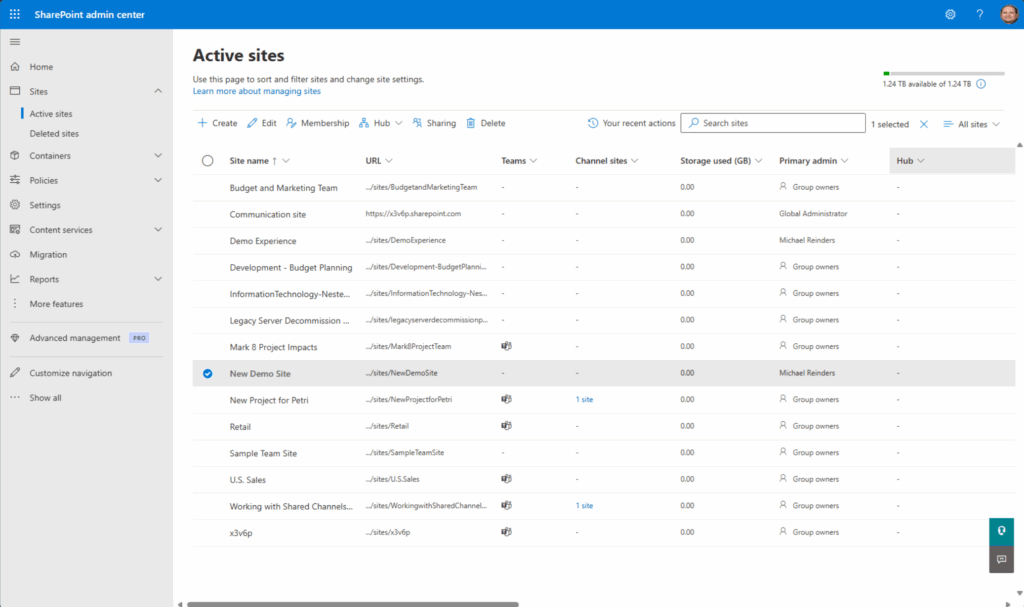
Delete a SharePoint Online site
What if we want to delete a site? Let’s use the ‘Remove-PnPTenantSite’ cmdlet like so.
Remove-PnPTenantSite -Identity https://x3v6p.sharepoint.com/sites/SalesandMarketingBecause this site is from the most common (modern) ‘Team Site’ template, there’s an associated Microsoft 365 Group. We would need to delete the group first. I’ll quickly browse to the Microsoft 365 Admin Center, browse to ‘Teams & groups’, and delete the ‘Sales and Marketing’ group.
The most common scenario is that the SharePoint site will be deleted automatically within a few minutes.
Note: you’ll have 30 days to restore the group and SharePoint site from the corresponding Recycle Bin feature.
More Connect-PnPOnline examples
Let me go through a few more examples of common commands in my tenant environment.
Restore a deleted SharePoint Online site from the Recycle Bin
After you’ve deleted a site, you can restore it within 30 days. You can use this command as an example.
Restore-PnPTenantSite -Identity https://contoso.sharepoint.com/sites/arecycledsiteRename a SharePoint Online site using Set-PnPTenantSite
Another useful cmdlet is ‘Set-PnPTenantSite’. This lets you adjust many properties and attributes on an individual site. Here are some common switches.
| Switch | Function |
| -Identity | This lets you specify the URL or GUID of the site collection. |
| -Title | Sets the title of the site collection (Also known as the Display Name). |
| -Owners | Sets the owners of the site collection. |
| -StorageQuota | This lets you specify how much storage space to allocate to the site collection. |
I’ll rename the title of my SharePoint site ‘Mark8ProjectTeam’ to something new.
Set-PnPTenantSite -Identity https://x3v6p.sharepoint.com/sites/Mark8ProjectTeam -Title "Mark 8 Project Impacts"Automating repetitive SharePoint Online tasks with Connect-PnPOnline
Creating new site collections (SharePoint Sites) can be batch-scripted using the New-PnPTenantSite cmdlet. If you had a large list of site Titles (Display Names) in a CSV file, you could create a simple PowerShell script to create 5, 10, or hundreds of sites.
Add a new user to a SharePoint site
Adding users to a specific SharePoint site is a piece of cake with the ‘New-PnPUser’ cmdlet. Let me show you.
New-PnPUser -loginname [email protected]That will add the specified user to the current site. This could also be scripted with a CSV file.
Change the storage quota of many SharePoint sites
Here is an example of managing/changing the storage quota on many sites.
$sites = Get-PnPTenantSite

foreach ($site in $sites) {

    Set-PnPTenantSite -Identity $site.Url -StorageQuota 2048

}
This example will gather ALL the sites in the tenant and set the storage quota to 2 GB.
Advanced Connect-PnPOnline features
I’ll include some more advanced cmdlets and feature scenarios that will boost your efficiency with SharePoint Online even more.
Change the External Sharing setting for all SharePoint Online sites
If you want to modify the External Sharing for all of your sites to ‘External User Sharing Only’, you can use this script.
$sites = Get-PnPTenantSite
foreach ($site in $sites) {
    Set-TenantSite -Identity $site.Url -SharingCapability ExternalUserSharingOnly
}
Generate are report of all your SharePoint online sites
A wonderful report you can generate that includes all of your sites can be accomplished with this script.
$sites = Get-PnPTenantSite

$report = @()

foreach ($site in $sites) {

    $report += [PSCustomObject]@{

        Title = $site.Title

        Url = $site.Url

        Owner = $site.Owner

        StorageQuota = $site.StorageQuota

    }

}

$report | Export-Csv -Path "C:\SiteCollectionsReport.csv" -NoTypeInformation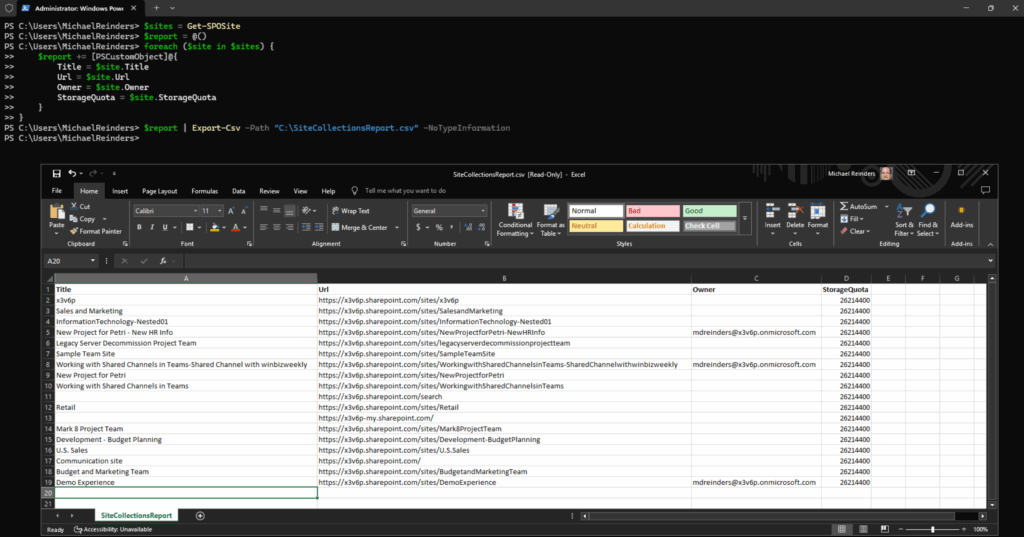
This gathers all of your SharePoint site collections, includes a report array with the Title, URL, Owner, and Storage Quota, and exports the results in an easy-to-read CSV file in the specified location.
Set several SharePoint sites as read-only
Now, let’s close out this post with some security-related scenarios. If you need to mark several sites as Read-Only (no changes can be made to the sites), you can use this script.
$sites = Get-PnPTenantSite

foreach ($site in $sites) {

    Set-PnPTenantSite -Identity $site.Url -LockState NoAccess

}
In this example, the script will gather all of your sites and mark their ‘LockState’ as ‘NoAccess’. (Read-Only). You can also easily import a CSV file with Site URLs to only lock down a subset of your sites.
Quick Tip – To ‘unlock’ a set of sites so they are read/write capable again, replace ‘NoAccess’ above with ‘Unlock’.
Thank you for reading my post on the PnP PowerShell module and how to use it. Please leave a comment or a question below and I’ll be glad to get back to you.
Frequently asked questions
How do I connect using Connect-PnPOnline?
Use the PnP PowerShell module (PnP.PowerShell). It supports interactive/MFA sign-in, device code, certificate (app-only), and more:
# Install once (elevated PowerShell)
Install-Module PnP.PowerShell

# 1) Interactive/MFA to a site
Connect-PnPOnline -Url "https://contoso.sharepoint.com/sites/ProjectX" -Interactive

# 2) Device login (handy on headless/remote)
Connect-PnPOnline -Url "https://contoso.sharepoint.com/sites/ProjectX" -DeviceLogin -Tenant "contoso.onmicrosoft.com"

# 3) App-only (certificate) for automation
Connect-PnPOnline -Url "https://contoso.sharepoint.com/sites/ProjectX" `
  -ClientId "<app-id>" -Tenant "contoso.onmicrosoft.com" -Thumbprint "<cert-thumbprint>"
What’s the difference between Connect-PnPOnline and Connect-SPOService?
- Scope and module
Connect-PnPOnline(module: PnP.PowerShell) connects to a site (or admin site) and unlocks hundreds of PnP cmdlets that cover SharePoint Online and other M365 workloads. It’s community-driven (led by Microsoft engineers + community) and very feature-rich.Connect-SPOService(module: Microsoft.Online.SharePoint.PowerShell, a.k.a. SharePoint Online Management Shell) connects the tenant/admin session to the SharePoint Online Admin Center for tenant-level admin tasks; one SPO service connection per session.
- Auth and patterns
- PnP supports interactive/MFA, device code, certificates, access tokens, etc., aimed at both human and app-only scenarios.
- SPOService is primarily for admin connections to the -admin center URL and exposes a smaller, admin-focused cmdlet set.
Rule of thumb:
Use PnP (Connect-PnPOnline) for day-to-day site automation and rich operations; use SPOService (Connect-SPOService) when you need tenant/admin-center operations surfaced by the Microsoft-supported SPO module.
What does “PnP” stand for in PowerShell?
PnP = Patterns and Practices—a Microsoft-led, community-driven initiative that produces guidance, samples, and tooling (including the PnP PowerShell module) for Microsoft 365/SharePoint development and administration.
How do I connect to SharePoint Online using PowerShell (both ways)?
A) With PnP PowerShell (recommended for rich site work):
Install-Module PnP.PowerShell
Connect-PnPOnline -Url "https://contoso.sharepoint.com/sites/ProjectX" -Interactive
# ...run PnP cmdlets, e.g.:
Get-PnPList
Connect-PnPOnline establishes the session to the target site (or admin site) with multiple auth options.
B) With SharePoint Online Management Shell (tenant admin tasks):
Install-Module Microsoft.Online.SharePoint.PowerShell
Connect-SPOService -Url "https://contoso-admin.sharepoint.com"
# ...run SPO admin cmdlets, e.g.:
Get-SPOSite
Connect-SPOService connects to the Admin Center for tenant-level commands provided by the Microsoft Online SharePoint module.

Michael has been an IT Pro since 1998. He has worked predominantly in the Windows world including client and server operating systems, on-prem systems engineering (AD, DNS, etc.), and over the last ten years or so has embraced and immersed himself in...