- Blog
- PowerShell
- Post
Microsoft Graph Explorer PowerShell: Simplifying API Calls with Code Snippets
Microsoft Graph Explorer contains a hidden gem: code snippets.

Microsoft Graph Explorer PowerShell code snippets help you quickly adopt the Graph API. Let’s look at how you can generate PowerShell code in Microsoft Graph Explorer.
Microsoft Graph Explorer PowerShell code snippets
Nowadays, administrators are working more frequently with cloud platforms and difficult APIs to retrieve information. For PowerShell administrators, the change from commands like Get-User to REST APIs, bearer tokens, and HTTP requests represents a major initial challenge.
Graph Explorer can show you a successful REST call and its data, but figuring out the PowerShell code to do the same thing takes extra effort. That’s where code snippets come in.
In early 2022, Microsoft introduced a feature to Graph Explorer called code snippets. Code snippets auto-generate working code in multiple programming languages based on the Graph API query you just executed – including:
- C#
- JavaScript
- Java
- PHP
- Python
- PowerShell
When you run a query like retrieving all users with specific properties, Graph Explorer not only shows you the JSON response but also provides the exact Get-MgUser command with all the correct parameters you’d need in your PowerShell script.
Navigating to PowerShell code snippets in Graph Explorer
Getting started with PowerShell snippets in Graph Explorer is straightforward once you know where to look.
- Open https://developer.microsoft.com/en-us/graph/graph-explorer.
- Click the sign-in button in the top right corner.
Although you can use Graph Explorer without logging in, signing in with your work account will give you a much better experience by letting you access your tenant’s real data. The sample data is often too limited to provide useful results and will produce generic responses.
- Once signed in, you’ll see the main Graph Explorer interface with a query box at the top. You can either select one of the pre-built sample queries from the left sidebar, such as “Get my profile” under the Users section, or create your own query.
- For your first attempt, try running the default query (https://graph.microsoft.com/v1.0/me) by clicking the blue “Run query” button.
- After the query executes successfully, look for the “Code snippets” section in the center panel, typically below the response data. You’ll see language options at the top of the pane that defaults to a language like C# or JavaScript.
- Select PowerShell from the list and the corresponding PowerShell command will appear instantly, complete with cmdlet name, parameters, and syntax.
Practical examples of using PowerShell snippets in Graph Explorer
The best way to understand the value of PowerShell snippets is to see them in action. You don’t need to know how to write complex REST API calls; Graph Explorer provides dozens of sample queries to get you started.
Example 1 – Querying all users in your organization with the Graph API
- Go to the left sidebar, expand the “Users” section and click on “Get all users in the organization.” This loads a basic query (https://graph.microsoft.com/v1.0/users) into the query box.
- Click “Run query” and you’ll see actual users from your organization displayed in the response preview.

In the screenshot above, you can see the actual data returned from the query.
- In the bottom pane, you can switch to the “Code snippets” section and select “PowerShell” from the dropdown. The same query that returned your tenant’s user data is now displayed as a simple PowerShell command: Get-MgUser.

The magic here is that if you didn’t know how to search for all users, you could browse the various APIs in the Graph Explorer, pick one to run and then you can see the relevant PowerShell module and cmdlets that were used to retrieve the data.
This is the real value of PowerShell snippets: you can explore real tenant data through the web interface and immediately see the equivalent PowerShell commands needed to replicate those results in your own scripts.
Example 2 – Finding users with advanced filtering and sorting with the Graph API
Let’s try a more complex example that shows multiple Graph API features working together.
- In the left sidebar under “Users,” look for “Find all users in the Finance department sorted by name with count.” This sample query shows how to combine filtering, sorting, and counting in a single request.
- Select this sample and you’ll see a more complex query in the query box: https://graph.microsoft.com/v1.0/users?$count=true&$filter=department eq ‘Finance’&$orderby=displayName&$top=20.
- Click “Run query” and you’ll see users from the Finance department sorted alphabetically by their display name, along with a count of total matching users.

- Now check the PowerShell snippet and you’ll see something like:
Get-MgUser -Filter “department eq ‘Finance’” -Sort “displayName” -Top 20 -CountVariable CountVar.This single query teaches you several important PowerShell techniques: filtering by department, sorting results, limiting the number of results returned, and getting a count of total matches.

You can easily change this example to fit your specific needs. Go to the address bar in the Graph Explorer and change ‘Finance’ to any department that exists in your organization – ‘IT’, ‘Marketing’, ‘Sales’, ‘HR’, or whatever departments you have. You could also change the sorting from displayName to mail or jobTitle depending on how you want the results organized.
This flexibility makes the sample queries a powerful starting point for building your own custom administrative scripts.
Moving from read to write operations in Graph Explorer
Until now, we’ve performed GET operations to retrieve data; these are safe, read-only and don’t change your org. Let’s explore POST operations, which actually create or change resources in your tenant. This is where Graph Explorer’s power becomes apparent, but it’s also where you need to exercise caution.
When you run a POST operation to create a group, user, or any other resource, you’re changing your Microsoft 365 environment, and those changes will persist until you manually remove them.
Let’s create a new security group.
- In the left sidebar under “Groups,” look for “Create a new group” POST operation.
- Select the group creation sample and you’ll see a POST request with JSON data in the request body, something like:
{
    "displayName": "Test Security Group 26",
    "mailEnabled": false,
    "mailNickname": "testgroup26",
    "securityEnabled": true,
    "groupTypes": []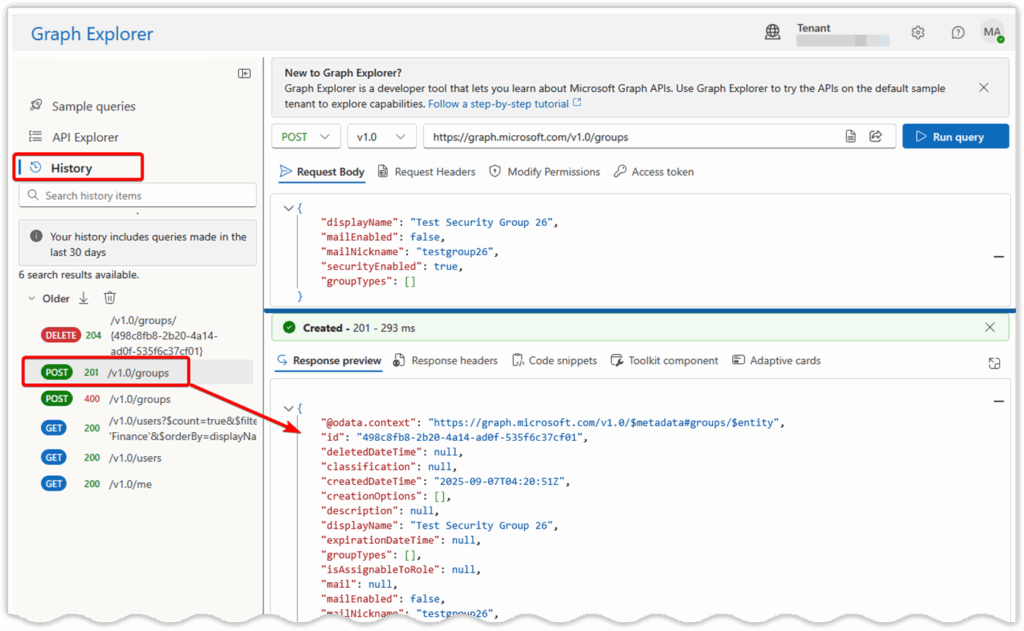
}- Before clicking “Run query,” make sure the displayName is clearly identifiable. Notice I used a unique name so I can easily find and delete it later. You can confirm the group’s creation in your tenant by viewing its details in the query response.

If you look at the Code snippets section, you’ll find that a PowerShell snippet is missing. Unfortunately, as mentioned earlier, while PowerShell snippets have good coverage for common GET operations (retrieving data), many POST, PATCH, and DELETE operations don’t yet have snippet support. The coverage varies for each API.
For these situations, you’ll need to refer to the Microsoft Graph PowerShell SDK documentation to find the equivalent cmdlet – in this case, New-MgGroup.
Let’s clean up the group we just created and see if DELETE operations have better PowerShell snippet support.
- In the left sidebar under “Groups,” look for “Delete group” or use the query box to enter: https://graph.microsoft.com/v1.0/groups/498c8fb8-2b20-4a14-ad0f-535f6c37cf01
Note: The group ID shown here (498c8fb8-2b20-4a14-ad0f-535f6c37cf01) is unique to the group I created for this example. Your group will have a different ID that was generated when you created it. You can find your group’s ID from the response you received when creating the group, or by running a query to list groups and finding yours by name.
- Change the HTTP method from GET to DELETE using the dropdown next to the query box.
- Click “Run query.” You should receive a successful response confirming that the group was deleted.

- Now check the Code snippets section and you’ll notice that a code snippet is available for this operation.
In this code snippet, Microsoft replaced the group ID with a variable called $GroupId. You could replace that variable with the actual group ID, and it would execute exactly the same.
In the last two examples, you can see that PowerShell snippets aren’t always present: there are no snippets for POST operations that create groups, but there are snippets for DELETE operations that remove them.
There’s no obvious pattern that reveals which operations have PowerShell snippet support and which don’t. When code snippets are unavailable, the SDK documentation should be your go-to resource or fall back to using direct REST API calls with Invoke-RestMethod in your PowerShell scripts.
Use history to track your work in Graph Explorer
The Graph Explorer’s history feature logs your queries for the past month. You’ll find this handy when you’re experimenting with different API calls, or if you want to repeat a past query and can’t be sure of the syntax you used.
- Look for the “History” tab in the left sidebar (or in the upper left corner depending on your view). Click on it and you’ll see a chronological list of every query you’ve run over the last 30 days, including the HTTP method, URL, and timestamp.
- You can click on any historical query to reload it into the query box, making it easy to re-run successful queries or build upon previous work.
This is especially valuable when you’re developing complex queries – you can experiment with different parameters, then easily return to a working baseline if your modifications don’t produce the expected results.
The history feature also serves as a learning log. After a session of exploring different APIs, you can review your history and literally replay your steps to see the progression of queries you tried and the PowerShell snippets they generated. This is very useful for documenting your successful executions or for sharing with team members.
Understanding Microsoft Graph API permissions and consent
As you explore different Graph APIs and their PowerShell snippets, you may encounter permission errors when trying to run certain queries. Even though you may have permission to perform an operation, Azure also requires user consent for some operations.
When you encounter a permission error, Graph Explorer will typically prompt you to consent to additional permissions needed for that specific operation. You might see a pop-up asking you to grant permissions like “User.Read.All” for reading user information or “Group.ReadWrite.All” for managing groups.
These permission prompts are normal and necessary for Graph Explorer to access different data on your behalf. However, it’s important to remember that you should completely understand the permissions you’re granting to prevent errors that could lead to data loss or provide excessive access for everyday activities.
To learn more about Microsoft Graph permissions, refer to the Microsoft’s Overview of Microsoft Graph permissions. If you need admin-level consent for certain operations, see the documentation on Granting tenant-wide admin consent to an application.
Coverage and limitations of PowerShell code snippets in Graph Explorer
PowerShell snippets are very helpful, but it’s not all puppies and rainbows, at least not yet. PowerShell code snippets are not available for every Graph API. Remember that Microsoft Graph is a collection of hundreds of APIs created and maintained by different teams inside Microsoft, which means features don’t appear in Graph Explorer all at once.
But the good news is that the strongest PowerShell snippet coverage exists in the areas where administrators spend most of their time: user management, group operations, and basic organizational directory tasks. You’ll find that queries for retrieving user profiles, filtering users by specific attributes, managing group memberships, and performing common Exchange Online mailbox operations typically generate clean, working PowerShell code.
However, as you venture into more specialized APIs that touch on newer features, advanced security configurations, or complex multi-step workflows, you may encounter operations that don’t yet have PowerShell snippet support. Areas like advanced compliance policies, detailed SharePoint site provisioning, complex Teams governance settings, and some of the newer security APIs may show the REST API call working perfectly in Graph Explorer but provide no corresponding PowerShell code snippet.
In these cases, you’ll need to translate the successful REST call into PowerShell using the Microsoft Graph SDK documentation, or fall back to using direct REST API calls with Invoke-RestMethod in your PowerShell scripts.
What is Microsoft Graph Explorer?
Graph Explorer is a tool to help navigate the complexities that come with using the Microsoft Graph API. Explorer is a web-based tool that allows you to test and experiment with Microsoft Graph API calls without having to write code. Think of it as a front-end UI for the Microsoft Graph API. The Graph Explorer lets you browse available API endpoints, run queries against live data, and see the results in real-time.
The Microsoft Graph API is the primary interface for accessing data and intelligence in Azure, Microsoft 365, SharePoint, and similar products programmatically. Through Microsoft Graph, you can access data and intelligence living in Microsoft’s cloud services. Think of Graph as the fabric that connects all Microsoft services together.
Test queries in Graph Explorer and get code snippets immediately
Graph Explorer bridges the gap between traditional PowerShell administration and modern Graph-based automation. Instead of struggling to translate REST API documentation into working PowerShell, you can test queries against real data and get the code snippets immediately.
This overview covers just the basics of the Microsoft Graph Explorer’s PowerShell snippets feature. We’ve looked at how to find and run sample queries, generate PowerShell code from your results, and work around the gaps where snippets aren’t available yet. Practice with different sample queries, experiment with various workloads, and explore the PowerShell snippets they generate. With regular use, it’ll become an essential part of your admin toolkit.
Frequently asked questions
Will Microsoft Graph replace PowerShell?
No, Microsoft Graph will not replace PowerShell. Instead, Microsoft is gradually moving functionality that traditionally required PowerShell modules (like Azure AD and MSOnline) into Microsoft Graph APIs. The newer Microsoft Graph PowerShell SDK allows you to use PowerShell while leveraging Microsoft Graph under the hood.
How to use Graph Explorer Microsoft?
Microsoft Graph Explorer is a web-based tool provided by Microsoft that lets you run queries against Microsoft Graph without writing code. To use it:
- Go to Graph Explorer.
- Sign in with your Microsoft 365 account to access your tenant’s data.
- Select an HTTP method (GET, POST, etc.) and enter a Graph API endpoint (e.g., /me, /users, /groups).
- Run the query and view the JSON response.
- Use the “Modify permissions” tab to consent to specific scopes as needed.
This tool is mainly for testing queries before implementing them in PowerShell, apps, or automation scripts.
Is Microsoft Graph free to use?
Yes, Microsoft Graph is free to use, but with conditions:
- Core API calls (like retrieving users, groups, mail, calendars) are included in Microsoft 365 subscriptions.
- Premium APIs (like Identity Protection, advanced reports, or Intune features) may require specific licenses such as Azure AD Premium or EMS.
- The Graph Explorer tool itself is free, but the data you can query depends on the licenses tied to your signed-in account.
What is the alternative to Microsoft Graph?
Alternatives depend on the scenario:
- Legacy PowerShell modules (e.g., AzureAD, MSOnline) – still available but deprecated, not future-proof.
- Direct REST APIs from individual services (like Exchange Online or SharePoint REST APIs) – still exist, but Microsoft is consolidating everything into Graph.
- Third-party SDKs and tools (like Microsoft Graph SDKs for .NET, Python, or JavaScript) – these are alternatives for developers who don’t want to use PowerShell.
Ultimately, Microsoft Graph is becoming the single unified API, so while alternatives exist, they’re being phased out.

Mike Kanakos is a 5-time Microsoft MVP (PowerShell) and Manager of the Enterprise Identity and Access Services team at Invisalign, where he leads an engineering team that specializes in enterprise identity and access management and automation. Mik...


