How to Check Windows 11 Upgrade Readiness Using a PowerShell Script
Learn how to check for Windows 11 upgrade readiness across multiple PCs using PowerShell

PowerShell is a command-line language designed to automate the management of Windows systems, and it excels at pulling system-level details from local or remote machines. With PowerShell, IT teams can quickly gather compliance data from hundreds of PCs, generate reports, and build repeatable workflows that scale. In this article, I’ll show you how to check Windows 11 upgrade readiness using a PowerShell script.
Windows 11 system requirements
There are eight hardware requirements needed to install and run Windows 11. These are the minimum system requirements. However, you will need more than these minimums for Windows 11 to run adequately.
- TPM 2.0
- Secure Boot
- UEFI modern firmware
- a compatible CPU
- 4 GB RAM minimum
- 64 GB free storage minimum
- DirectX 12 compatible graphics
- Internet connectivity
Testing with PowerShell
Below I’ll share a few simple code snippets to verify each of the seven requirements for Windows 11 (we won’t test for Internet connectivity). You can run these code snippets individually as needed. Following this, I’ll integrate them into one PowerShell script that can test all eight areas at one time.
TPM 2.0
TPM (Trusted Platform Module) is a small, dedicated security chip, or a function integrated into CPUs, that provides hardware-level security features and cryptographic functions needed to run BitLocker encryption and Windows Hello, which provide enhanced login security in Windows 11. TPM 2.0 is the latest iteration of TPM and provided hardened security and improved performance.
We can use WMI to query PC information to see if a PC has a TPM installed.
# Make sure you run this in an elevated PowerShell console
Get-CimInstance -Namespace "Root/CIMV2/Security/MicrosoftTpm" -ClassName Win32_Tpm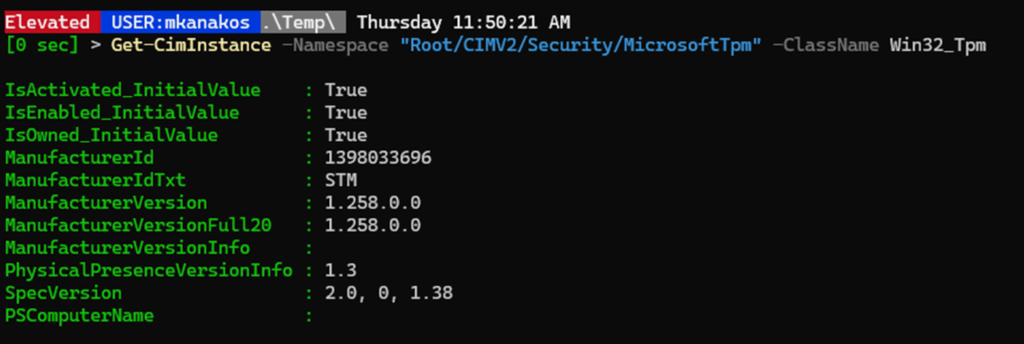
However, this test might be deceptive, as the cmdlet only outputs data if the PC has a TPM chip. The key data point to examine from this list is the leading number in the SpecVersion field. Ideally, the SpecVersion should be 2.0 or greater; however, 1.2 is the minimum acceptable version. We can use this information to query if a computer possesses a TPM that meets Windows 11’s minimum requirements.
$TPMSpec = (Get-CimInstance -Namespace "Root/CIMV2/Security/MicrosoftTpm" -ClassName Win32_Tpm).SpecVersion -split ',' | select -first 1

#test if $TMSpecVersion is an empty string
if ([string]::IsNullOrEmpty($TPMSpec)) {
    Write-Output "TPM is not installed in computer"
} else {
    $Version = [version]$TPMSpec

    # Check TPMSpecVersion
    If ($Version -ge '1.2'){ "TPM is Win11 compliant" } else { "TPM is installed but not Win11 compliant" }
}
SecureBoot
Secure Boot uses digital signatures to make sure only the manufacturer’s software can start your computer. When combined with TPM, the system is more secure because of the verification of boot process integrity and prevention of tampering. You can use the Confirm-SecureBootUEFI cmdlet to quickly check if a computer supports SecureBoot; it outputs a simple true/false result.
Confirm-SecureBootUEFI
Disk Partition Style
Windows supports two types of disk partitions: MBR (Master Boot Record) and GPT (GUID Partition Table). The older MBR format has limitations: partitions can only be a maximum of 2 TB and up to four partitions are allowed.
GPT, the modern disk partitioning system, supports larger drives, up to 128 partitions, with a maximum partition size of 9.4 zettabytes, and is compatible with UEFI firmware. You can’t install Windows 11 on an MBR-formatted disk because of its security requirements; Windows 11 needs UEFI Secure Boot and TPM 2.0, and MBR doesn’t offer them.
Querying for disk partition type is straightforward with just one cmdlet.
Get-Disk | Select Number, PartitionStyleThis will the list all the disks installed in the computer and the partition style of each disk.

In my computers, I have just one disk installed. While a computer may have multiple drives, you only need to check the boot drive, which should be drive 0 in almost all cases. If that’s the case, then we can simply our code to check the partition type even farther.
(Get-Disk 0).partitionStyle
RAM and storage space
Most of the Windows 11 requirements can be pretty detailed, but the storage and memory needs are actually the easiest to meet. You need at least 4 GB of RAM and 64 GB of free space on your hard drive. Keep in mind, though, that these are just the basics to get Windows 11 running. For everything to work smoothly and quickly, you’ll want more RAM and extra disk space.
Checking these two components is straightforward with PowerShell. A WMI query will show you how much RAM is installed. Next, use the MATH::ROUND function to round to the nearest whole number. It’s normal if the number is less than your total RAM; Windows allocates memory for its own functions. The figure you see represents your usable RAM, rounded up or down to the nearest whole number.
[math]::Round((Get-CimInstance Win32_ComputerSystem).TotalPhysicalMemory / 1GB)
Use the Get-PSDrive cmdlet to get information about how much disk space is available. Again, I am leveraging the MATH::ROUND method to return a whole number.
[math]::Round((Get-PSDrive C).Free / 1GB)
CPU check
While confirming Windows 11 CPU support isn’t complex, you’ll need to match your computer’s CPU against the compatible list found on Microsoft’s website. They maintain supported processor lists for AMD, Intel and Qualcomm CPUs.
Surprisingly, there are many instances of computers that have TPM chips in them, but the processor is not Windows 11 capable. You’ll need to pay close attention to the results and confirm your findings against the latest published list from Microsoft.
(Get-CimInstance -ClassName Win32_Processor).Name
Testing for DirectX
Windows uses DirectX, a suite of Microsoft tools, to process graphics and multimedia content such as games, videos, and 3D applications. It bridges the gap between software and hardware, ensuring everything runs smoothly and looks great.
Windows 11 needs DirectX 12 to support modern graphics. Even if you don’t play games, DirectX 12 makes Windows faster and smoother. Microsoft enforces this requirement to maintain a high level of graphics performance across all Windows 11 systems.
However, there is no way via WMI to check if a graphics card supports direct x. Instead, we need to invoke the dxdiag.exe on the computer and then parse the data that is returned from that tool.
$dxdiagOutput = "$env:TEMP\dxdiag_output.txt"

# Generate dxdiag report (text format)
Start-Process -FilePath "dxdiag.exe" -ArgumentList "/t $dxdiagOutput" -Wait

# Use Select-String to find the DirectX version line
$dxLine = Select-String -Path $dxdiagOutput -Pattern "DirectX Version"

if ($dxLine) {
    # Extract just the line text, clean it up
    $rawLine = $dxLine.Line.Trim()
    $version = $rawLine -replace "DirectX Version:\s*", ""

    if ($version -match "12") {
        "DirectX 12 or higher is supported"
    } else {
        "DirectX 12 not detected"
    }
} else {
    "Could not detect DirectX version from dxdiag output"
}
Consolidating all tests into a single hardware readiness script
Having the code snippets for each of the hardware tests is a great start and good if you need to only check a few areas occasionally. But running each check individually gets old fast, especially when you’re responsible for dozens or hundreds of machines. That’s where wrapping your code into a reusable PowerShell script comes in.
The script below takes all those one-off checks and combines them into a single, complete solution that you can run locally or remotely. It captures key system requirements, outputs the results in a simple format, and makes it easy to build repeatable, automated checks across your environment. Whether you’re just testing a few machines or preparing for a larger rollout, this approach will save you time and reduce guesswork.
# Get-Windows11ReadinessReport.ps1
# TPM Check
$TPMResult = try {
$TPMSpec = (Get-CimInstance -Namespace "Root/CIMV2/Security/MicrosoftTpm" -ClassName Win32_Tpm).SpecVersion -split ',' | Select-Object -First 1
if ([string]::IsNullOrEmpty($TPMSpec)) {
"TPM is not installed in computer"
} else {
$Version = [version]$TPMSpec
if ($Version -ge '1.2') {
"TPM is Win11 compliant"
} else {
"TPM is installed but not Win11 compliant"
}
}
} catch {
"TPM check failed: $_"
}
# Secure Boot Check
$SecureBoot = try {
Confirm-SecureBootUEFI
} catch {
"Secure Boot check failed or not supported"
}
# Partition Style (assumes Disk 0 is OS disk)
$PartitionStyle = try {
(Get-Disk 0).PartitionStyle
} catch {
"Partition style check failed: $_"
}
# Physical Memory in GB
$MemoryGB = try {
[math]::Round((Get-CimInstance Win32_ComputerSystem).TotalPhysicalMemory / 1GB)
} catch {
"Memory check failed: $_"
}
# Free Disk Space on C: in GB
$DiskFreeGB = try {
[math]::Round((Get-PSDrive C).Free / 1GB)
} catch {
"Disk space check failed: $_"
}
# CPU Model
$CPUName = try {
(Get-CimInstance -ClassName Win32_Processor).Name
} catch {
"CPU check failed: $_"
}
# DirectX Version
$DirectXResult = try {
$dxdiagOutput = "$env:TEMP\dxdiag_output.txt"
Start-Process -FilePath "dxdiag.exe" -ArgumentList "/t $dxdiagOutput" -Wait
$dxLine = Select-String -Path $dxdiagOutput -Pattern "DirectX Version"
if ($dxLine) {
$rawLine = $dxLine.Line.Trim()
$version = $rawLine -replace "DirectX Version:\s*", ""
if ($version -match "12") {
"DirectX 12 or higher is supported"
} else {
"DirectX 12 not detected"
}
} else {
"Could not detect DirectX version from dxdiag output"
}
} catch {
"DirectX check failed: $_"
}
# Output all values in a custom object
$Report = [PSCustomObject]@{
TPM = $TPMResult
SecureBoot = $SecureBoot
PartitionType = $PartitionStyle
MemoryGB = $MemoryGB
FreeDiskGB = $DiskFreeGB
CPU = $CPUName
DirectX = $DirectXResult
}
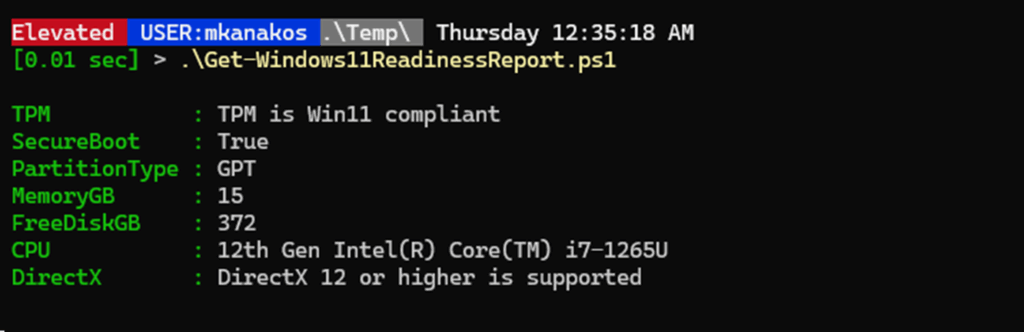
# Display the result
$ReportTo run the script, just type the path to the file and it will execute. The output will be the results of the tests. Here are the results run against my laptop.
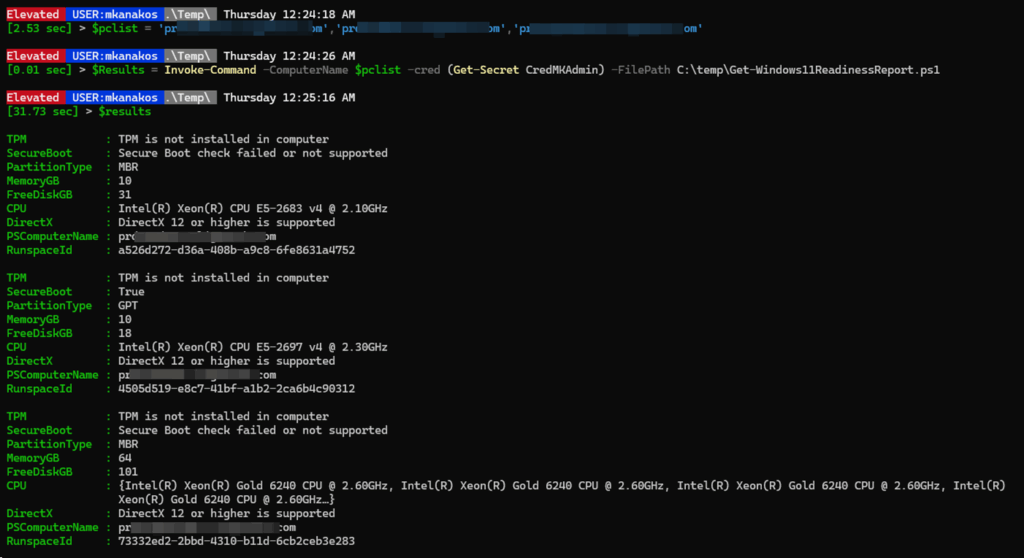
The script can be run against multiple computers using Invoke-Command as shown in this example below. This screenshot shows the script against three servers in my lab. The output can be formatted many different ways. In this view the results are listed one after another.
Here is the same output as above exported to Excel using the ImportExcel module.

Other ways to check Windows 11 upgrade readiness
Microsoft created an application called the PC Health Check GUI app to make it easy for consumers to test their computers for Windows 11 readiness. This tool, however, is geared toward consumers and lacks enterprise-level features. It’s not equipped to handle the needs of system administrators who might have to check hundreds or thousands of PCs. Its reporting and automation options are very limited.
Microsoft provides Intune, Endpoint Analytics, and Update Compliance, among other cloud-based tools, to help businesses determine if their many Windows devices are ready for Windows 11. These tools work well in enterprise environments where devices are enrolled in Mobile Device Management (MDM) and connected to Azure services. But what if your organization isn’t using Intune, or you’re managing standalone or hybrid devices? That’s where PowerShell becomes invaluable. PowerShell provides a lightweight, scriptable way to verify key system needs (TPM 2.0, Secure Boot, CPU, disk partitions, etc.) with no need for cloud services or extra licenses.
Conclusion
For system administrators who don’t have access to cloud tools like Microsoft Intune, PowerShell offers a practical way to check Windows 11 compatibility across different systems. We’ve reviewed each hardware requirement for Windows 11 and created code snippets that let admins run ad hoc tests.
By combining these snippets into a single function, you can streamline your process, reduce manual effort, and run consistent checks on multiple machines. Whether managing a small network or planning a large migration, you now have the tools to evaluate your environment and meet the Windows 11 upgrade deadline.
FAQs
How to check Windows 11 readiness?
You can use the Windows PC Health Check Tool or PowerShell scripts to assess if a device is ready for Windows 11. For a PowerShell-based method, Microsoft provides the Get-WindowsUpgradeEligibility function via the Windows Assessment and Deployment Kit (ADK) or community scripts that evaluate TPM, Secure Boot, CPU compatibility, RAM, and disk space.
For example, using a PowerShell script:
Get-ComputerInfo | Select-Object CsName, OsName, OsVersion, OsBuildNumber, BiosFirmwareType, SecureBootState, TpmPresent
For enterprise environments, you can deploy Microsoft Endpoint Manager (Intune) or Cayosoft Administrator to report on upgrade readiness at scale.
How to upgrade Windows 11 22H2 to 24H2 manually?
To manually upgrade from Windows 11 22H2 to 24H2, follow these steps:
- Download the 24H2 ISO from the Microsoft Download Center.
- Mount the ISO file:
Mount-DiskImage -ImagePath "C:\Path\To\Win11_24H2.iso" - Start the upgrade using
setup.exewith optional parameters:Start-Process "D:\setup.exe" -ArgumentList "/auto upgrade /quiet /noreboot" -Wait - Reboot the system to complete the upgrade:
Restart-Computer
Alternatively, use the Windows Update Assistant or In-Place Upgrade Task Sequence via Configuration Manager for a managed deployment.
How to repair Windows 11 using PowerShell?
To repair Windows 11 with PowerShell, you can use DISM and SFC commands:
- Check and restore system image health:
DISM /Online /Cleanup-Image /RestoreHealth - Scan and fix system files:
sfc /scannow
Run these commands in an elevated PowerShell session (Run as Administrator). These tools can fix corrupt or missing system files without requiring a full reinstallation.

Mike Kanakos is a 5-time Microsoft MVP (PowerShell) and Manager of the Enterprise Identity and Access Services team at Invisalign, where he leads an engineering team that specializes in enterprise identity and access management and automation. Mik...