Connect-SPOService – How to Connect to SharePoint Online Using PowerShell
Use the SharePoint Online Management Shell to establish a connection with SharePoint Online.

This blog post will cover the Microsoft-supported Connect-SPOService cmdlet. This step-by-step guide will walk you through the process, from verifying prerequisites to connecting to SharePoint Online in your PowerShell session and empowering you with standard cmdlets. I’ll also touch on some automation tips.
What is Connect-SPOService
Connect-SPOService is used to establish a connection with SharePoint Online using the SharePoint Online Management Shell. Microsoft supports this module, in contrast to the community-driven ‘PnPOnline’ module.
There are several purposes for using Connect-SPOService. A fairly common one is getting your job done when the SharePoint Online Administration Center website is unreachable. You still need to access your SharePoint Online services – PowerShell to the rescue.
The only prerequisites you’ll need are your favorite PowerShell terminal, with administrative rights, and an Internet-connected device.
How to install the Microsoft.Online.SharePoint.PowerShell module
The first step is to launch Windows PowerShell.
- There are many options – I’ll open an Admin Terminal by right-clicking the Start button and clicking ‘Terminal (Admin)‘.

Second, make sure the correct PowerShell module is installed.
- We can use the ‘Get-Module‘ PowerShell cmdlet to check if it’s already installed. Go ahead and type in this command.
Get-Module -Name Microsoft.Online.SharePoint.PowerShell -ListAvailable
- No output means it is not installed. If you get no output, use this command to install it.
Install-Module -Name Microsoft.Online.SharePoint.PowerShell- To utilize the cmdlets in the module, type this to import them into your current session.
Import-Module Microsoft.Online.SharePoint.PowerShell- A routine command you can run to make sure the module is up to date is to run this.
Update-Module -Name Microsoft.Online.SharePoint.PowerShellHow to connect to SharePoint Online (SPO) with the Connect-SPOService PowerShell cmdlet
Now that we’ve confirmed the appropriate module is installed and ready, we have to make the actual connection to our SharePoint Online tenant.
- Here is the most common and robust command to use.
Connect-SPOService -Url https://x3v6p-admin.sharepoint.com -ModernAuth $true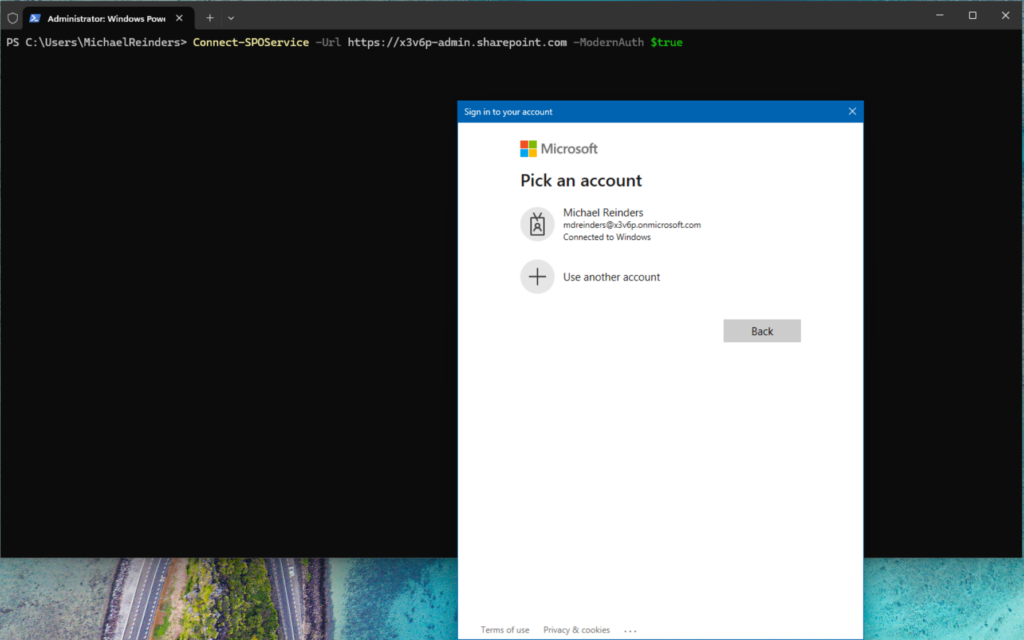
This includes the specific URL for my tenant and tells the command to use Modern Authentication. This is required if the account you’ll use to authenticate uses MFA.
No news is good news. There will be no output if the connection is successful.
Various methods to connect to SPO
There are alternate configurations and switches with the Connect-SPOService cmdlet. Let me show you a few here as examples of other methods to connect.
Connect-SPOService -Url https://contoso-admin.sharepoint.com -Credential [email protected]This tells the command to use the specified username. It will then prompt you for the password. This is useful when MFA is NOT required.
Another example is when you want to explicitly specify credentials, include Modern Authentication, and specify the Authentication URL.
Connect-SPOService -Credential $creds -Url https://tenant-admin.sharepoint.com -ModernAuth $true -AuthenticationUrl https://login.microsoftonline.com/organizationsWhat can I do with the Microsoft.SharePoint.Online.Powershell module?
I could write more than several thousand words about all you can do with this module. There are hundreds of base commands with the SharePoint Online Management Shell.
Common tasks and commands
Instead of writing an exhaustive list, let me go through some of the most common you’ll encounter and utilize with SPO, especially as a new IT Pro to SharePoint Online.
List SharePoint sites
First, let’s do a very simple one. Let’s find out what SharePoint sites exist in our tenant. You can do this at the most basic level with the ‘Get-SPOSite‘ cmdlet.

Get SharePoint site attributes
As you are probably well aware, there are many switches and parameters for each of the hundreds of cmdlets in SPO. We can use the -Identity switch to pinpoint a single site and get all the attributes of said site with the -detailed and ‘Format-List‘ (fl) switch.
Get-SPOSite -Identity https://x3v6p.sharepoint.com/sites/DemoExperience -detailed | fl
There are more attributes than fits in the screenshot above. My tenant is only a developer/test tenant, but my ‘day job’ company’s tenant has thousands of sites. This is very useful in either generating reports in CSV format to filter in Excel, or even batch creating a lot of sites, or deleting a lot of sites.
Remove SharePoint site
What if we want to delete a site? Let’s use the ‘Remove-SPOSite‘ cmdlet like so.
Remove-SPOSite -Identity https://x3v6p.sharepoint.com/sites/NewProjectforPetriBecause this site is from the most common (modern) ‘Team Site’ template, there’s an associated Microsoft 365 Group. We would need to delete the group first.
- I’ll quickly browse to the Microsoft 365 admin center website
- Browse to ‘Teams & groups‘
- Delete the ‘Legacy Server Decommission Project‘ group.
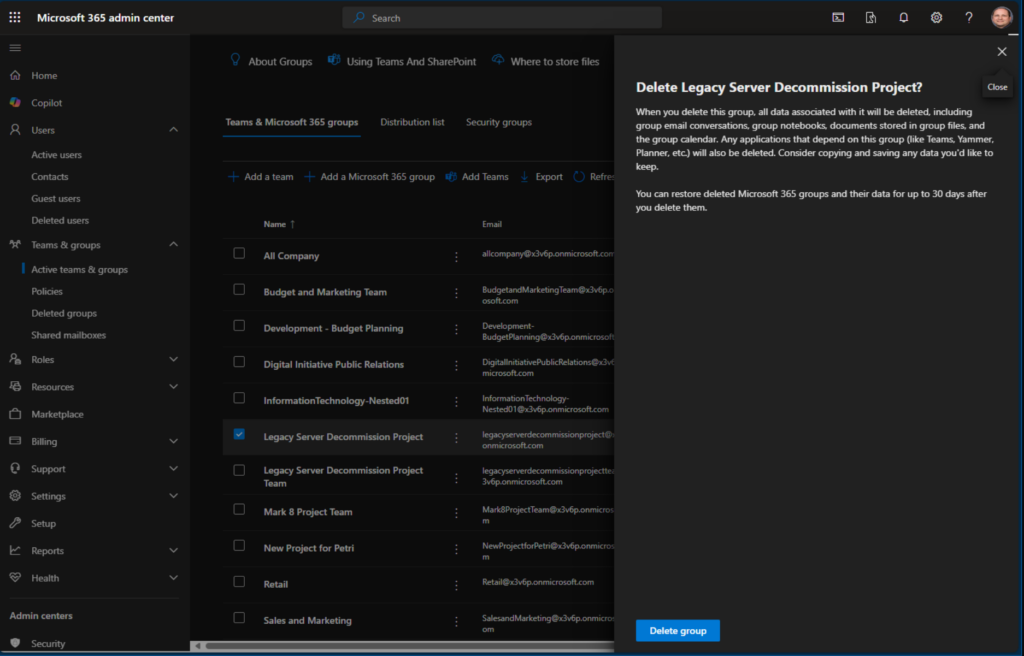
The most common scenario is that the SharePoint site will be deleted automatically within a few minutes.
Also, as a side note – you’ll have 30 days to restore the group and SharePoint site from the corresponding Recycle Bin feature.
Examples
Let me go through a few more examples of common commands in my tenant environment.
Restore a SharePoint site
After you’ve deleted a site, you can restore it within 30 days. You can use this command as an example.
Restore-SPODeletedSite -Identity https://contoso.sharepoint.com/sites/arecycledsiteSet SharePoint site properties and attributes
Another useful cmdlet is ‘Set-SPOSite’. This lets you adjust many properties and attributes on an individual site. Here are some common switches.
- ‘-Identity’ – This lets you specify the URL or GUID of the site collection.
- ‘-Title’ – Sets the title of the site collection (Also known as the Display Name).
- ‘-Owner’ – Sets the owner or owners of the site collection.
- ‘-StorageQuota’ – This lets you specify how much storage space to allocate to the site collection.
I’ll rename the Title of my SharePoint site ‘Sales and Marketing‘ to something new.
Set-SPOSite -Identity https://x3v6p.sharepoint.com/sites/SalesandMarketing -Title "Marketing Impacts"Automating repetitive tasks
The main power of PowerShell is being able to streamline repetitive tasks. Creating new site collections (SharePoint Sites) can be batch-scripted using the ‘New-SPOSite‘ cmdlet. If you had a large list of site Titles (Display Names) in a CSV file, you could create a simple PowerShell script to create 5, 10, or hundreds of sites.
Add users to SharePoint site
Adding users to a specific SharePoint site is a piece of cake with the ‘App-SPOUser’ cmdlet. Let me show you.
Add-SPOUser -Site https://yourdomain.sharepoint.com/sites/yoursite -LoginName [email protected] -Group "Site Members"That will add the specified user to the specified site in the specified group. This could also be scripted with a CSV file.
Set SharePoint site storage quota on multiple sites
Here is an example of managing/changing the storage quota on many sites.
$sites = Get-SPOSite

foreach ($site in $sites) {

    Set-SPOSite -Identity $site.Url -StorageQuota 2048

}
This example will gather ALL the sites in the tenant and set the storage quota to 2 GB.
Advanced features
I’ll include some more advanced cmdlets and feature scenarios that will boost your efficiency with SharePoint Online even more.
Set SharePoint site sharing permissions
If you want to modify the External Sharing for all of your sites to ‘External User Sharing Only’, you can use this script.
$sites = Get-SPOSite
foreach ($site in $sites) {
    Set-SPOSite -Identity $site.Url -SharingCapability ExternalUserSharingOnly
}
Generate a SharePoint sites report
A wonderful report you can generate that includes all of your sites can be accomplished with this script.
$sites = Get-SPOSite

$report = @()

foreach ($site in $sites) {

    $report += [PSCustomObject]@{

        Title = $site.Title

        Url = $site.Url

        Owner = $site.Owner

        StorageQuota = $site.StorageQuota

    }

}

$report | Export-Csv -Path "C:\SiteCollectionsReport.csv" -NoTypeInformation
This gathers all of your SharePoint site collections, includes a report array with the Title, URL, Owner, and Storage Quota, and exports the results in an easy-to-read CSV file in the specified location.

Set SharePoint sites to read-only
Beautiful! Now, let’s close out this post with some security-related scenarios. If you need to mark several sites as Read-Only (no changes can be made to the sites), you can use this script.
$sites = Get-SPOSite

foreach ($site in $sites) {

    Set-SPOSite -Identity $site.Url -LockState NoAccess

}
In this example, the script will gather all of your sites and mark their ‘LockState’ as ‘NoAccess’. (Read-Only). You can also easily import a CSV file with Site URLs to only lock down a subset of your sites.
Quick Tip – To ‘unlock’ a set of sites so they are read/write capable again, replace ‘NoAccess’ above with ‘Unlock’.
Thank you for reading my post on the SharePoint Online PowerShell module and how to use it. Please leave a comment or a question below and I’ll be glad to get back to you.

Michael has been an IT Pro since 1998. He has worked predominantly in the Windows world including client and server operating systems, on-prem systems engineering (AD, DNS, etc.), and over the last ten years or so has embraced and immersed himself in...


