5 Easy Ways to Install PowerShell 7 on Windows
- Blog
- PowerShell
- Post
In this guide, I’ll show you all the ways to install PowerShell 7 on your Windows 11 computer so you can get started with the latest PowerShell has to offer.
Windows PowerShell has been part of Windows since Windows 7 and Windows Server 2008 R2, when it was known as Windows PowerShell 2.0 starting in 2009. A lot has changed since then, and Windows PowerShell 5.1 is no longer being actively developed.
But back in 2016, Microsoft open-sourced the code for a new, cross-platform version built on .NET Core. After a few early iterations, PowerShell 7 as a scripting language and automation framework is quickly replacing Windows PowerShell 5.1 as the essential tool for IT professionals and developers.
So how do you install PowerShell 7? I’m glad you asked!
System requirements for installing PowerShell 7
To follow along with this guide, you’ll need to have the following:
- Windows 11 (23H2 as of this writing). You can get an evaluation copy here.
- Some familiarity with the command line and installing applications.
Some examples in this guide also work with Windows 10 and Windows Server 2016 or newer. For the purposes of this guide, you will only be working with the release version of PowerShell 7, not preveiw version(s).
Ready? Let’s get started!
5 ways to install PowerShell 7
There are many different installation methods available for getting PowerShell 7 onto your Windows 11 desktop environment. You can obtain PowerShell 7 using the Windows App Store, WinGet or Chocolatey, MSI, or by extracting a ZIP file. It’s up to you to choose your preferred installation method. Let’s go over each of these now.
As of this writing, PowerShell is at version 7.4.1
1. Download and install PowerShell 7 using the Microsoft Store
If you are looking for a quick, point & click installation, then installing PowerShell 7 using the Microsoft Store is for you.
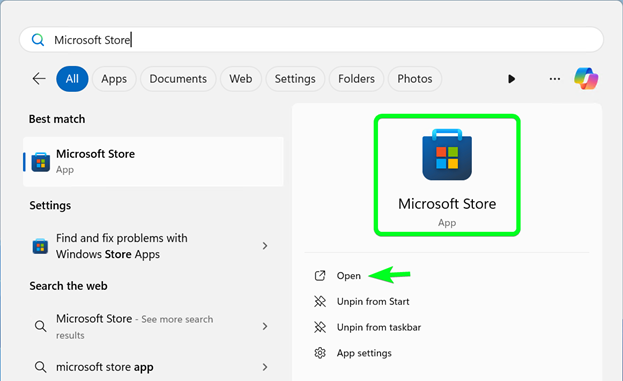
- Locate the Microsoft Store app on your Windows 11 desktop in your Start menu or by searching for “Microsoft Store” in the search bar. You should see this icon and the option to open:
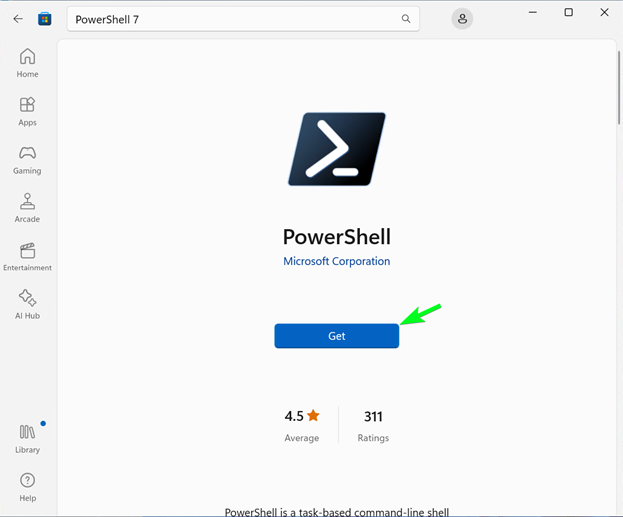
- With the Microsoft Store now open, you can search for PowerShell:

You will now see the official PowerShell 7 app.
- Click on “Get” to begin the download and installation process:
- After a few moments, you will be able to open PowerShell 7 on your computer by clicking Open.
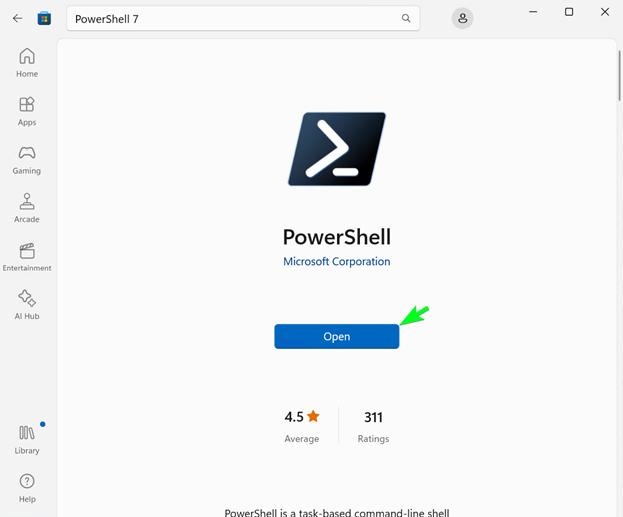
That’s it! If the installation was successful, you will now see PowerShell 7:

Installation via the Microsoft Store is by far the easiest method if you are new to IT and just wanting to start exploring the possibilities of what PowerShell has to offer. But it’s not the only way to install PowerShell 7. Let’s go over some of the other methods now.
2. Install PowerShell 7 using an MSI package
The MSI package installation method is another common method for installing the latest version of PowerShell. If you are an IT Administrator, this method may already be a familiar one. Installing apps using an MSI package is useful if you want to automate the process across many devices.
You can get the latest release by going to the PowerShell Releases GitHub repo page. Be sure to choose the correct architecture for your environment.
In this example, let’s assume you are installing the 64-bit version of PowerShell.
- Begin by downloading the MSI package as shown below:

- Once downloaded, double-click on the MSI package you downloaded to begin the installation wizard.
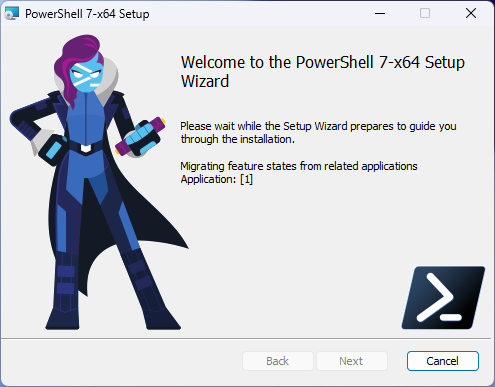
- Once the pre-setup checks are completed, click Next:
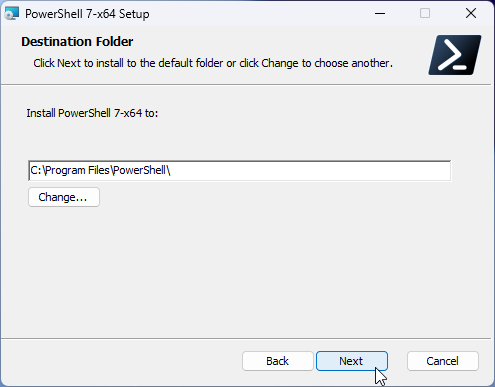
- You will be asked to verify your installation path. It’s best to just keep the default. Click Next:
Now you are asked about optional actions you want to take as part of the installation.
- By default, PowerShell will be added to your path environment variables, and it will be register with the Windows Event Logging Manifest. Click Next if you do not wish to select additional actions:
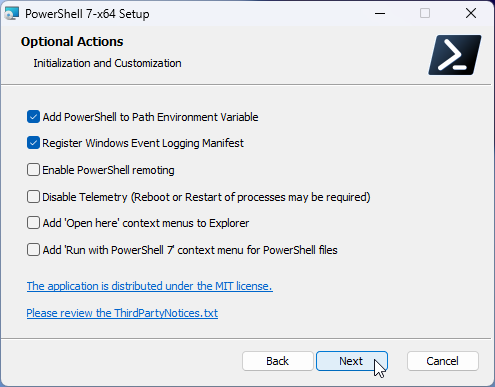
I personally select all the options because PowerShell 7 is my daily driver when it comes to my needs. YMMV.
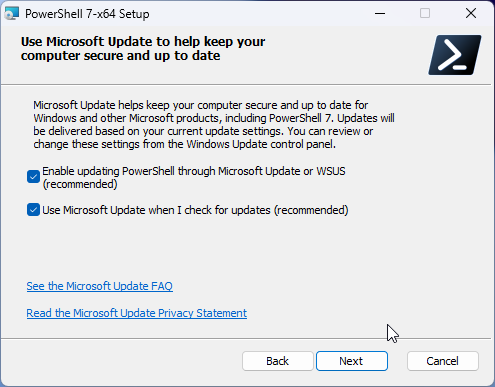
You are now asked how you wish to keep PowerShell updated. By default, both options are selected to allow PowerShell to receive updates through Microsoft Update or your own WSUS.
- If you do not have a reason to uncheck these, it’s best to leave the defaults selected here. When ready, click Next:
- And lastly, if you are satisfied with all your choices, simply click Install to begin installation:
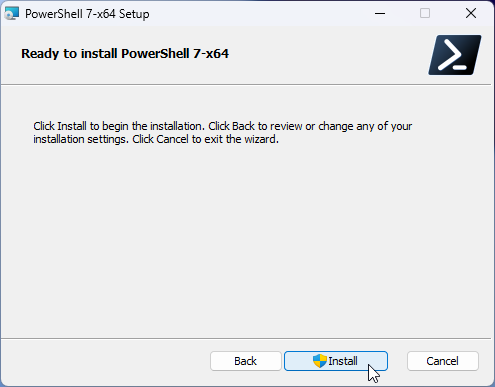
The installation begins and takes just a few moments to complete:
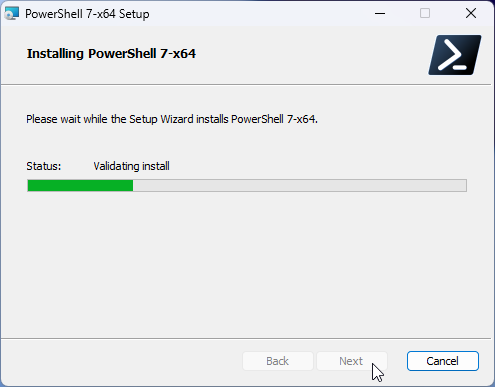
Now that you have seen how to install using the MSI package using the installation wizard, Let’s explore an alternative method using the same installation file.
Install PowerShell 7 using an MSI package at the command line
To install PowerShell 7 using an MSI package at the command line, run the following code from your Command Prompt or PowerShell 5.1 session using administrator credentials:
msiexec.exe /package PowerShell-7.4.1-win-x64.msi /quiet ADD_EXPLORER_CONTEXT_MENU_OPENPOWERSHELL=1 ADD_FILE_CONTEXT_MENU_RUNPOWERSHELL=1 ENABLE_PSREMOTING=1 REGISTER_MANIFEST=1 USE_MU=1 ENABLE_MU=1 ADD_PATH=1>)The command above will install PowerShell 7.4.1 for Windows x64 silently, and it also enables the options for:
- File Explorer Context Menu
- File Context
- enable PSRemoting
- and add PATH variables.
This installation method is great for Systems Administrators who may need to perform an installation remotely without interrupting a user or wants to use an automation routine to complete the installation with preset parameters.
Now that I’ve mentioned the possibility of scripting an installation, it’s a perfect segue for the next section!
3. Install PowerShell 7 using a PowerShell script
Another easy way to install PowerShell 7 is to use PowerShell. Yes, you read that right! Using PowerShell 5.1 and the Invoke-Expression and Invoke-RestMethod cmdlets, you can simply run the following command as an administrator to install PowerShell 7 like so:
Invoke-Expression "& { $(Invoke-RestMethod -Uri 'https://aka.ms/install-powershell.ps1') }"When the installation is complete, you will see this:

In one, short command, you download the latest version of PowerShell 7 as a zip file, extract the MSI package, and install with default settings using a pre-built installation script from Microsoft. This is the fastest way to get PowerShell 7 installed on your computer.
Although this method is fast, it does not add **pwsh** to your environment paths, nor does it create shortcuts on your desktop or start menu. You can create your own by navigating to
C:\Users\[username]\AppData\Local\Microsoft\powershell\ and finding the executable. The modules folder will also be in this directory.
One advantage of the scripted installation method is that it will rename your previous PowerShell 7 installation to powershell.old.
Now that we have covered a couple of scriptable installations, let’s look at two popular package management installation methods.
4. Install PowerShell 7 using WinGet
Since Windows 10 version 1809, a new Windows Package Manager, known as WinGet, has been built into Windows. WinGet is a command-line tool which enables users to install, upgrade, and configure applications. It is part of App Installer.
- To view the options available with the WinGet command, open a Windows PowerShell terminal using Windows Key + X, type in winget and press Enter:
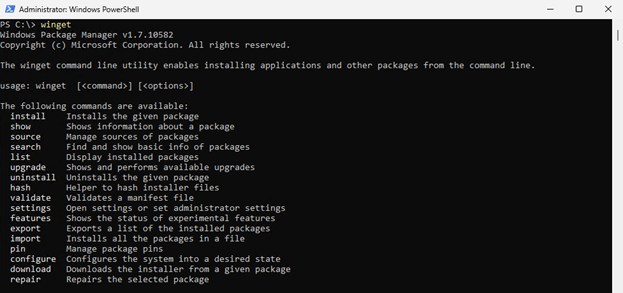
- To install PowerShell 7, let’s first update WinGet:
winget update- When prompted, choose Y to agree to source agreements and terms:

If any upgrades are available, you can install them using winget upgrade Microsoft.PowerShell.
- Next, type the following command to search for the PowerShell 7 package:
winget search PowerShell
- Note the Id in the screenshot above. This is what you would expect to see searching for just a keyword for any package.
- Let’s clean the results up a little and narrow down the choices by searching for a specific Id:
winget search Microsoft.PowerShellAs you see in the below screenshot, the results are much more precise:

Let’s install the current release by using the install, –id, and –source options using information gathered with this previous command.
- In the example below, you are choosing the package id of Microsoft.PowerShell from the default source repository winget:
winget install --id Microsoft.PowerShell --source wingetFor x86 and x64 systems, WinGet installs the MSI package. For ARM64, the Microsoft Store (MSIX) package is installed.
After you press Enter, WinGet begins the installation process using the latest MSI package from the PowerSHell GitHub repository, as shown below:

- Let’s verify it has been installed by closing this current WIndows PowerShell session and opening a new one. In the prompt, simply type pwsh, and you should now have a PowerShell 7 session prompt as shown below:

And that’s it! PowerShell 7 is now installed!
But what if you are having trouble with installing PowerShell 7 using WinGet? Well there are a few basic troubleshooting tips you should know about:
- Check your Internet connection: You have to have a stable internet connection that works properly as WinGet relies on an active connection to download and install packages. It is possible to host your own repository on your local network, but that still means you have to have basic network connectivity that works.
- Update WinGet: Always make sure you are using the latest version of WinGet by running the winget update command.
- Check repository availability: Repositories can come and go or otherwise be temporarily unavailable for several reasons. You can test availability by attempting to install another package from the same repository to determine if the problem is related to the repository or with the PowerShell 7 package itself.
- Run PowerShell as Administrator: Ensure you are running PowerShell with administrative privileges.
- Check your spelling: Sometimes we can mis-spell a package name, miss an option, etc. If you are unsure how to spell a package name, try using the search option first to find the correct id and source.
- Check firewall and antivirus: Sometimes the Windows firewall and some Antivirus products may block WinGet from accessing the internet and downloading packages. Temporarily disabling these can help you narrow the issue down and make adjustments accordingly.
- Restart: “Have you tried turning it on and off again?”. Sometimes a simple reboot is all that’s needed to resolve issues.
By following these instructions and troubleshooting tips, you should be able to install PowerShell 7 using WinGet without encountering significant issues.
5. Install PowerShell 7 using Chocolatey
Another package manager for Windows is called Chocolatey. And it is very similar to other package managers on Linux and Mac OSX. It’s simple and easy to use, with features for both individual and enterprise users. It pre-dates Microsoft’s package management solution WinGet by a few years.
This guide is not meant to be a tutorial on how to install and use Chocolately, but if you are interested in setting this up for yourself, there’s an excellent Chocolatey tutorial that will get you up and running in no time.
Assuming you have already installed Chocolatey, you can begin installing PowerShell 7 using the Chocolatey package manager. But first, search for the PowerShell 7 package.
- Copy and paste the code below into your Windows PowerShell terminal:
choco search powershell-coreYou can also search for packages at [Chocolatey Software | Packages] to view additional information and availability.
This will display a list of available PowerShell packages. Look for the one labeled powershell-core [version]:

- Once you’ve identified the correct package, you can install PowerShell 7 by running the following command:
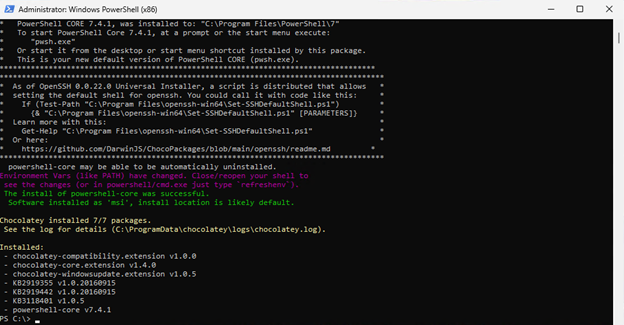
choco install powershell-core- Chocolatey will then download and install PowerShell 7 along with any necessary dependencies. Follow any prompts that appear during the installation process (choose [A] – yes to all), as shown below:
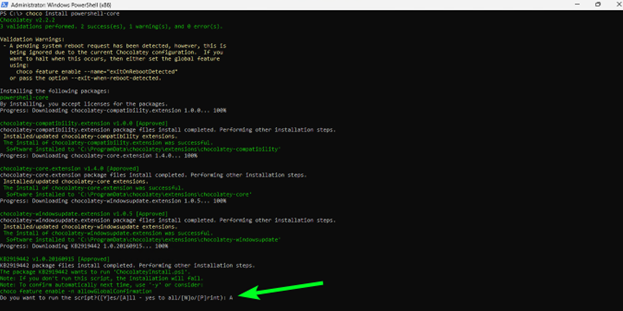
When the installation is successful, you should see similar output to what is shown below:
- After the installation is complete, verify that PowerShell 7 has installed correctly by opening a new Windows PowerShell session and typing:
pwshAfter pressing Enter, a PowerShell 7 terminal session will launch as shown below:

If any upgrades are available, you can install them using choco upgrade powershell-core.
But what if you are having trouble with installing PowerShell 7 using Chocolatey? Well, there are a few basic troubleshooting tips you should know about:
- Run-As Administrator: Run Command Prompt or PowerShell as an administrator when executing Chocolatey commands, as administrative privileges are required for package installation.
- Verify your installation completed successfully: If you encounter any errors during the installation process, ensure that Chocolatey was properly installed.
- Check your Internet connection: Verify that your system has access to the internet to download packages. Occasionally, Chocolatey repositories might experience issues or downtime. In such cases, you may need to wait for the issue to be resolved or use alternative installation methods.
Conclusion
By following any of the above methods provided in this guide, you can now install PowerShell 7 on your PC with ease. You have learned how to install and troubleshoot PowerShell 7 installation using the Microsoft Store package, traditional installation, scripted installation, and finally, installation using WinGet and Chocolatey package managers.
If you are up for an additional challenge, try installing PowerShell 7 on a Linux distribution of your choice or Mac OS X. Until next time, keep using PowerShell!


