- Blog
- PowerShell
- Post
Install or Update PowerShell: A Comprehensive How-To Guide
Install or update PowerShell to make sure you are always running the latest version.

Use this guide to help you check your current PowerShell version, update PowerShell from one version to another, run two versions side by side in Windows Terminal, and update PowerShell to the latest revisions.
Windows PowerShell has been an essential tool in the IT Pro’s toolbelt. PowerShell 5.1 was introduced back in 2016 with Windows 10 version 1607 and Windows Server 2016. It has evolved significantly from the 5.x release to the latest PowerShell 7.x, bringing performance improvements, new features, more cmdlets, and better compatibility, especially for scripts. Another benefit for PowerShell 7 is cross-platform support for additional operating systems – there is native support now in macOS and Linux.
Before you update PowerShell, check your current version
Before we delve into the two major version branches of PowerShell, let’s show you how to quickly determine what version you have installed in the shell session you have open.
- First, I’ll right-click the Start button and choose ‘Terminal (Admin)’ to open Windows Terminal.
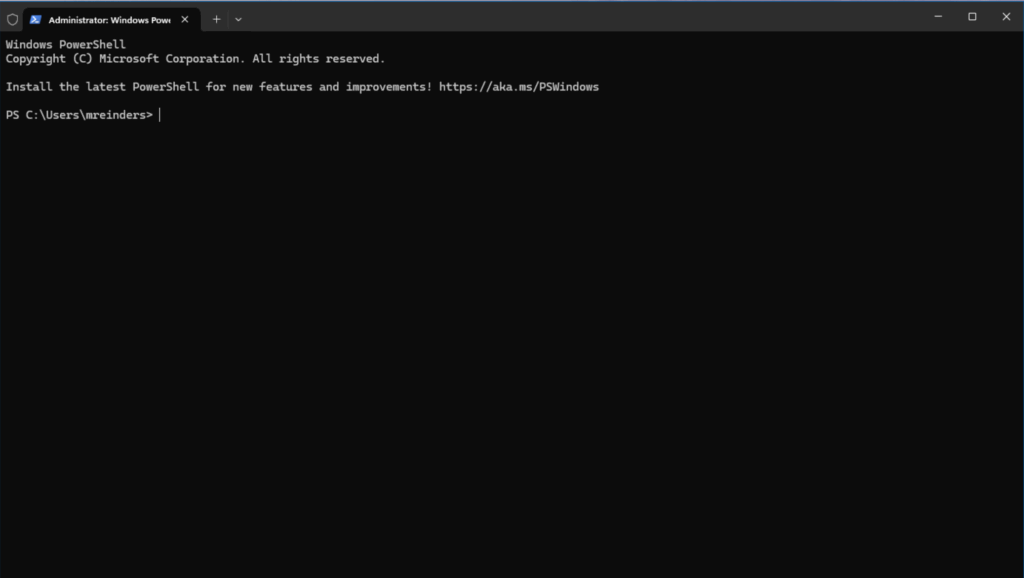
- Next, I’ll type the following command ‘$PSVersionTable’ and hit Enter.
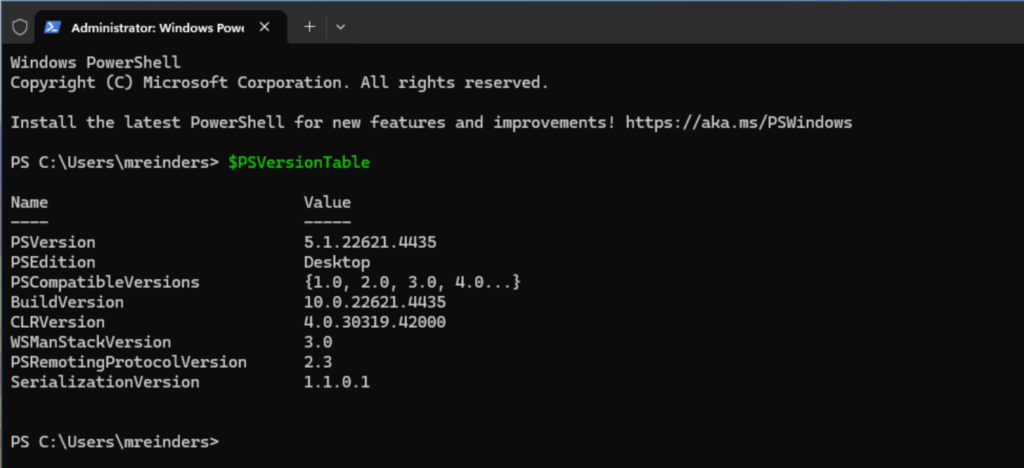
The first line showing the ‘PSVersion’ is the source of truth. Mine shows ‘5.1.22621.4435’. This can be simplified to ‘5.1’. The process using PowerShell 7.x is the same. I’ll show you the output a little later on.
Update PowerShell 7.x to the latest revision
For the best results, it is recommended to update PowerShell 7 using the same method that was used during its installation. You can determine that by using the $PSHOME variable. Let me show you.
- Type $PSHOME in the command prompt.
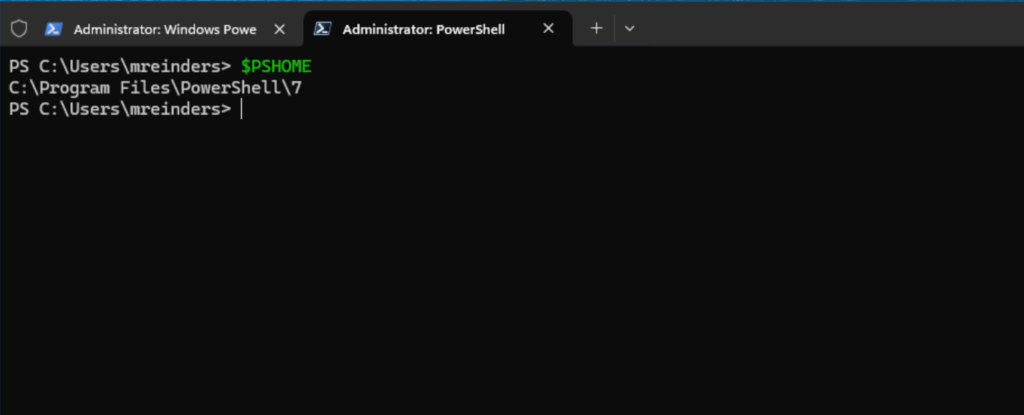
Because the value shown here ends in ‘…\PowerShell\7’, that tells us it was installed as an MSI package or with winget.
- If the value is ‘$HOME\.dotnet\tools’, PowerShell was installed with the ‘.NET Global tool’.
- If the value starts with ‘$Env:ProgramFiles\WindowsApps\’, it was installed as a Microsoft Store package or winget with an ARM64 processor.
- If the value is anything else, PowerShell was likely installed from a ZIP package.
Let me demonstrate the most efficient method to update PowerShell 7 version to the latest version available.
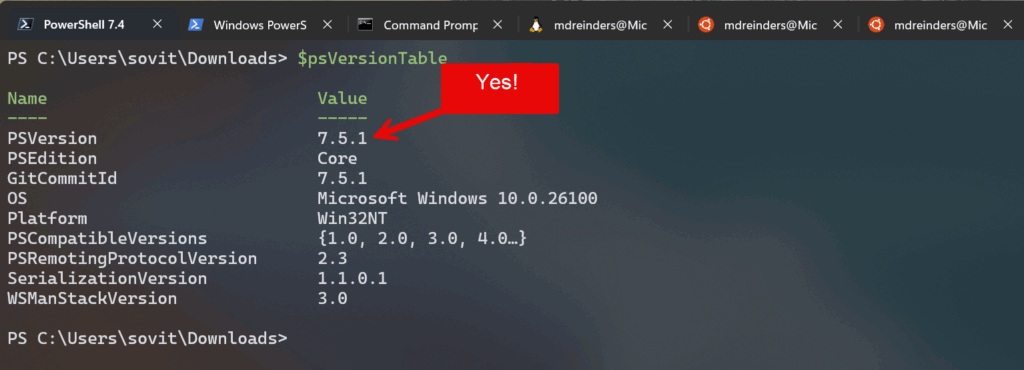
- First, I’ll run $PSVersionTable to check the current status.
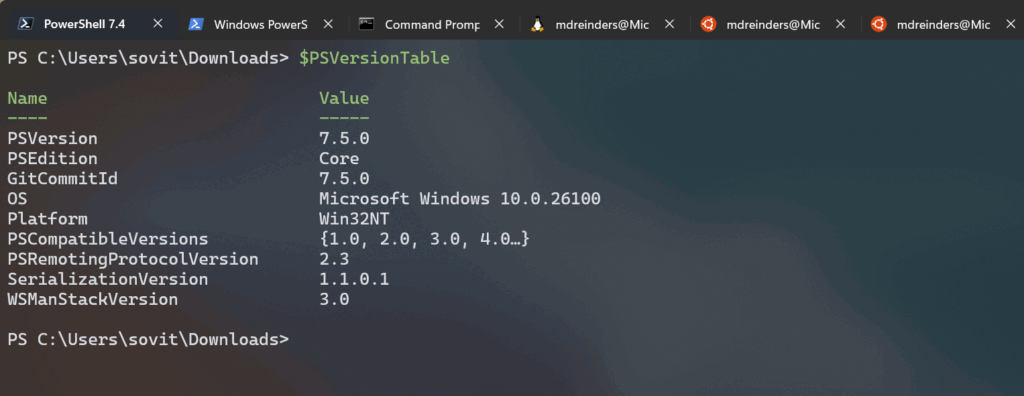
We’re running PowerShell version 7.5.0 and we know that there is a small PowerShell update available – 7.5.1. On this system, PowerShell 7 was installed from the Web (MSI file). But let’s see if we can use winget to our advantage.
winget search Microsoft.PowerShell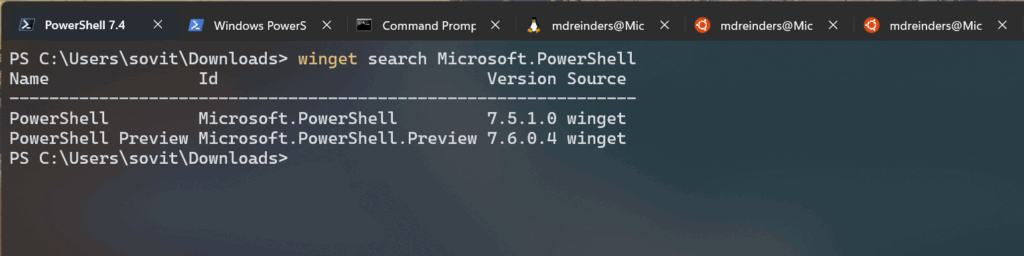
The first result is what we want. Let’s try it.
winget upgrade Microsoft.PowerShellAhh, there is no installed package. This is a result of the fact that my installation is an MSI installation. However, there is syntax to make this work.
winget install --id Microsoft.PowerShell --source winget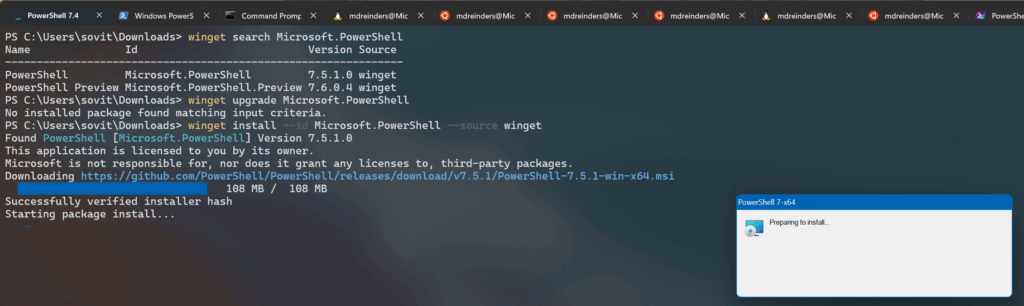
This hones in on the precise package and the precise source (winget vs Store). Now, we are destined for greatness. After the install is complete, I’ll close Terminal, re-launch it, and then run $PSVersionTable to confirm we’re running the latest version.
Based on how you initially installed PowerShell 7.x, you can also use Windows Update to get the latest supported release. Be advised that it may take longer to get the latest versions of PowerShell using this method.
How to install PowerShell 7.x
It is prudent to include instructions on how to install PowerShell 7 in case you don’t have it installed on a particular system. When I started this article, I only had the built-in Windows 5.1 version of PowerShell.
Using ‘winget’ to install PowerShell 7.x
The easiest method, seeing as we’re already in Windows Terminal, is to use winget to install it directly. No need to go anywhere else. (I’ll include the other methods next…)
winget install Microsoft.PowerShell
This will automatically:
- search the repository online
- find a match
- ask you to confirm source agreements (as this is the first time installing a package using winget on this computer)
- download the software, and install it.
Piece of cake. As of this writing, the latest version is the newly released PowerShell 7.5.1.
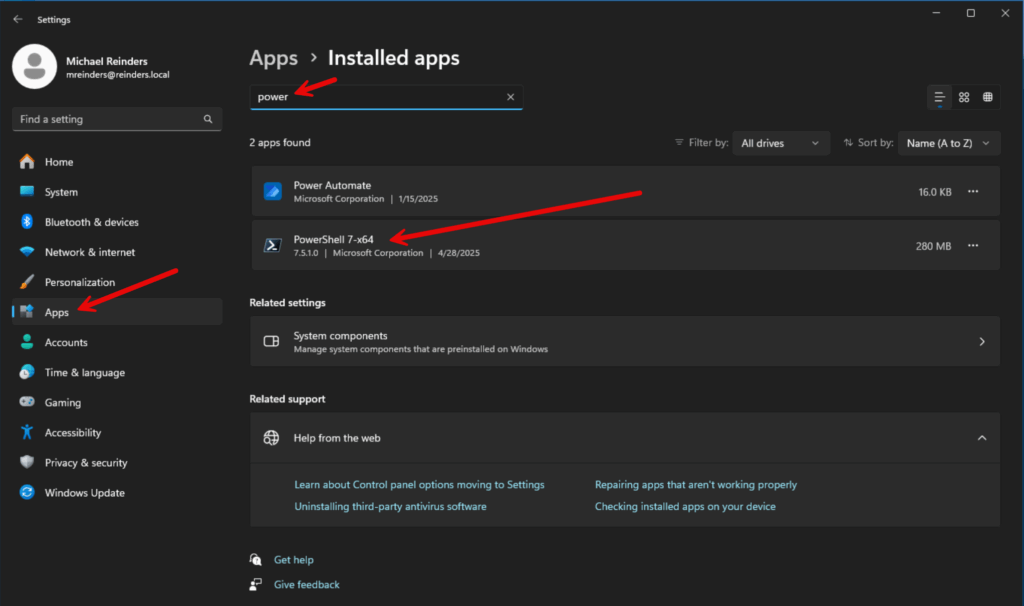
Let’s confirm installation:
- Open the Settings app from the Start Menu.
- Go to Apps -> Installed Apps
- Then search for ‘power’ and see the results.
I’ll also show you how to confirm with Windows Terminal in a few sections.
Using the Microsoft Store
Another method for installing PowerShell 7 is using the Microsoft Store.
- Launch the Microsoft Store from your Taskbar or the Start Menu.
- Then, at the top, enter ‘powershell’ in the search bar and you’ll see results.
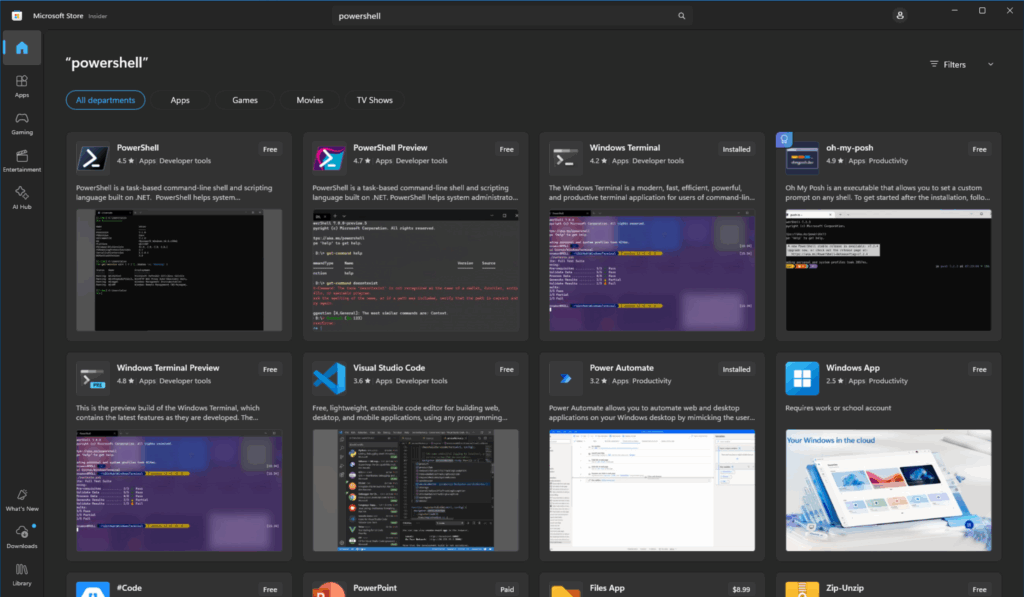
- The first option – ‘PowerShell’ is the correct choice. You can click this item, and you’ll see more details.
- Scroll down a bit to the ‘What’s new in this version’ heading, and you can see the precise version it includes on GitHub (7.5.1).
- Click the Install button to install PowerShell.
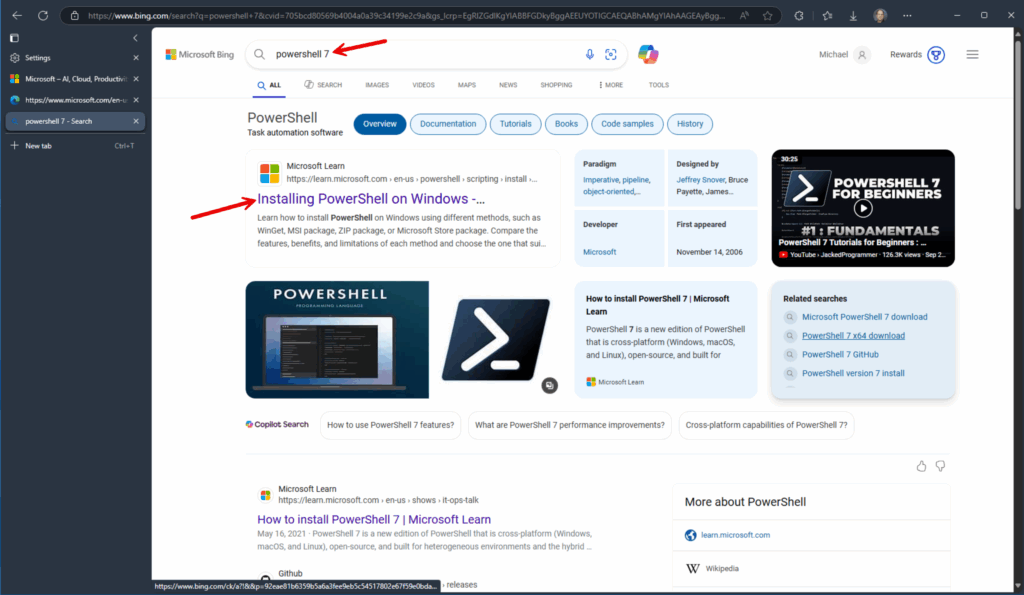
Downloading PowerShell 7 from the web and installing using an MSI package
The last method to install PowerShell 7 is from the web.
- You can open a new tab in Edge and type directly in the Address/Search bar – ‘powershell 7’ and you’ll see the best result first. The public releases are housed on github.com.
- Click the link for ‘Installing PowerShell on Windows…’ and then click the heading at the beginning for ‘Installing the MSI package.’
- You can then click on the link for the architecture that matches your device (x64, x86, and Arm64).
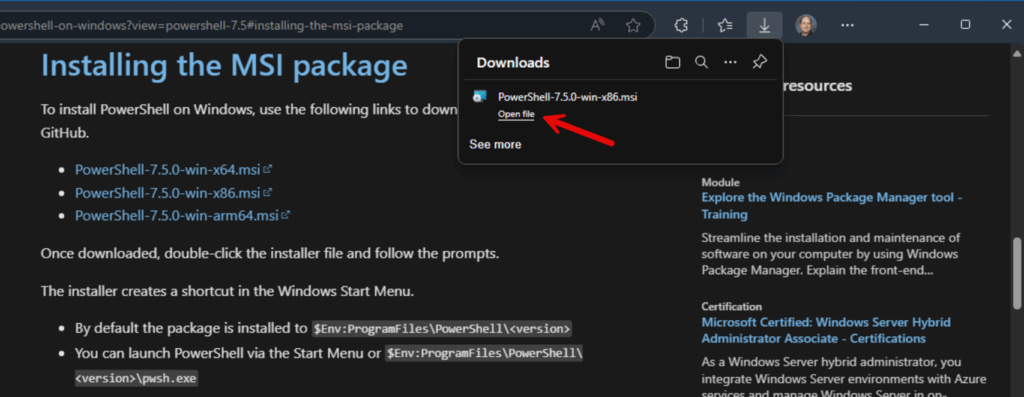
- Double-click on the MSI file to install it.
Installing PowerShell on Linux
The preferred method to install and update PowerShell on Linux (Ubuntu, in this case) is to use Microsoft’s Package Repository. You can use this script from Microsoft’s Learn website to install the latest version.
###################################

# Prerequisites

# Update the list of packages

sudo apt-get update

# Install pre-requisite packages.

sudo apt-get install -y wget apt-transport-https software-properties-common

# Get the version of Ubuntu

source /etc/os-release

# Download the Microsoft repository keys

wget -q https://packages.microsoft.com/config/ubuntu/$VERSION_ID/packages-microsoft-prod.deb

# Register the Microsoft repository keys

sudo dpkg -i packages-microsoft-prod.deb

# Delete the Microsoft repository keys file

rm packages-microsoft-prod.deb

# Update the list of packages after we added packages.microsoft.com

sudo apt-get update

###################################

# Install PowerShell

sudo apt-get install -y powershell

# Start PowerShell

pwsh
I use Windows Subsystem for Linux (WSL) and have an Ubuntu 24.04.2 LTS distribution. Here is the output from the script.

You can see the 7.5.1-1 version being installed, and then the launch of PowerShell with the prompt. Very easy.
How to manage PowerShell in Windows Terminal
Remember when I mentioned earlier about how to confirm that PowerShell 7 was installed on your system using Windows Terminal? Well, here we are.
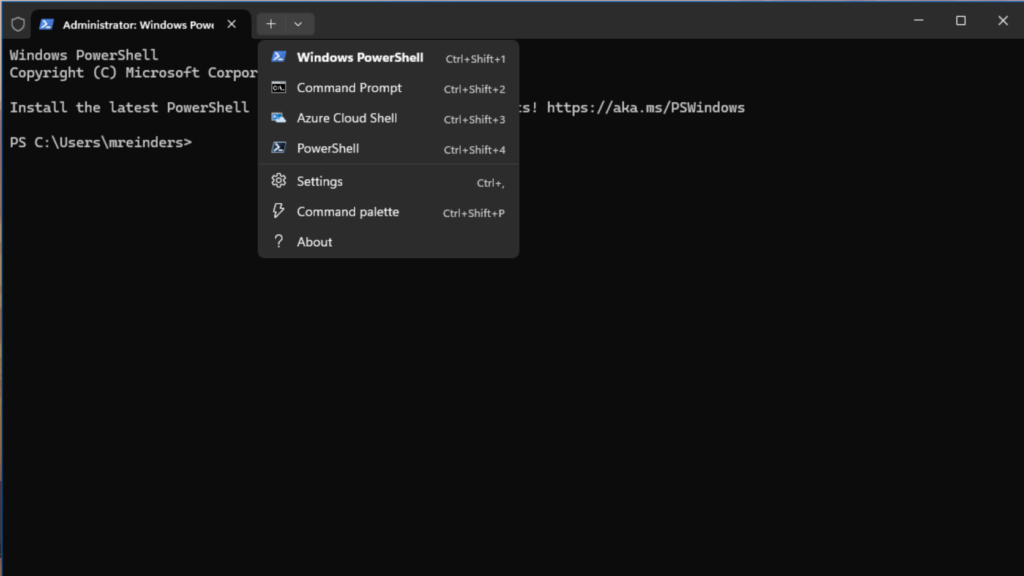
- Type ‘exit’ in Windows Terminal to end your session
- Now launch it again.
Every time Terminal is launched, it scans specific areas of your system (Registry), enumerates detected versions of PowerShell, WSL, etc., and confirms/adds a profile for each iteration.
- If you click the down arrow dropdown next to the ‘+’ (New Tab) area, you’ll see a new profile titled ‘PowerShell’.
- Click it, and a new tab will open in Terminal.
Now we see the second tab shows ‘PowerShell 7.5.1’ running. Let’s confirm (again) with the $PSVersionTable command.

‘PSVersion’ shows the very precise and concise ‘7.5.1’. Again, a piece of cake.
Troubleshooting and best Practices
Let me finish up this article with some troubleshooting you can perform and some best practices for updating and managing your PowerShell environments.
- Test scripts before running in production, in PowerShell 7 environments
- Use the ‘-Version’ parameter to check compatibility
- Use ‘Test-Path’ and ‘Get-Command’ to confirm the correct modules are installed/still available.
- Set Execution Policy
- PowerShell 7.x may contain differing policies from what you encountered on PS 5.x
- ‘Set-ExecutionPolicy -ExecutionPolicy RemoteSigned -Scope CurrentUser’ is best/secure.
- ‘Set-ExecutionPolicy -ExecutionPolicy RemoteSigned -Scope CurrentUser’ is best/secure.
- PowerShell 7.x may contain differing policies from what you encountered on PS 5.x
- Leverage Windows Terminal to easily manage both PowerShell 5.x and 7.x on the same system.
- Utilize additional profiles in Terminal to ease your testing and migration of scripts from 5.x to 7.x
- Utilize additional profiles in Terminal to ease your testing and migration of scripts from 5.x to 7.x
- If your PowerShell 7.x is not recognized in Windows Terminal, add a new profile manually in the settings.json file thusly.
- { “commandline”: “pwsh.exe”, “name”: “PowerShell 7” }
- { “commandline”: “pwsh.exe”, “name”: “PowerShell 7” }
- If Profile Script conflicts are encountered, your ‘$PROFILE’ paths may be different.
- Use conditional logic in your profile.
- if ($PSVersionTable.PSVersion.Major -ge 7) { # PowerShell 7.x specific settings }
Thank you for reading my latest post on updating PowerShell. If you have any questions or comments, please leave them below in the Comments section. Thank you!
Frequently Asked Questions
Should I upgrade PowerShell?
Yes, upgrading PowerShell is generally recommended, especially if you are using Windows PowerShell 5.1 or older. Newer versions of PowerShell (specifically PowerShell 7+, also known as PowerShell Core) offer:
- Cross-platform support (Windows, macOS, and Linux)
- Improved performance
- New cmdlets and features
- Security enhancements
- Better compatibility with modern scripting practices
However, check your organization’s software compatibility and scripts before upgrading, as some legacy modules or scripts may need adjustments.
How do I check for PowerShell updates?
There isn’t an automatic update mechanism built into PowerShell itself, but you can:
For PowerShell Core (7+):
- Use
wingeton Windows: powershellwinget search Microsoft.PowerShell - Or check the latest release at https://github.com/PowerShell/PowerShell.
For Windows PowerShell (5.1):
- It is updated via Windows Update, not individually.
- Windows PowerShell 5.1 is the final version of “Windows PowerShell” and will not receive feature updates, only security patches via Windows.
What is my current PowerShell version?
Run the following command in your PowerShell terminal:
$PSVersionTable.PSVersionThis returns details like the major, minor, build, and revision numbers of the installed PowerShell version.
How to install the latest PowerShell version in VS Code?
To use the latest PowerShell in Visual Studio Code:
- Install PowerShell Core:
- Download the latest version from PowerShell GitHub Releases.
- Follow the installer instructions for your OS.
- Install the PowerShell extension in VS Code:
- Open VS Code.
- Go to the Extensions pane (
Ctrl+Shift+X). - Search for and install PowerShell by Microsoft.
- Configure VS Code to use the new version (if multiple versions are installed):
- Press
Ctrl+Shift+Pand typeSelect Default Shell. - Choose the latest PowerShell from the list (e.g.,
pwsh.exefor PowerShell Core).
- Press
How do I update PowerShell?
On Windows (PowerShell Core 7+):
- Open a terminal with admin rights and use
winget: powershellwinget upgrade --id Microsoft.PowerShell - Or manually download and install from GitHub.
On macOS or Linux:
- Use your package manager:
- macOS: bash
brew update && brew upgrade --cask powershell - Ubuntu/Debian: bash
sudo apt-get update sudo apt-get install --only-upgrade powershell
- macOS: bash
Note: Always restart your shell or VS Code after an update to apply the changes.
How to install the PowerShell extension in VS Code?
- Open VS Code.
- Press
Ctrl+Shift+Xto open Extensions. - Search for “PowerShell” by Microsoft.
- Click Install.
- Reload VS Code if prompted.
How do I make sure it’s working?
Open a .ps1 file — you should see syntax highlighting and IntelliSense. The PowerShell language should appear in the bottom-right corner.
Can I choose which PowerShell version VS Code uses?
Yes! Press Ctrl+Shift+P, run PowerShell: Show Session Menu, and pick your preferred version (like PowerShell 7).

Michael has been an IT Pro since 1998. He has worked predominantly in the Windows world including client and server operating systems, on-prem systems engineering (AD, DNS, etc.), and over the last ten years or so has embraced and immersed himself in...


