- Blog
- PowerShell
- Post
PowerShell Copy-Item: Copy Files and Folders
Copy files and folders using the PowerShell Copy-Item cmdlet

This guide will explore how to copy files and directories using the PowerShell Copy-Item cmdlet, cover advanced options (like recursion, filtering, and overwrite rules), and discuss performance considerations. Whether you’re a sysadmin or a developer, learn how to streamline your file operations with practical examples and best practices.
What is the PowerShell Copy-Item cmdlet?
The Copy-Item cmdlet, built into Microsoft Windows, is the command you use to copy files on your local computer using PowerShell. There is no need to install or import any other module—it comes with all versions of Windows.
There are nearly countless switches, parameters, and piping possibilities that you can use to achieve some serious coding tricks and powerful scripts. Being able to copy hundreds or thousands of files and only copy files with a ‘7’ in the filename with ease is a great time saver.
Besides using Copy-Item to copy files, you can also copy Registry entries and environment variables. This post will focus on copying files. Let’s first go through the basic syntax with Copy-Item.
Copy-Item command syntax
The most basic syntax includes a source path and a destination path.
Copy-Item -Path <source> -Destination <destination> [<parameters>]Let’s use this to copy a file from one location to another.
- I’ll right-click on the Start button and click on ‘Terminal (Admin)’.
I have a c:\Scripts folder with a few files and an empty F: drive. Let’s copy the Scripts folder and its contents to the F: drive.
Copy-Item -Path C:\Scripts\* -Destination F:\ -Passthru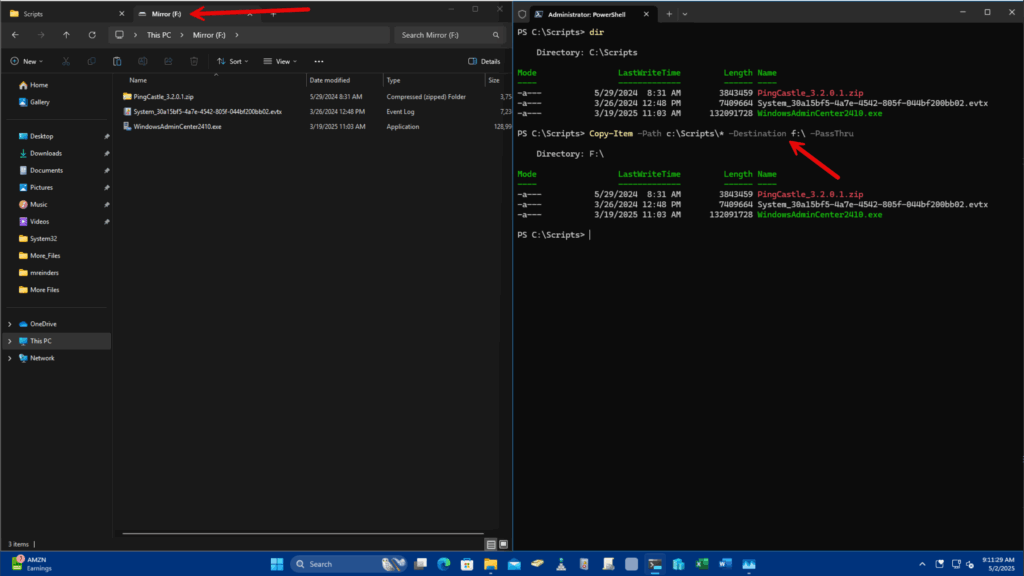
I used the -Passthru parameter to tell PS to show me the output of copied files. If you don’t use that parameter, there will be NO output, unless there’s an error.
Let’s go into more examples and other parameters in the next section.
Copying files with Copy-Item
There are hundreds of ways to use PowerShell Copy-Item to copy, rename, or even delete files from a source to a destination. Let’s continue learning about more of the common parameters.
Learn how to rename a file in PowerShell with this tutorial on Petri.com
Common use cases and examples
By default, PowerShell overwrites files in the destination, again, with no clarification or output. If you attempt to copy a file to a read-only destination file, you will receive an ‘access denied’ of sorts error.
We can copy a single file to a specific destination folder this way.
Copy-Item -Path c:\Scripts\Entries.txt -Destination f:\Scratch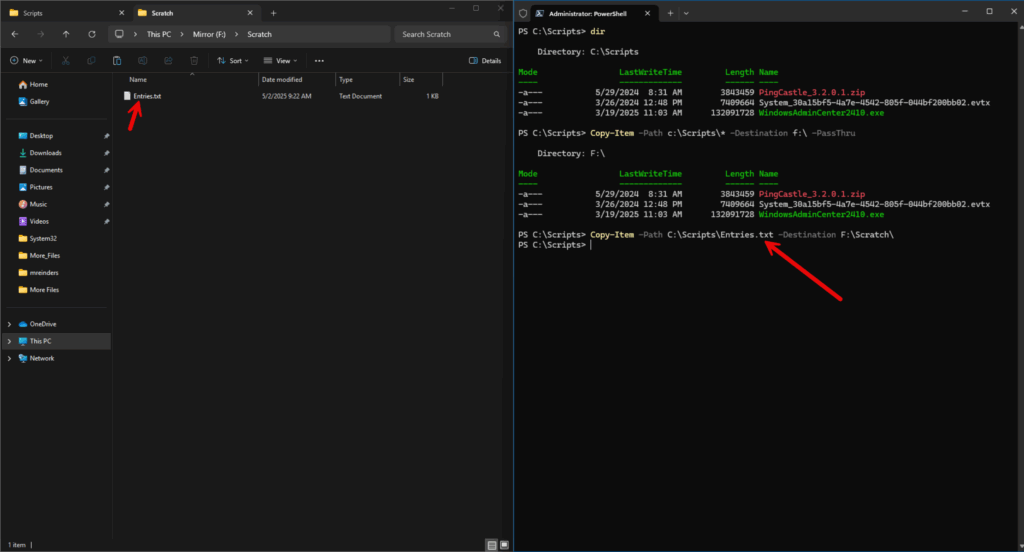
As you can see, the file has been copied to the F: drive in the Scratch folder.
Let’s copy a file again, but rename the file in the destination – in one command. Do it like this.
Copy-Item -Path C:\Scripts\Entries.txt -Destination f:\Scratch\temp.txt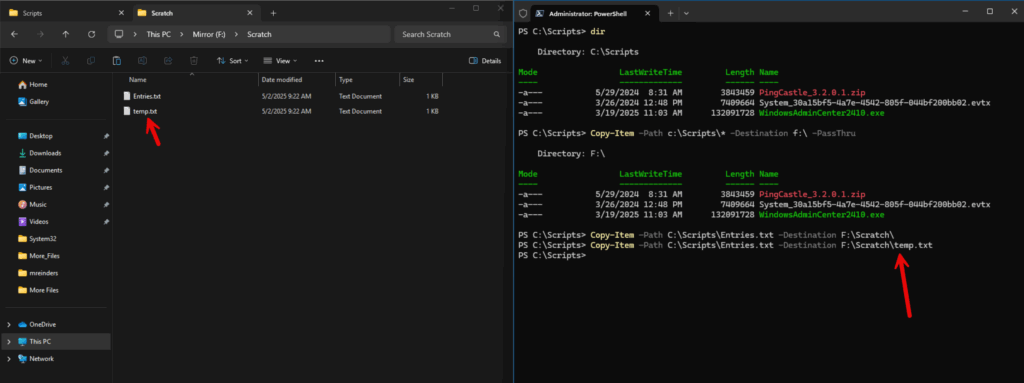
There’s essentially another copy of the file. Very handy for a developer that needs plenty of scratch space, as it were, for files in varying formats or versions over time.
Let’s copy a file to a remote machine or a remote computer. We can achieve this by starting a remote PS session to one of my domain controllers (don’t do this at home). You’ll need appropriate permissions on the remote computer.
$Session = New-PSSession -ComputerName “WS25-DC5” -Credential “Reinders\mreinders”

Copy-Item -Path C:\Scripts\*.zip -Destination C:\Temp -ToSession $Session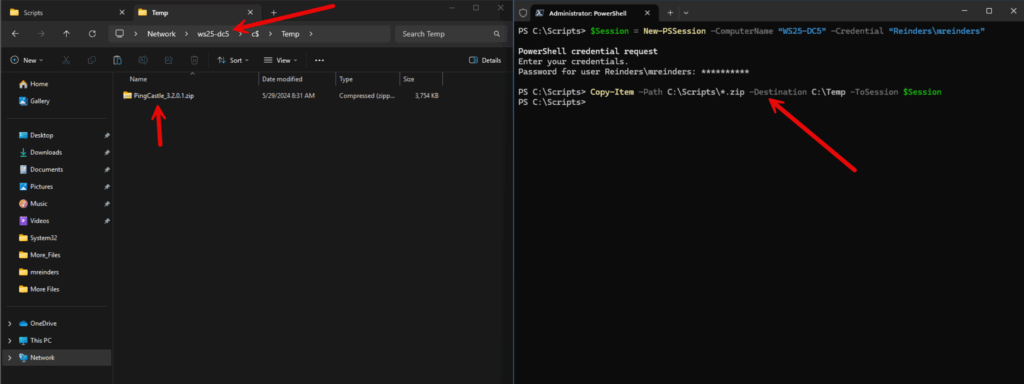
This is cool. After entering the password for the specified account, the file is copied.
In case it wasn’t clear, you can also supply a list of filenames separated by commas. PowerShell will copy each file in sequence.
Copy-Item -Path e1.log,e2.log,e5.log,e9.log -Destination C:\ScratchAreaHow to copy folders with PowerShell
Now, let’s move on to handling folders and their contents from source to destination. Just a small change in the syntax allows us to copy folders, even creating them in the destination if they don’t exist.
Examples and syntax
Let’s grab the same Scripts folder and its contents from the C: drive and copy them to the F: drive under the Scratch folder. It should copy the Scratch folder, its files, and all its subfolders. We’ll use the recurse parameter to tell PowerShell to get all subfolders and files under the root ‘Scripts’ folder.
Copy-Item -Path “c:\Scripts” -Destination “F:\Scratch\Extra” -Recurse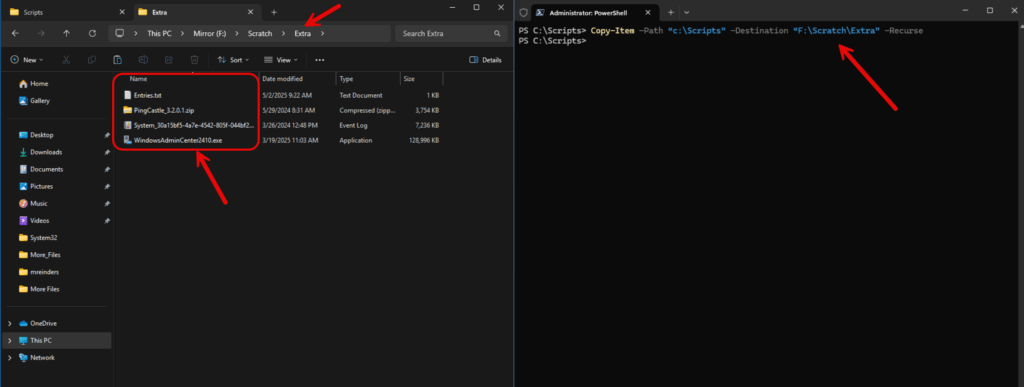
And there you go. PowerShell created the ‘Extra’ folder in the ‘Scratch’ folder and copied the same 4 files.
Let’s include one more example where we will copy a folder, its contents, and all recursive subdirectories to the destination.
Copy-Item -Path C:\Scripts\* -Destination F:\More_Files -Recurse
All the files have been copied, the extra folders were copied, and their contents.
Utilizing the PowerShell progress indicators
Included in Powershell version 7.4 and newer, progress indicators help to give you a real-time status of how long the copy procedure should take so you can track progress. Let me show you an example while I copy a larger group of folders to a second location.
Copy-Item -Path "F:\*" -Destination "C:\Backup_Location" -Recurse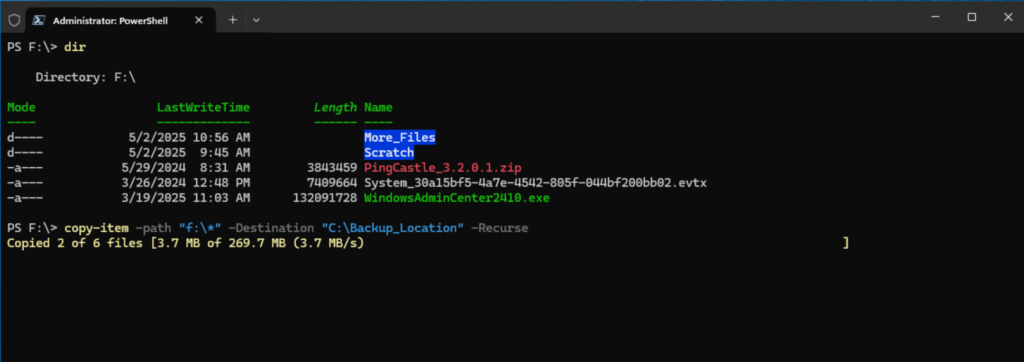
The -ProgressAction parameter lets you disable progress tracking if you want the copy operation to be performed at maximum speed:
Copy-Item -Path "F:\*" -Destination "C:\Backup_Location" -Recurse -ProgressAction SilentlyContinueAdvanced techniques
There are more examples of using PowerShell Copy-Item to make traditionally complex or tedious tasks nice and simple. Let’s explore some of these methods.
Filtering files
Although my example here will be relatively basic, the filtering feature is rather powerful. You could have thousands of very similarly named log files, for example, in a folder. If you only want to copy the files with a specific string, you can use this command thusly.
Copy-Item -Path c:\Logfiles -Filter *ren* -Destination c:\ScratchAreaThis will only copy the files that have ‘ren’ somewhere in the filename. Perhaps you need to grep or do a check for specific files when troubleshooting.
You can also use an -Exclude switch to get precise. Say you want to copy all the files that start with the letter ‘e’, but you want to exclude any files that have the number sequence ‘01’. Simple – use something like this.
Copy-Item -Path C:\LogFiles\* -Filter e*.log -Exclude 01.log -Destination C:\ScratchAreaThis can assist greatly when honing in on only what you need to troubleshoot an issue or verify that the correct files are all in a single folder for testing or validation.
Using wildcards with Copy-Item
You’ve likely noticed my use of wildcards already in this post. This allows you to copy files with a specific pattern without listing every file in an array separated by commas. You can use the -‘Filter *.txt’ string to include only files that end in .TXT. You can use -Filter 5*.log to only copy files that start with the number ‘5’ and have a .LOG extension.
Here’s another example.
Copy-Item -Path “C:\Reports\Log*” -Destination “C:\Log_Examination”This will copy all files in the Reports folder that have a filename starting with ‘Log…’.
You could also copy all the files in a folder, but exclude all the .TXT files this way.
Copy-Item -Path “C:\LogFiles\*” -Destination “C:\ScratchArea” -Exclude “*.txt”Example PowerShell script
Next, I’ll give you an example of a PowerShell script that can check network connectivity before attempting to copy files.
<#

.SYNOPSIS

Copies files to a remote computer with connectivity checks and hash verification.

.DESCRIPTION

This script copies files/directories to a remote computer after verifying network connectivity.

It performs hash checks to ensure file integrity and includes error handling for failed operations.

#>

# Prompt for source and destination paths

$sourcePath = Read-Host "Enter the source path (file or directory)"

$destinationPath = Read-Host "Enter the destination UNC path (e.g., \\RemotePC\C$\Folder)"

# Validate source path

if (-not (Test-Path $sourcePath)) {

    Write-Error "Source path does not exist or is inaccessible"

    exit 1

}

# Validate destination format

if (-not $destinationPath.StartsWith("\\")) {

    Write-Error "Destination must be a UNC path (starting with \\)"

    exit 1

}

# Extract remote computer name from UNC path

$remoteComputer = ($destinationPath -split '\\')[2]

if (-not $remoteComputer) {

    Write-Error "Invalid UNC path format"

    exit 1

}

# Check network connectivity

Write-Host "`nTesting connectivity to $remoteComputer..."

if (-not (Test-Connection -ComputerName $remoteComputer -Count 2 -Quiet)) {

    Write-Error "Remote computer $remoteComputer is not reachable"

    exit 1

}

# Copy operation

try {

    $sourceItem = Get-Item $sourcePath

    Write-Host "`nStarting copy operation..."

    if ($sourceItem -is [System.IO.DirectoryInfo]) {

        # Create destination directory if it doesn't exist

        if (-not (Test-Path $destinationPath)) {

            New-Item -Path $destinationPath -ItemType Directory -Force | Out-Null

        }

        # Copy directory contents

        Copy-Item -Path "$sourcePath\*" -Destination $destinationPath -Recurse -Force -ErrorAction Stop

    }

    else {

        # Copy single file

        Copy-Item -Path $sourcePath -Destination $destinationPath -Force -ErrorAction Stop

    }

    Write-Host "Copy completed successfully`n"

}

catch {

    Write-Error "Copy failed: $_"

    exit 1

}

# Hash verification

Write-Host "Starting hash verification..."

$allHashesMatch = $true

$totalFiles = 0

$verifiedFiles = 0

try {

    if ($sourceItem -is [System.IO.DirectoryInfo]) {

        $sourceFiles = Get-ChildItem -Path $sourcePath -Recurse -File

    }

    else {

        $sourceFiles = @($sourceItem)

    }

    $totalFiles = $sourceFiles.Count

    foreach ($file in $sourceFiles) {

        # Calculate relative path

        $sourceRoot = $sourceItem.FullName.TrimEnd('\')

        $relativePath = $file.FullName.Substring($sourceRoot.Length + 1)

        $destFile = Join-Path -Path $destinationPath -ChildPath $relativePath

        # Verify destination file exists

        if (-not (Test-Path $destFile)) {

            Write-Error "Destination file missing: $destFile"

            $allHashesMatch = $false

            continue

        }

        # Calculate hashes

        try {

            $sourceHash = Get-FileHash -Path $file.FullName -Algorithm SHA256 -ErrorAction Stop

            $destHash = Get-FileHash -Path $destFile -Algorithm SHA256 -ErrorAction Stop

        }

        catch {

            Write-Error "Hash calculation failed for $($file.Name): $_"

            $allHashesMatch = $false

            continue

        }

        # Compare hashes

        if ($sourceHash.Hash -ne $destHash.Hash) {

            Write-Error "Hash mismatch: $($file.Name)"

            $allHashesMatch = $false

        }

        else {

            $verifiedFiles++

            Write-Host "Verified: $($file.FullName)"

        }

    }

}

catch {

    Write-Error "Verification failed: $_"

    exit 1

}

# Final results

Write-Host "`nVerification complete:"

Write-Host "Total files checked: $totalFiles"

Write-Host "Successfully verified: $verifiedFiles"

if ($allHashesMatch) {

    Write-Host "`nSUCCESS: All files copied and verified successfully" -ForegroundColor Green

}

else {

    Write-Error "`nWARNING: Some files failed verification. See above for details."

    exit 1

}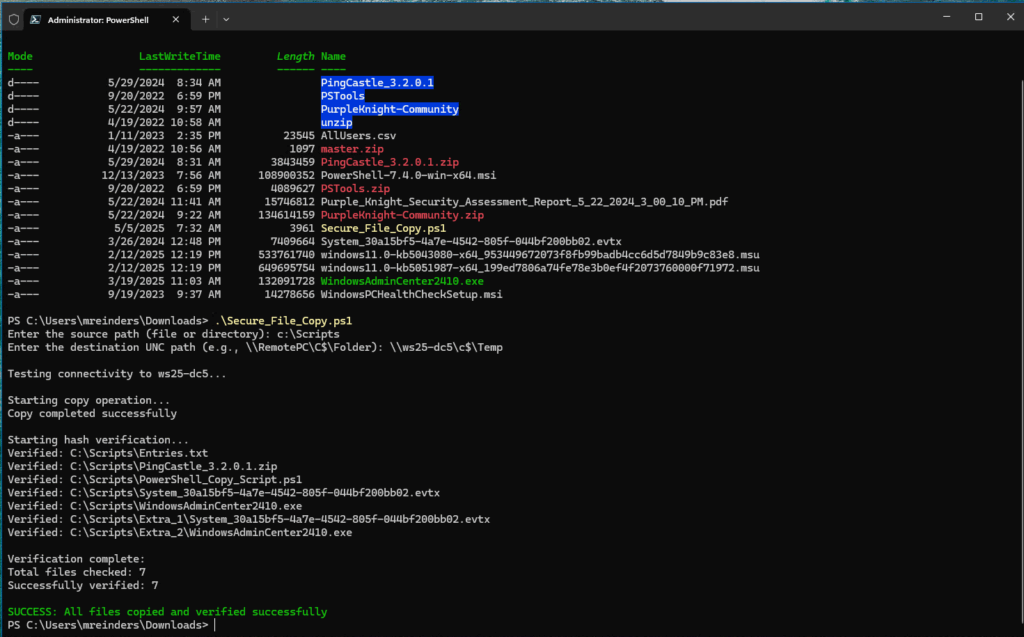
As you can see in the output, the script first checked network connectivity to the remote machine (WS25-DC5), then copied the files, and finally ran hash calculations to confirm the validity of the files in the destination folder. The script also contains a good deal of error handling and syntax checks to confirm if the user is intending to copy a single file, or many.
Plus, the script will create the folder in the destination if it’s not already there. Robust scripts like this mean you can be assured your scripts will handle more of your complex needs.
Best practices with PowerShell Copy-Item
Let me list some of the common parameters you can use with Copy-Item.
-Path: Specifies the source file or folder to copy.-Destination: Defines the target location where the item will be copied.-Recurse: Copies all subdirectories and their contents.-Force: Overwrites existing files or folders without confirmation.-Filter: Limits the items copied by a specific condition (e.g.,"*.txt"to copy only text files).-Include: Specifies certain file types or names to include in the copy (e.g.,*.log, *.csv).-Exclude: Defines items to exclude from the copy operation (e.g.,"*.tmp"to skip temporary files).-Container: Determines whether to copy the folder itself or just its contents ($truekeeps the container,$falsecopies only contents).-PassThru: Returns details about copied items, useful for further processing.-Confirm: Prompts for confirmation before executing the command.-WhatIf: Simulates the command without actually performing the action.-ErrorAction: Defines how errors are handled (e.g.,Stop,Continue,SilentlyContinue).-Verbose: Displays detailed output of the copy operation.
The -WhatIf parameter is rather helpful. Let’s try an example.
Copy-Item -Path “C:\Scripts” -Destination “F:\More_Files” -WhatIf
This will give you final confirmation on what action the command ‘would’ perform if you omitted the parameter. A sanity check, per se.
You can also use the ‘-Confirm’ parameter to prompt you before executing the command.
Copy-Item -Path “C:\Scripts” -Destination “F:\More_Files” -Confirm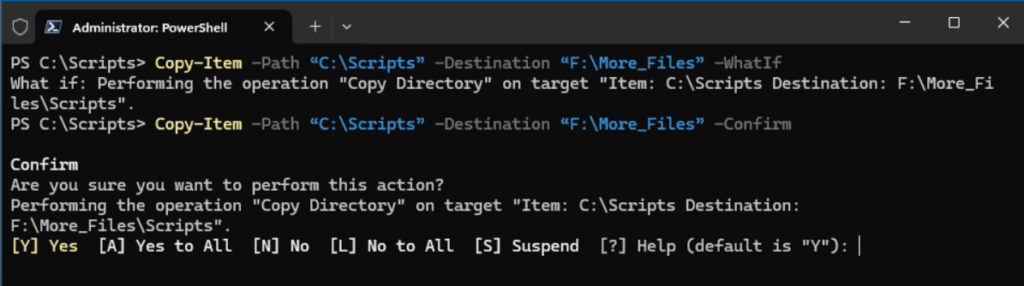
Now you’ll have a safety net when working through these commands and your syntax before overwriting thousands of files in the destination path!
Frequently asked questions
How do you copy a file without extension in PowerShell?
To copy a file without an extension in PowerShell, you can use the Copy-Item cmdlet with a wildcard filter or specify the exact file name if known:
Copy-Item "C:\source\file" -Destination "C:\destination\file"
If you’re targeting all files without extensions in a folder:
Get-ChildItem "C:\source" | Where-Object { -not $_.Extension } | ForEach-Object {
    Copy-Item $_.FullName -Destination "C:\destination\"
}
This command lists all files without an extension and copies them to the destination folder.
How to copy a file from local to remote server using PowerShell?
To copy a file from a local system to a remote server, you can use PowerShell Remoting (Invoke-Command and Copy-Item) or a file share path. Here’s an example using PowerShell Remoting:
Copy-Item -Path "C:\local\file.txt" -Destination "\\remoteserver\C$\target\path" -Credential (Get-Credential)
Alternatively, if remoting is enabled:
Invoke-Command -ComputerName remoteserver -ScriptBlock {
    Copy-Item -Path "C:\temp\file.txt" -Destination "D:\data"
} -Credential (Get-Credential)
Note: Ensure administrative privileges and remote access are correctly configured.
How do I copy all files in a folder and subfolders in PowerShell?
Use the -Recurse parameter with Copy-Item to copy all files and folders, including subfolders:
Copy-Item -Path "C:\source\*" -Destination "C:\destination" -Recurse
This will maintain the directory structure and copy everything within the source directory.
How do you copy the folder structure of a folder and paste it in a new folder?
To replicate the folder structure without copying the files, you can use Get-ChildItem and New-Item:
$source = "C:\source"
$destination = "C:\destination"

Get-ChildItem -Path $source -Recurse -Directory | ForEach-Object {
    $dest = $_.FullName.Replace($source, $destination)
    New-Item -ItemType Directory -Path $dest -Force
}
This copies the full directory tree, excluding the files.
How to copy multiple files from one folder to another using PowerShell?
You can use Copy-Item with wildcards or filter specific files:
Example 1: Copy all .txt files
Copy-Item "C:\source\*.txt" -Destination "C:\destination"
Example 2: Copy files listed in an array
$files = @("file1.txt", "file2.docx", "file3.jpg")
foreach ($file in $files) {
    Copy-Item "C:\source\$file" -Destination "C:\destination"
}
This is useful for selectively copying specific files.

Michael has been an IT Pro since 1998. He has worked predominantly in the Windows world including client and server operating systems, on-prem systems engineering (AD, DNS, etc.), and over the last ten years or so has embraced and immersed himself in...


