- Blog
- PowerShell
- Post
Install Git on Windows
Manage your scripts using Git for Windows and GitHub, a version control system.

In this article, I’ll show you how to quickly install Git on Windows, set Visual Studio Code (VS Code) as the default editor, and install the GitHub CLI, all using the command line.
Install Git on Windows
In this example, we’ll use the winget and git commands to install and configure Git on your local PC.
- Open a command prompt or Windows Terminal
- Run the following WinGet command to install the latest version of Git
winget install --id Git.Git -e --source winget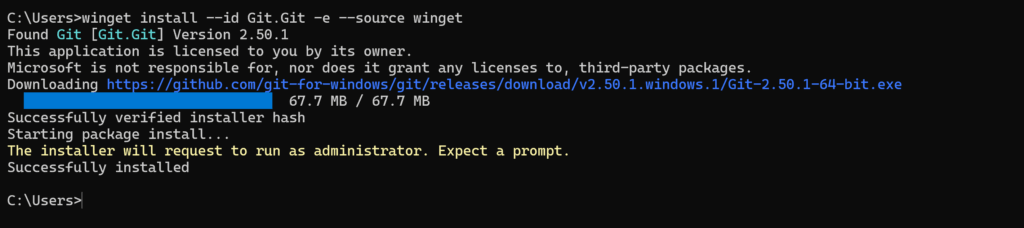
Git will now be available from the command line and PowerShell. You will also find the Git GUI and Git Bash applications installed on your PC.
- Once the installer has finished running, restart the command prompt or Windows Terminal.
- Use the following command to check the version of Git installed:
git --version
Set Visual Studio Code as the default Git code editor
Now let’s set VS Code as the default code editor for Git. If you don’t already have VS Code on your PC, you can install it using WinGet:
winget install -e --id Microsoft.VisualStudioCodeNow let’s set VS Code as the default code editor for Git:
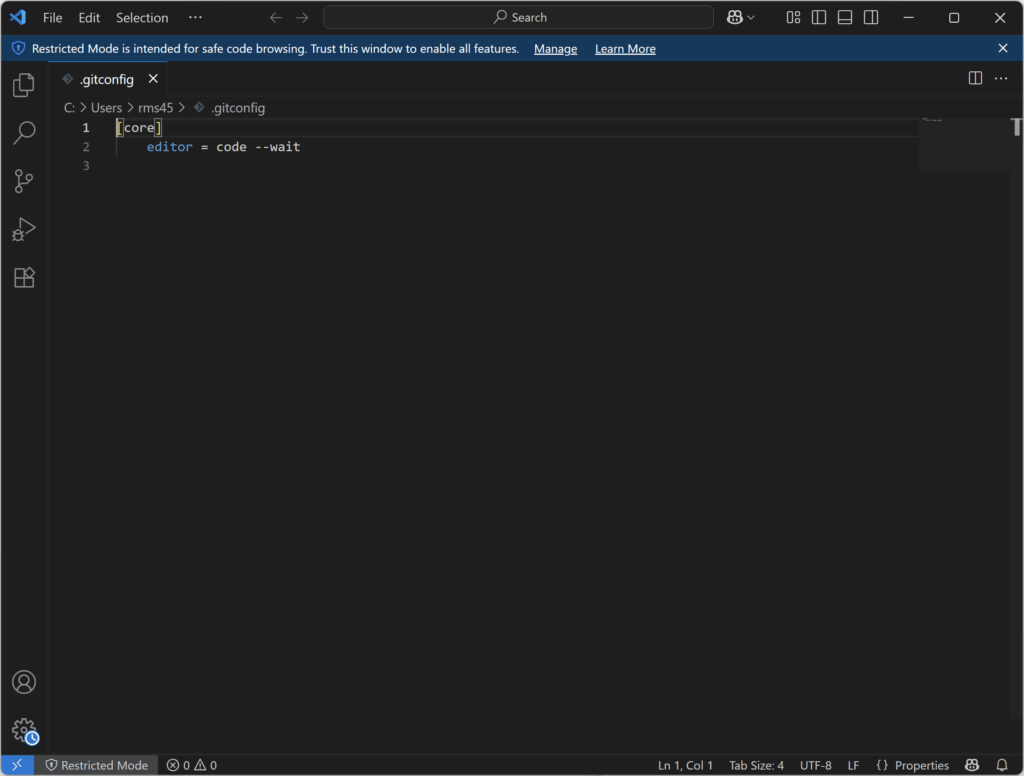
- Modify the Git configuration file using the following command
git config --global core.editor "code --wait"- Now open the .gitconfig configuration file. If the default editor has been correctly set to VS Code it will open and display the Git confg file:
git config --global -e- You will need to trust the VS Code window before the Git extension is available:
Install GitHub CLI
This step is optional, but if you want to create and work with repositories hosted on GitHub, it’s also handy to have the GitHub CLI installed on your PC.
- Run the command below to install the GitHub CLI:
winget install --id GitHub.cli- Provide admin credentials if prompted.
- Once the installer has finished, restart your command prompt or Windows Terminal window.
- Run the following command to check the GitHub CLI was successfully installed:
gh --versionAuthenticate to GitHub
Now you need to authenticate to GitHub before you can start working with remote repositories (repo):
- Run this command and follow the prompts to authenticate with GitHub:
gh auth login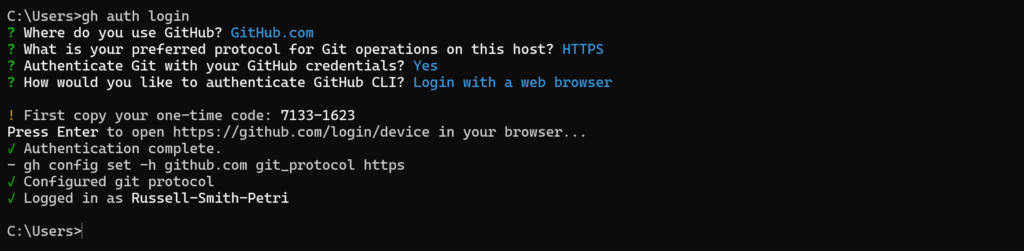
Now you can start using the git and gh command line tools to manage remote and local repositories.
Why use Git to manage PowerShell scripts?
Whether you are working alone or with a team, using Git adds version control to your scripting efforts. Git is to code what SharePoint is to document management. Here are some advantages of using Git to manage your PowerShell scripts:
- Version control Track every change you make. If a script breaks after an edit, you can roll back to a working version.
- Change history and audit trail Git logs who changed what and when—perfect for debugging or compliance.
- Collaboration made easy Share scripts with teammates, review changes, and merge improvements without overwriting each other’s work.
- Safe storage and backup Hosting your scripts on platforms like GitHub or GitLab means they’re backed up and accessible from anywhere.
- Experiment without fear Create branches to test new features or refactor code. If it works, merge it. If not, discard it—no harm done.
- Documentation and comments Commit messages act like mini-journals, explaining why changes were made. It’s like leaving breadcrumbs for your future self.
- Integration with CI/CD tools
You can use the POSH-GIT PowerShell module to manage Git instead of the git command line. POSH-GIT is installed as part of Git for Windows.
Do I need to install Git for Windows if I have already installed GitHub Desktop?
A version of Git is bundled with GitHub Desktop (GitHub for Windows). So, technically you don’t need to install Git for Windows if you are already using GitHub Desktop. But if you want access to Git Bash and the full range of Git commands, you’ll need to install Git for Windows.
Why install Git locally?
If you want to perform any of the following operations, you’ll need to have Git installed locally on your PC:
- Clone repositories to your machine
- Make commits from the command line
- Push and pull changes
- Use Git features like branching, merging, or rebasing
Frequently asked questions
How do I install Git in Windows?
To install Git on Windows, download the latest installer from the official Git website. Run the installer, follow the setup wizard, and choose your preferred options (such as default editor and PATH settings). Once installed, you can verify by opening Command Prompt or PowerShell and typing git --version.
Is there a Git for Windows?
Yes. Git for Windows is a specific version of Git tailored for the Windows operating system. It includes the Git command-line tools and Git Bash, a terminal emulator that supports Unix-style commands. You can get it from gitforwindows.org.
Where is Git installed on Windows 10?
By default, Git is usually installed in C:\Program Files\Git or C:\Program Files (x86)\Git. You can also check the installation path by typing where git in Command Prompt or PowerShell. This command will display the exact directory where Git is located.
How to install Git using pip?
Git cannot be installed using pip because it is not a Python package; it’s a version control system. To install Git, you need to download the installer from the official Git website or use a package manager like Chocolatey (choco install git) or Winget (winget install --id Git.Git -e).
Russell Smith, the Editorial Director at Petri IT Knowledgebase, has over two decades of hands-on experience in IT, in both small business settings and government IT infrastructure projects. Russell started writing for Windows IT Pro Magazine in t...


