How to Write and Run a PowerShell Script File on Windows 11
- Blog
- PowerShell
- Post

PowerShell is a command-line tool developed by Microsoft for automating common administrative tasks. A script is a collection of PowerShell commands, stored into a text file, with a *.ps1 file extension. When executing a PowerShell script, the interpreter reads the file and runs the commands sequentially.
You can create a PowerShell script using any text editor (even NotePad). But preferably, it is recommended to use a PowerShell script editor. The default editor included in Windows is the PowerShell Integrated Scripting Environment (PowerShell ISE). It includes useful functions like color coding, code completion, syntax checking, debugging, auto-save, crash protection, etc.
Microsoft has a free cross-platform code editor called Visual Studio Code (VS Code), which is available for Windows, Linux, and macOS. It supports a variety of programming languages through extensions that you can install, including PowerShell.
One advantage of Visual Studio Code is that it supports the most recent versions of PowerShell, while the PowerShell ISE only supports up to PowerShell version 5.1.
How to run a PowerShell script (quick guide)
Here’s a quick rundown of how to run a PowerShell script. The following method works for PowerShell scripts that don’t have required parameters and don’t return output to the command prompt.
- Right click the PowerShell script in File Explorer.
- Select Run with PowerShell from the context menu.
- The script will run with an execution policy of Bypass. The execution policy for the computer or user isn’t changed.
For more details on writing and running PowerShell scripts, keep on reading!
How to create PowerShell scripts
There are a couple of ways you can create PowerShell scripts:
- With the cross-platform code editor Visual Studio Code
- With the PowerShell ISE
- Or any other text editor, i.e. NotePad
Creating PowerShell scripts with Visual Studio Code
Visual Studio Code is not available out of the box on Windows, so it has to be downloaded from the dedicated Visual Studio website. In our case, we need to download the Windows distribution, which is available for 64-bit, 32-bit, and ARM systems.
Here are the different steps you need to follow after installing the app. First, you’ll need to open Visual Studio Code from the Start menu.
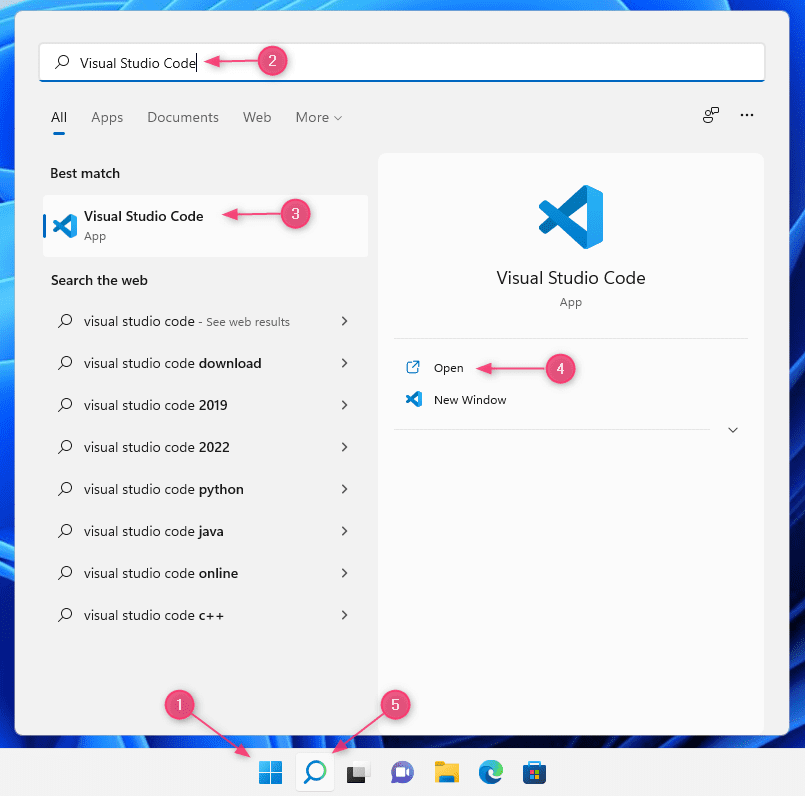
Install the PowerShell extension
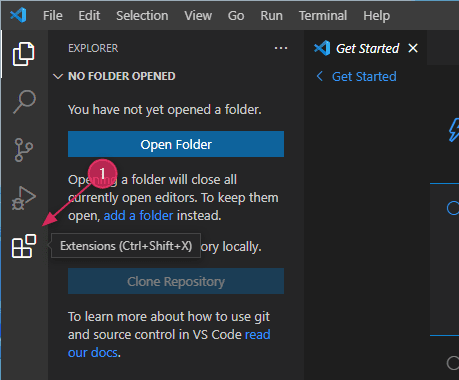
Open the extensions menu by clicking on the extension icon shown in the figure below, or use the keyboard shortcut Ctrl + Shift + X.
Type powershell in the search box, select the most downloaded option as shown below, ensuring you download the extension provided by Microsoft. Then click Install.
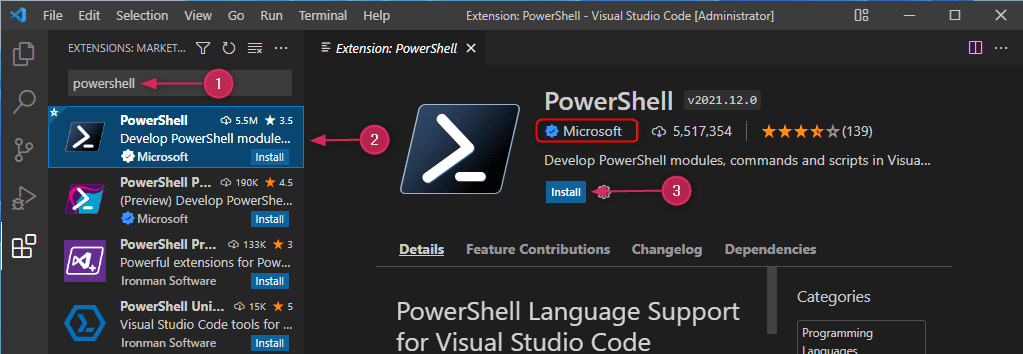
When the installation completes, you will not see any confirmation. However, you’ll see that the Install button has been replaced by Disable and Uninstall options.

How to create a PowerShell script with Visual Studio Code
To create a new PowerShell script, go to File > New File, or use the keyboard shortcut Ctrl + N.

To specify that the new file is a PowerShell script, click on Plain Text on the lower left side, or Select a Language in the script pane. Either option will send you to the Select a Language Mode box. Type powershell and then select PowerShell.

This will trigger the PowerShell Extension, and you will see a change in behavior and functionality. First, you will notice that the icon next to File Name will change to PowerShell. Also, you will notice that the PowerShell Console will start, and that’s where you will be able to execute PowerShell commands and scripts.
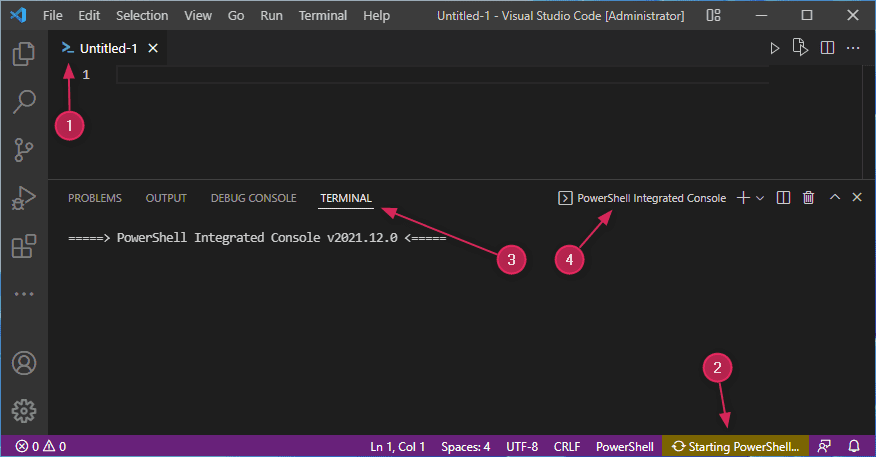
The same result can be achieved by saving the file with a *.ps1 extension.
Type the following commands in the script pane and you’ll appreciate benefits like color coding, command auto-completion, and syntax hints in action:
Write-Host "This is a Visual Studio Code script"
Write-Host "Writing PowerShell Scripts is fun!"
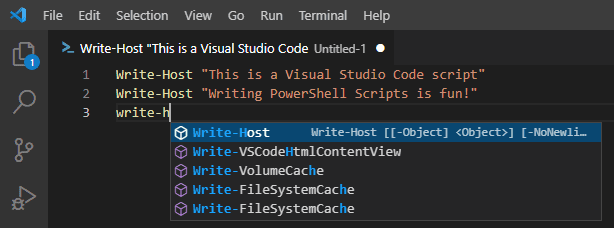
Note: The third line is for demonstration purposes only, to show the command completion option.
To save the file, you can use the File menu: File > Save. You can also the keyboard shortcut Ctrl + S.
Next, use an easy-to-access location, provide the file name, make sure to specify *.ps1 as the file extension, and click Save. In this example, I am storing the file in C:\TEMP\MyVSCodeScript.ps1.
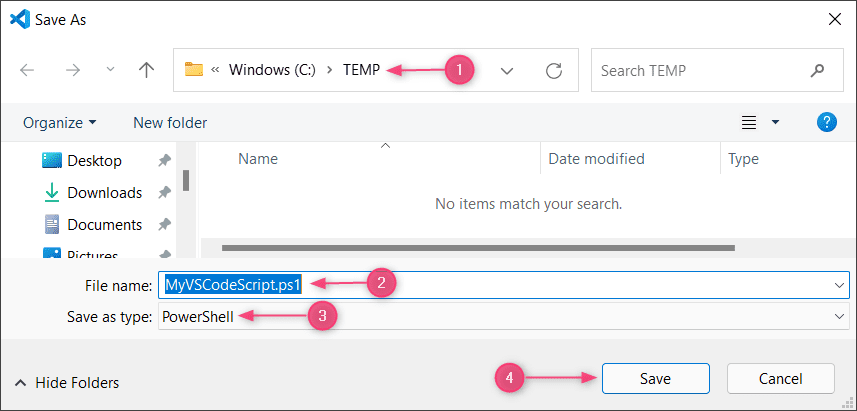
Executing scripts in VS Code will be covered later in the article.
Creating scripts with the Windows PowerShell ISE
To launch the PowerShell ISE, click on the Start button (or Search button) and start typing PowerShell ISE. You will see the application in the search results with different opening options. It is always advisable to use Run as Administrator to ensure that all commands will be executed correctly and not blocked.
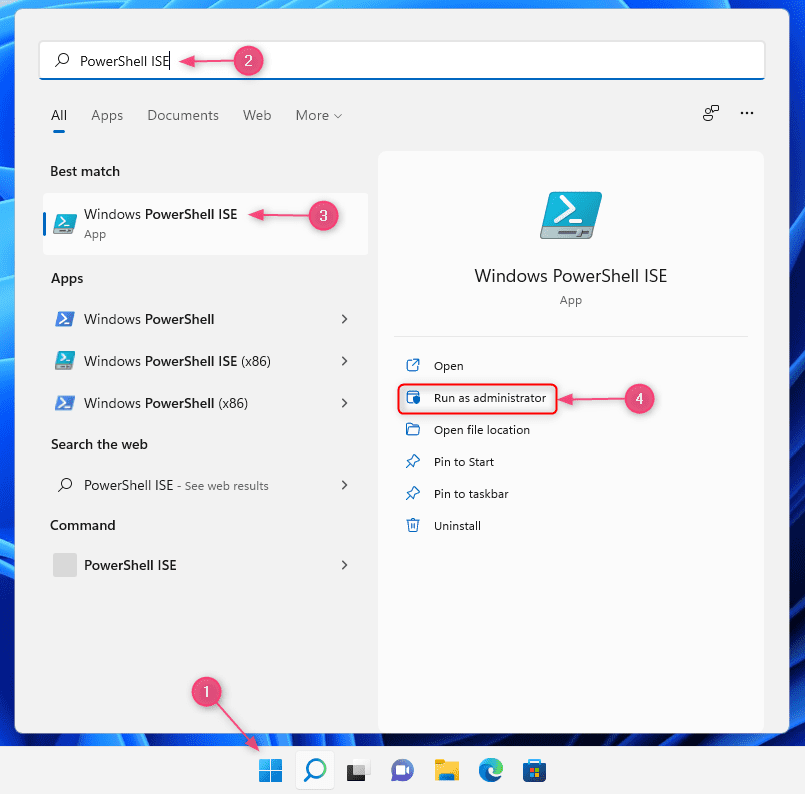
So, let’s create a script in the PowerShell ISE. Write the following lines, and again, you can notice handy features like color coding, command auto-completion, syntax hints, etc.:
Write-Host "This is a PowerShell ISE script"
Write-Host "Writing PowerShell Scripts is fun!"
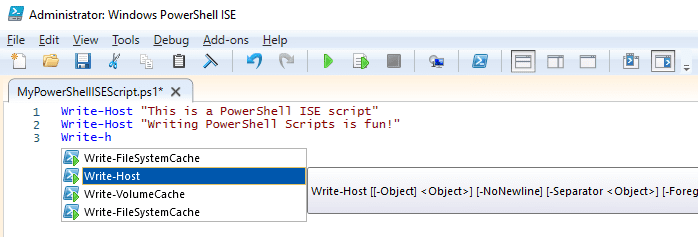
Note: The third line is for demonstration purposes only, to show the command completion option.
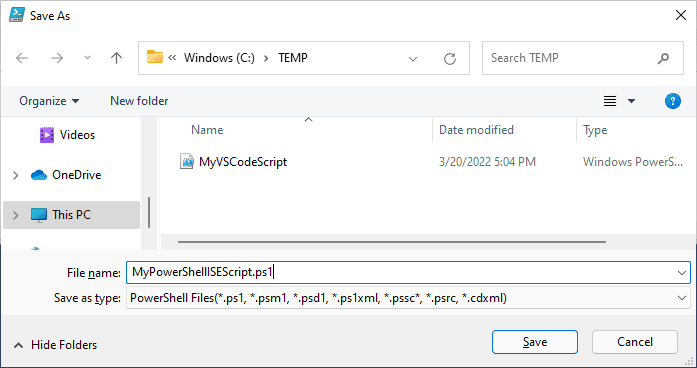
Now let’s save the list of commands as a PowerShell script. To do so, you need click the floppy disk icon on the toolbar, then click on File > Save from the file menu. You can also use the keyboard shortcut Ctrl + S.
In the Save as dialog, choose a folder, provide a file name, specify the *.ps1 extension, and click Save. In this example, I am providing the following name: C:\TEMP\MyPowerShellISEScript.ps1.
Creating scripts with NotePad
It is not recommended to use a basic text editor to write PowerShell scripts, but this is a possibility. Let’s take an example with NotePad
- Open NotePad and type the following commands:
Write-Host "This is a Notepad script"
Write-Host "Writing PowerShell Scripts is fun!

- To save the script, select File > Save.
- In the Save as dialog, choose a folder and provide a file name with the *.ps1 extension. In this example, I am using: C:\TEMP\MyNotepadScript.ps1.
How to run PowerShell scripts
A PowerShell script (*.ps1 file) can be run in the PowerShell console, which recognizes the *.ps1 file type and runs the commands sequentially. You may open the script as a file in code editors like the PowerShell ISE and Visual Studio Code, and run the whole script in the console pane or run only a part of it.
How to enable PowerShell scripts by changing the execution policy
PowerShell’s execution policies are a safety feature that controls the conditions under which PowerShell loads configuration files and runs scripts. It is important to point out that this is not a security system as execution policies can be easily bypassed. However, they help to protect users from executing scripts unintentionally.
The default execution policy for Windows 11 is Restricted. On non-Windows OSes, the default execution policy is Unrestricted, and it cannot be changed.
To view the current execution policy, use the PowerShell command Get-ExecutionPolicy.
You may change the execution policy on Windows using the Set-ExecutionPolicy cmdlet:
Set-ExecutionPolicy -ExecutionPolicy <PolicyName>
The different execution policies will be discussed in the next topic.
Changing the PowerShell execution policy
On Windows, you can set the execution policy for the local machine, the current user, or the PowerShell process.
To list all the available scopes, use Get-ExecutionPolicy -List.
Get-ExecutionPolicy -List
The order matters, so the highest configured item takes precedence. For example, if you have set an execution policy using a group policy, it will take precedence over others.

| Policy | Description |
| Restricted | The default execution policy for Windows client OSes. It does not allow ANY scripts (*.ps1 files) to be executed. Still, you may run individual commands. |
| RemoteSigned | The default execution policy for Windows Server. It Allows running scripts that are created locally. Scripts downloaded from untrusted locations, like the Internet, e-mail, messengers, etc. must be digitally signed by a trusted publisher. You may use the command Unblock-File to allow a script to run on the system. |
| Unrestricted | The default execution policy for non-Windows computers, and it cannot be changed. It allows unsigned scripts to run, but it shows a warning message and asks for confirmation if scripts are coming from an untrusted location. |
| AllSigned | It requires all scripts running on the machine to be digitally signed by a trusted publisher, no matter if they are created locally on the machine or downloaded from the Internet. |
| Bypass | It allows all scripts to run, like Unrestricted, but no confirmation is required. |
| Undefined | There is no execution policy set on the specified scope. If all scopes are set as undefined, then the default execution policies are applied. |
To allow PowerShell to run scripts, you need to use the Set-ExecutionPolicy -ExecutionPolicy <PolicyName> command.
Set-ExecutionPolicy -ExecutionPolicy <PolicyName>
By default, this command applies your chosen policy to the Local machine scope. If you would like to specify a different scope, you must use the parameter -Scope and provide the name of the scope.
For example, the following command sets the execution policy to Unrestricted for the current user:
Set-ExecutionPolicy -ExecutionPolicy Unrestricted -Scope CurrentUser
Running a script with PowerShell
To open the PowerShell console, click on the Start button (or search button), type powershell, and click Run as Administrator.
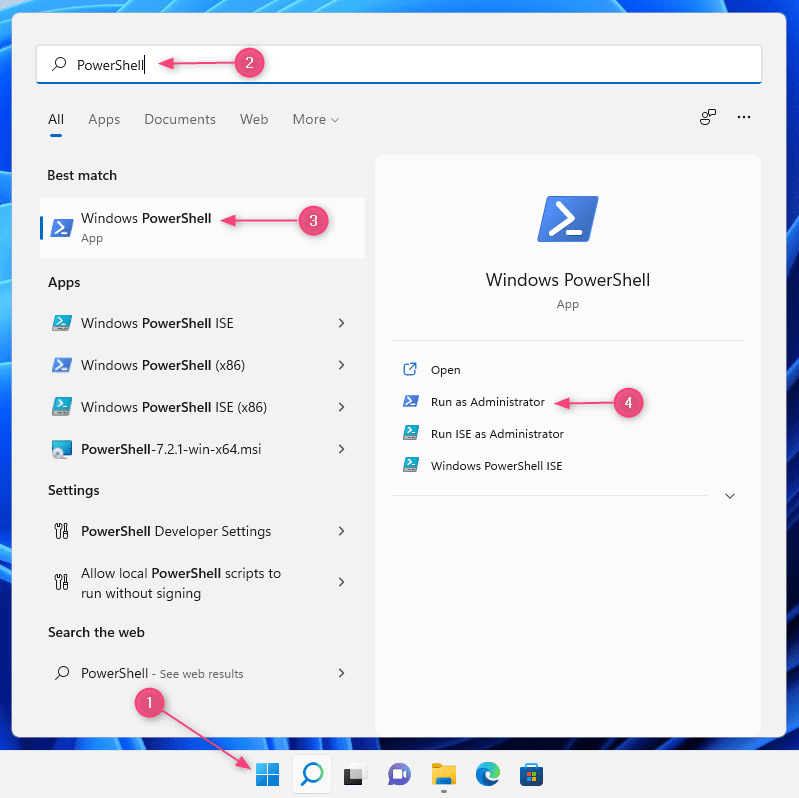
To run a script in the PowerShell console, you can either:
- Use the full path to script, like: C:\TEMP\MyNotepadScript.ps1
- Or use just the script name, from the folder where the file is located: .\MyNotepadScript.ps1
Running a PowerShell script in Visual Studio Code
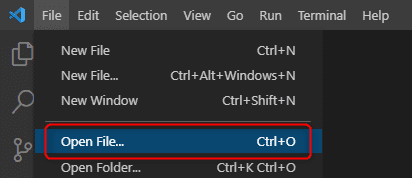
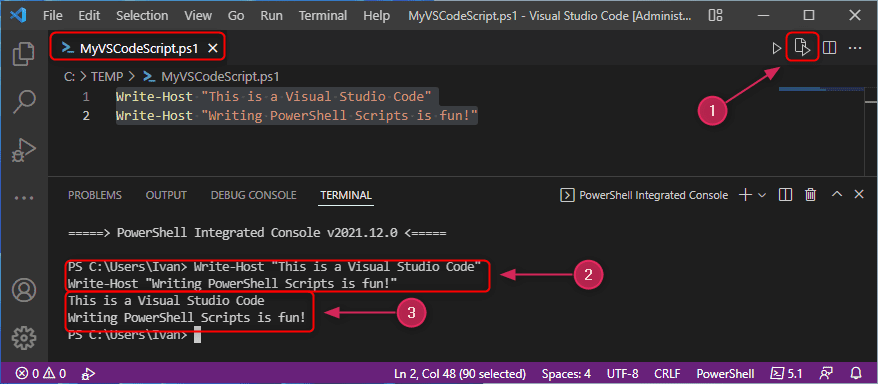
To run a script in Visual Studio Code, you first need to start the application and open the script file created earlier (C:\TEMP\MyVSCodeScript.ps1).
- Select File > Open File or use the keyboard shortcut Ctrl + O.
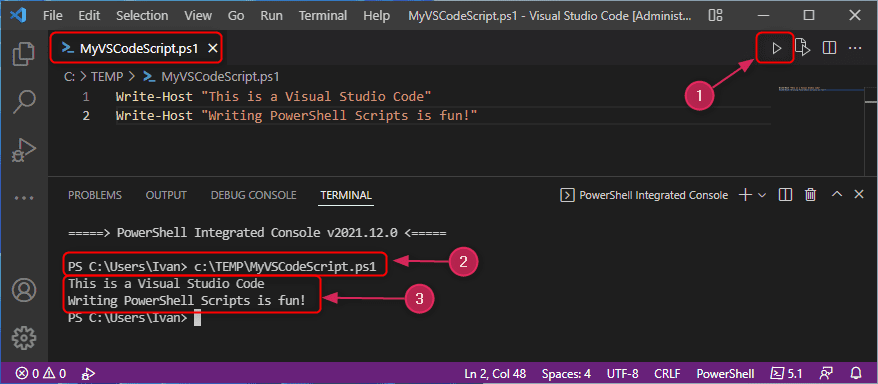
- With the script loaded in VS Code, you may execute it by clicking on the Run button in the top right corner, or by pressing F5 on your keyboard.
The script will be executed in the console pane, where you will see the output of the script.
Another option would be to run only a part of the script (Run Selection). This is often useful when you’re creating your script and you would like to confirm that parts of it behave as expected.
- To run a selection of the script, highlight the part you would like to execute.
- Click on Run Selection in the top right corner of the console, or press F8 on your keyboard.
This time, VS Code executes only the selected lines of code in the console pane.
Running a script in the PowerShell ISE
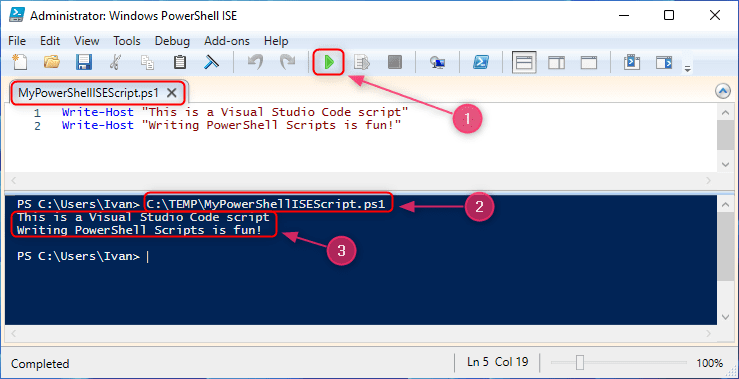
Running scripts in the PowerShell ISE is quite similar.
- Launch the PowerShell ISE.
- Open the script from the earlier demonstration (in this case – C:\TEMP\MyPowerShellISEScript.ps1) using File > Open, or the Open icon from the toolbar, or the keyboard shortcut Ctrl + O.
- Select the script file and click Open.
To execute the whole script, use the Run button on the toolbar or press F5 on your keyboard. This will execute the script file in the console pane, returning the result.
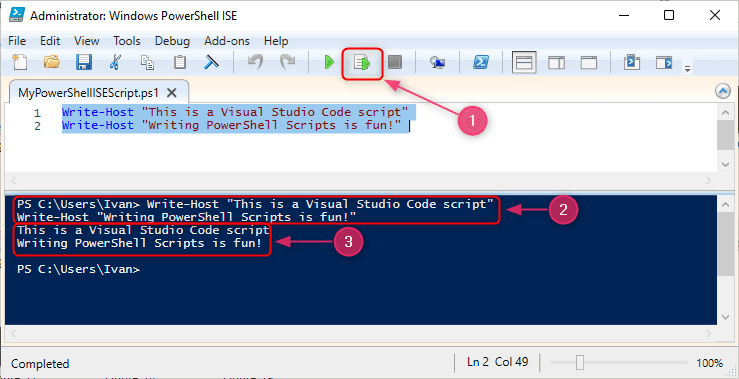
If you need to execute only part of the script, highlight the section and select Run Selection from the toolbar, or press F8 on your keyboard. Again, the PowerShell ISE will only execute the selected lines of code.
Running a PowerShell script from the Command Prompt
If *.ps1 files are interpreted by PowerShell, the Command Prompt (CMD) cannot work with PowerShell scripts directly. If you would like to run a PowerShell script in CMD, you’ll need to execute it by calling the PowerShell process with the -File parameter, as shown below:
PowerShell -File C:\TEMP\MyNotepadScript.ps1.
Conclusion
PowerShell scripts are a great way to automate repetitive tasks. Follow the general rule: “If you need to do something more than once, script it,” and you cannot go wrong!
Related article:


