Get-ADComputer: The PowerShell Command for Managing Active Directory Computers

The Get-ADComputer PowerShell cmdlet is a powerful tool for managing AD computers. It can be used to retrieve information about computer objects, search for computer objects based on specific criteria, and perform various actions on computer objects.
🎬 Watch This Week in IT.
What is Get-ADComputer used for?
Get-ADComputer is a PowerShell cmdlet that retrieves one or more computers from Active Directory. It can be used to retrieve a single computer by specifying its distinguishedname, GUID, security identifier (SID), or SAMaccountname. Alternatively, it can be used to search for and retrieve multiple computers by using the Filter or LDAPFilter parameters. I’ll touch on those later on.
The basics of Get-ADComputer
Whether you’re a network administrator, IT professional, or just curious about your network’s computer infrastructure, Get-ADComputer can provide essential insights.
It is a powerful tool that can be used to perform a variety of tasks, such as:
- Listing all computers in a domain
- Finding computers that meet specific criteria, such as operating system, location, or department
- Exporting computer information to a file or database
- Managing computer objects
The Get-ADComputer cmdlet, part of the Active Directory module (RSAT), has a number of parameters that can be used to control its output. For example, the Identity parameter can be used to specify a specific computer object’s name or distinguished name. The Filter parameter can be used to search for computers that meet specific criteria. The Properties parameter can be used to specify the properties that should be returned for each computer object. We’ll dig deeper into these concepts soon.
Commonly used Get-AdComputer parameters
And here we are, delving deeper. Let’s go through some of the basic parameters used with Get-ADComputer.
The easiest way is to start with the basics. You can run this command to list ALL computer objects in your current AD domain. Use the ‘|’ (pipeline) command and ft (Format-Table name) to make things easy to read on screen.
Get-ADComputer -Filter * | ft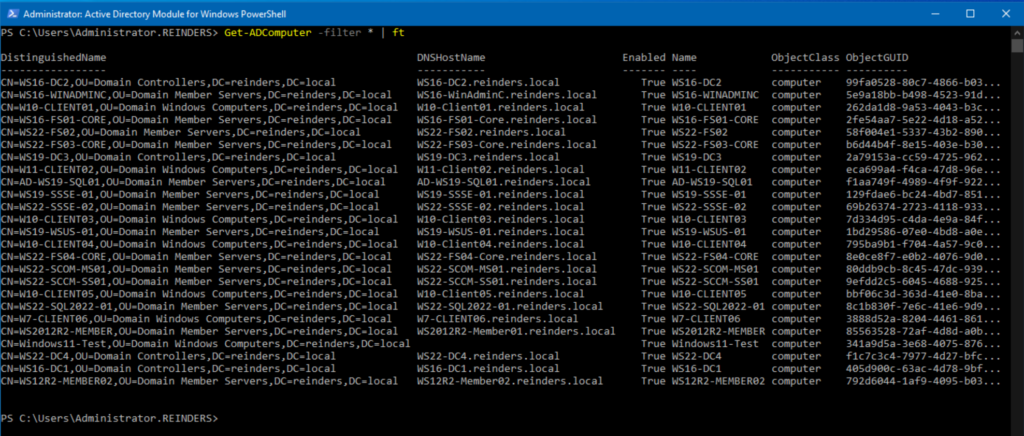
Here are all of the computers in my domain, including domain controllers.
Using -SearchBase to limit results to specific OUs in AD
The -SearchBase parameter is used to specify the distinguished name (DN) of the search base for the query. This is also sometimes described as changing the ‘searchscope’ of the command. This parameter limits the search to a specific Organizational Unit (OU) or its child OUs.
Here is an example of how to use Get-ADComputer with the -SearchBase parameter.
Get-ADComputer -Filter * -SearchBase "OU=Domain Member Servers,DC=reinders,DC=local"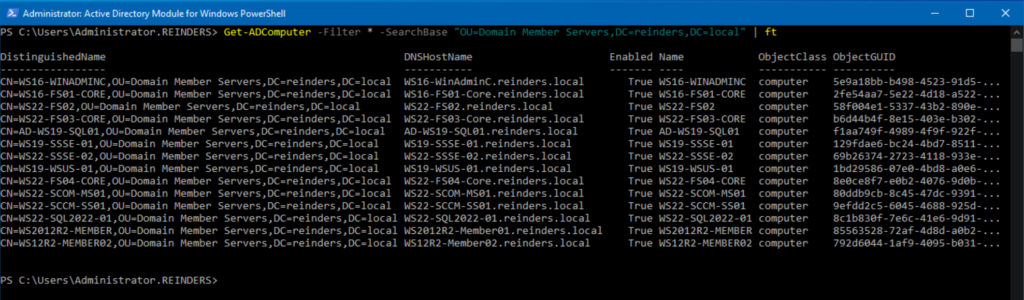
This shows all the computer objects in the specified OU “Domain Member Servers”. Very helpful. And, as you know, PowerShell allows you to get this information and then optionally pipe this to, as an example, Set-ADComputer, and modify the same attributes on a small or large list of computer objects in one command!
To search for computer objects using the CN= attribute, you can use the -SearchBase parameter with the distinguished name (DN) of the search base for the query. Here is an example of how to use Get-ADComputer to retrieve all computer objects in the Computers container.
Get-ADComputer -Filter * -SearchBase "CN=Computers,DC=reinders,DC=local" | ft
There we can see one computer object in the Computers container. We use ‘CN‘ because that stands for Container whereas ‘OU’ stands for Organizational Unit.
Using Get-AdComputer -Properties
Another handy parameter is the -Properties parameter. It is used to specify the additional properties of the computer object that should be retrieved along with the default set of properties.
Let me show you an example of how to use Get-ADComputer with the -Properties parameter.
Get-ADComputer -Identity "WS19-SSSE-01" -Properties IPv4Address,LastLogonDate,OperatingSystem,OperatingSystemVersion,WhenCreated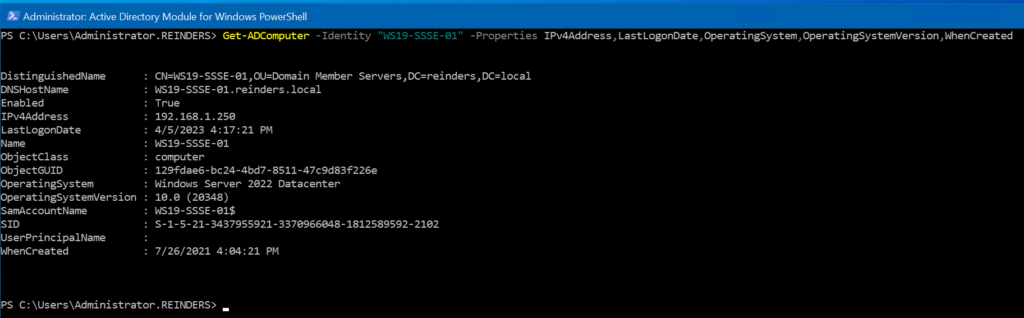
All the pertinent attributes are at your fingertips. IP address, last logon time, operating system…very cool.
Listing, filtering, and sorting results using Get-AdComputer
Let me go into some more detail and depth around finding precisely what you need. As an IT Pro, you get pulled and pinged every day with specific queries from a variety of people in your environment. Hopefully, my examples will boost your efficiency when responding to said queries.
Retrieve a list of computers in an Active Directory domain
Again, we can get a simple listing of all computer objects by using ‘-Filter *’ and piping it to Format-Table.
Get-ADComputer -Filter * | ftThis displays all your computer objects in a simple table format. You can use this output to go a few levels deeper into specific computer objects or specific OUs.
Filtering results based on the computer name
Let’s narrow things down by specifying all computer objects that start with ‘WS19’…
Get-ADComputer -Filter {Name -like "WS19*"}
So quick and easy. We used the -Filter command and checked for objects wherein the ‘Name’ attribute starts with ‘WS19’ with anything else after it. Say that three times fast.
Sorting your results
Next, I’ll show you some examples and methods of using ‘Sort-Object‘ in PowerShell to sort the output of your computer objects in AD.
Get-ADComputer -Filter * | Sort-Object Name | ft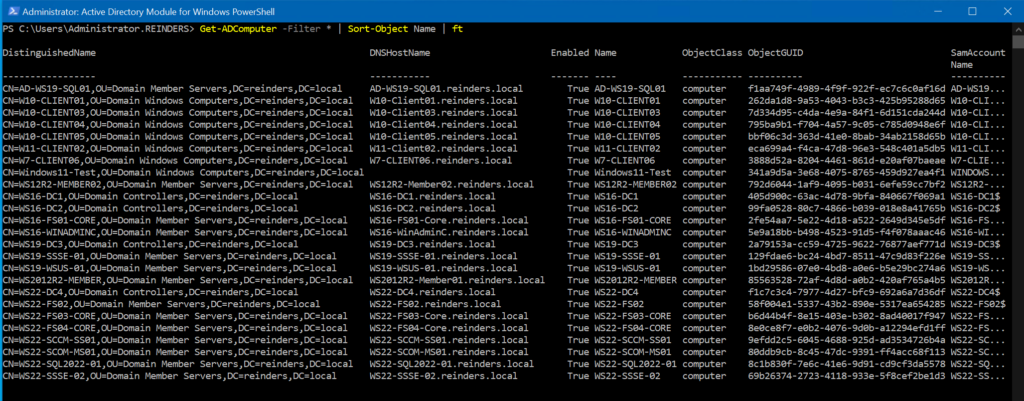
Helpful, helpful, helpful. I can tell you that at least ONE of your supervisors will ask for things to be nice and tidy… and sorted.
Let’s sort them by the operating system.
Get-ADComputer -Filter * -Properties OperatingSystem | Sort-Object OperatingSystem -Descending | ft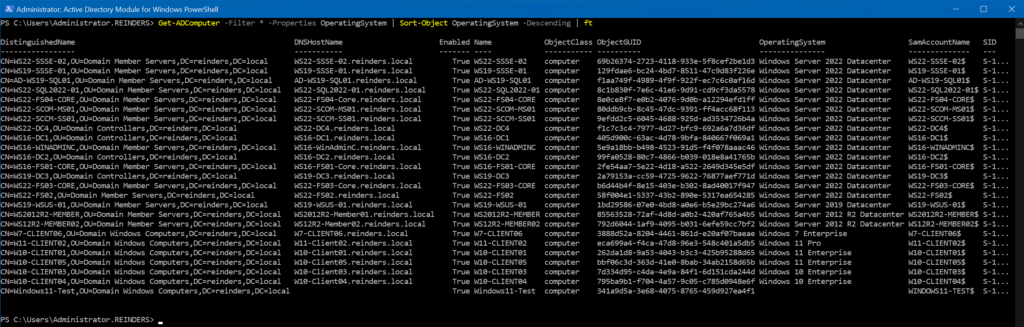
So awesome. There is so much power here. It goes from Windows Server 2022 Datacenter all the way to Windows 10 Enterprise. Slick.
Exporting your results to a CSV file
To export the results of Get-ADComputer to a CSV file, you can use the Export-CSV cmdlet, as you’ve seen before. Here is an example of how to use Get-ADComputer to retrieve all computers in the domain and export the results to a CSV file.
Get-ADComputer -Filter * | Export-CSV -Path "C:\Users\administrator.reinders\Downloads\Computers.csv" -NoTypeInformationI didn’t include a screenshot here as there is no output.
This command retrieves all your computer objects in the domain and it exports them to a CSV file named “Computers.csv” in the location specified in the ‘-Path’ parameter.
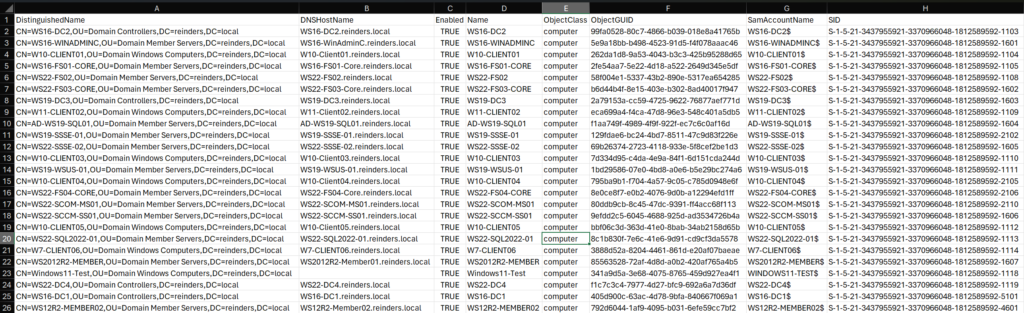
Here’s a snippet from the produced CSV file. The sheer power of using Export-CSV is that you will almost always get a large dataset. You can filter later in Excel. But this will include specific attributes and concepts such as dnshostname, adsearchscope, userprincipalname, objectclass, os version, and more.
Advanced queries
Let me show you some more advanced queries to find more specific pieces of information inside your Active Directory domain.
How to filter for inactive computers using Get-AdComputer
To filter for inactive computers, you can use the LastLogonDate property and the Where-Object cmdlet. Here is an example of retrieving all inactive computers that have not logged on in the last 90 days.
$DaysInactive = 90$time = (Get-Date).AddDays(-($DaysInactive))Get-ADComputer -Filter {LastLogonDate -lt $time} -Properties LastLogonDate | Select-Object Name, LastLogonDate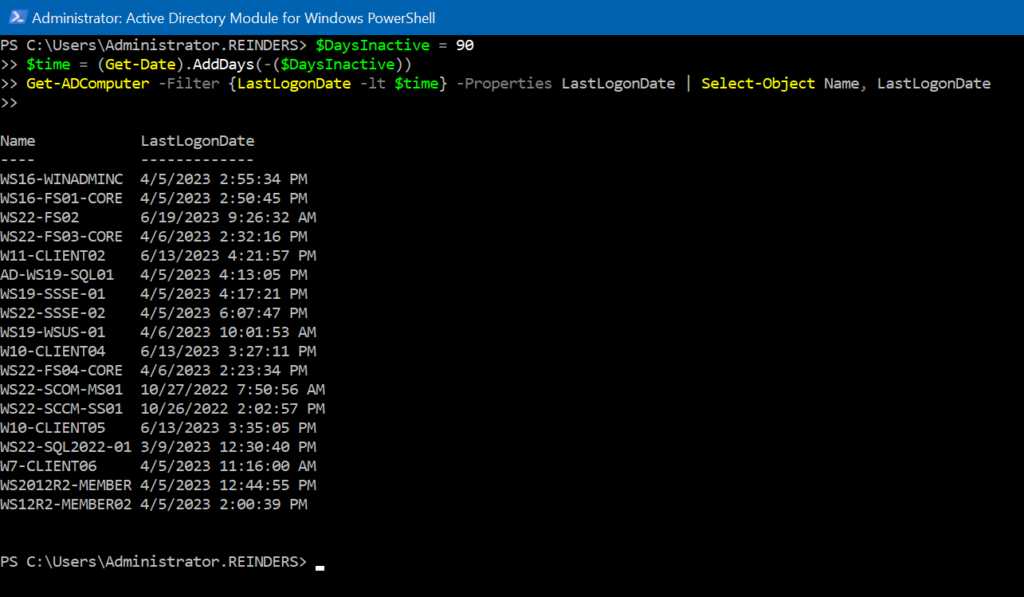
Nice. This is the coolest thing. We get a listing of computer objects that haven’t logged into Active Directory in over 90 days using the date variable. We utilize the LastLogonDate and find objects ‘lt’ (less than) 90 days prior.
Using the Select-Object parameter
You can further refine your query results by using Select-Object to display only the properties you need. Let me show you some helpful examples here.
Get-ADComputer -Filter * -Properties OperatingSystem | Select-Object Name, OperatingSystem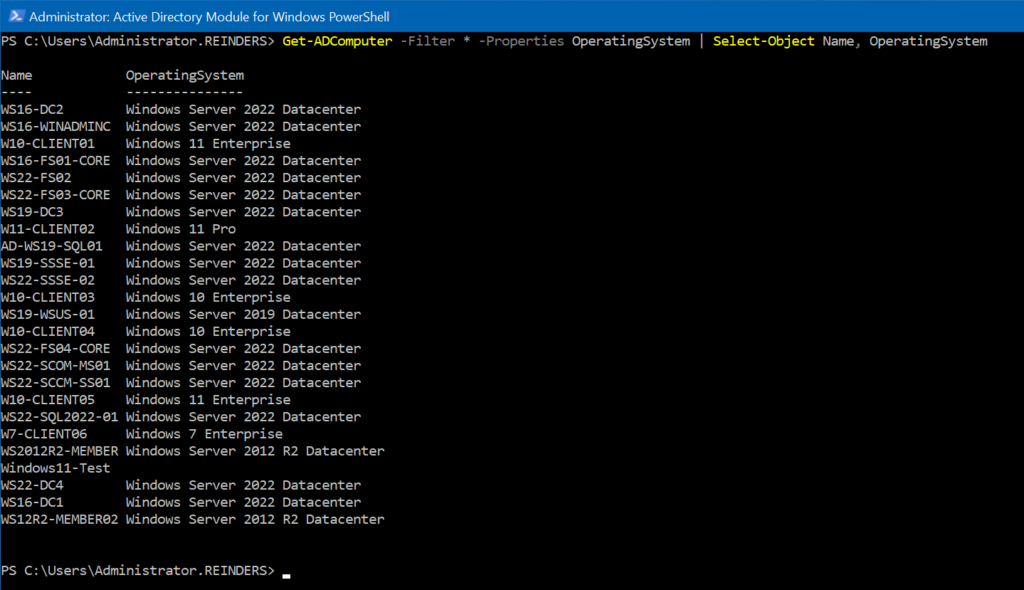
The default list of properties returned with Get-ADComputer does not include ‘OperatingSystem’, so I need to include that with the ‘-Properties’ parameter. And there we are.
Here’s another useful one – you can also use LDAP queries. Here, we query your AD using the ‘LDAPFilter’ parameter to find all the ‘Server’ computer objects. This scans the operatingsystem attribute for anything with ‘server’ in the name.
Get-ADComputer -LDAPFilter "(&(objectCategory=computer)(operatingSystem=*Server*))" -Properties Name, OperatingSystem | ft 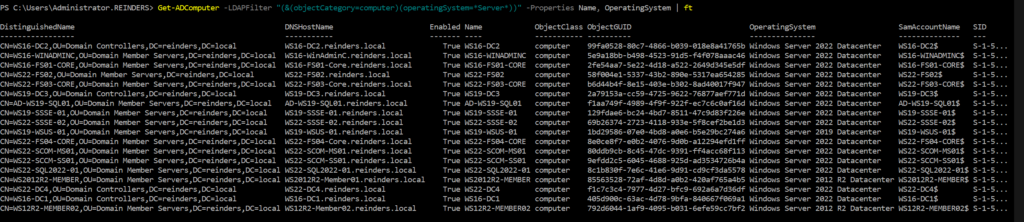
Awesome.
Accessing results from a specific domain controller (-Server)
If you have the need to retrieve the information from a specific domain controller in your environment, you can use the -Server parameter thusly.
Get-ADComputer -Filter * -Server "WS16-DC2.reinders.local" | ft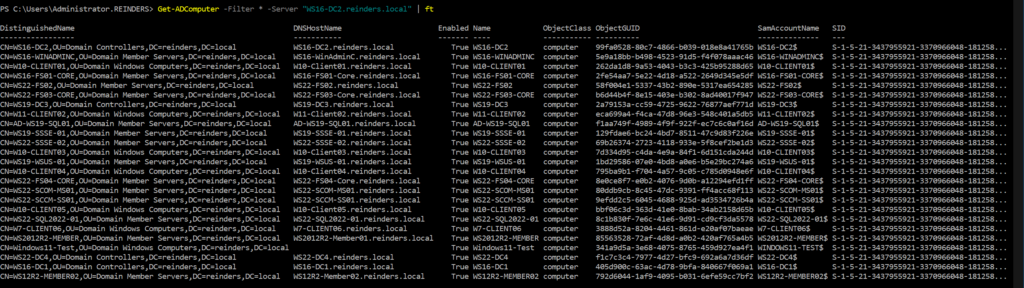
I know there are use cases where this would be useful, but, it is slightly more obscure and therefore is in the ‘Advanced’ section of my post.
Retrieve a single computer or multiple computers by using various Get-AdComputer parameters
In conclusion, Get-ADComputer is a powerful cmdlet that can be used to retrieve computer objects from Active Directory. It can be used to retrieve a single computer or multiple computers by using various parameters such as -Identity, -Filter, -LDAPFilter, -SearchBase, and -Properties.
Some advanced techniques include filtering for inactive computers, searching for computers in a specific OU and its child OUs, exporting results to a CSV file, and sorting results by one or more properties.
IT Professionals can gain a great deal of value by using Get-ADComputer to perform various tasks such as retrieving computer information, generating reports, and automating administrative tasks. By leveraging the power of PowerShell and Get-ADComputer, IT professionals can save time and increase efficiency in their daily tasks.

Michael has been an IT Pro since 1998. He has worked predominantly in the Windows world including client and server operating systems, on-prem systems engineering (AD, DNS, etc.), and over the last ten years or so has embraced and immersed himself in...


