How To Install Active Directory Users And Computers: A Step-by-Step Guide

Active Directory is an essential part of Windows Server. It allows IT pros to manage computer resources on the network. In this guide, we’ll show you how to install Active Directory Users and Computers and the basics of working with it so you can manage Active Directory.
Active Directory Users and Computers (ADUC) is built as an add-on for the Microsoft Management Console (MMC), and it’s the go-to tool for IT Pros to manage their Active Directory (AD) environments. You can use ADUC to:
- Create AD objects like users, groups, organizational units (OUs), and even printers.
- Make changes to existing users, groups, OUs, etc.
- Delegate permissions
- Move FSMO roles
- Raise the domain functional level
- Work with advanced features like the LostAndFound container, NTDS Quotas, Program Data, and System information.
How to install Active Directory Users and Computers
To install Active Directory Users and Computers on Windows 10 and Windows 11, open the Settings app and go into Apps. From there, add the ‘RSAT: Active Directory Domain Services and Lightweight Directory Services Tools‘ optional feature.
Keep reading to learn in more detail about the various methods you can use to install ADUC on your computer.
Why you should install Active Directory Users and Computers on a management workstation
Before we proceed, I want to make the point, as I have in previous articles, that it is highly recommended to install the Active Directory Domain Services tools on your workstation or whatever management workstation you use for daily tasks. Although the tool is installed automatically on your domain controllers (DCs) when you add the Active Directory Domain Services role, it is not recommended to directly work on your DCs interactively.
ADUC vs Active Directory Administrative Center (ADAC)
I will briefly mention that there are actually two tools installed when you follow the steps here to add the Remote Server Administration Tools (RSAT) for Windows: Active Directory Users and Computers (ADUC) and the Active Directory Administrative Center (ADAC). The latter was written more recently and provides a more intuitive and clean interface for your HelpDesk support representative/”junior admins”.
Install Active Directory Users and Computers on Windows 10 and later
Alright, let’s go through the various methods you can use to install Active Directory Users and Computers on your Windows 10/11 workstation. As you’ll see, based on the version of Windows 10 you’re using, you’ll either install an MSI file with the RSAT tools, or access optional features in Windows Settings to install the tools already built-in to Windows 10 as of version 1809.
If you’re running Windows 10 version 1809 or newer, or Windows 11, follow these steps to install the tool. Make sure you are online and are Internet-enabled (The screens for Windows 11 are slightly different, but you should be able to follow along just fine).
- Click Start -> Settings -> Apps.
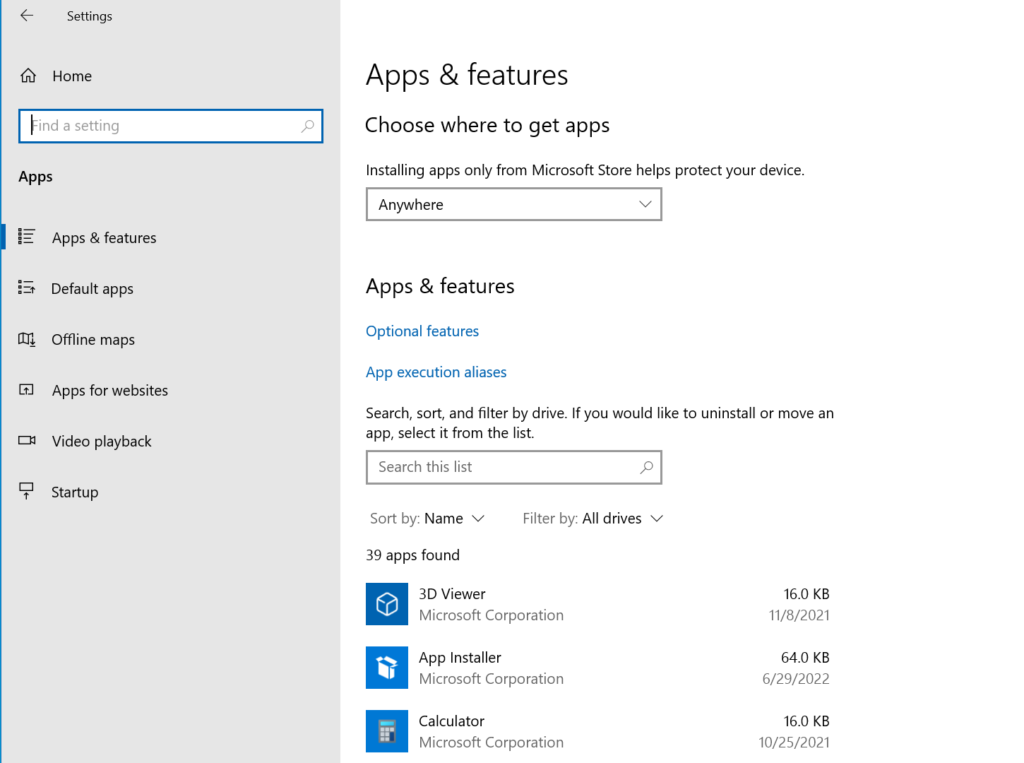
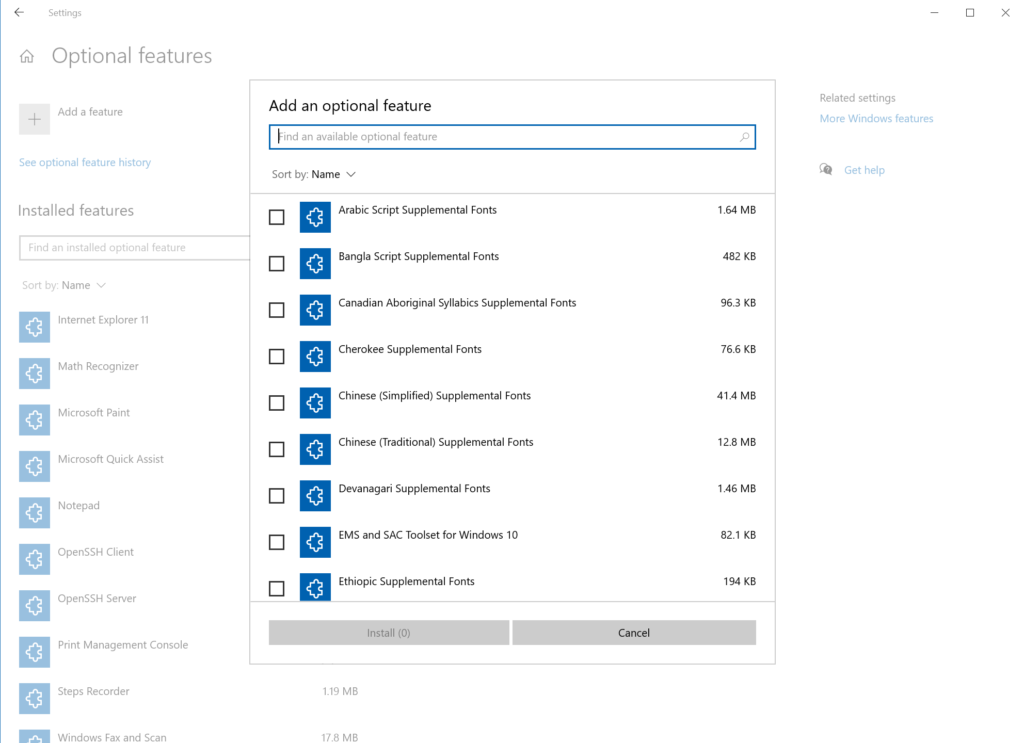
- In the ‘Apps & features‘ section, click ‘Optional features‘. Click the ‘Add a feature‘ plus-sign button.
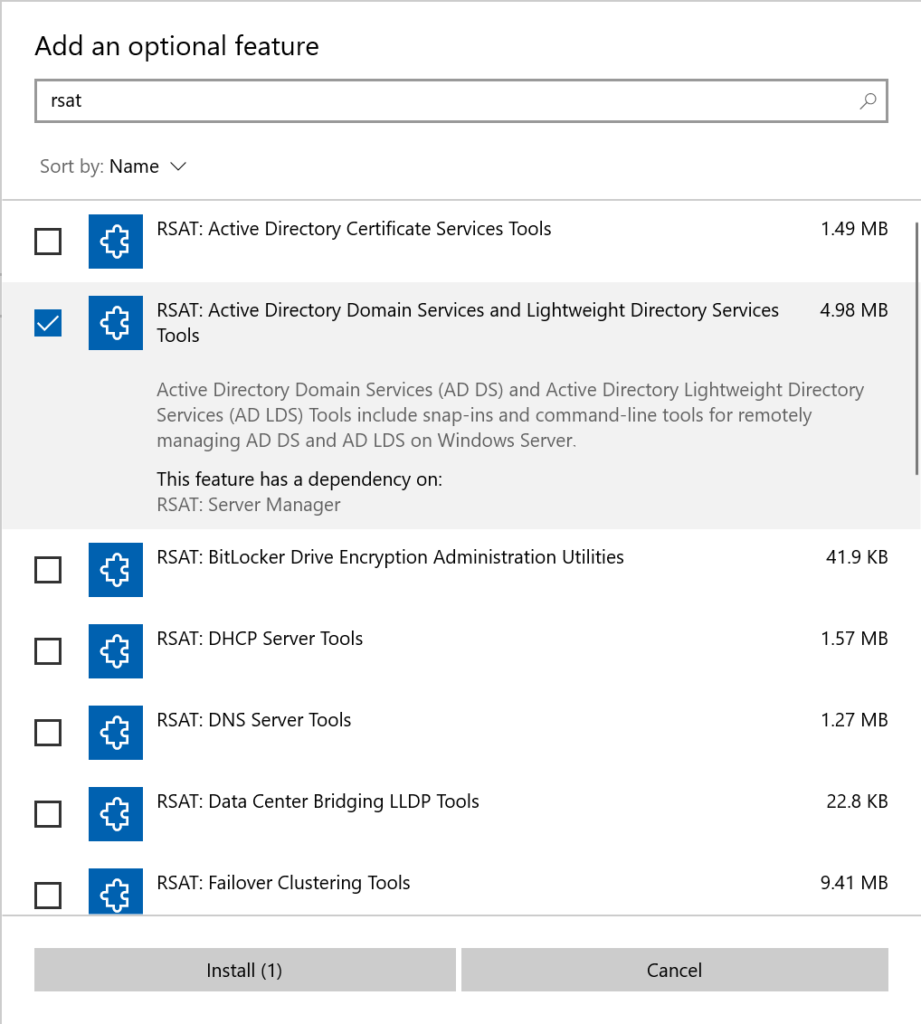
- At the top of the ‘Add an optional feature‘ dialog box, type in ‘rsat‘. Place a checkmark in the item ‘RSAT: Active Directory Domain Services and Lightweight Directory Services Tools,’ and click Install.
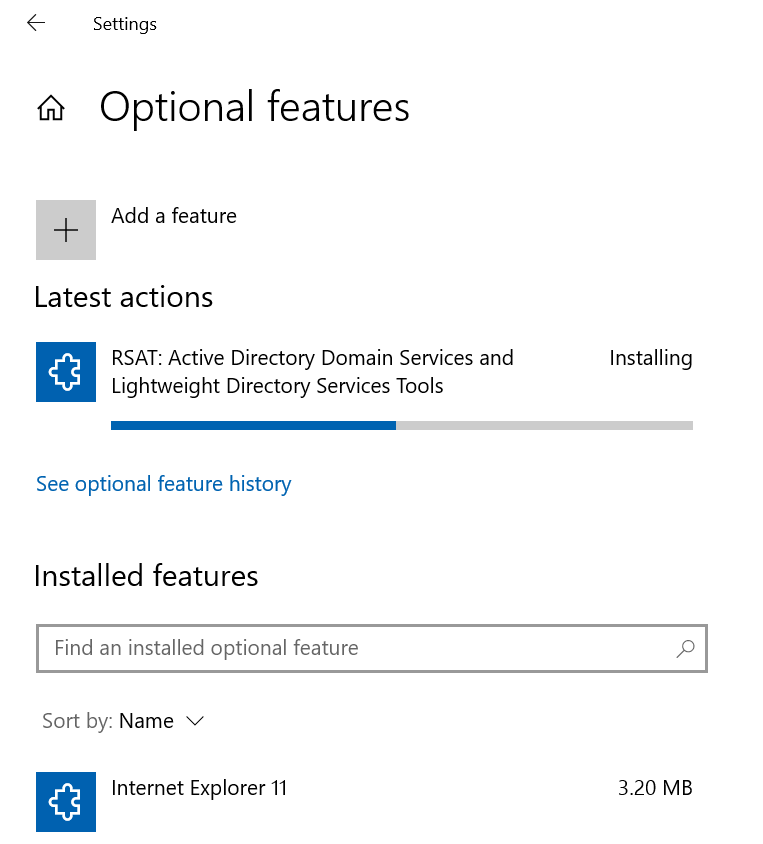
- After clicking Install, you should see some progress…
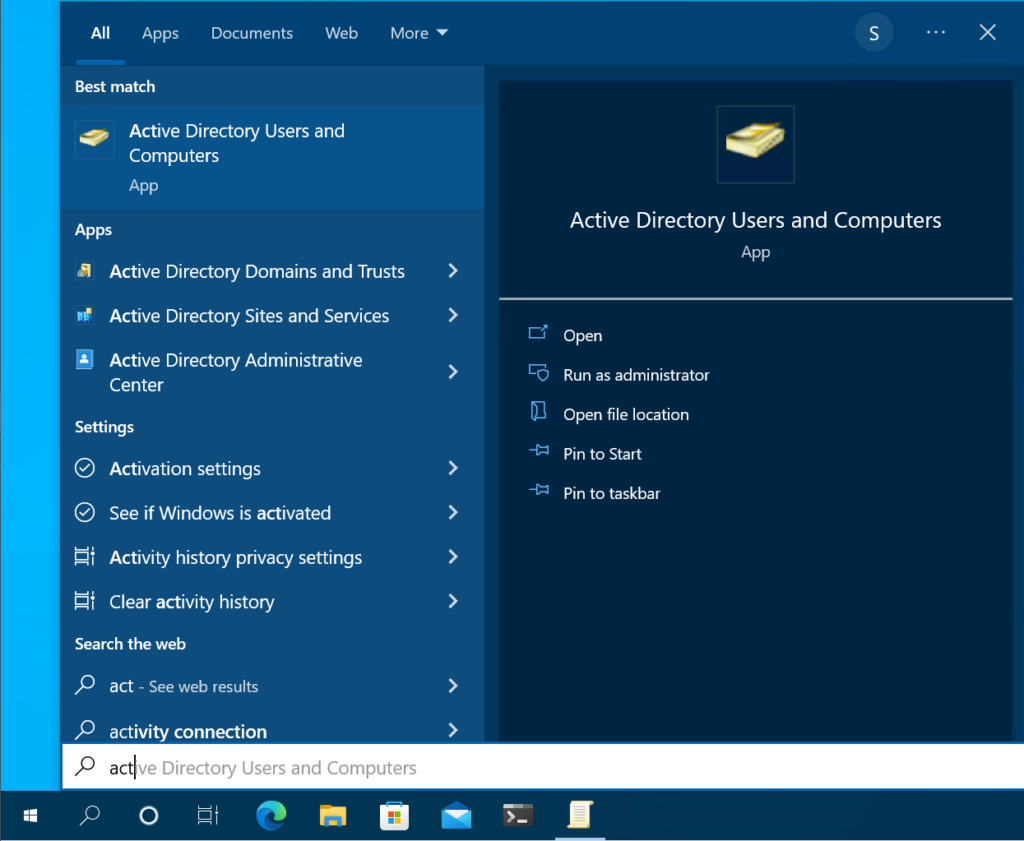
- After installing it, you can find the tool by clicking the Start button, typing in ‘active‘, and clicking ‘Active Directory Users and Computers!
How to install Active Directory Users and Computers on older versions of Windows
If you are still running Windows 10 version 1803 or older (really? Come on. These versions are long out of support…), you can still install Active Directory Users and Computers.
- Download the Remote Server Administration Tools from this link.
- After you’ve downloaded them, simply double-click on the ‘WindowsTH-KB2693643-x64.msu‘ file to install the software on your workstation. After that is complete, you will find the tools again in your Start Menu.
How to open Active Directory Users and Computers
Now that you have the tool installed, let me describe a few ways you can launch the tool. You can use the ‘Run’ command, the Start Menu, and even the Control Panel. Let’s consider each option one by one.
Method 1: The ‘Run’ command
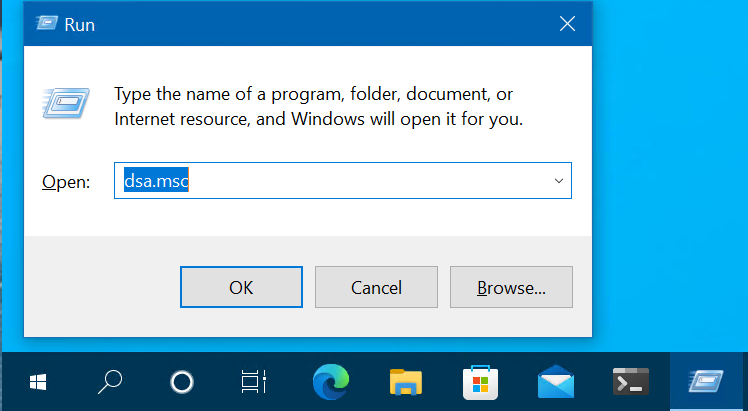
- Press the Windows key down on your keyboard and click ‘R’. Type ‘dsa.msc‘ and hit Enter.
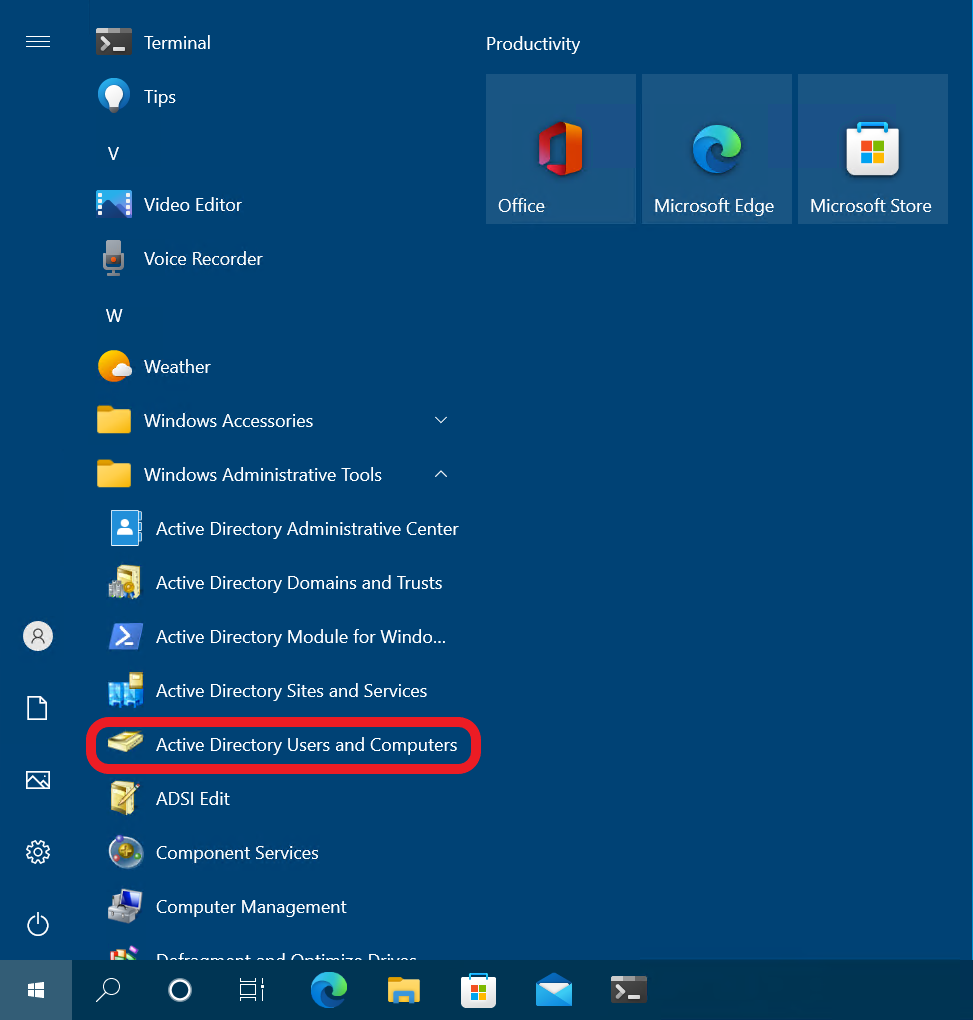
- Go ahead and click the Start button, scroll down in the list towards the bottom where you’ll find ‘Windows Administrative Tools‘.
- Click that folder and you’ll see ‘Active Directory Users and Computers.’ Select it and you’re in!
Method 3: Control Panel
- Click the Start button, and type in ‘control.’ Select Control Panel.
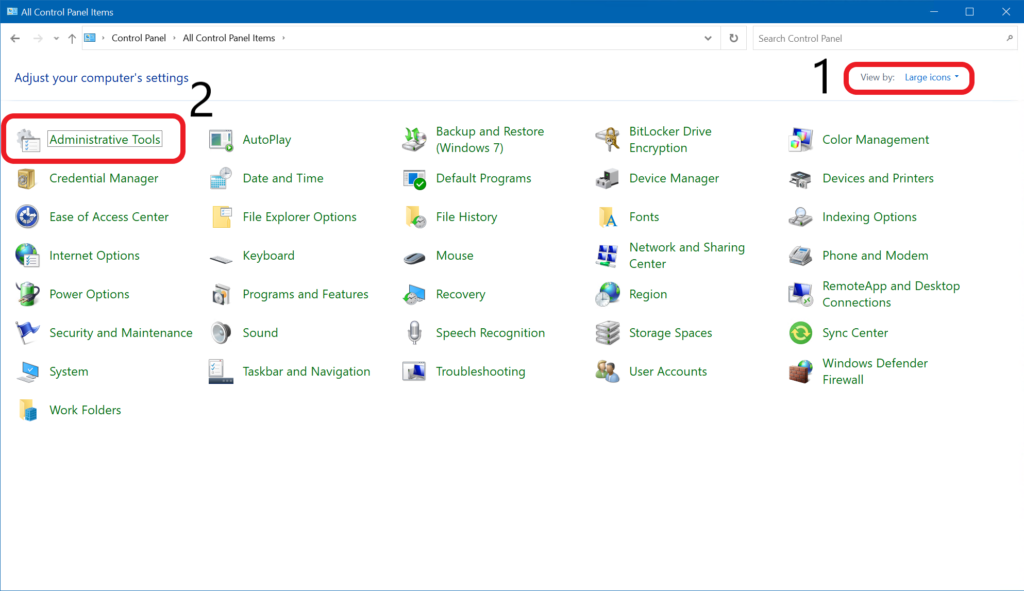
- In the upper-right corner where it says ‘View by:‘ click the dropdown and choose Large icons.
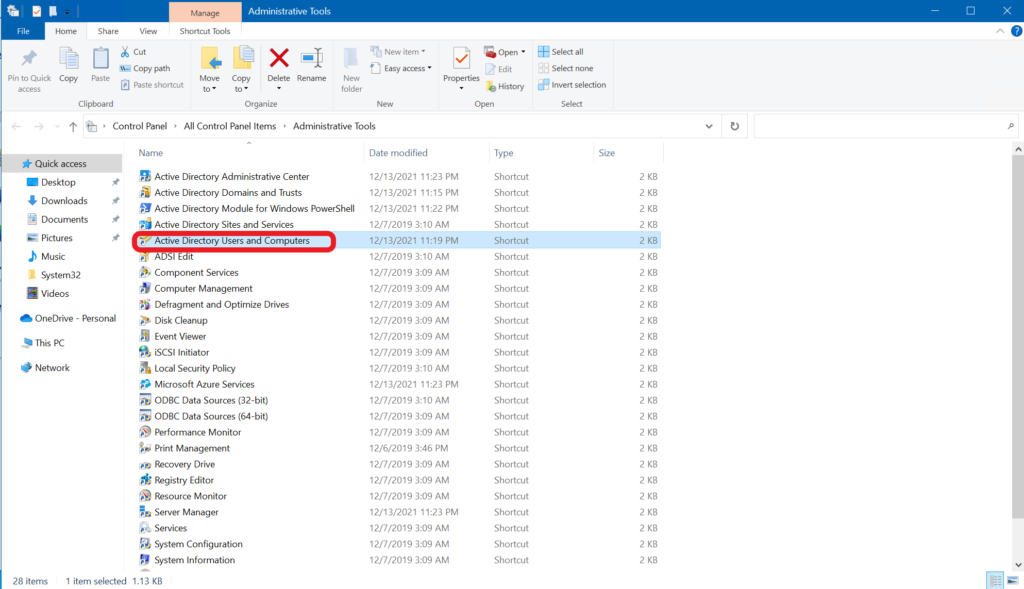
- Open ‘Active Directory Users and Computers‘ and you’re there!
How to create and manage user accounts with Active Directory Users and Computers
Now that we have the tool installed, it would be pretty prudent to show you the basics of how to use it. Right? Sure, let’s get started by adding a user.
Creating an Active Directory user account
- Although you can always move an account after you create it, let’s select the container or OU you’ll use to store this new user.
- Then, right-click on the OU and click New -> User.
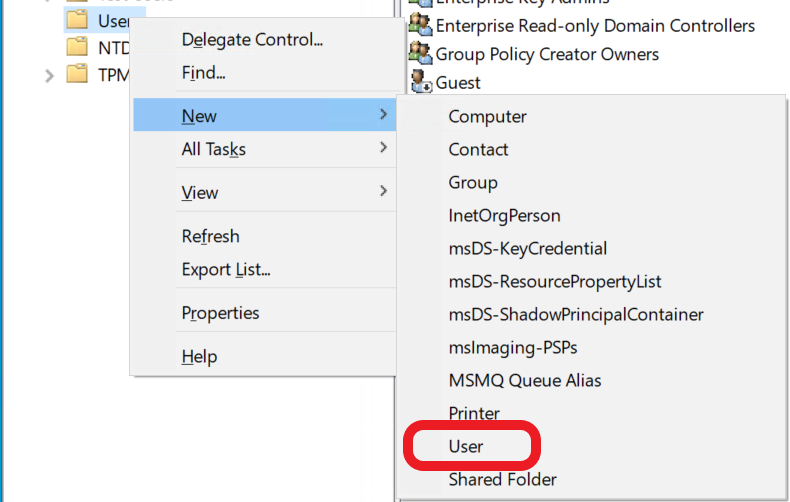
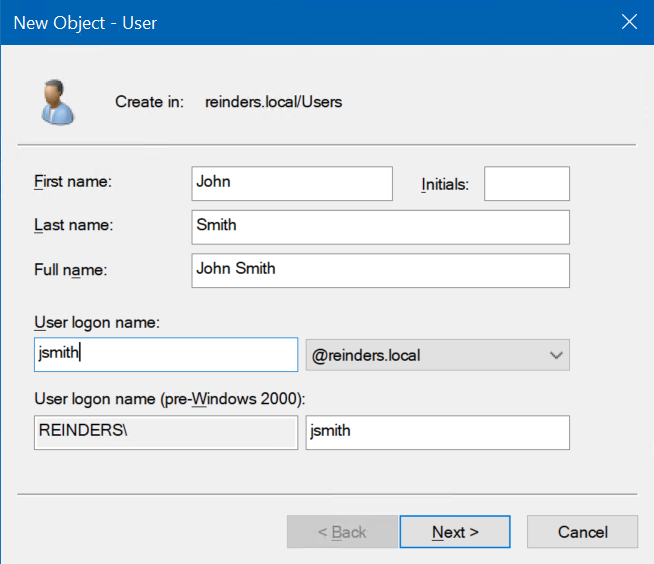
- On the first screen, fill in the user’s basic information including First name, Last name, User logon name, etc.
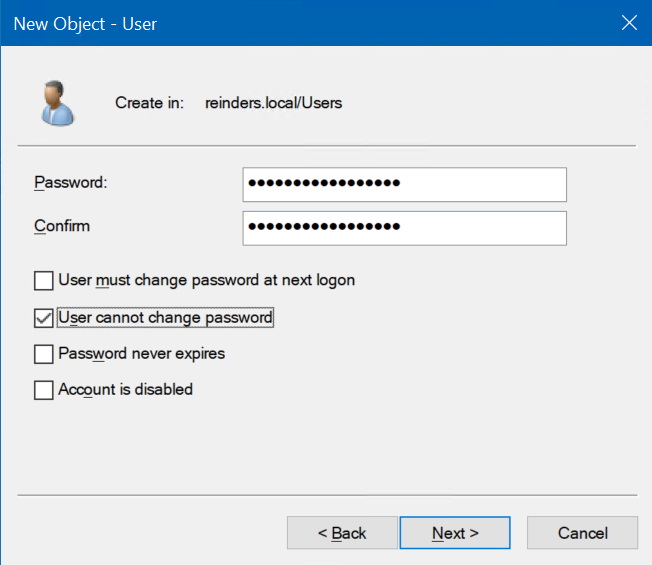
- Next, enter in a new password for the user twice for confirmation. You can optionally set the 4 attributes below to suit your needs. Click Next.
- Click the Finish button on the screen that follows.
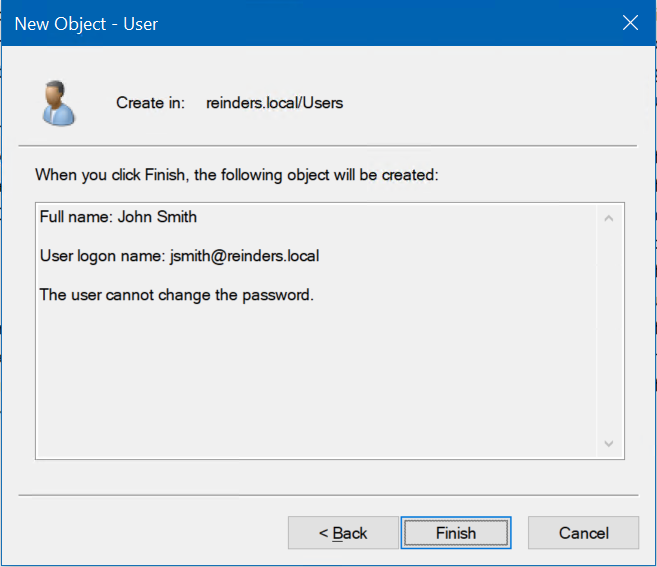
There is our new user, John Smith.

Enabling or disabling an Active Directory user account
- If you want to enable or disable an account, you can simply right-click on their user object, and choose either ‘Disable account’ or ‘Enable account‘ depending on their current state.
Note: A disabled account can not log in to the domain.

How to reset an Active Directory user account password
If you need to reset a user’s password for any reason, you can do so right on the user object.
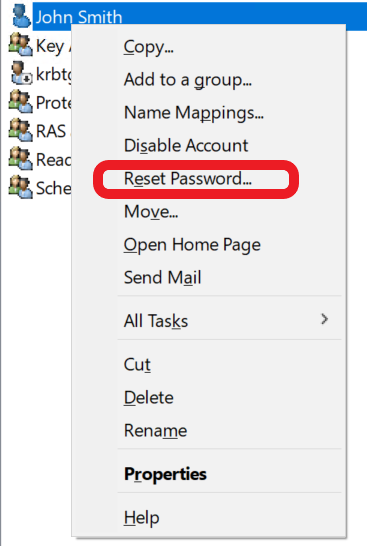
- Right-click on the user and click ‘Reset password…‘
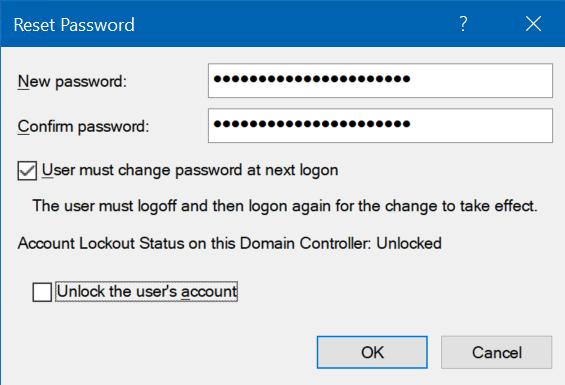
- Enter in a strong, robust password (twice), and optionally force the user to change their password when they use this (temporary) one.
- You can also accomplish two things by checking the ‘Unlock the user’s account‘ checkbox, thereby unlocking their locked account AND changing their password. A very common task and rather easy to use!
How to delete a user account
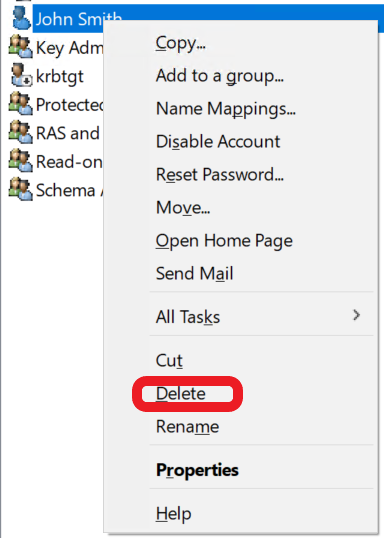
- To delete a user, right-click on their user account and choose ‘Delete.’
How to create and manage Active Directory groups with Active Directory Users and Computers
Now, throughout your administration of Active Directory, it’s definitely recommended to use groups to help ease the administrative overhead of managing hundreds or even thousands of users.
Instead of granting permissions for 433 people individually to a file server share, you can create a group with those 433 users as members. Then, all you need to do is add your group to the Access Control List (ACL) for the share. The result is one Access Control Entry (ACE) vs. 433!
Creating an Active Directory group
- First, select the container/OU you wish to house the group in.
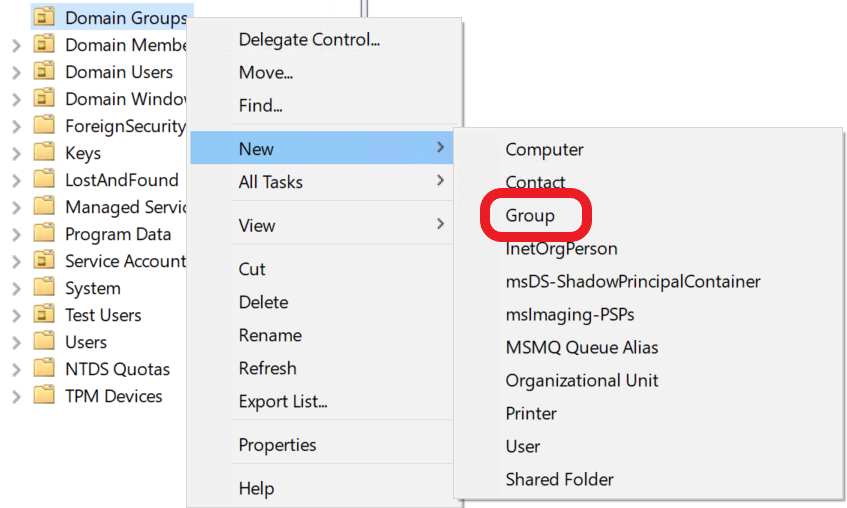
- Right-click on the container/OU and click New -> Group.
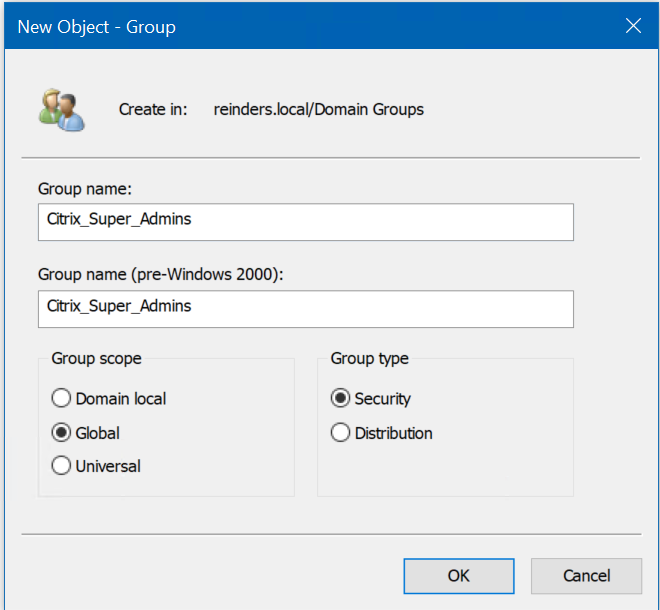
- Enter a Group name, and choose the Group scope and Group type. We’ll cover these options shortly.
How to add a member to an Active Directory group
There are two common methods you use to add a user to a group.
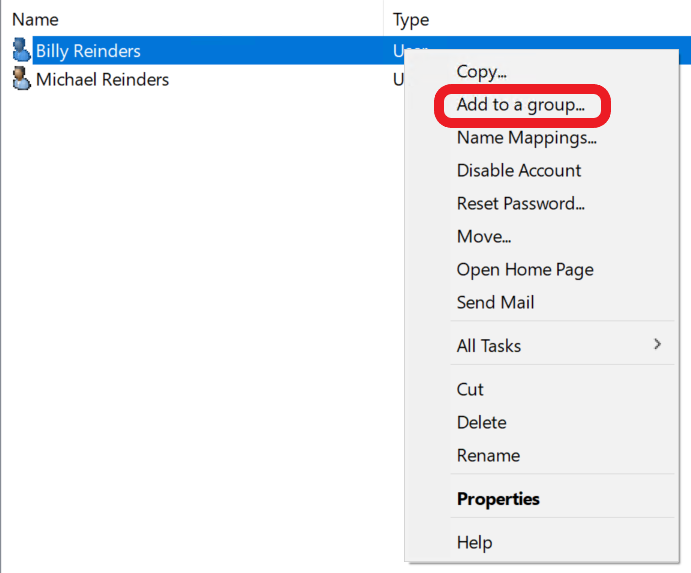
- First, right-click a user object and click ‘Add to a group...’
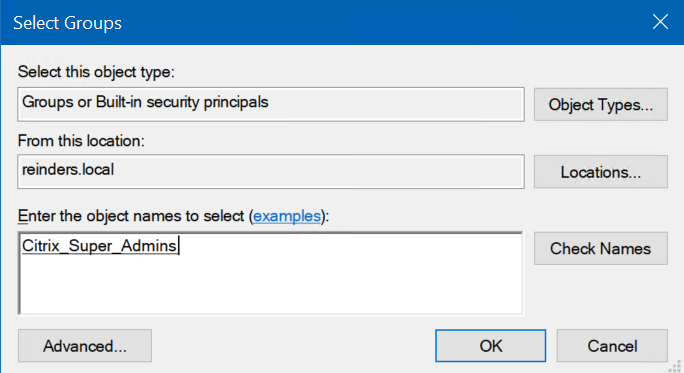
- Here, you can start typing the group name or click the Advanced button to do more fine-tuned searches.
- I’ll type in ‘citrix‘ and click ‘Check Names.’
- There’s our new group, click OK, and they are added.
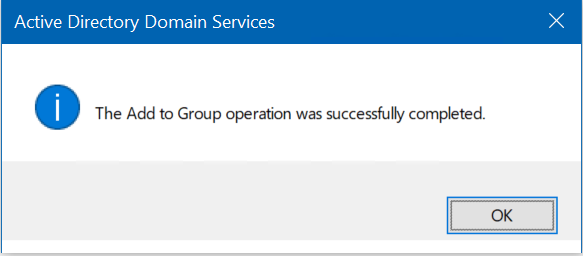
You should see the confirmation window below.
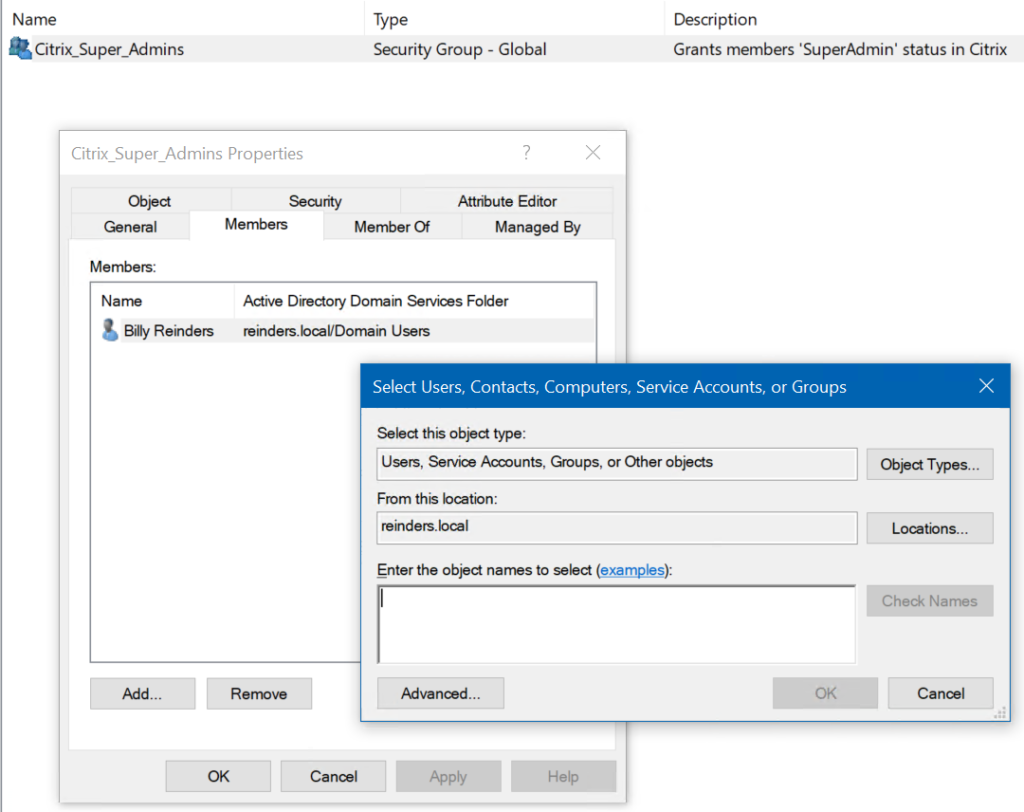
- The other method to add users to a group is to open the Group properties, click the Members tab, and then add users of your choice.
Active Directory security versus distribution groups
The first core attribute of a group in Active Directory is its type: Security or Distribution. The only real difference you need to know is that a distribution group can not be added to an ACL related to the sharing of files. Only a security group can be added.
However, both types of groups can be used for email delivery purposes: You can choose to send an email to a security group, its members will receive the email.
What’s the difference between domain local, global, and universal AD group scopes?
The other core attribute of a group is the scope: Domain local, global, or universal. Here are the main differences between them:
- Domain local: A security or distribution group that can contain universal groups, global groups, other domain local groups from its own domain, and accounts from any domain in the forest. You can only grant rights and permissions with this type of group to resources that reside in the same domain where the group is located.
- Global: A group that can be used in its own domain, in member servers, computers, and in trusting domains. A global group can contain user accounts ONLY from its own domain.
- Universal: A security or distribution group that contains users, groups, and computers from ANY domain in its forest. You can give universal security groups permissions and rights on resources in any domain in the forest!
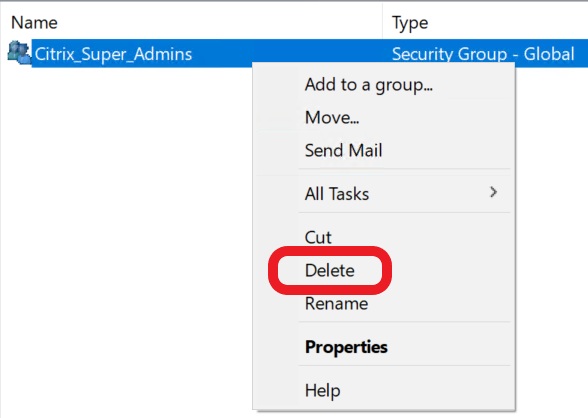
How to delete a group
- To delete a group, right-click on it and choose Delete.
How to manage Active Directory computer accounts with Active Directory Users and Computers
A computer account in Active Directory is actually kind of similar to a user account: It allows a computer to log in to the domain.
This grants a token to the computer itself, allowing access to resources on the network and for Group Policy to apply. Every 30 days, the computer will verify that its computer account password is in sync with Active Directory.
How to create a new computer account
- Navigate to the container/OU where you wish to store your new computer account.
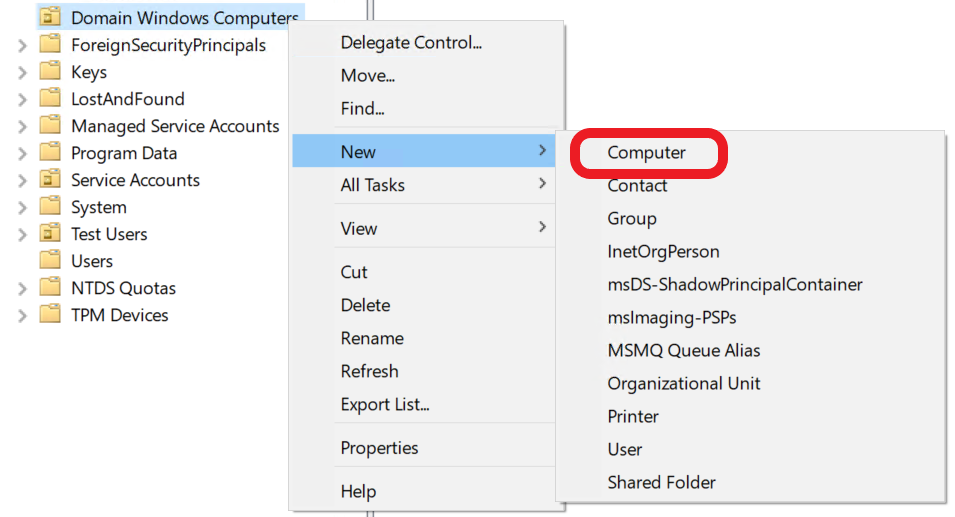
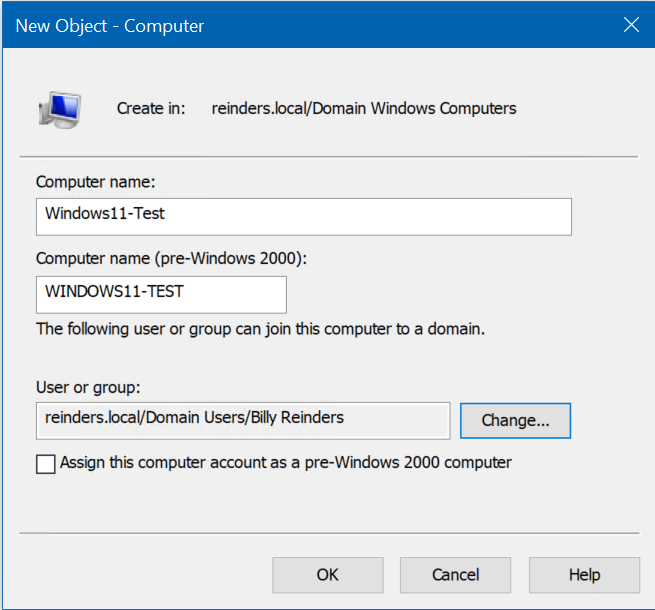
- Right-click the OU and click New -> Computer.
- Type in the computer name. You may optionally change what user or group has the permission to join this computer to the domain.
How to reset a computer account and why you might need to
- If you need to reset a computer account (password), right-click on it and choose ‘Reset account.’
There may be times when you get the dreaded error “Trust Relationship Between This Workstation And The Primary Domain Failed.” If you do, please read my recent article about how to resolve this.
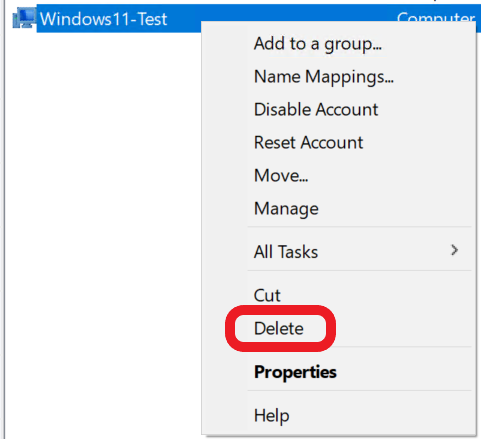
How to delete a computer account
- If you need to delete a computer account, simply right-click on it and choose Delete.
What to manage Active Directory Organizational Units (OUs) in Active Directory Users and Computers
Organization Units (OUs) let you logically group user, service accounts, or computer accounts. You can use these OUs to delegate rights and permissions to administrators (or users), and apply Group Policy in an ordered and logical fashion.
How to create a new Organizational Unit
Creating an OU is similar to creating a user or group.
- For our purposes here, let’s right-click on the root of our domain (reinders.local) and choose New -> Organizational Unit.
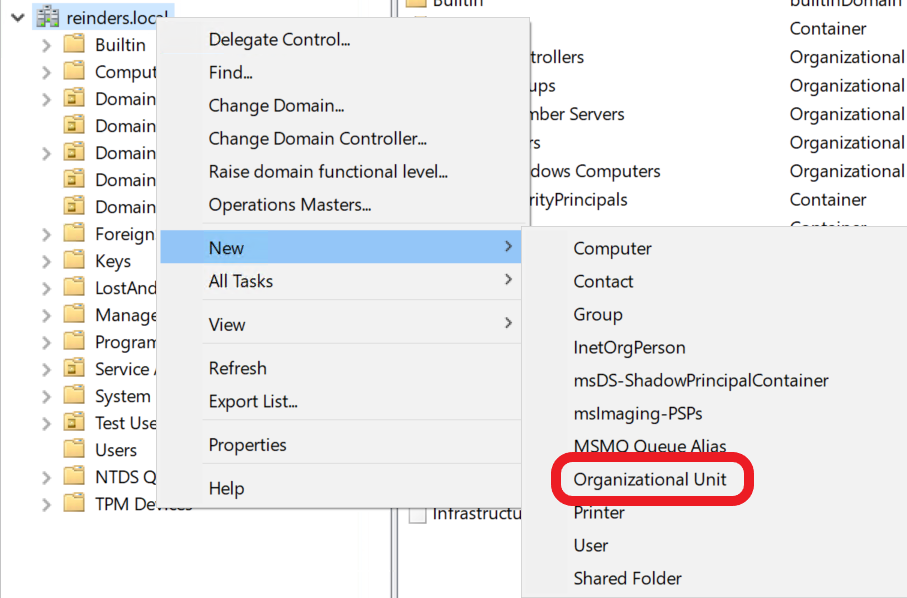
- Enter a name and click OK.
How to delete an OU
- All you need to do is right-click on the OU and click Delete.
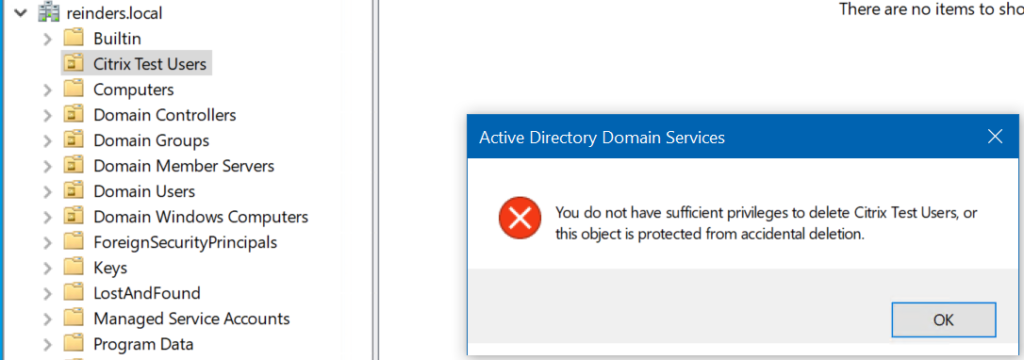
Wait, what? Remember when we created the OU? There was a checkbox, on by default, that protects the object from accidental deletion. I’ll show you that in more detail very soon.
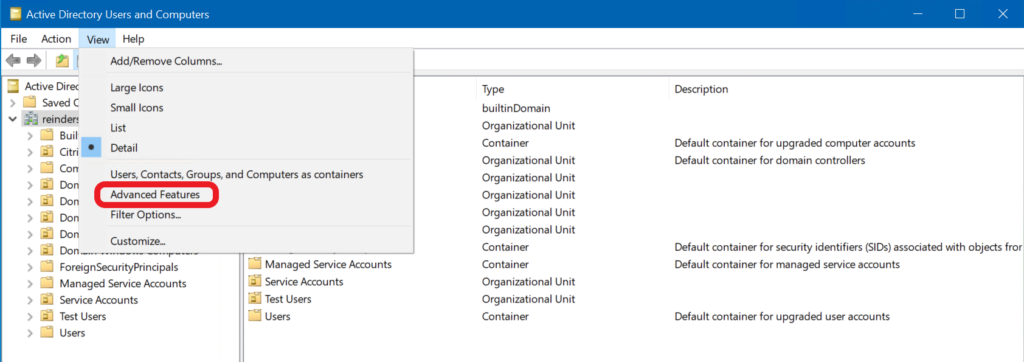
By default, Active Directory Users and Computers will not display hidden containers and attributes in your domain. You need to enable the ‘Advanced Features‘ option.
- To do so, click the View menu and select ‘Advanced Features.’
- You can read our separate post on how to view the Attribute Editor in Active Directory for more details.
How to protect objects from accidental deletion
Now, as I mentioned above, when I tried to delete an OU, I was ‘blocked’ because the object was protected. Let me show you that setting again.
- Right-click on a user object, a group, or an OU and click Properties. Click the ‘Object‘ tab.
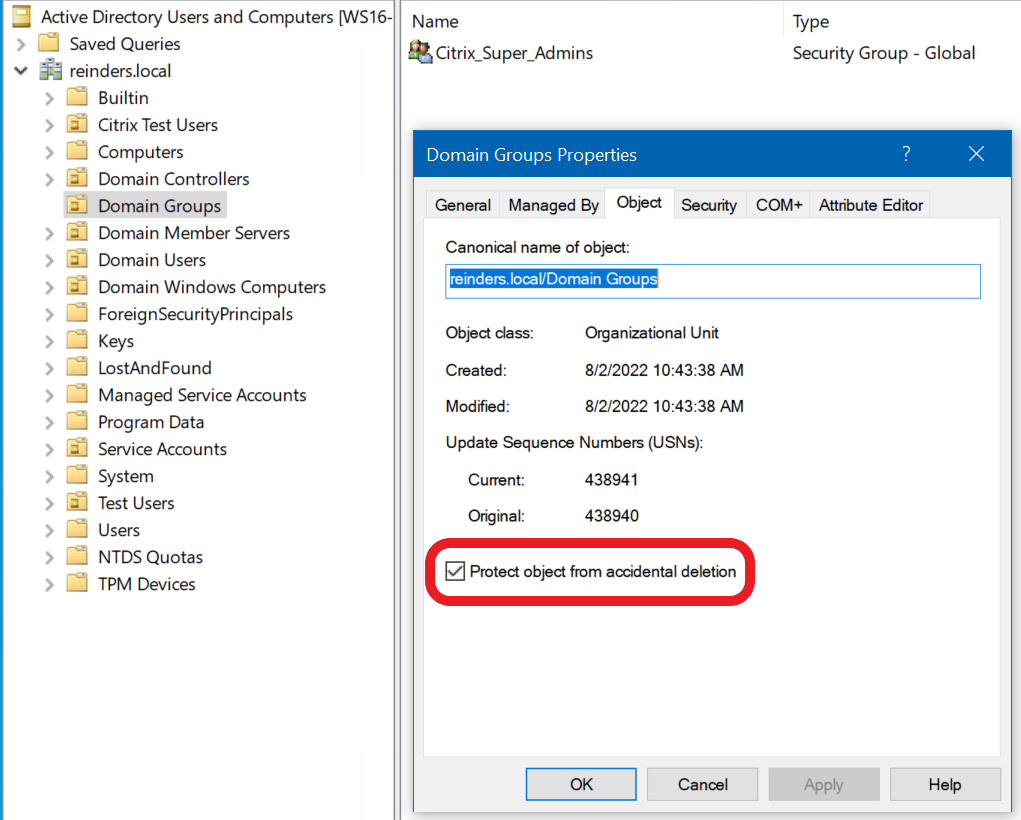
- If you need to delete an object, uncheck the box labeled ‘Protect object from accidental deletion,’ and click OK.
- Then, right-click on the object and click Delete.
By the way, with this attribute enabled, even command line and Windows PowerShell cmdlets will get blocked if you attempt to delete an AD object.
How to search for objects in Active Directory Users and Computers
You can well imagine how difficult it could be to locate an object in a domain with hundreds and thousands of OUs, groups, users, etc. Instead of needing to drill down to find the object, we can use the ‘Find’ function in ADUC.
- You can narrow the search if you initiate the command at an OU or a container, but I almost always right-click on the root of the domain and click Find to make sure I search the entire domain.
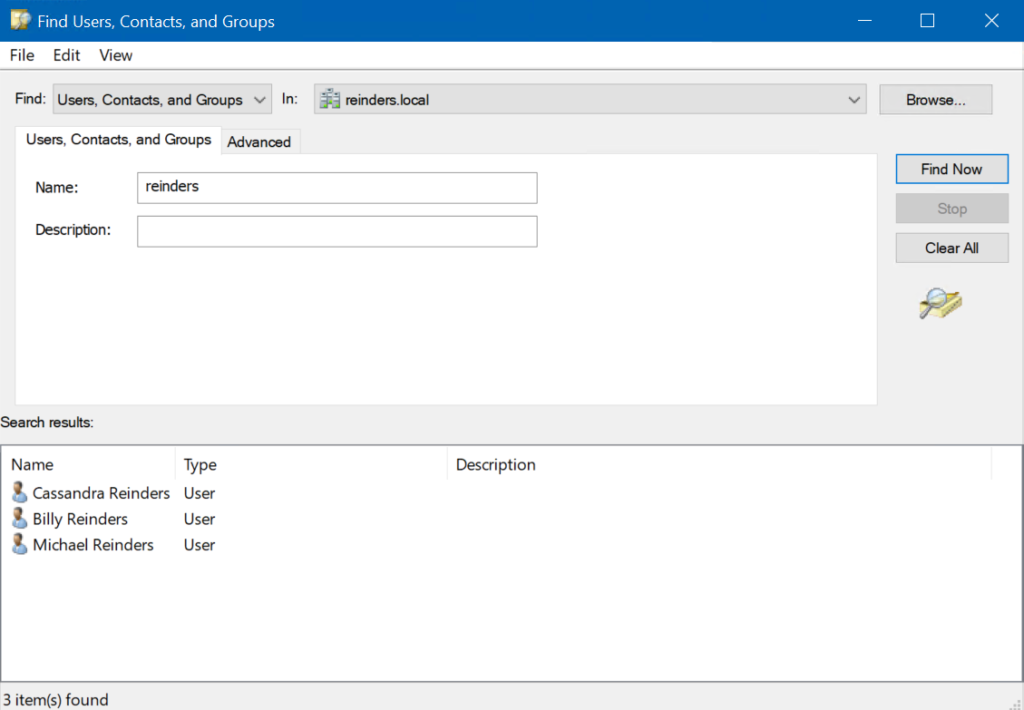
- Here, I can type in ‘reinders‘ to find all users, contacts, and groups with ‘reinders’ in the display name.
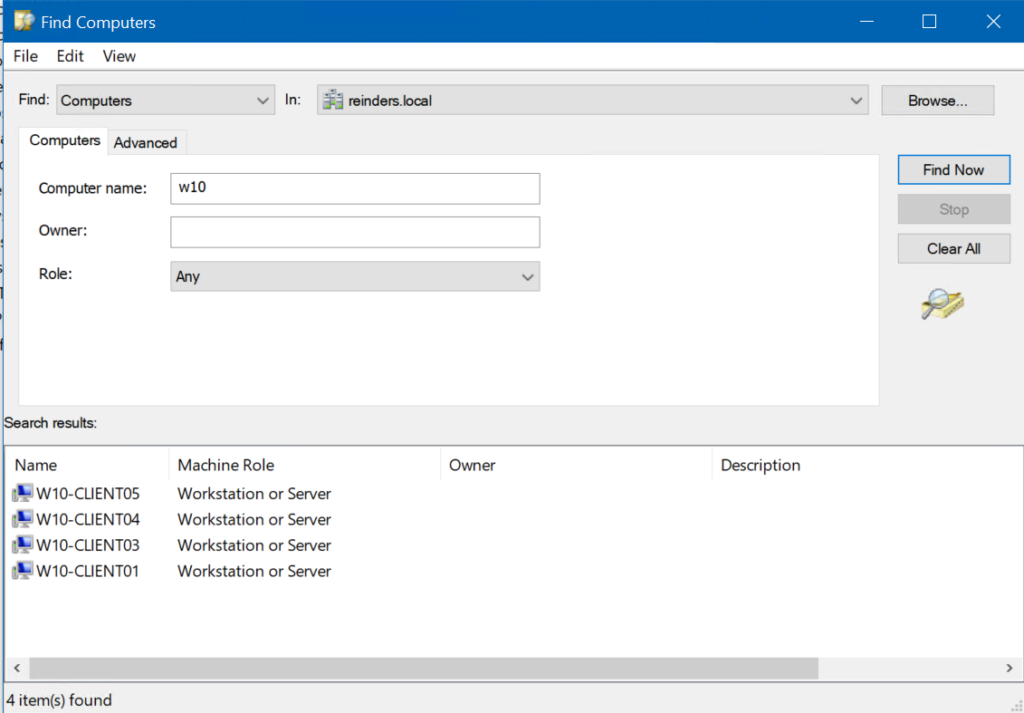
If you want to search for a computer, you first need to change the ‘Find:‘ field in the upper left to Computers. Then, you can do your search using the same methods.
How to save search queries
If you find yourself performing the same or very similar searches often, you can get a nice boost in efficiency by saving your query.
- In the main window view above the domain name, you’ll see Saved Queries.
- Select that. Then, right-click and click New -> Query.
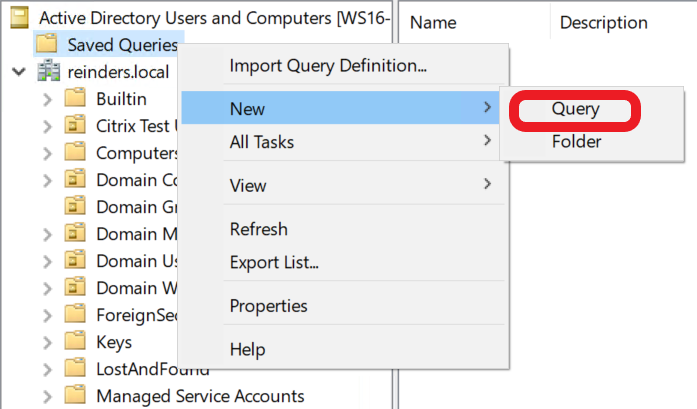
- I’ll just choose Users and type in ‘reinders.’
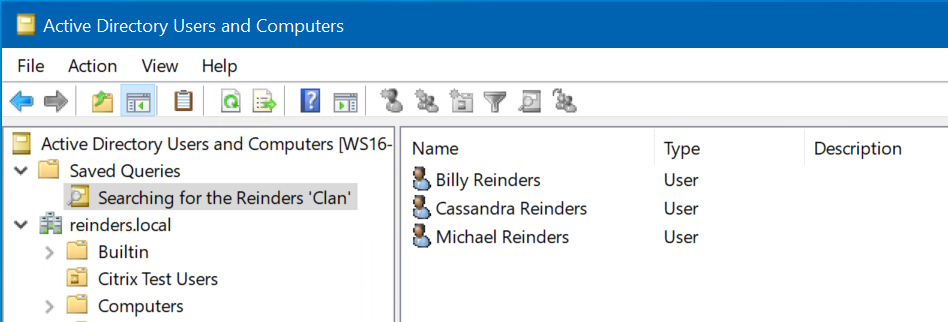
- Now, I can simply click on this search item and it will dynamically run the search for me. I don’t have to do anything else, which is very nice.
Conclusion
In this guide, we’ve detailed how to install Active Directory Users and Computers (ADUC) on Windows 10 and Windows 11. This is an essential tool for managing Active Directory user accounts, computer accounts, groups, and OUs.
However, there are other tools you can use to manage Active Directory such as the Active Directory Administrative Center (ADAC) and Active Directory Sites and Services (ADDS). If you want to learn more about these tools, please check out our previous guide on How to Access Active Directory on Petri.
Table of contents
- How to install Active Directory Users and Computers
- Install Active Directory Users and Computers on Windows 10 and later
- How to open Active Directory Users and Computers
- How to create and manage user accounts with Active Directory Users and Computers
- How to create and manage Active Directory groups with Active Directory Users and Computers
- How to manage Active Directory computer accounts with Active Directory Users and Computers
- What to manage Active Directory Organizational Units (OUs) in Active Directory Users and Computers
- How to view hidden containers and attributes in Active Directory Users and Computers
- How to search for objects in Active Directory Users and Computers
- Conclusion


