Using Diskpart: A Guide to Windows Disk Management
Learn how to manage disks in Windows using the Diskpart command

Diskpart is a powerful command-line utility in Windows that allows users to manage their hard drive, disks, partitions, and volumes with precision and control. This article covers key commands, syntax, and best practices to help you manage your storage devices effectively on any version of Windows.
How to access Diskpart
Diskpart is accessed from the command line.
- You can open Windows Terminal from the Start Menu and use either a command prompt tab or a Windows PowerShell tab. The command will work in both shells.

- To get started, type in ‘diskpart‘ and press Enter.

At this point, you’re at the DISKPART prompt in the local computer’s disk subsystem.
How does Diskpart work? (Key commands)
Understanding how Diskpart commands work is key. One word = “focus.” There are three steps to using Diskpart.
- The first step is selecting a particular volume, hard drive partitions, or disks.
- Then you mark the item as active.
- Finally, you perform actions on said item.
How to list all disks using Diskpart
For instance, we can first type ‘list disk’ to list the state of all disks in my Windows 11 PC. This will display both an online disk and an offline disk.
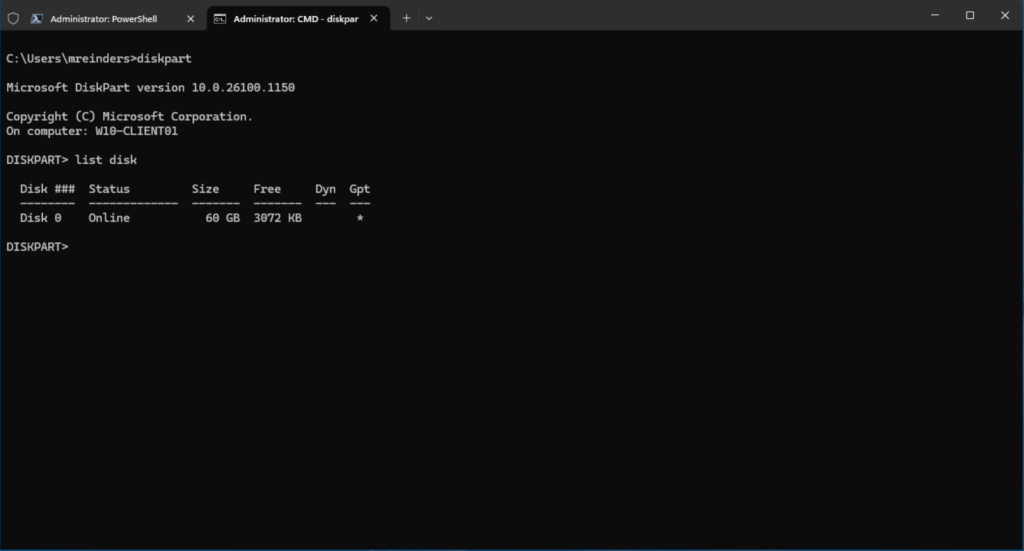
We see our current disks. I have a single ‘virtual’ disk, ‘Disk 0’. It is Online (of course), and is 60 GB in size. It is not a Dynamic Disk (Dyn is null), and the partition type is ‘GPT’.
How to list disk partitions using Diskpart
- Let me type ‘list partitions‘ to view the partitions on the disk.

As you can see, focus is the linchpin to how Diskpart works. Thankfully, it is very precise – harder to make any mistakes, in my opinion.
How to select a disk and list partitions
So, first, let’s do:
- select disk 0
- ‘list partition’ again

There we go. We have 4 partitions. As I’m sure you’re familiar with the Windows Disk Management console, this will undoubtedly look familiar to you. Partition 3 shows 59 GB in size, that is our ‘C: drive.’
Add a new disk to Windows using Diskpart
Let’s go ahead and show you how to handle the addition of a new disk to the computer. Behind the scenes, I will add a 100GB virtual hard disk using the Hyper-V Manager interface because this is a virtual machine (VM). Then, we’ll need to initialize it, select the new disk, and create a partition…let’s not get ahead of ourselves. One moment.
- Now, let’s try ‘list disk‘ again.
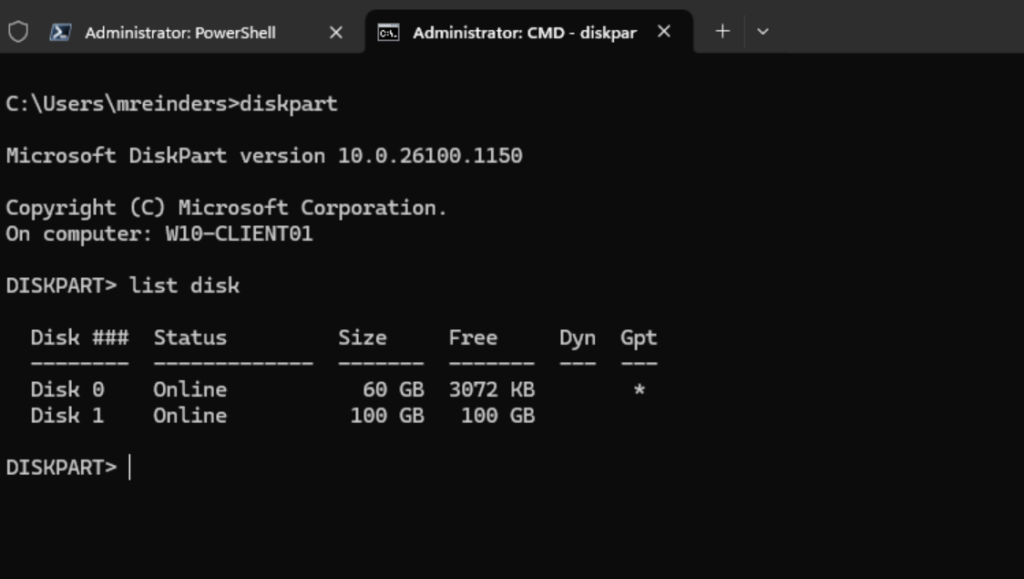
Now we have two disks. You can see that ‘Disk 1’ is the new 100GB disk.
- First, we need to select it with ‘Select Disk 1‘.
Create a new disk partition
We’ve selected Disk 1. When we list partitions, it shows there aren’t any.
- Let’s create a partition with this command – ‘create partition primary‘. We can create a specific partition type by specifying it.
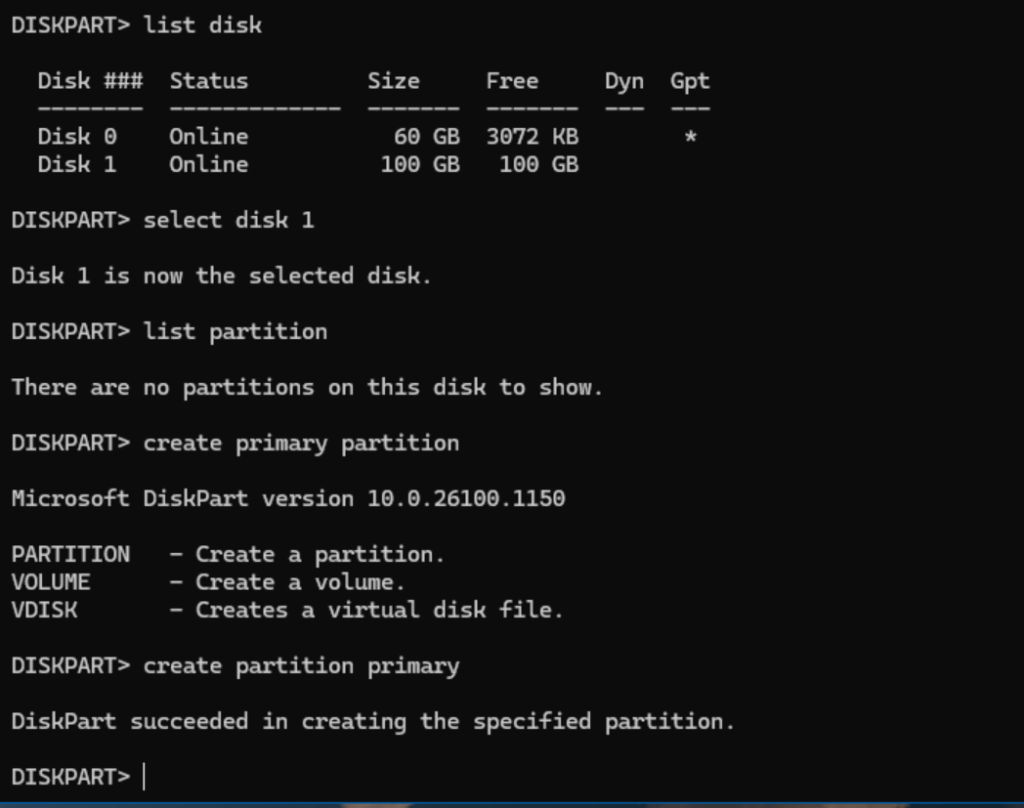
We’ve created our new primary partition. When we ‘list partition‘, we see that Partition 1 is selected (due to the ‘*’ to the left of the partition.
Create and format a new NTFS volume
Now all we need to do is create a new disk volume:
- Type ‘select partition 1‘ to give it focus.
- Type ‘format fs=ntfs label=Extra quick‘ to add a logical volume.

Done! The filesystem is NTFS, the drive label is ‘Extra’, and I ‘quick formatted’ the current volume.
List all disk volumes using Diskpart
- Now we’ll type ‘list volume‘ to see the various volumes and the size of the selected volume (logical containers as Windows sees them).
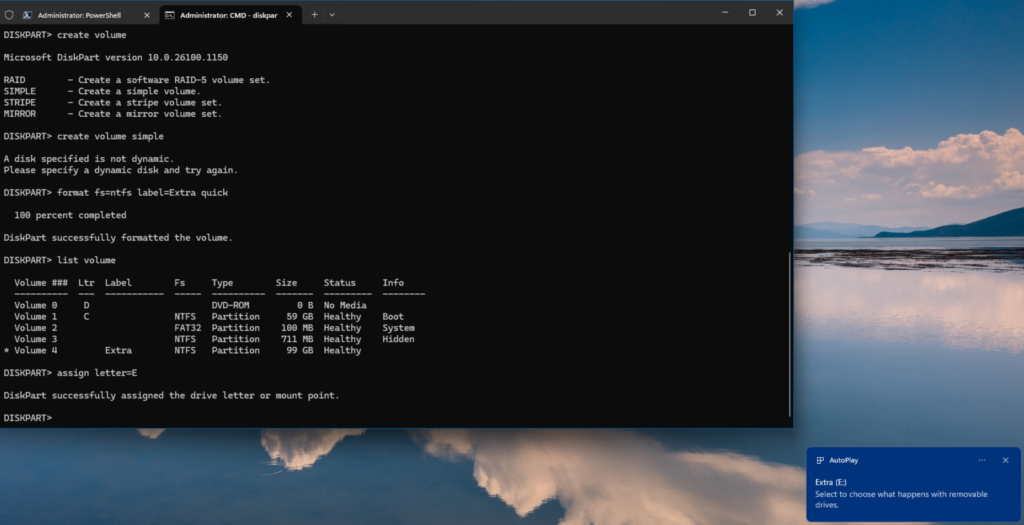
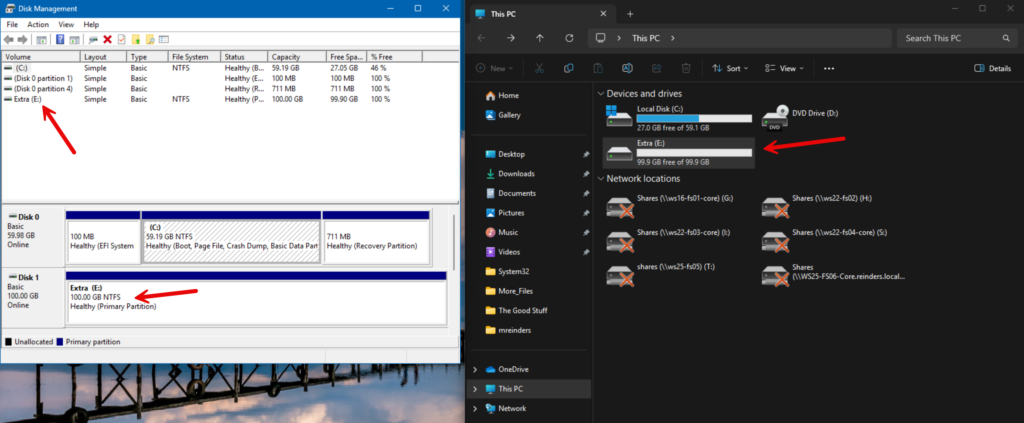
We can see our C: drive, our current D: drive (a virtual DVD drive), and the selected Volume 4. There’s the ‘Extra’ label.
How to assign a drive letter with Diskpart
Let’s assign a drive letter next.
- As ‘Volume 4’ is already selected (the ‘*’), we can type ‘assign letter=E‘ and press Enter.
Voila! There’s a popup from Windows identifying a new volume recognized and accessible in the operating system. Let me open File Explorer and Disk Management to confirm all our hard work.
Everything looks good. Let’s backtrack a bit and go over some of the more rudimentary basics of the syntax in Diskpart.
Diskpart syntax basics and example commands
After starting Diskpart by typing in ‘diskpart’ in your admin command prompt, the new interpreter opens. Here are the basic commands and syntax when using Diskpart:
| Command | Description | Example |
|---|---|---|
diskpart | Opens the Diskpart utility | diskpart |
list disk | Lists all disks | list disk |
list volume | Lists all volumes | list volume |
list partition | Lists all partitions on the selected disk | list partition |
select disk X | Selects disk number X | select disk 1 |
select volume X | Selects volume number X | select volume 2 |
select partition X | Selects partition number X | select partition 1 |
create partition primary size=XXXX | Creates a primary partition of specified size | create partition primary size=10000 |
format fs=ntfs quick | Formats the selected partition with the NTFS file system | format fs=ntfs quick |
assign letter=Y | Assigns the drive letter Y to the selected volume | assign letter=D |
clean | Removes all partitions and volumes from the selected disk | clean |
detail partition | Shows detailed information about the selected partition | detail partition |
Here are some general tips and tricks.
If you need to convert the partition style from MBR to GPT, you can type ‘convert gpt‘ on a selected partition.
Another common troubleshooting step is repairing MBR and GPT partitions. A very simple and succinct Diskpart command – ‘clean’. After you’ve selected a particular disk (using for example ‘select disk 1’), you can use the diskpart clean command to erase all partitions and volumes from the disk. It’s similar to wiping the master boot record.
Note – you can use diskpart on computers running BIOS or UEFI mode.
What is Diskpart?
Diskpart was introduced in Windows 2000, replacing the rather old, long-in-the-tooth, fdisk command. A command interpreter helps you manage your computer’s drives (partitions, disks, volumes, or virtual hard disks) from the command line. The most basic equivalent to a GUI in Windows is the MMC-based Disk Management tool.
Diskpart offers excellent detail when displaying information like system volume, system partition, which volume is your boot volume, and even lists specific types of volumes:
Prerequisites – Supported Windows versions
Every version of Windows (including Windows client and Windows Server) since Windows 2000 has included Diskpart – even “Home” editions. The only real prerequisite is that you’ll need to have administrative privileges in your command prompt or Windows Terminal shell.
Be careful when using Diskpart. You can irrevocably delete or lose data easily on your computers or servers. You can’t recover a deleted partition. Double-check your commands and double-check what disk, volume, or partition is active before you execute – more on this in a bit. If you mess up, you may be unable to boot Windows.
Troubleshooting with Diskpart and best practices
Here are common troubleshooting ideas you should always keep in mind when using Diskpart:
- Run Diskpart as Administrator: Ensure you have administrative privileges to make changes to disk partitions.
- Check Diskpart Syntax: Double-check the commands and parameters for any typos or errors.
- Verify Disk and Volume Selections: Use
list disk,list volume, andlist partitionto confirm you’re selecting the correct disk, volume, or partition. - Backup Data: Always back up important data before performing operations that modify partitions or volumes.
- Use
cleanCommand: If a disk is not functioning correctly, use thecleancommand to remove all partitions and volumes from the disk. - Format After Cleaning: After cleaning a disk, use the
create partition primaryandformat fs=ntfs quickcommands to create and format a new partition. - Check for Logical Errors: Use Diskpart commands to fix logical errors on the disk.
- Disconnect External Drives: If multiple drives are connected, disconnect any external drives to avoid selecting the wrong one.
- Consult Diskpart Help: Use the
helpcommand within Diskpart to get detailed information about specific commands. - Review Diskpart Logs: Check Diskpart logs for any error messages or warnings that can provide clues about what went wrong.
Regarding best practices, let me show you an example of creating a mirrored volume on my client computer using Diskpart.
- First, I will add two additional 50 GB disks via Hyper-V to my machine.
- Then, I will type ‘list disk‘.

We have Disks 2 and 3 each with 50 GB free. First:
- Type ‘select disk 2’.
- Type ‘convert dynamic’ to convert the disk type to Dynamic.
- Now, we do the same for the 2nd disk (Disk 3).
- ‘Select Disk 3’.
- ‘Convert dynamic’.
- Then, type ‘create volume mirror disk=2,3’.

- When we ‘list volume‘, we see ‘Volume 5’ – unformatted, and Type = ‘mirror’.
- Next, we’ll assign the drive letter ‘F’ by typing ‘assign letter=F
- And finally format it with ‘format fs=ntfs quick label=Mirror.
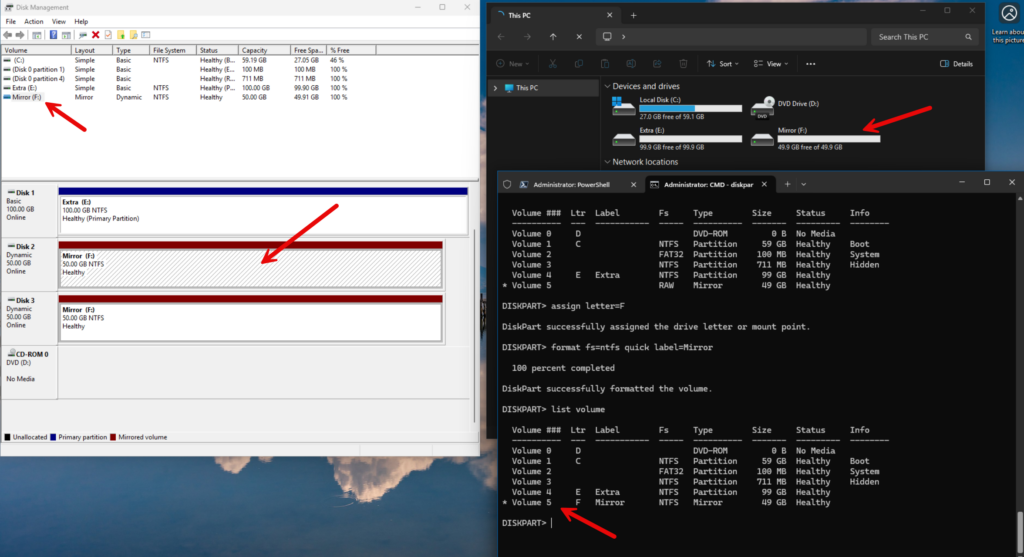
Sweet! In Disk Management and File Explorer, we can see the new mirrored volume.
Thank you for reading my article on using Diskpart.

Michael has been an IT Pro since 1998. He has worked predominantly in the Windows world including client and server operating systems, on-prem systems engineering (AD, DNS, etc.), and over the last ten years or so has embraced and immersed himself in...


