Windows Server DHCP Migration: Making a Seamless Transition
Migrating a DHCP server is most often done to upgrade infrastructure, upgrade Windows Server operating system levels to be more security-oriented and reduce risk and improve reliability.

Planning a Windows Server DHCP migration from one server to another takes careful planning. This post outlines two primary options for successfully migrating the DHCP Server role from an older server to a newer one.
Windows Server DHCP migration: Preparing for a smooth transition
Let’s start with a valid and efficient migration checklist. We’ll need this to get through the migration with as few hiccups as possible. The goal is to migrate the DHCP Server role to a new server with minimal disruption to our users. For this, we’ll need this checklist.
Inventorying your current DHCP server configuration: No stone left unturned
The first major step on our checklist will be to discover and document our current DHCP Server configuration on our old server. And remember, only the following Windows Server versions are supported to run the DHCP Server role:
- Windows Server 2016
- Windows Server 2019
- Windows Server 2022
- Windows Server 2025
Note – you can install the DHCP Server role on Windows Server Core configurations.
Documenting IP ranges, scopes, reservations, and exclusions
Let’s get started by documenting the existing DHCP server’s configuration, including scopes and reservations.
- Log into the existing server (in my lab, WG-DHCPOld-01)
- Open the DHCP applet in Server Manager.
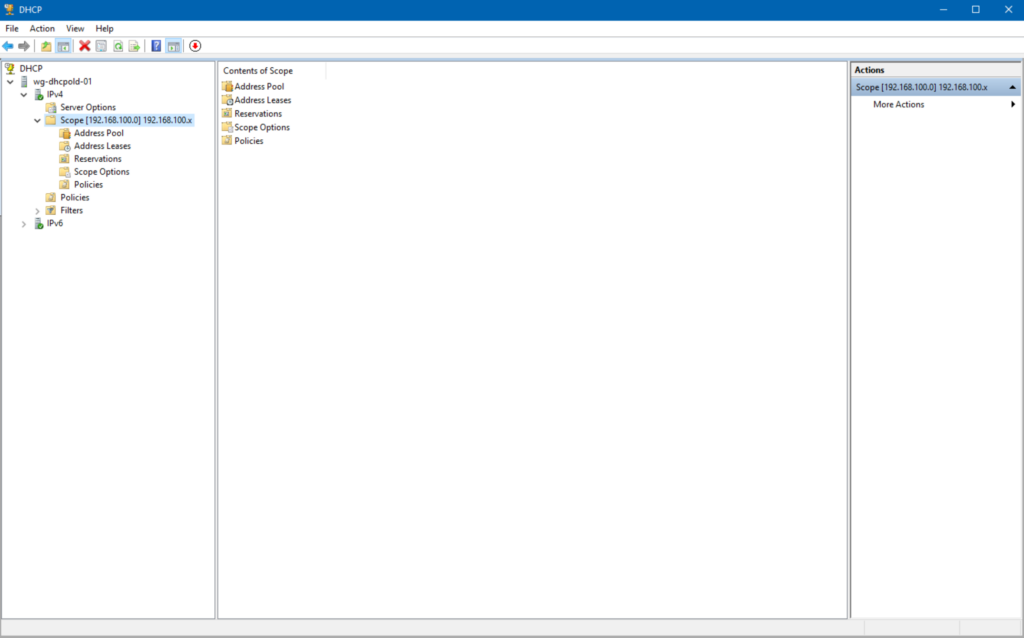
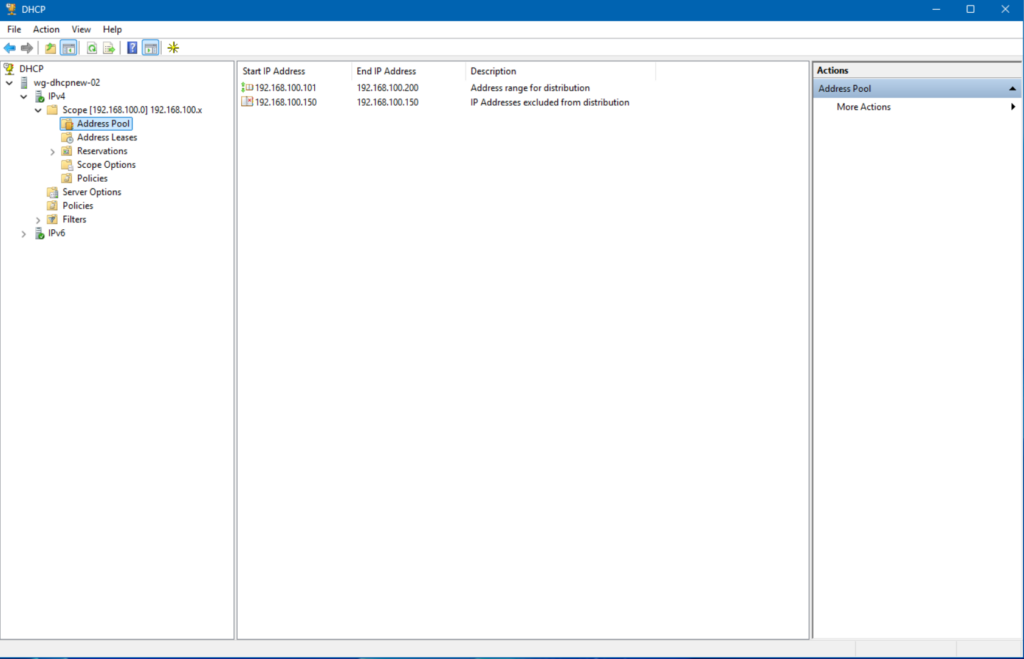
This server’s IP address is 192.168.100.10. The existing scope’s range is from 192.168.100.101-192.168.100.200. There is also one IP address excluded from the scope (192.168.100.150) and a few Scope Options for Router and DNS addresses for clients.
Screenshots can be taken for documenting purposes in your documentation environment.
Backing up your existing DHCP server
DHCP is not a critical role. My point is taking a backup of a DHCP server is relatively clean and reliable. You can use Windows Server backup or your enterprise data backup and recovery solution to back up your DHCP server, physical or virtual.
Migrating your DHCP server settings
Let’s start by exporting our existing DHCP server configuration.
Step 1: Exporting DHCP configuration from the source server
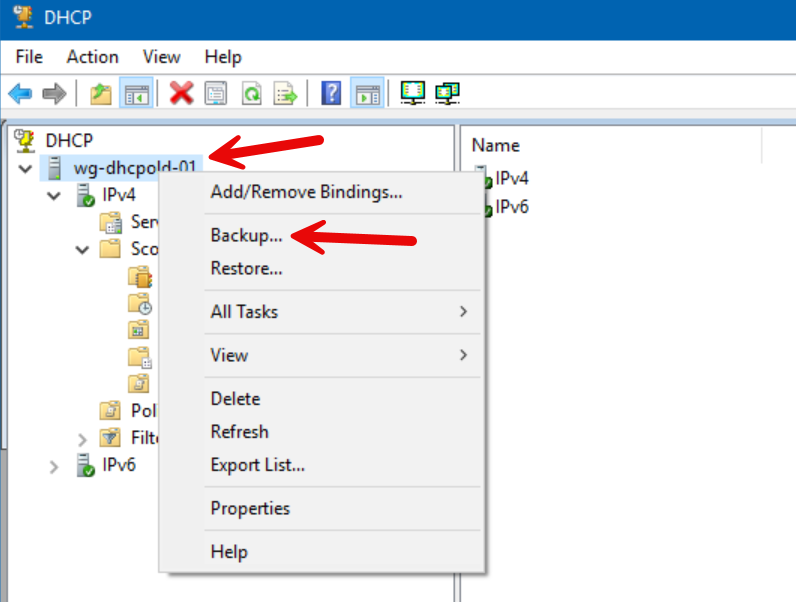
The first step is to export or ‘Backup’ the existing config from our old server, WGDHCPOld-01.
- In the DHCP Console, we’ll right-click on the server name, then choose the ‘Backup…’ option.
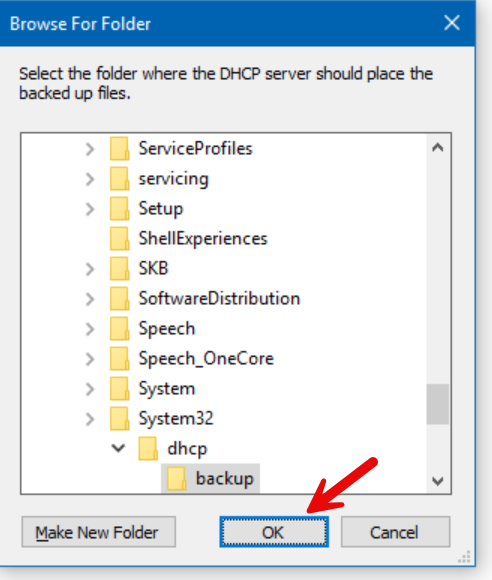
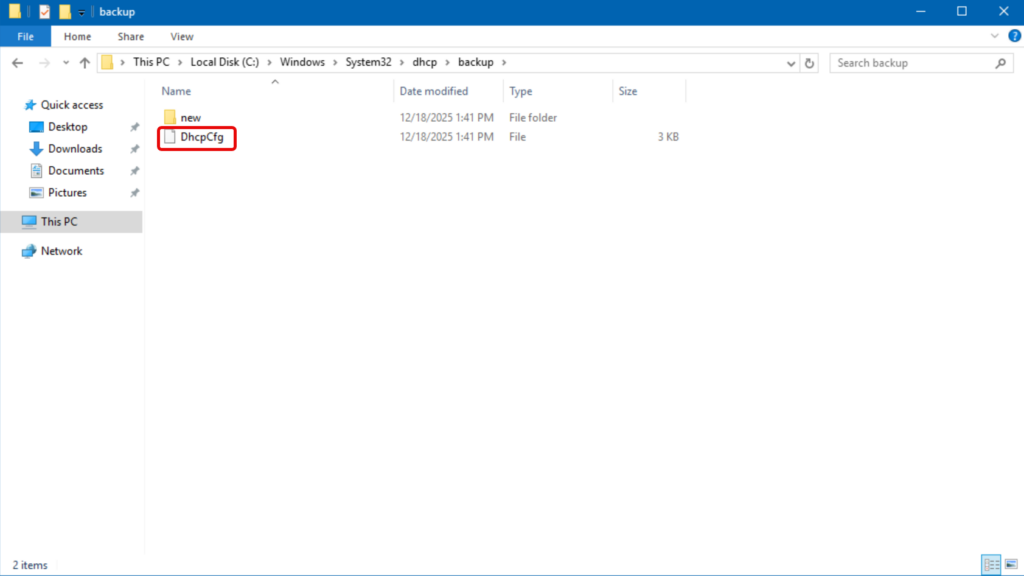
- A new dialog opens asking you where you want the backed up DHCP files to be stored. For simplicity, accept the default location, which is c:\Windows\System32\dhcp\backup.
And, we’re done.
Step 2: Installing and authorizing the DHCP role on the destination server
Now that we have our config, we can continue on our new server (in my lab: WGDHCPNew-02). This is a brand-new server running Windows Server 2025.
- We’ll start in Server Manager.
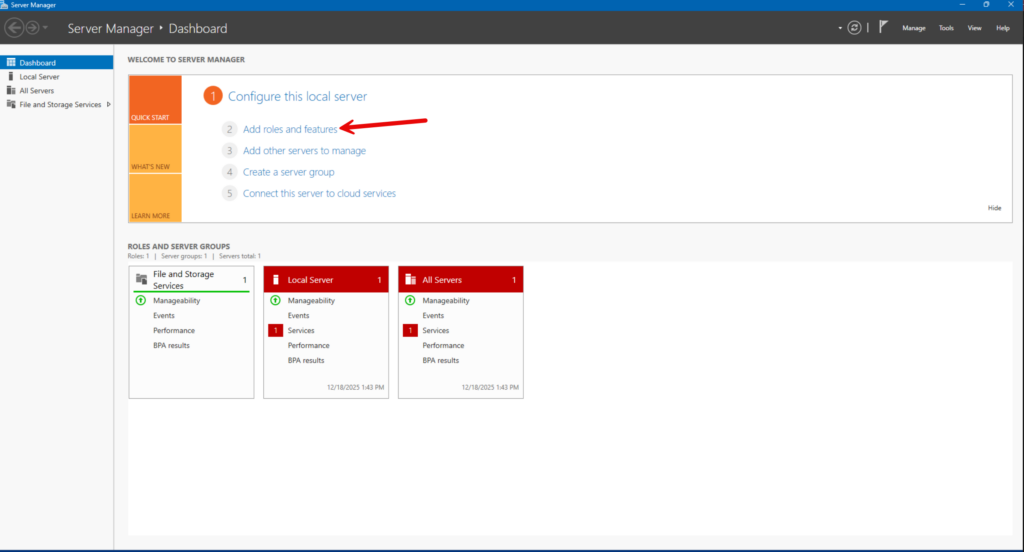
- In Server Manager’s Dashboard view, click the ‘(2) Add roles and features’ link.
- Click Next a few times, then click to select the ‘DHCP Server’ role on the Select server roles screen.
- When the ‘Add features that are required for DHCP Server?’ opens, click the ‘Add Features’ button.
- Click Next a few more times, then click Install.

After that is complete, you can reboot the server. We’re good!
Step 3: Importing DHCP configuration to the destination server
We’re ready to import those backed-up files from the old server and bring them into the new server.
- On the new server, in the DHCP Console, we can right-click on the server name and click ‘Restore…’.
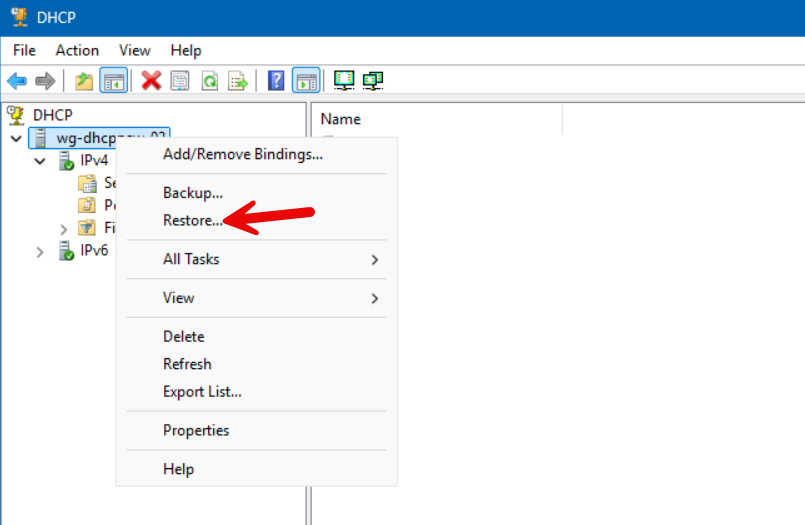
Important note: If you get either an ‘Access denied’ or ‘Cannot find the file specified.’ error, make sure that you have copied the ‘dhcp\backup’ folder’s contents in the exact same location on the new server.
Excellent.
- After I click the Refresh button, the Scope from the old server is there.
- I can expand it and click the Address Pool and see everything is as it should be.
On to the next!
Step 4: Authorizing the new DHCP server and deauthorizing the old if your DHCP servers are in an Active Directory environment
If your DHCP servers are in an Active Directory environment, you need to first unauthorize the old server and then authorize the new server so that I can assign IP addresses to Active Directory members.
To unauthorize the old server with PowerShell, here is an example you could use.
Remove-DhcpServerInDC -DnsName "WG-DHCPOld-01.reinders.local"Then, we can authorize the new server by using this PowerShell command.
Add-DhcpServerInDC -DnsName "WG-DHCPNew-02.reinders.local" -IPAddress "192.168.100.20"That should do it.
Step 5: Post-migration verification and cleanup
On the new server, I’ll launch DHCP again and check the basics.
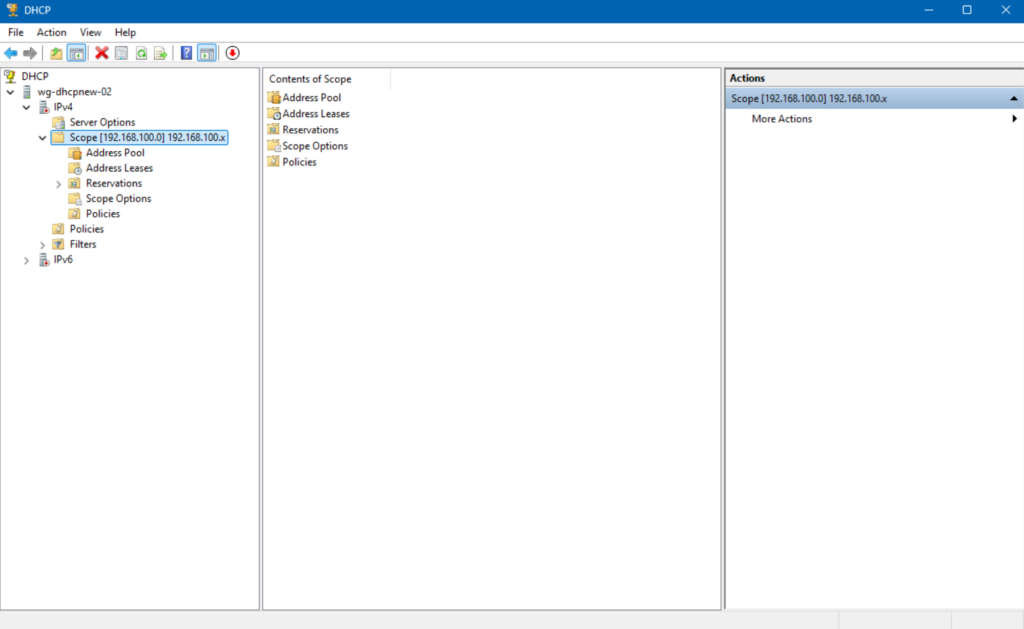
Everything is there, our Scope, Address Pool, Scope Options, etc. We’re ready to confirm with a client machine that it is still able to get a DHCP IP Address lease AND that it gets it from our new DHCP Server.
Post-migration sanity checks: Ensuring everything’s running smoothly
Now that we’ve completed the heavy lifting, we’ll be validating and verifying everything is working as expected. We should be able to release and renew any IP addresses on client machines, get a new IP from the scope, and prove that the client gets its IP address from our new server, not the old one (or another one).
Verifying DHCP lease distribution
On our new DHCP Server, let’s verify our Windows 11 client got a lease from us. I opened DHCP again, expanded our scope, and clicked on Address Leases.
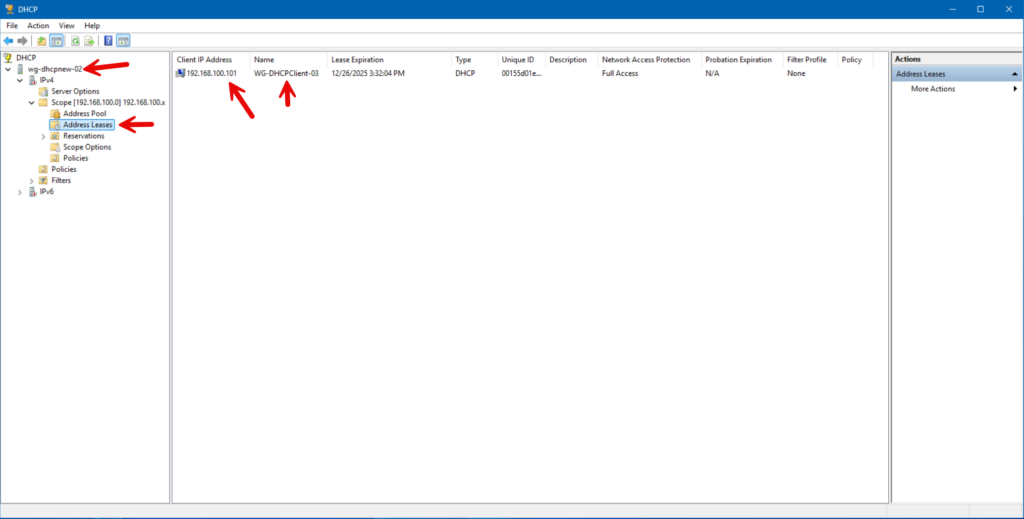
Everything looks perfect. It shows the same IP Address and our client’s hostname.
Testing client connectivity
After I installed my Windows 11 client on the same Hyper-V virtual switch for this special lab environment, I noticed that when the Desktop came up, it had Internet access. I knew SOMETHING worked. But, we want to make sure everything is working as we expect from the client side. Let me go to Windows Terminal and type the following command:
ipconfig /all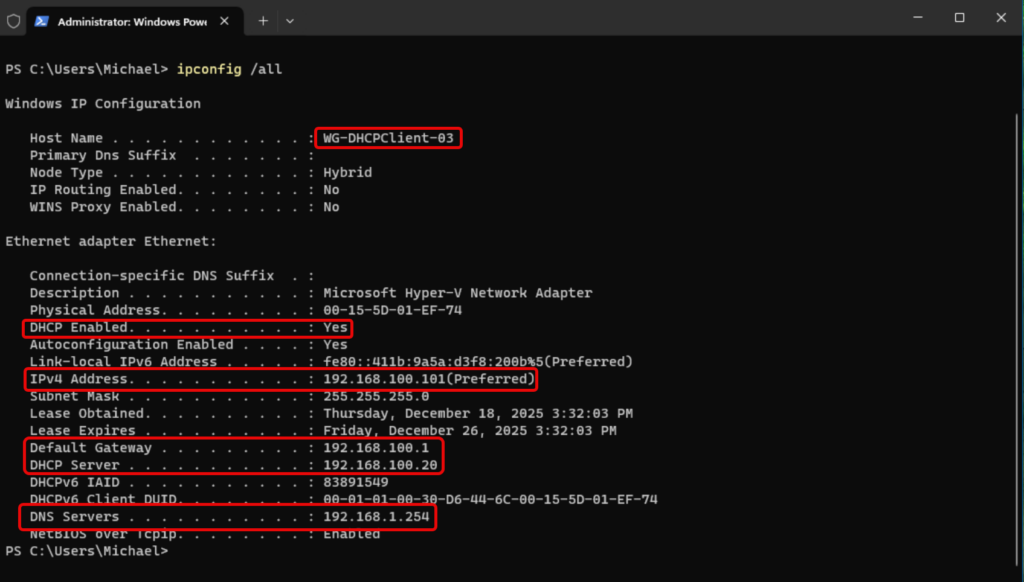
All looks great. We see the client name, DHCP is enabled, the IPv4 address is the first one available in our Scope, the default gateway – my host machine/virtual switch is present, the DHCP Server shows 192.168.100.20, which is our new DHCP server. Plus, the DNS Server is correct, also specified as a Scope Option in our Scope.
Monitoring DHCP server health and performance
After migrating the DHCP role, ongoing monitoring is critical to ensure the service remains stable and capable of meeting client demand. Key indicators of DHCP health include scope utilization, address availability, lease rates, and the absence of fail‑to‑assign events.
Performance counters such as Requests/sec, Active Queue Length, and Acks/sec offer additional insight into server load and responsiveness, particularly in environments where DHCP is servicing a large number of short‑lived clients.
Troubleshooting common DHCP migration hurdles
Even with proper planning and the use of supported migration tools, DHCP role migrations can encounter several common pitfalls that delay cutover or prevent clients from receiving leases successfully. These issues often surface during the transition phase, after configuration data has been migrated but before full production traffic is restored.
Let’s go through the 3 most common topic areas.
1. Firewall issues and port conflicts
Firewall misconfigurations are a frequent source of DHCP migration issues, particularly in environments where host‑based firewalls are tightly locked down. DHCP relies on UDP ports 67 and 68, and if these ports are blocked on the destination server, even temporarily, clients will fail to obtain or renew leases after cutover.
During migration, administrators should verify that the Windows Defender Firewall (or any third‑party firewall) is allowing DHCP Server traffic on all network profiles in use.
2. DNS registration problems
DNS registration issues commonly occur after DHCP migration, especially in Active Directory–integrated environments. While scopes and leases may migrate successfully, dynamic DNS updates can fail if the new DHCP server is not properly authorized, lacks sufficient permissions in DNS, or is using incorrect credentials for secure updates.
Symptoms include clients receiving valid IP addresses but failing to register or update DNS records, leading to name resolution failures.
3. Scope activation failures
Scope activation failures are often overlooked during final validation. Imported scopes may remain inactive by design, requiring manual activation on the destination server before lease distribution can begin. In some cases, scope activation may fail due to authorization issues, incorrect IP bindings, or overlapping subnets detected by the DHCP service.
Why migrate your DHCP server? Understanding the “why” before the “how”
While DHCP is often viewed as a foundational “set and forget” service, it plays an important role in nearly every network environment. Because it operates quietly in the background, the DHCP infrastructure can easily lag behind the rest of the environment in terms of platform updates, security posture, and operational best practices.
Migrating a DHCP server is most often done to upgrade infrastructure, upgrade Windows Server operating system levels to be more security-oriented and reduce risk and improve reliability.
The evolution of Windows Server and DHCP
Although the basic functionality of the DHCP Server service has remained relatively constant in newer versions of Windows Server, the role has done some evolving in areas such as security integration, PowerShell and automation support, and performance scalability.
Newer versions provide improved diagnostics, deeper Active Directory awareness, stronger auditing through expanded event logging, and better alignment with contemporary deployment models such as virtualization and hybrid environments.
Common migration scenarios: Upgrades, consolidations, and hardware refreshes
DHCP server migrations are commonly triggered by broader infrastructure changes rather than issues with DHCP itself. Again, operating system upgrades are a natural driver, particularly when older Windows Server versions approach the end of support and no longer receive security updates. In other cases, migrations occur as part of server consolidation efforts, where multiple roles are redistributed onto fewer, more efficient virtual machines.
Hardware refresh cycles also frequently precipitate DHCP migrations, as aging physical servers are retired in favor of virtualized or cloud‑adjacent platforms. In each of these scenarios, migrating the DHCP role ensures continuity of core network services while enabling the environment to evolve without disrupting client connectivity.
Frequently asked questions
How do I migrate a DHCP server to a new Windows Server?
You install the DHCP Server role on the new machine, export scopes and leases from the old server using PowerShell (Export-DhcpServer) or netsh dhcp server export, then import them with Import-DhcpServer or netsh import. Finally, authorize the new server in Active Directory and deactivate the old one.
Can I migrate DHCP scopes and leases seamlessly?
Yes. Using built‑in tools like PowerShell cmdlets, you can export full DHCP configurations (scopes, leases, reservations, options) and import them into the new server, ensuring continuity.
How can I migrate DHCP without disrupting users?
To avoid downtime, temporarily shorten lease durations on the old server, export/import settings, disable DHCP only after activating the new server, and then monitor clients as they renew from the new server.
What are common issues during DHCP migration?
Typical problems include missing scopes or options after import, clients initially failing to renew from the new server. Especially if IP or hostname changes and outdated IP helper/relay configurations. Ensuring identical server identity and updating relay settings usually resolves such issues.

Michael has been an IT Pro since 1998. He has worked predominantly in the Windows world including client and server operating systems, on-prem systems engineering (AD, DNS, etc.), and over the last ten years or so has embraced and immersed himself in...


