How to Use OneDrive for Business: A Complete Guide

Using OneDrive for Business will help your users be more productive with their files, from any place with an Internet connection. Do they know how to access the OneDrive website? Do they know how to use the OneDrive sync app in Windows? Read on to discover everything you need to know about how to use OneDrive for Business.
How to use OneDrive for Business: The basics
By early 2023, every IT pro knows what Microsoft’s OneDrive is: OneDrive is Microsoft’s file-sharing service for consumers and enterprises in the cloud. There is a distinction between consumer and business accounts, however.
What is OneDrive for Business?
As a consumer, you use a Microsoft account to access your files in OneDrive. OneDrive for Business is the marketing term for the business/enterprise crowd – here, you use your Microsoft 365 work or school account. Although there are very few GUI changes between OneDrive and OneDrive for Business (which is by their design, of course), there are subtle differences.
As this is an IT knowledgebase website, we will focus on OneDrive for Business. Instead of continuing to manage traditional, old, and costly on-premises fileserver infrastructures, hobbling your users by requiring them to be in the office or having a secure connection to your network, you can set them free and encourage them to use OneDrive for Business.
The most unique advantage (at least to me as an IT Pro AND an end user) is the ability to access my files anywhere on various applications and websites. You can have your IT department go ahead and decommission your G: drive and your K: drives, save some IT budget money. With OneDrive for Business, I can have native, integrated functionality in File Explorer on my work computer, my home computer (if necessary and compliant), and my mobile device.
Here’s an example of the productivity boosts you can realize very quickly: Imagine you are working on an Excel file at the end of the day and have to run to a personal appointment. While you’re waiting at the car repair shop, you can open the OneDrive app on your phone and make some final changes to your Excel spreadsheet and send a link to the file in your OneDrive to your manager. Pretty slick!
What do your users need to access OneDrive for Business?
Because OneDrive for Business is so central to file-sharing in the Microsoft 365 space, every user has access to the service. Almost every Microsoft 365 SKU includes licensing for OneDrive for Business. There is nothing special users need to do to use it.
One quick note: when a new user is provisioned either in the Microsoft 365 admin center or synced from an on-premises identity (Active Directory), they need to access the OneDrive website in order to have their account activated.
Don’t worry, there’s nothing special here. It’s just something you may have noticed when using the M365 admin center – when you click the OneDrive tab in the details of a new user, there will be verbiage showing no account exists, yet. All they have to do is browse the OneDrive app online to activate it. Again, very straightforward.
Are OneDrive for Business files secure and safe?
Microsoft always has security in mind with all of its services, and OneDrive for Business is no exception. BitLocker encryption is employed across the entirety of OneDrive for Business and SharePoint Online. In addition, per-file encryption is also included.
All data at rest in Microsoft’s cloud is encrypted with this design (BitLocker). However, per-file encryption goes even further by including a unique encryption key for each and every file! Plus, when a file is updated, every update to that file is encrypted with its own private encryption key.
How to use OneDrive for Business on the web
There are two core methods of accessing OneDrive for Business – online and on Windows (and macOS). Let’s start by investigating the online landscape. Because the web is so pervasive and generally accessible, using the OneDrive for Business service with your web browser is nice and simple across all platforms.
Methods to access the app
There are a few ways you can get to your OneDrive for Business account online. We’ll go through each one here.
First, browse to office.com or microsoft 365.com and log in with your work account.
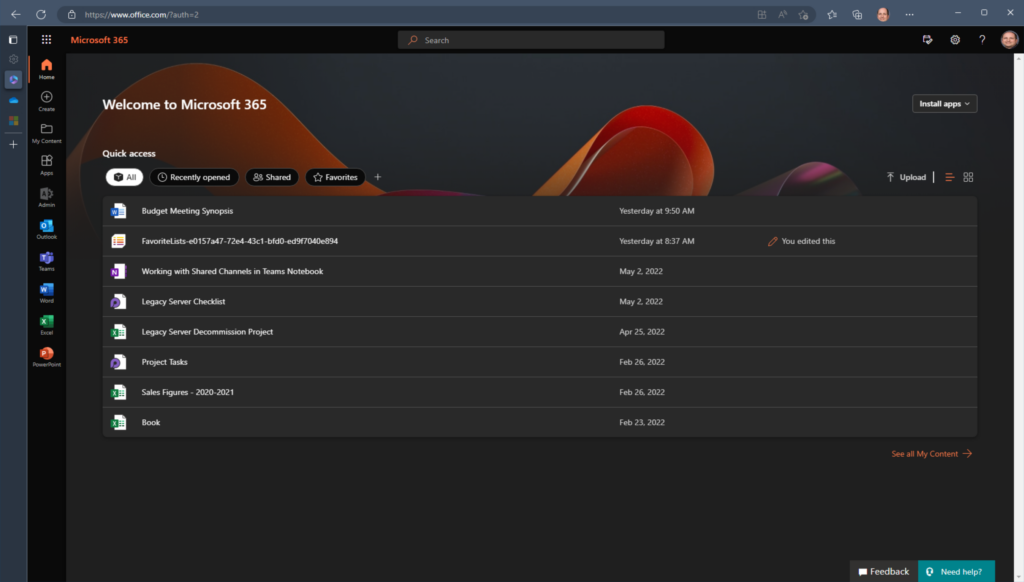
Click the ‘App Selector’ in the upper left corner of the website and choose OneDrive from the list (if you don’t see OneDrive, click the All apps link to expand and locate it).
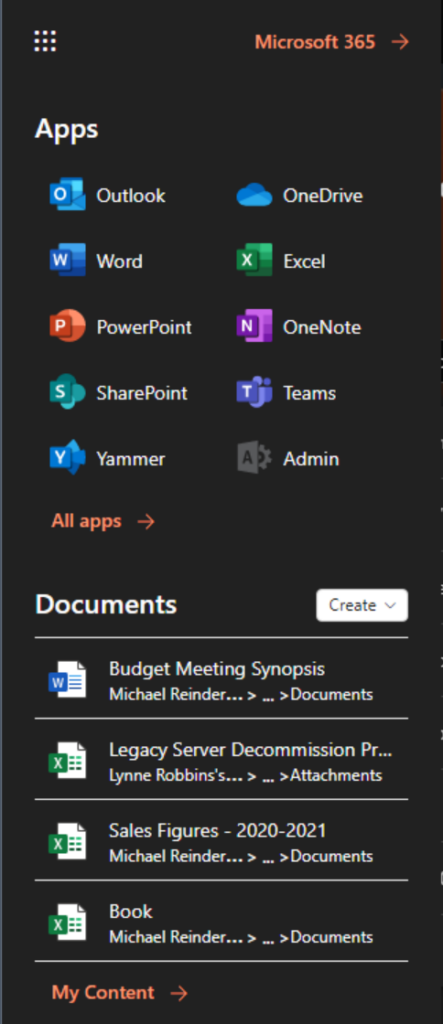
A new tab will open in your browser and open your OneDrive for Business account.
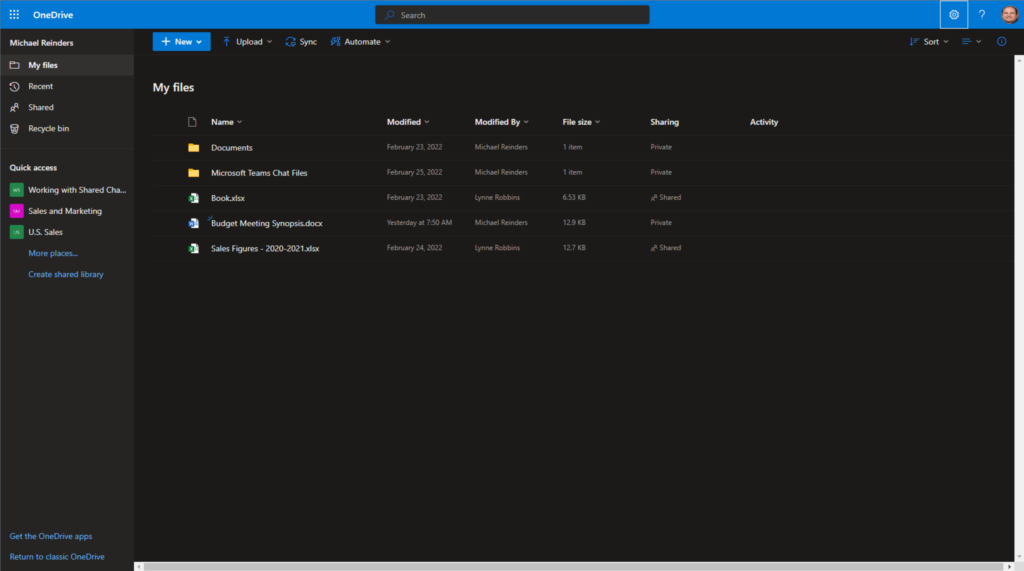
Here you can see your folders and files and the front end of your file-sharing capabilities in Microsoft 365. Microsoft engineers have progressed the UI and feature set over the years – it has become very nice, intuitive, and useful. We’ll go through the specific parts of the interface next.
Another direct method you can use is simply browse to the OneDrive website at onedrive.com.
The various functions of OneDrive for Business
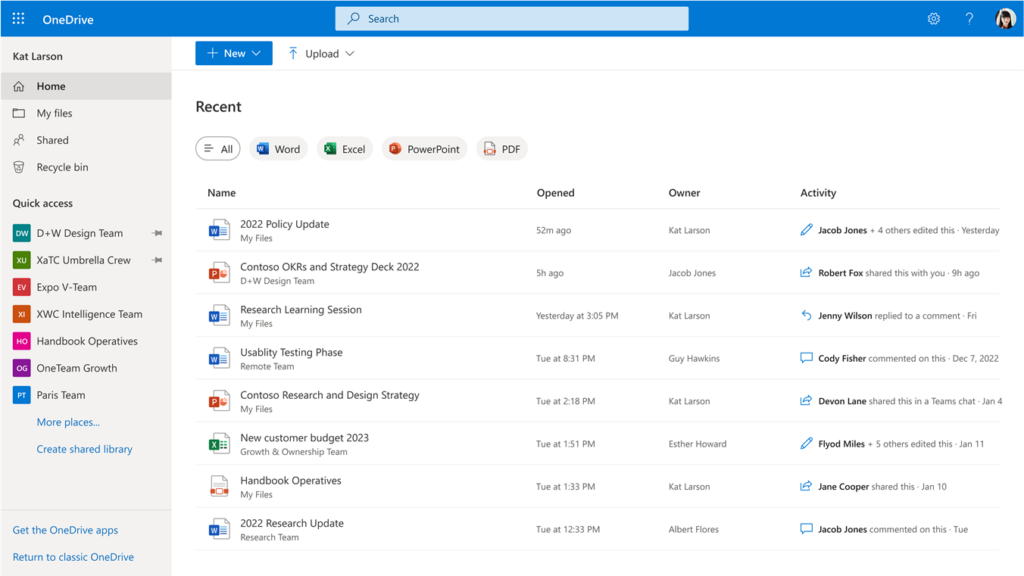
So, the interface looks pretty straightforward, right? Let me take you through the core areas of the website. First, on the left, you’ll see the core views and the ‘Quick access‘ menus.
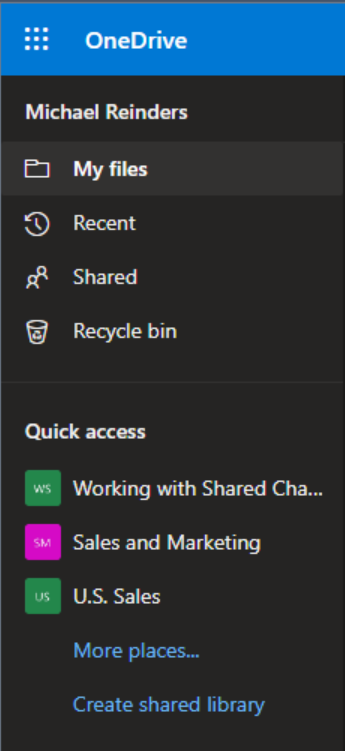
Now, as I write this in February 2023, the core view is labeled ‘My files’. This is where you see your file repository. However, Microsoft has announced a new ‘OneDrive Home’ view coming in late February and early March.
This new OneDrive Home view will more closely match the current view at office.com and will show all of the files that you’ve used, ordered by when you last opened them. You’ll be able to filter this list by file type to quickly find the file you’re looking for. You’ll also be able to stay up to date on any changes happening in the file with Activity.
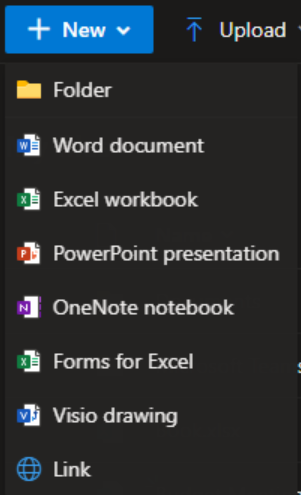
Across the top, you’ll find the OneDrive toolbar. This is where you can click ‘+ New‘ button to create new folders and Word, Excel, PowerPoint, OneNote, etc. files from scratch. I tell you, the integration is beautiful here. I’ll cover the other core buttons below.
How to upload files to OneDrive for Business
Yep, that next button is called ‘Upload.’ This is how you can transfer files from your computer to your online account. You have the option to upload an entire folder or individual files. You can also drag and drop folders (or files) right onto the OneDrive website for efficiency.

I’ll show you how to upload files directly in Windows later on. Stay tuned!
Microsoft has also refined the sharing experience in OneDrive for Business over the years. Because of the tight integration across the Microsoft 365 stack of services, you can share files from many different locations and apps seamlessly and effortlessly.
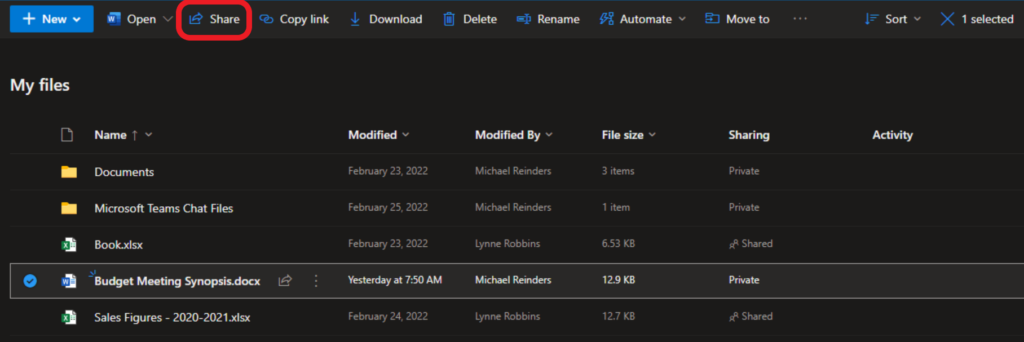
By default, every file in your OneDrive is yours, and yours alone. No one else has access to them (except Administrators). To share one of your files with another user, simply select the file, and click the ‘Share‘ button on the top toolbar.
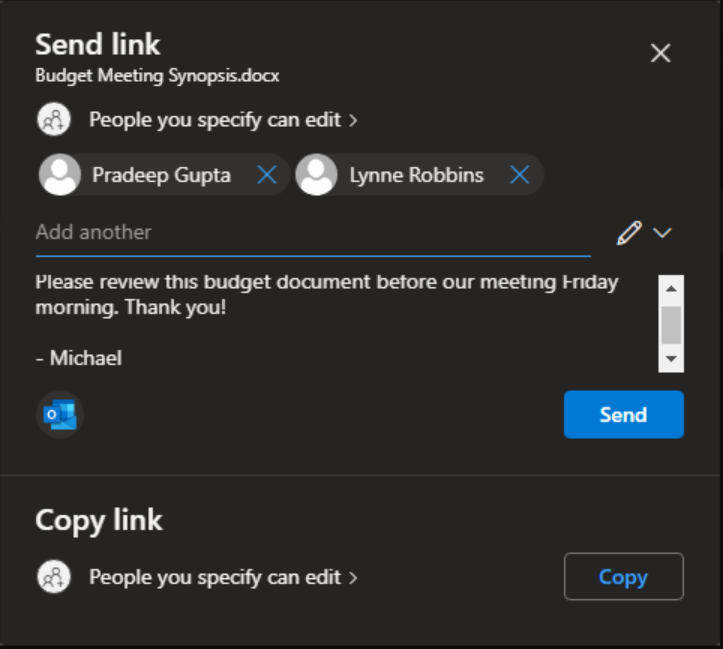
Start typing in the name of the user or users and choose if they should have ‘Can view’ or ‘Can edit’ or ‘Can review’ rights (they only could propose changes, not actually make them). Optionally, you can send an email to these users right from this interface!
Using the OneDrive Recycle Bin to restore files
The final core feature of the OneDrive UI is the Recycle Bin and the related ‘Restore your Onedrive‘ functionality. First, the Recycle Bin works just like the icon in Windows – it contains all the files you’ve deleted from your OneDrive for Business account.

Here, you can select a file, multiple files, or entire folders and click the ‘Restore’ button on top.

Nice and simple. The other, more ‘impactful’ feature is called Restore your OneDrive. Click the ‘gear‘ icon in the upper right corner, and click ‘Restore your OneDrive.’
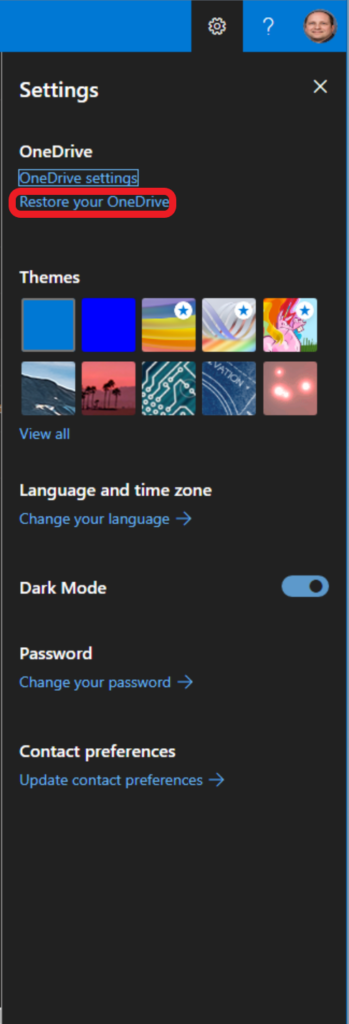
Here, you will see a new window that allows you to take the state of your OneDrive for Business account and revert it to a prior point in time, similar to how System Restore on Windows worked/works. This is especially helpful if you’ve been subjected to a ransomware attack or virus. If you lost a ton of folders due to piracy or a security breach, you can go back 2 days or 10 days and bring them all back!
Here, I have selected ‘One week ago‘ in the dropdown menu. Then, listed below are all the activity items that have occurred in the last week.
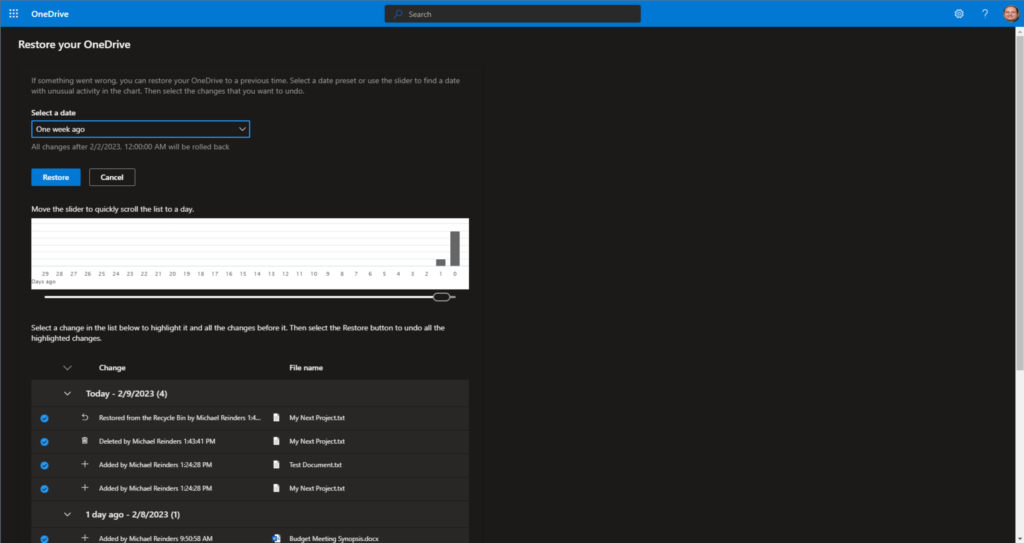
All I need to do is click the Restore button and my DeLorean will do its thing and revert all of those changes. If I created a file since that time, it will be gone. If I deleted a file, it will be restored. This is why I said this was an impactful feature – you have to be aware of the repercussions of all the changes you’re asking to be done. Tread carefully.
How to use the OneDrive for Business sync client on Windows
The other core feature of OneDrive for Business is the OneDrive sync client for Windows and its tight integration into the Windows shell interface. By default, on vanilla installs of Windows 10 (and Windows 11), the OneDrive application is installed and starts upon login. Depending on how your device has been configured, it will either auto-log you on when you sign in with your Microsoft 365 credentials, or the OneDrive window will pop up and ask you to sign in for a more cohesive and productive experience on your device.
One of the convenient features is the addition of the OneDrive folder in your Windows Explorer application. Let’s read more to find out how it all works.
Accessing the OneDrive sync client on Windows
The OneDrive Sync application runs in the System Tray by default. Look in the lower right corner of your device for the SysTray and find the blue cloud icon (or white).
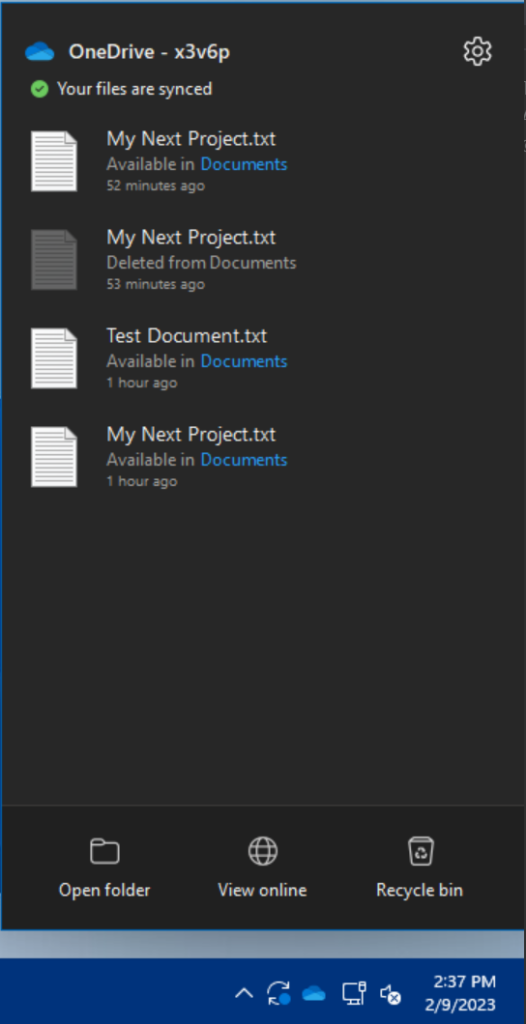
Click it, then click the Settings gear icon.
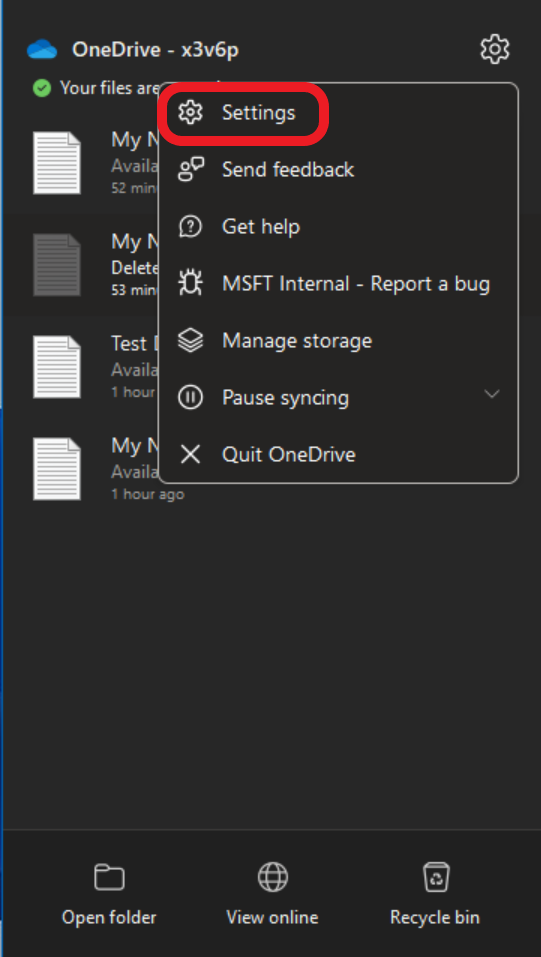
Here we are presented with the recently rolled out modern ‘Windows 11’ interface/UI. Although the UI on Windows 10 is more traditional, the same settings and screens are all here. They’re just laid out differently.
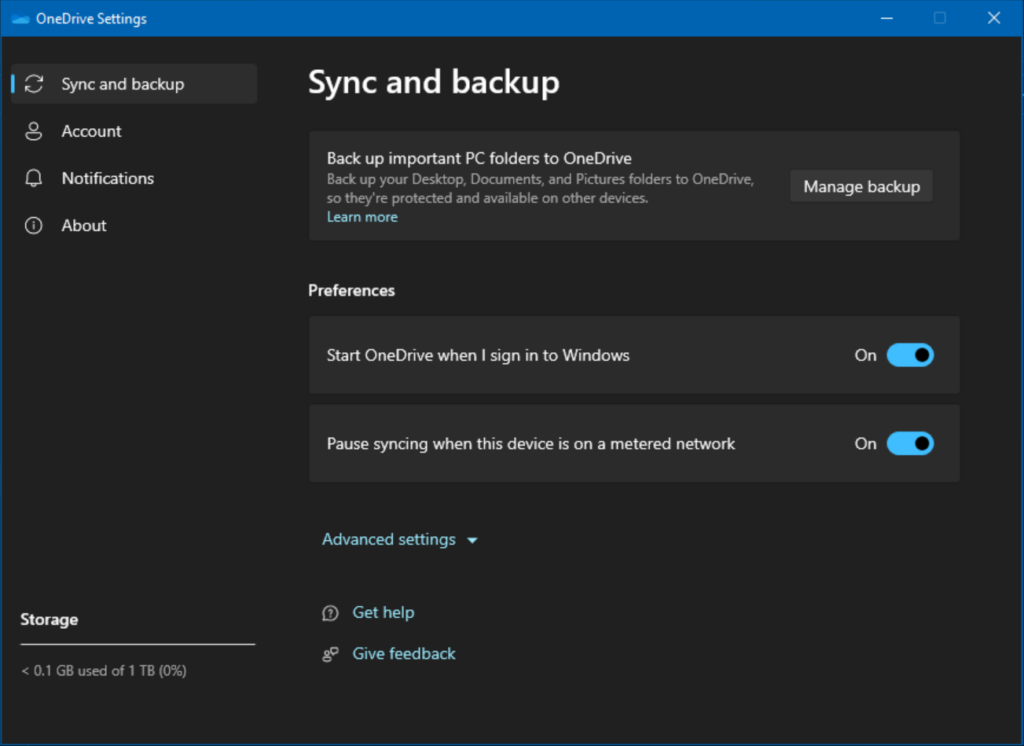
On the Sync and backup screen, you can manage the Known Folders feature. This lets you sync your users’ 3 critical folders to OneDrive.
When migrating users to new devices, the most cumbersome aspect of making sure they have everything from their old device on their new one is the Desktop, Documents, and Pictures folders. This makes it easy to set up the syncing of these folders to OneDrive. That way, no matter what device they are using, they will always have these folders and files available.
Accounts and notifications
Click on the Accounts menu option on the left and you’ll see what accounts are linked on the device.
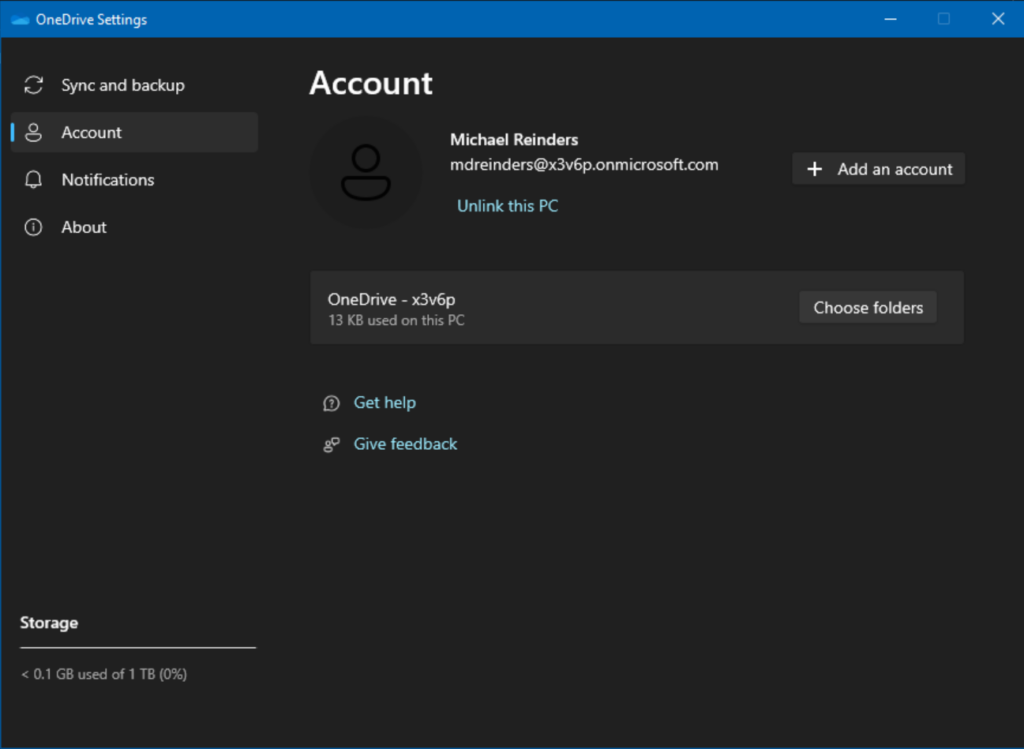
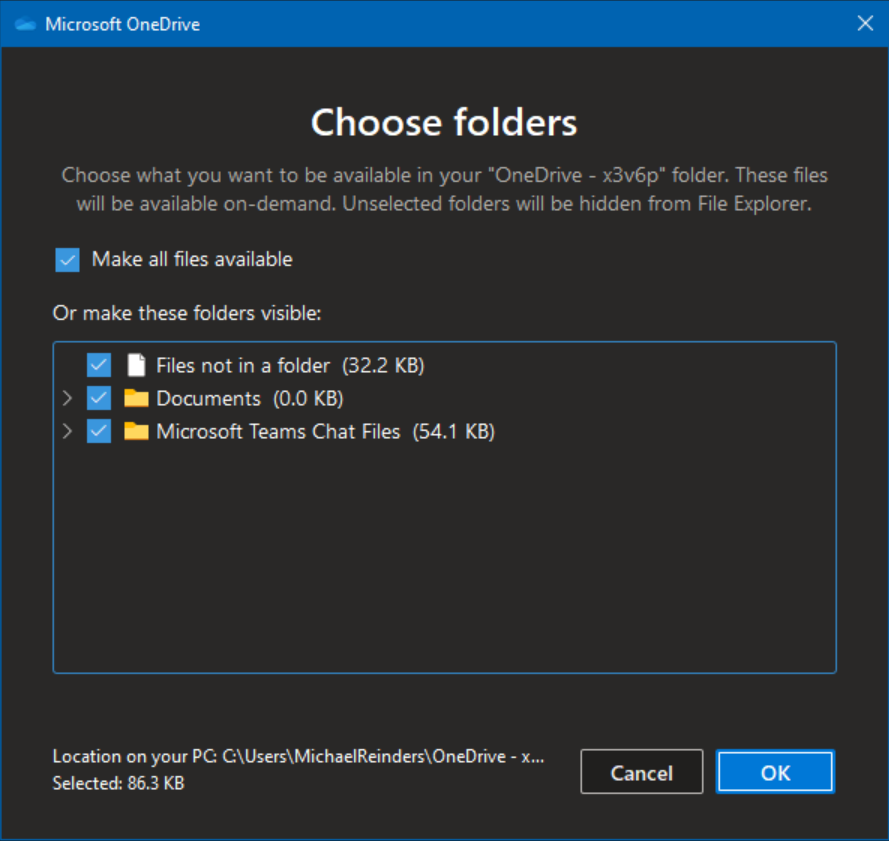
You can also see what specific folders are permanently synced (available offline) and how much local storage space they take up. Click Choose folders and you can choose which folders will be available offline all the time.
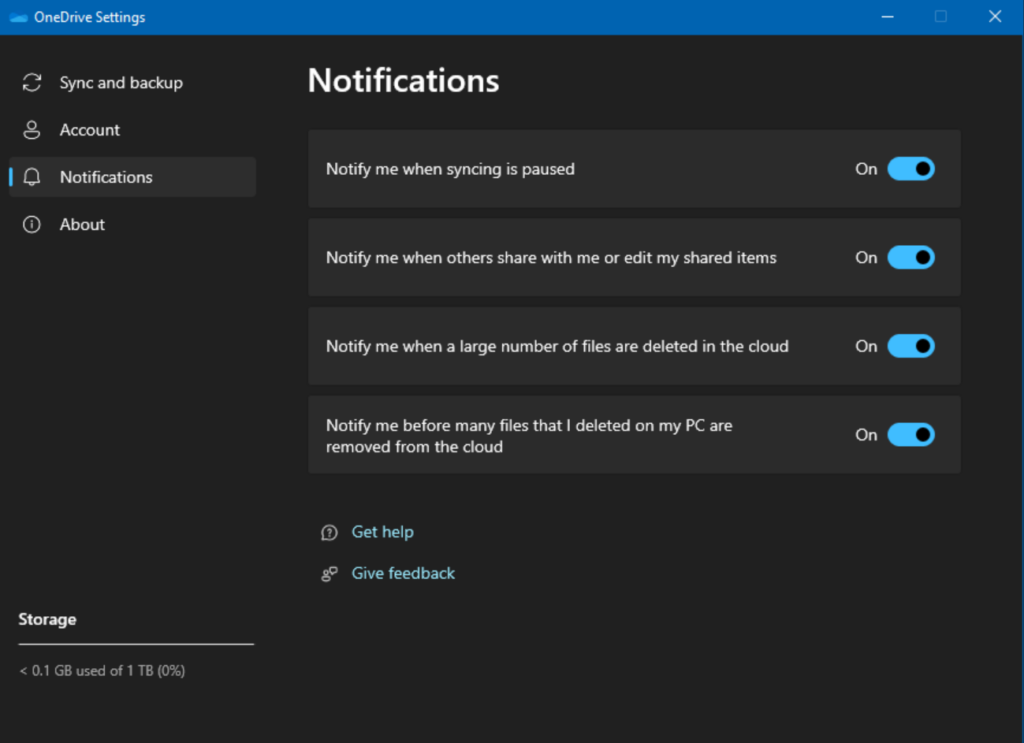
Click the Notifications option and you’ll see various options around receiving prudent OneDrive activity in Windows.
Key aspects of using OneDrive for Business when offline
Microsoft has gone back and forth between OneDrive and offline functionality over the years. It wasn’t pretty going through Windows Vista, Windows 7, Windows 8/8.1, and then Windows 10. With almost every major Windows version, they effectively changed how offline modes worked. Thankfully, with Windows 10 and forward, they came to their senses and determined Files On-Demand was the best.
Back on the Sync and backup menu, click the Advanced settings dropdown and you’ll find the Files On-Demand options.
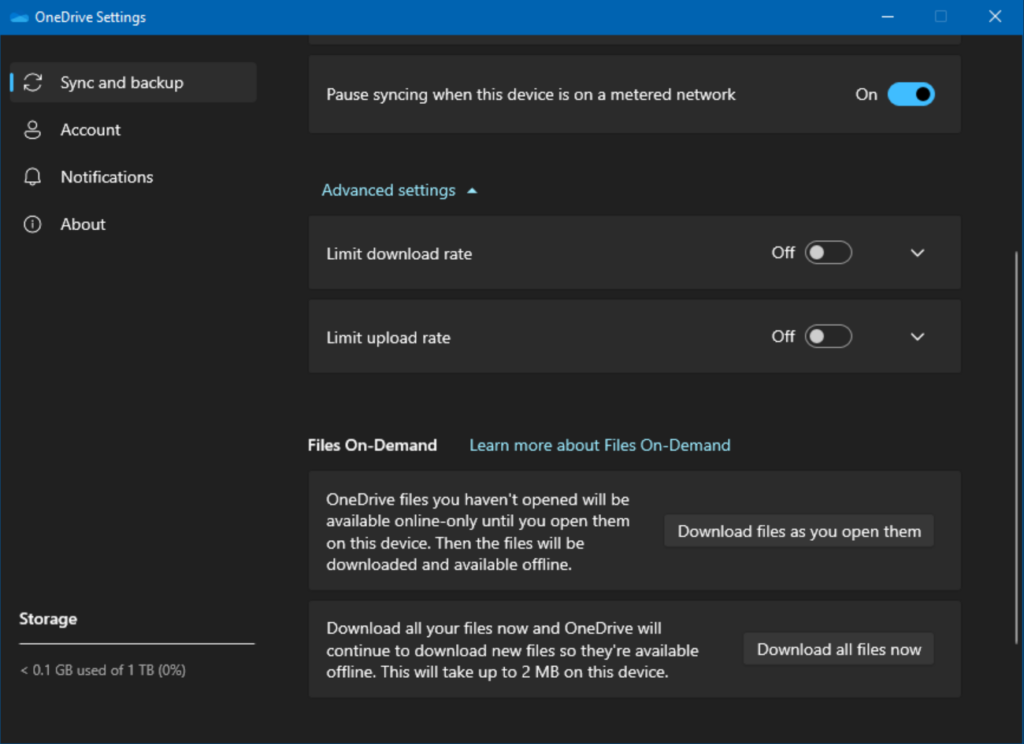
You can basically leave the defaults as they will work best for your users. Only the files your users explicitly access and open will be copied and stored on their devices. You don’t have to worry about a user’s 750GB of OneDrive files saturating every device they log into. This is nice and efficient.
Best tips for dealing with sync conflicts
As an IT Pro, I have needed to support end users and their issues sometimes when using the sync tool in Windows. Heck, I have had these issues, too!
If you glance down and see a red ‘x’ circle on your OneDrive icon, it means that there’s a sync problem. Click it and you’ll be presented with the fact that there is a sync conflict with one or more files. Maybe you worked on updating a file locally and it’s having issues syncing those changes up to the cloud. Now what?
Well, I’ll admit that even though the ‘wizard’ that pops up to assist you with resolving the issue is often cumbersome, it has improved with the service over the years. And, honestly, I could write an entire post about this issue. But, let me give some general steps to resolve this within the scope of this post.
- Try unlinking your OneDrive account, and signing in again from scratch. This, by design, will remove the conflict. Hopefully, when you get signed in again, the issue will self-heal.
- Move the files out of whatever folder they reside in. This sometimes will resolve the stuck issue with one of your files.
- Reboot your computer. (I mean, come on. If all else fails, reboot).
- Do a full reset of OneDrive synchronization.
Honestly, I would be remiss if I didn’t mention a wonderful productivity tool related to OneDrive for Business and SharePoint. By the way, the OneDrive service (and website) is essentially a highly-customized SharePoint Online site collection. So, it’s natural that Microsoft would include some tightly integrated features between the two.
Navigate to one of your favorite SharePoint sites and access the Documents link.
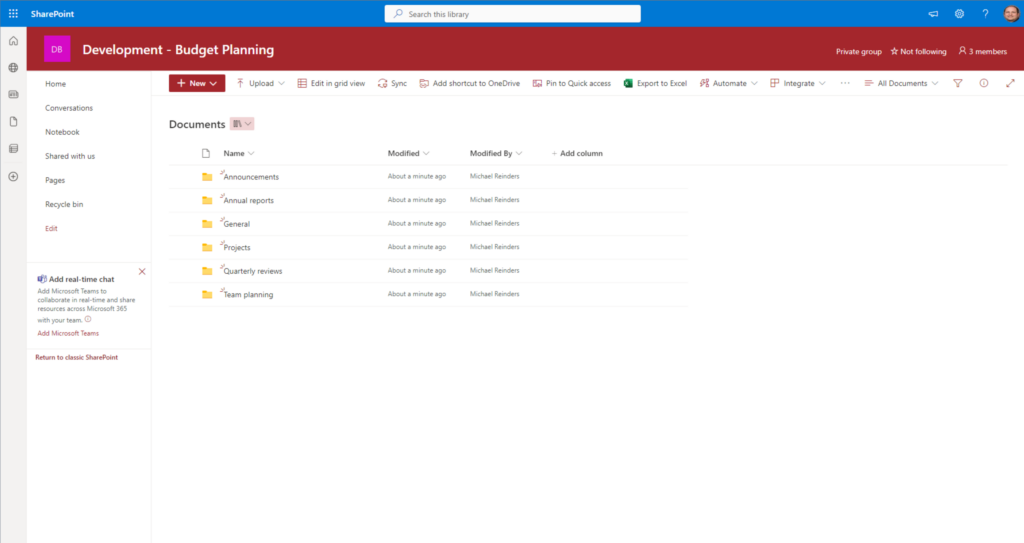
Who wants to keep a browser tab open to your SharePoint files? Wouldn’t it be nice if you could just work in Windows Explorer with the rest of your files and OneDrive files? Well, you can. See that Sync button on the toolbar? Click it!
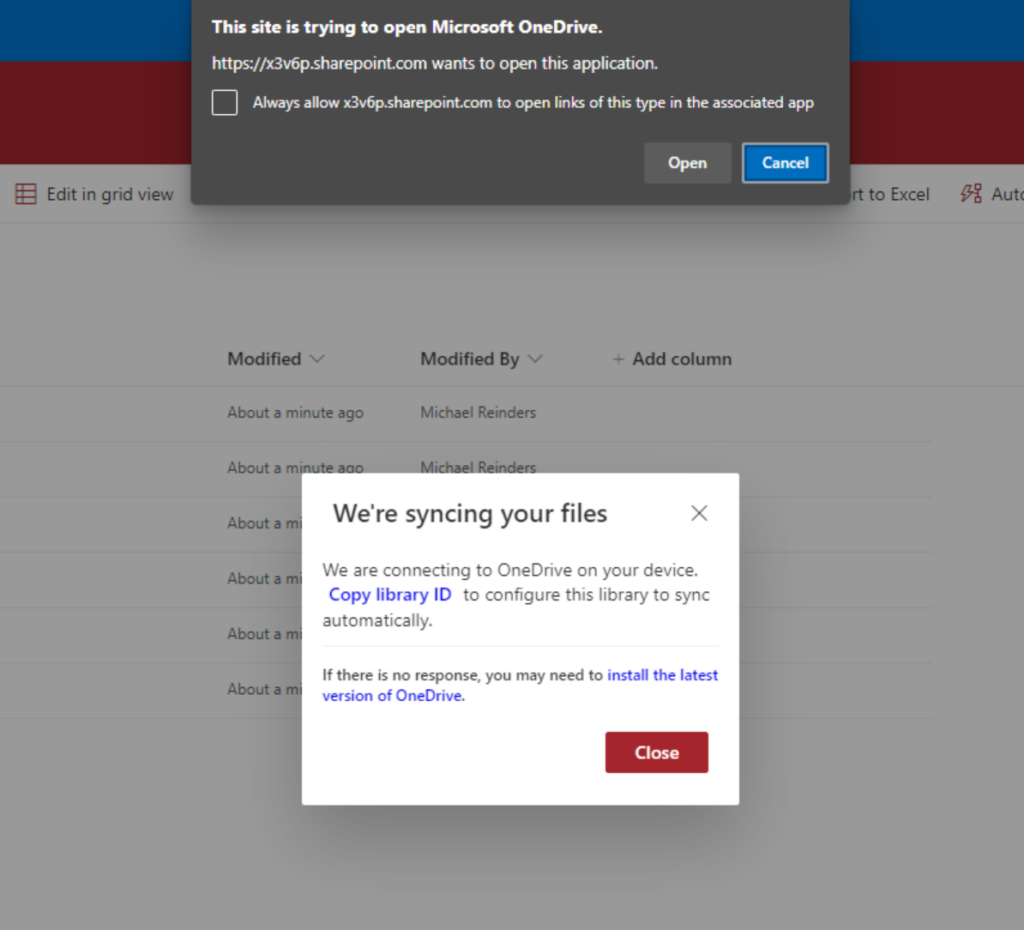
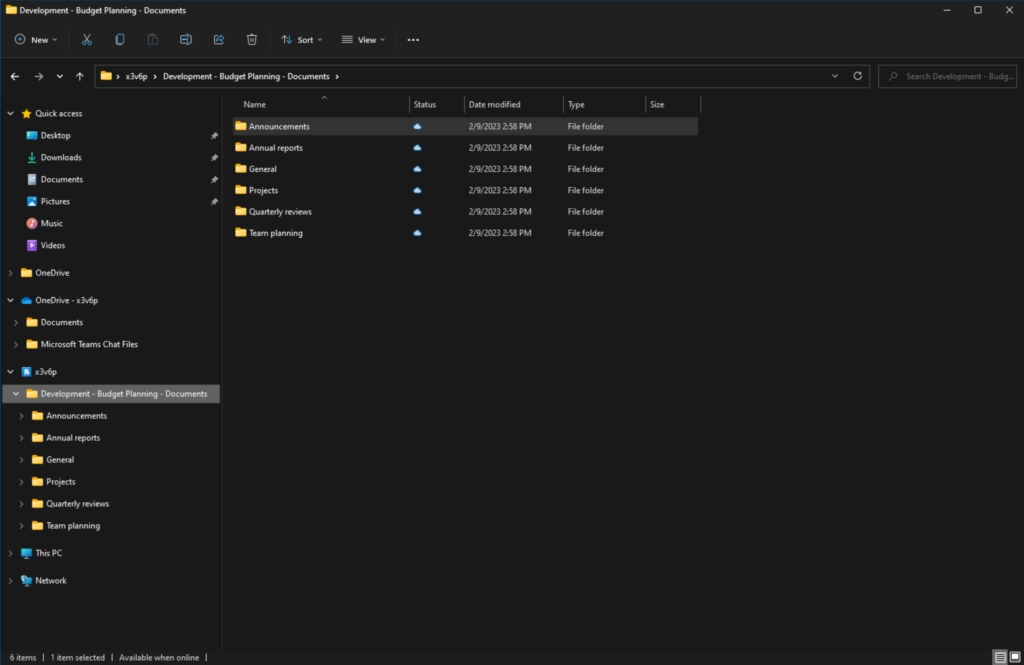
We’ve initiated the process to start syncing all the files in this Document Library with the OneDrive app. Now, let me open Windows Explorer… I spy something new!
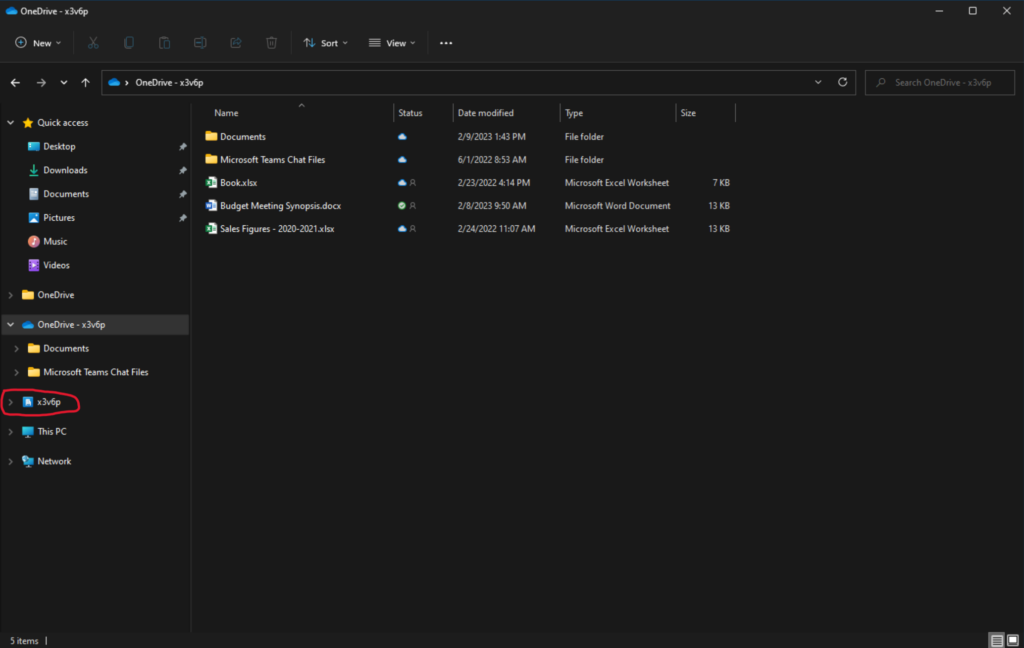
That ‘x3v6p‘ is the name of my tenant in Microsoft 365. The naming convention is ‘different’ because it’s part of my Developer tenant. You will see your company name here instead.
Anyway, click that, and now you have full access and feature parity as if you were on the SharePoint website. Every individual SharePoint Document Library you’ve synced will appear here. This is a boon for accessing all of your files in one place!
Additional ways to access OneDrive for Business
I will round out this post by giving you two more helpful locations to access your OneDrive files.
The OneDrive mobile app
Yes, there’s an app for that! Browse to the Apple or Android app store on your smartphone, search for ‘OneDrive‘, and download the app. Sign in with your Microsoft 365 credentials and you will have a very useful utility to give you a dashboard of sorts on your OneDrive account, recent activity, and the ability to do limited editing of files. Plus, you can share files and send links right from your device!
Always wishing to be transparent, I will mention an odd productivity snag when using the OneDrive app. It has to do with copying files from your OneDrive to SharePoint libraries. Unfortunately, there is no direct way to do this. The ‘easiest’ workaround is to first download your file(s) in your OneDrive app and then click the ‘Libraries’ link at the bottom of the UI, browse to your SharePoint document library, and upload.
(If you know of a better way to do this, please leave a comment at the end of this article. There are inquiring minds that would love to know!)
Microsoft Teams
In the desktop application in Microsoft Teams, access the Files app on the left, and click the OneDrive item under Cloud storage.
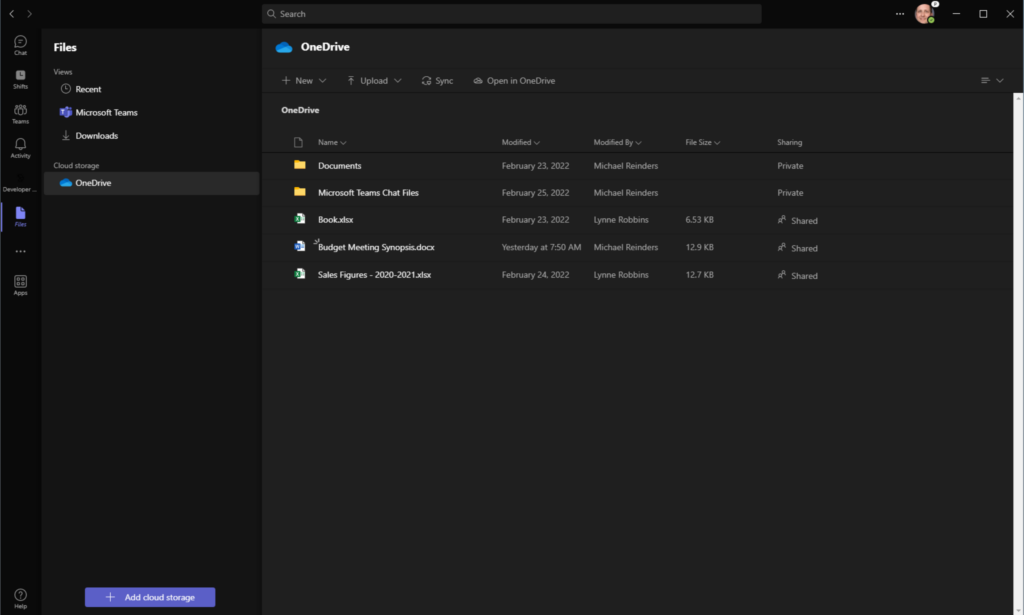
Here’s another helpful view into your OneDrive account. You will essentially have the same UI and features available to you as if you were on the OneDrive website.
Conclusion
OneDrive for Business is a full-featured, easy-to-access file-sharing service that is integral to Microsoft 365. They have given us multiple methods to access your files, multiple options to share files, and even use collaboration tools to edit files in real-time with other colleagues! I love using that feature.
Please leave a comment below if you have any questions or comments about this topic. Thank you!


