How to Recover Your PC Using System Restore on Windows 10

System Restore on Windows 10 is a crucial backup feature included in the OS. It lets you create restore points before installing any new apps, drivers, and Windows updates. If something you installed on your PC starts causing issues, you’ll always have the option to go back to a previous restore point and get your PC back up and running. Understanding Windows 10 System Restore from boot can be essential.
In this guide, we’ll show you how to use System Restore on Windows 10 and how to manage your different restore points. We’ll also explain how to address the various problems that can be encountered during the restoration process.
How to use System Restore on Windows 10
Well, we’ve got a decent idea of what System Restore is and what it’s used for. Let’s go through all the steps to make sure the feature is enabled, check the configuration options, show how to take a manual snapshot aside, and then go through a Windows 10 system restore from boot operation ourselves.
I’ll also show how you can choose which restore point to use, how to restore individual files and folders, and explain the other system triggers that warrant an automatic snapshot procedure.
How to access and turn on System Restore on Windows 10
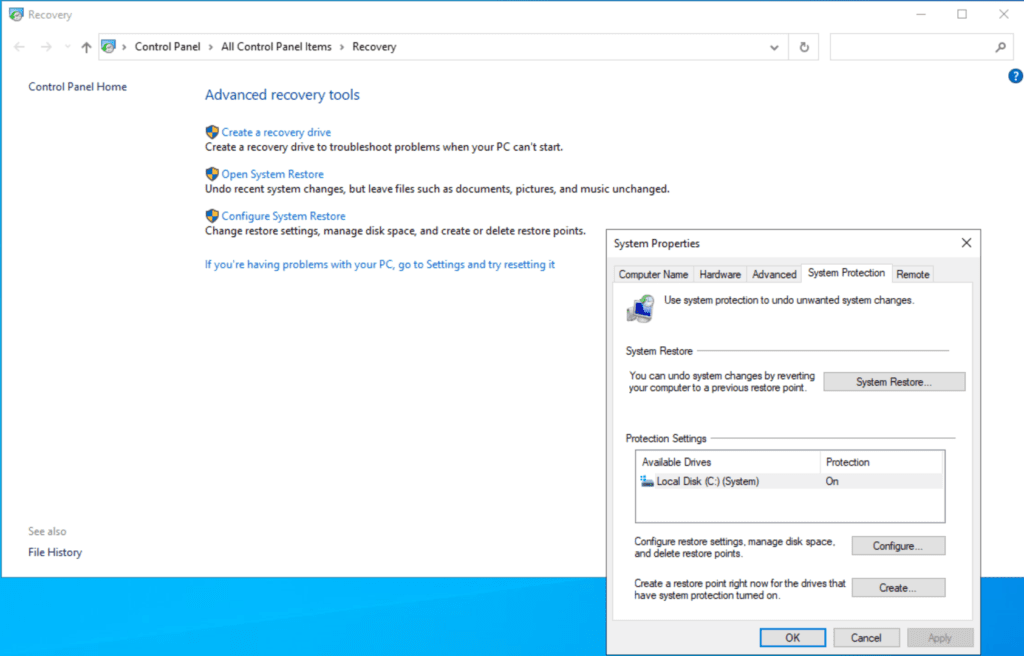
There are a few methods of opening the System Restore GUI in Windows 10. The fastest way (in my opinion) to access it is to click the Start button and type in ‘recovery.’ Choose the ‘Recovery’ Control Panel item, and the ‘Advanced recovery tools’ menu opens up.
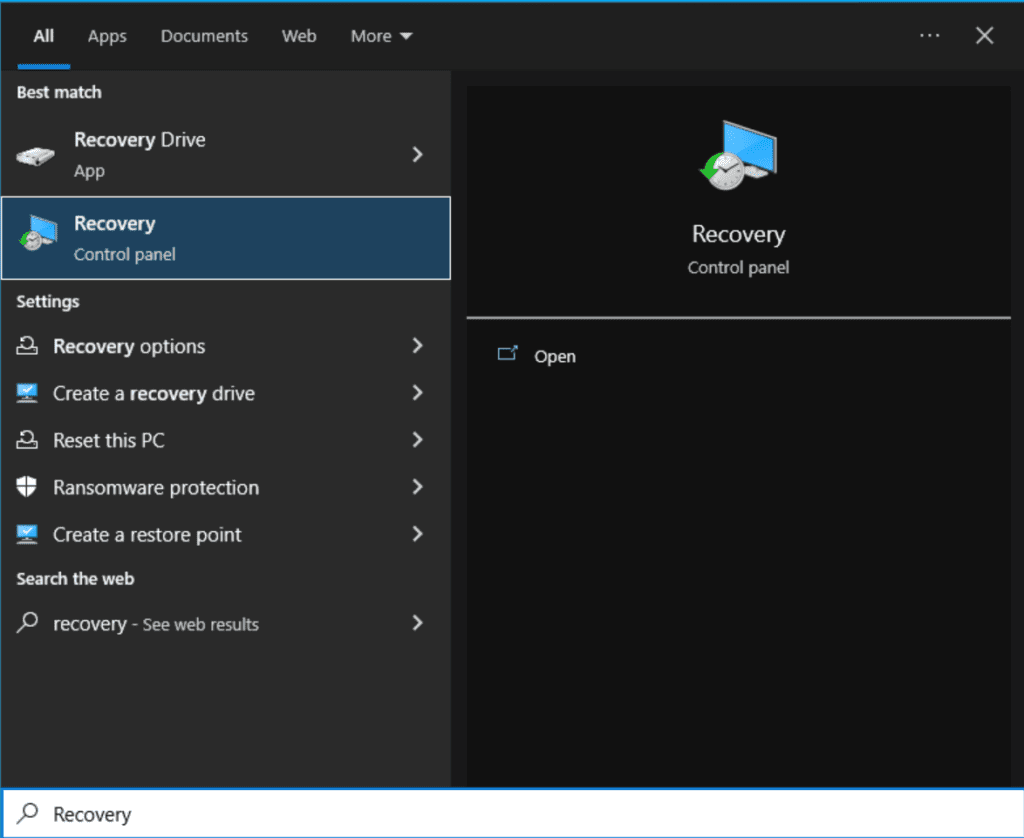
Here, you can choose the last option, ‘Configure System Restore’.
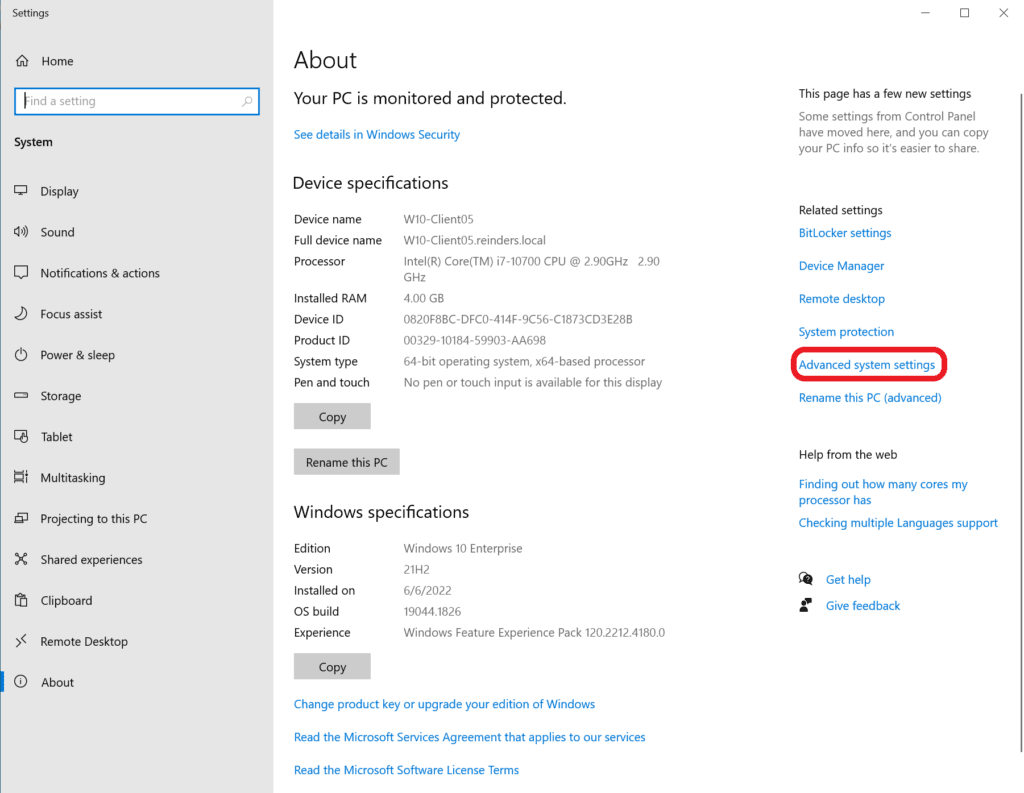
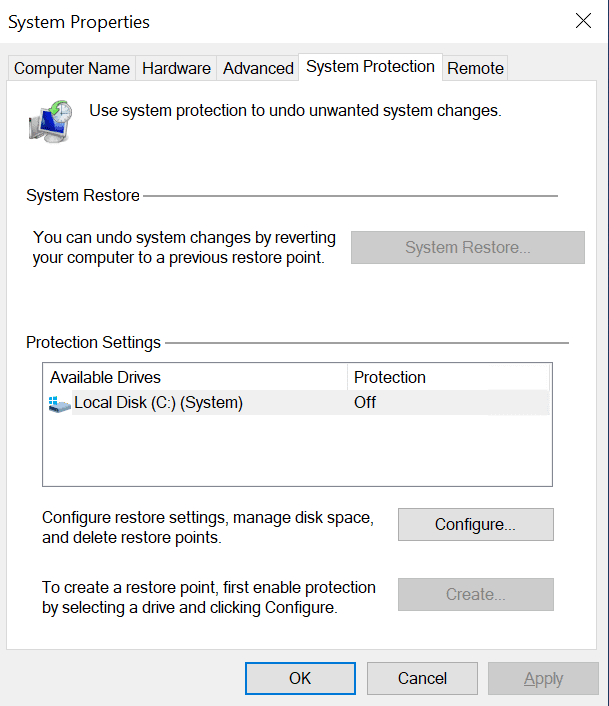
Another method is to right-click on the ‘This PC‘ icon on your desktop and click Properties.
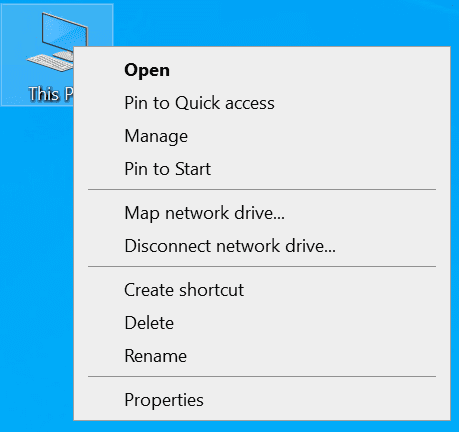
Next, click the ‘Advanced system settings’ link on the right. Finally, click the ‘System Protection‘ tab on the top!
Alright, we’re getting to the guts of this feature real soon now, I promise. However, before I show you how to view existing restore points and how to delete them, we have some prerequisites to take care of first – namely, turning it on! 🙂
Per my instructions above, click Start and type in ‘recovery.’ Choose the Recovery Control Panel item at the top of the list.
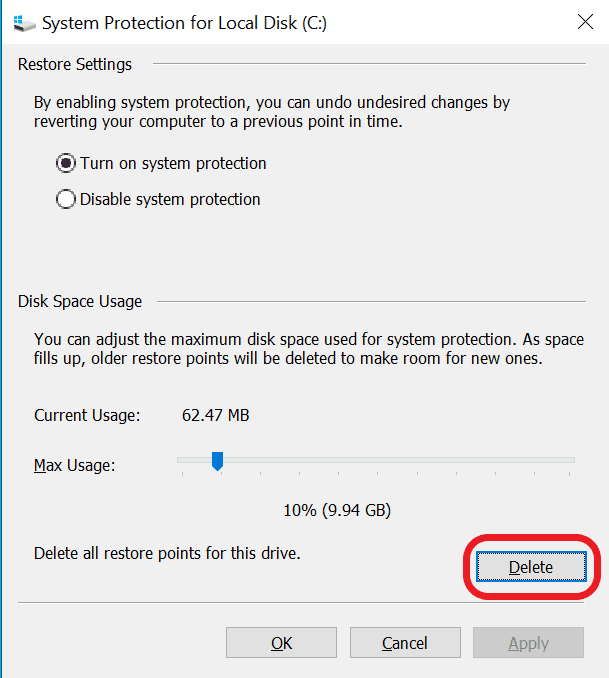
Click Configure System Restore. Click the ‘Configure…‘ button towards the bottom.
Next, click ‘Turn on system protection.’ Choose what percentage of the disk volume you want to set aside for restore points. I chose a nice round 10%.
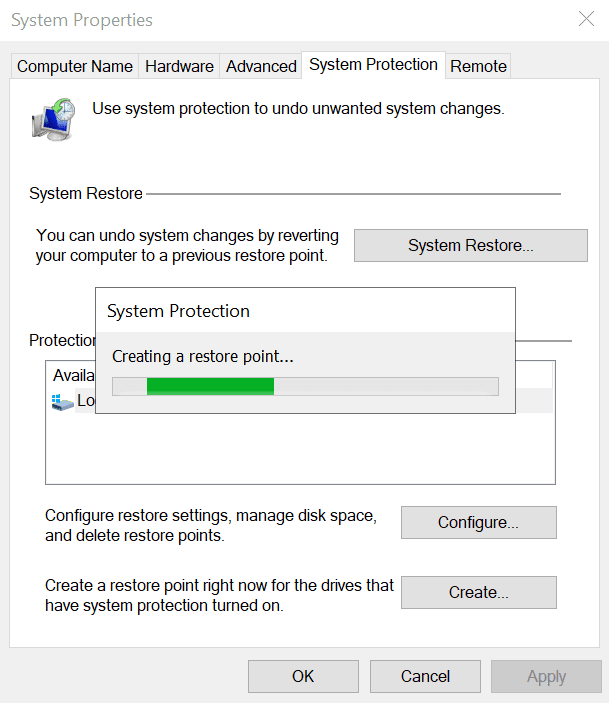
For completeness’ sake, click the ‘Create…‘ button at the bottom and name the snapshot whatever you wish. I’m calling mine ‘Initial Snapshot!’.
How to go back to a previous restore point
Now, I can show you how to view existing restore points and how to go back to them. Back on the System Protection tab in the System Properties window, click the ‘System Restore…‘ button that is now clickable.
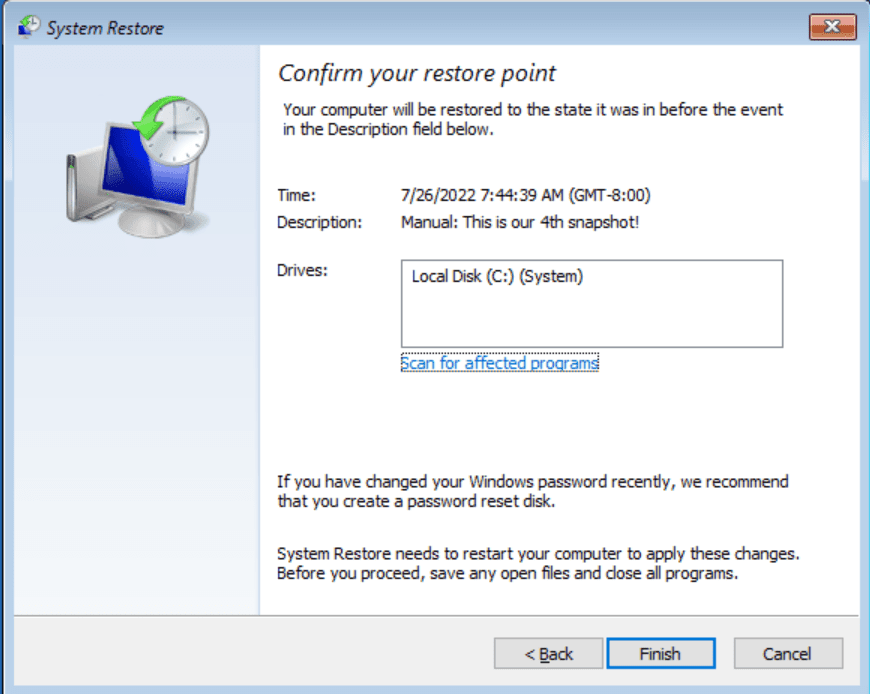
You’ll see a list of restore points available to choose from. Select one and click the ‘Scan for affected programs‘ button to have Windows show you what would be ‘reversed’ if that snapshot was used.
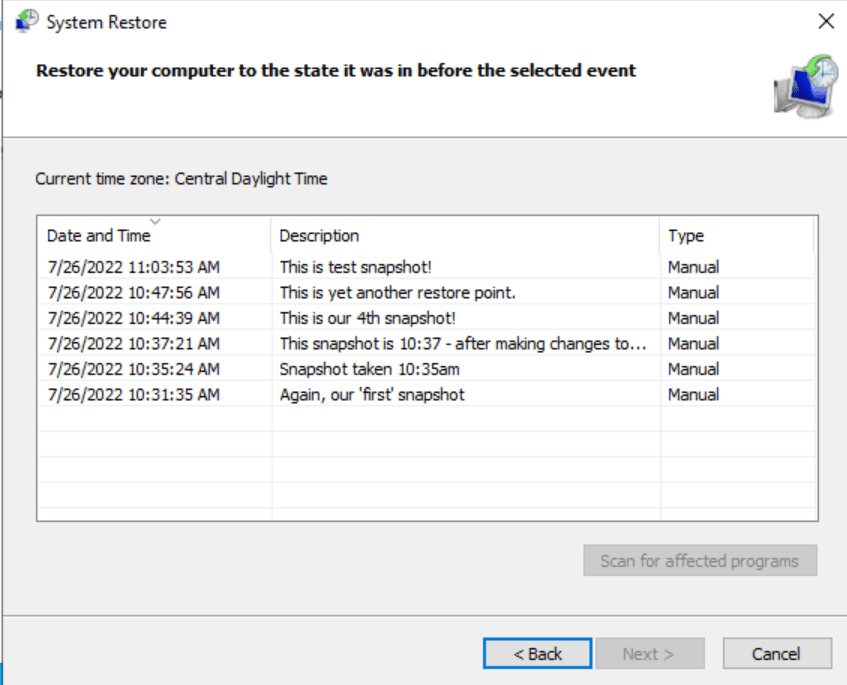
Let’s proceed to choose one of these restore points and observe the changes. I’ll choose one of the Manual restore points and click Next.
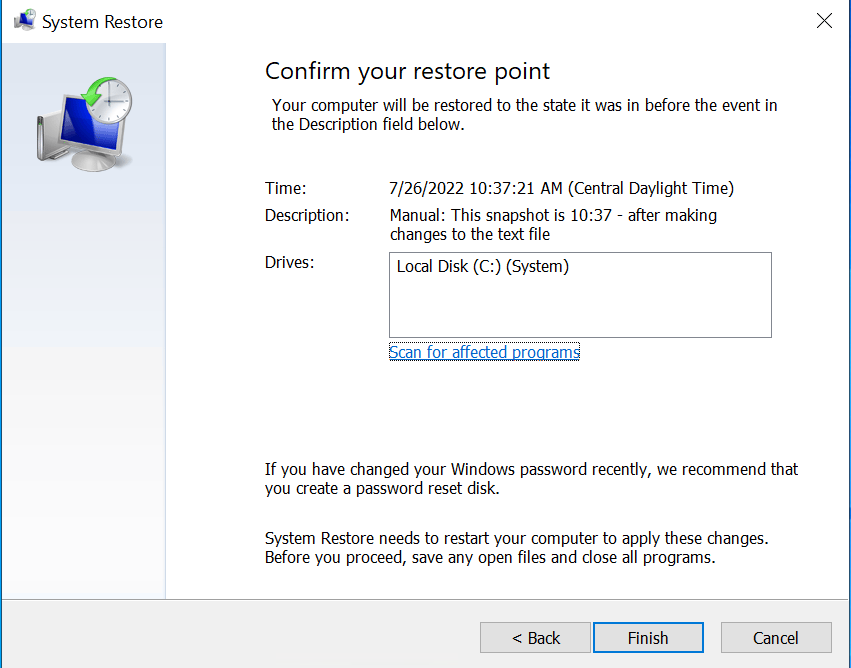
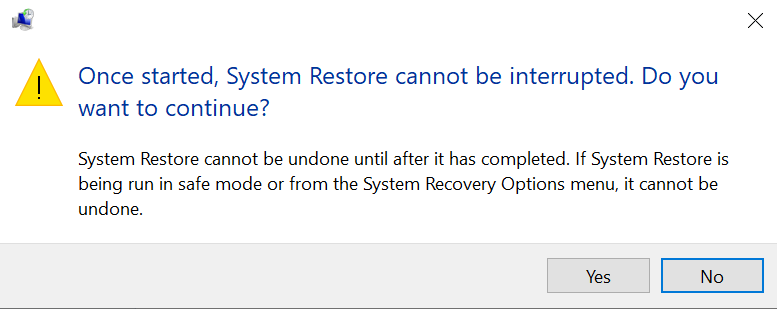
A quick warning before we proceed…
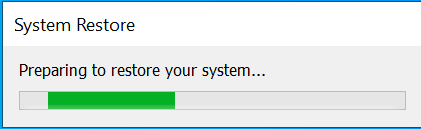
While we’re patiently waiting…
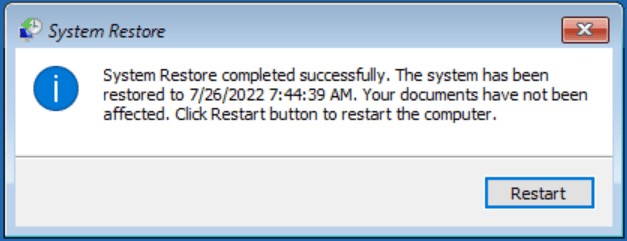
And here we are in between reboots…

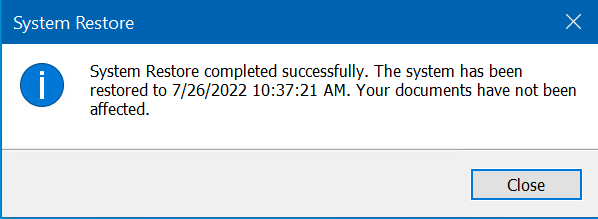
And after the machine reboots, we are good!
How to access System Restore from the Advanced Boot Menu
You do have another method of using System Restore to revert to an earlier snapshot. And, you can do it from a ‘cleaner’ interface, the Advanced Startup menu. Follow along here to learn how to access this menu.
There are several ways you can boot into the Advanced Menu. The easiest and most foolproof is to access it via the Recovery section in the Update & Security category of Windows Settings.
- Click Start -> Settings -> Update & Security -> Recovery.
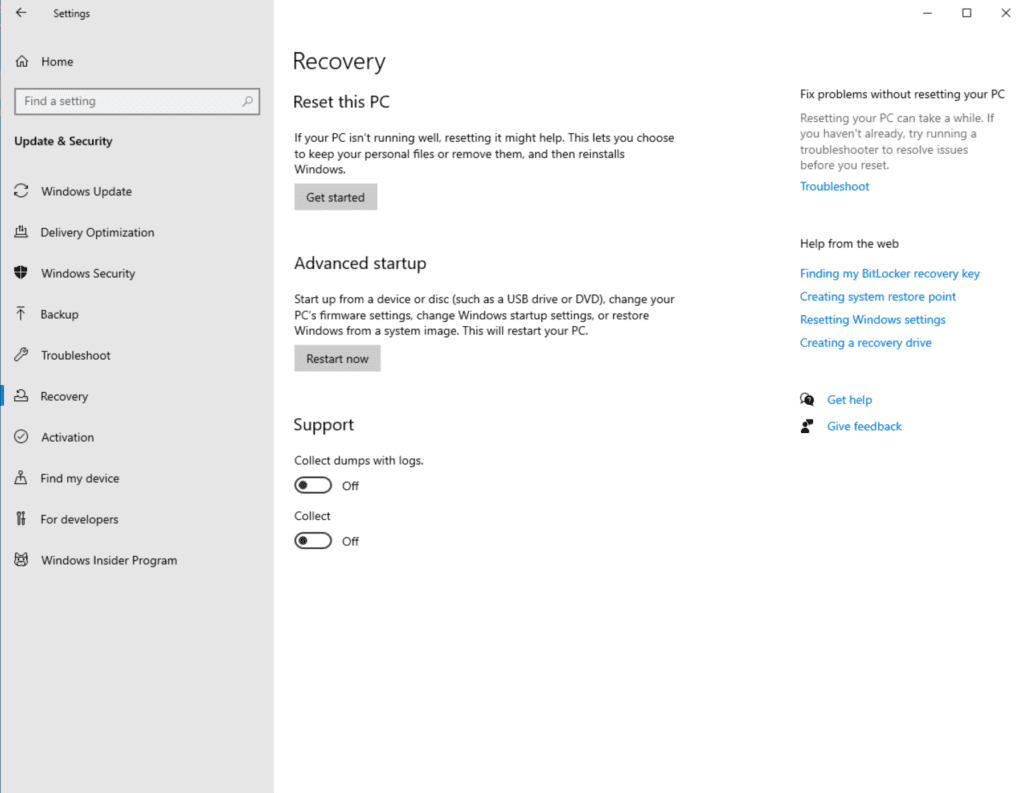
- Under ‘Advanced startup‘, click the ‘Restart now‘ button.
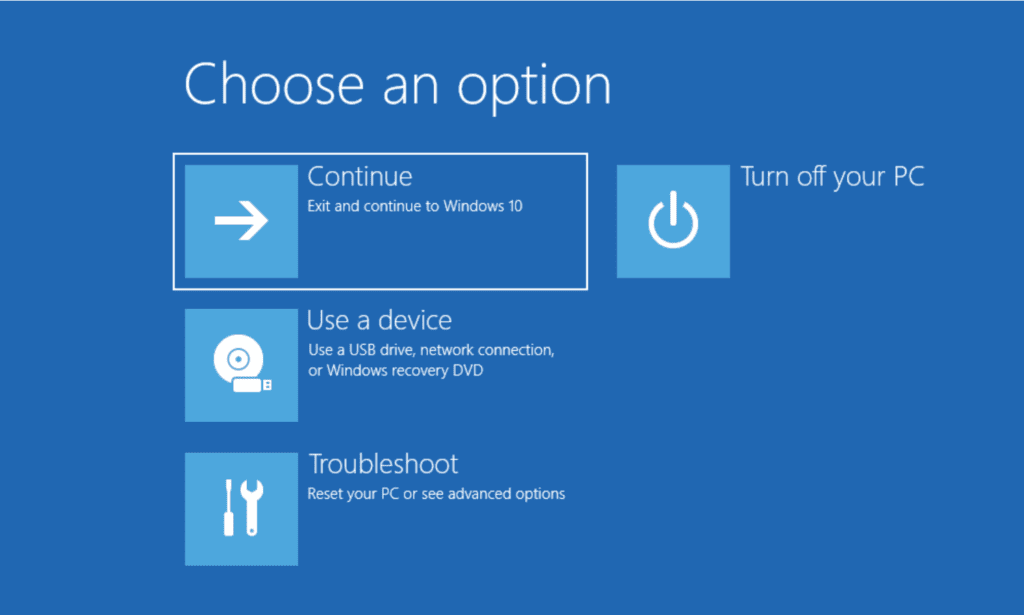
- Click Troubleshoot -> Advanced options -> System Restore. This will reboot and bring you to the System Restore menu.
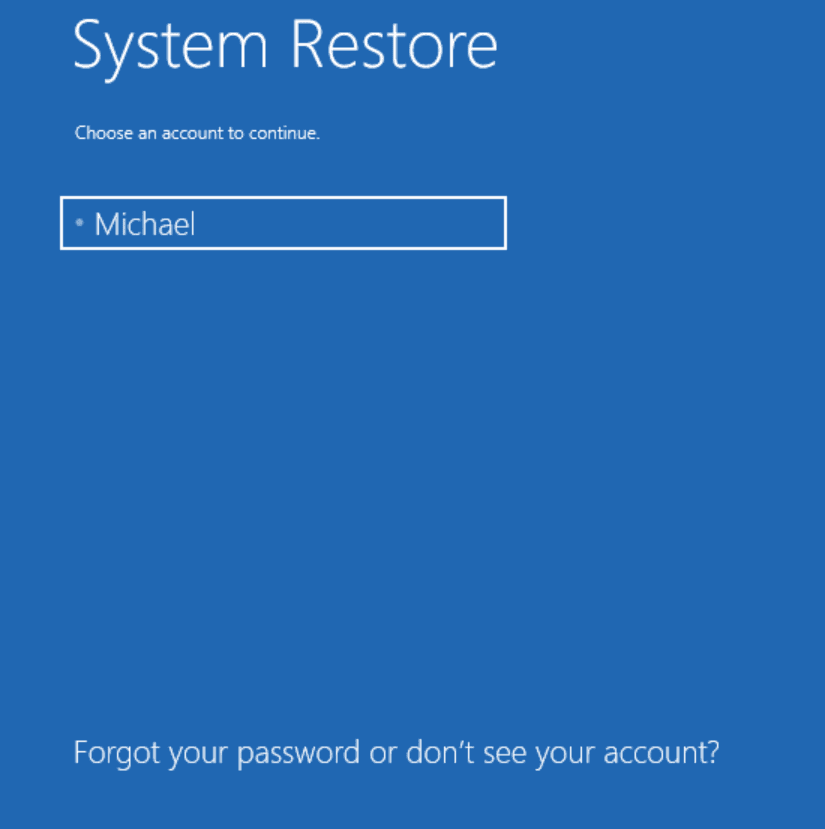
Click an account name with local Administrator privileges and enter your password.
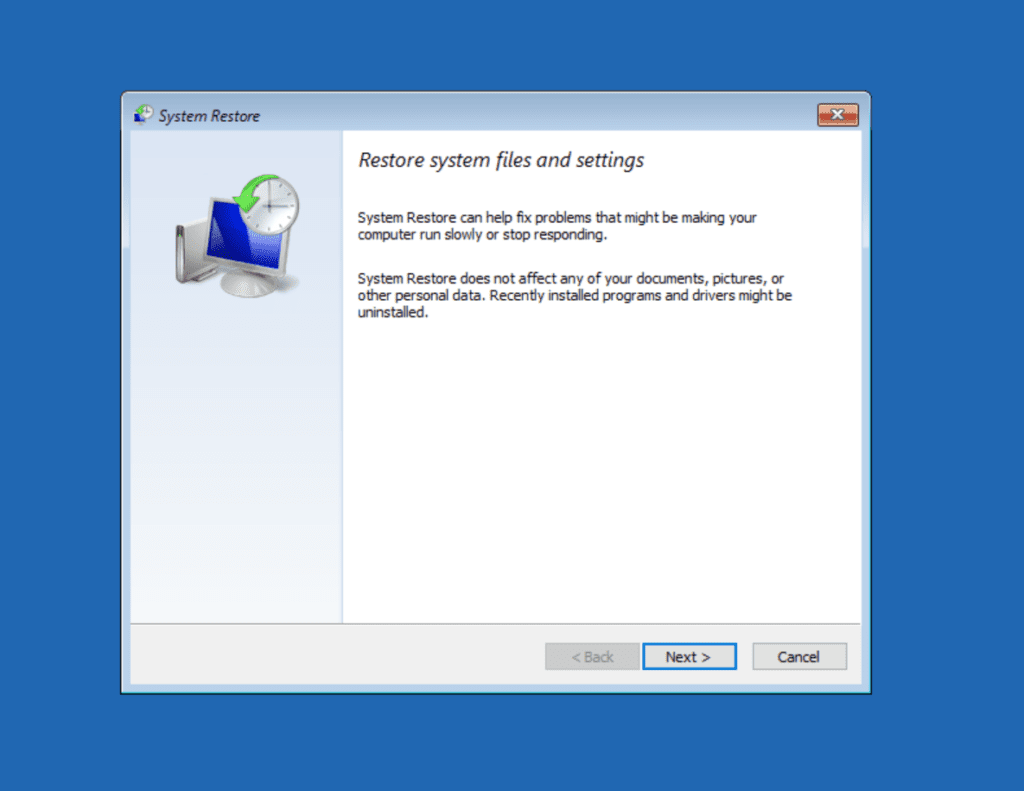
Now, you’ll be greeted with a System Restore welcome screen. Click Next.
Here, you can choose from the list of Restore Points and click Next. You will see a summary screen and a warning informing you to make sure you don’t interrupt the restore process.
Assuming it works, you should see a confirmation screen asking you to Restart.
How to manually create or delete system restore points
Although you always have the ability to create your own manual restore points, Windows 10 will also create one behind the scenes for you whenever any of these system-wide events occurs:
- When software is installed using Windows Installer technology.
- When Windows Update installs new updates.
- When a driver is installed or updated.
I already described the steps to create an initial restore point when configuring System Restore for the first time. However, let me show you how to manually create other restore points if needed:
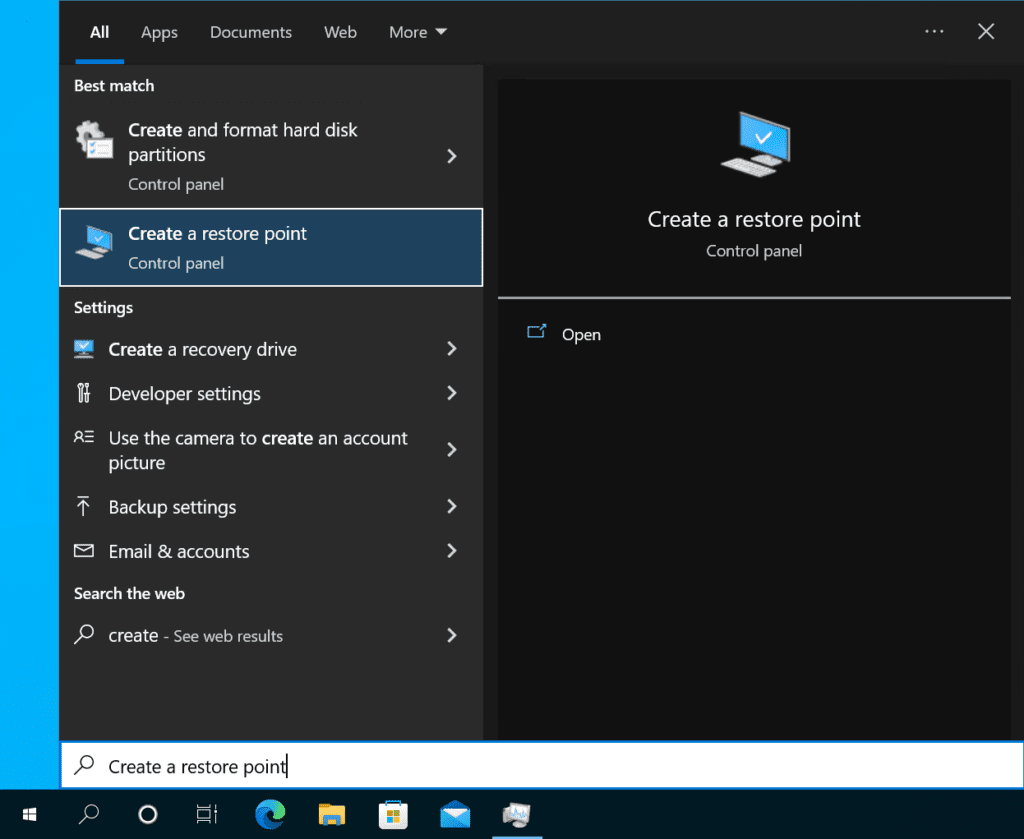
- Click Start, and type in ‘create.’ Choose the ‘Create a restore point’ Control Panel option.
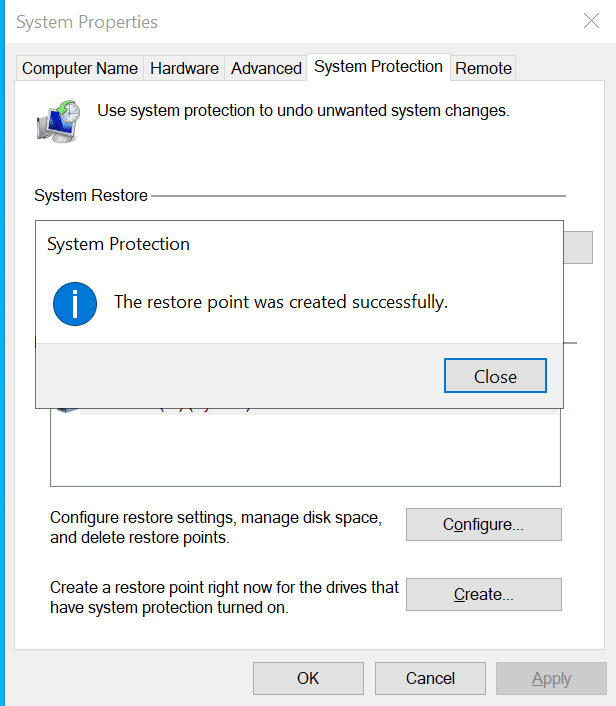
- Click the ‘Create…’ button at the bottom, name your snapshot, and click the ‘Create‘ button again.
That’s all there is to it! Now, let me show you how to delete saved system restore points:
- On the System Protection tab, click the ‘Configure...’ button, then the ‘Delete‘ button in the lower-right corner.

- Click the Continue button.
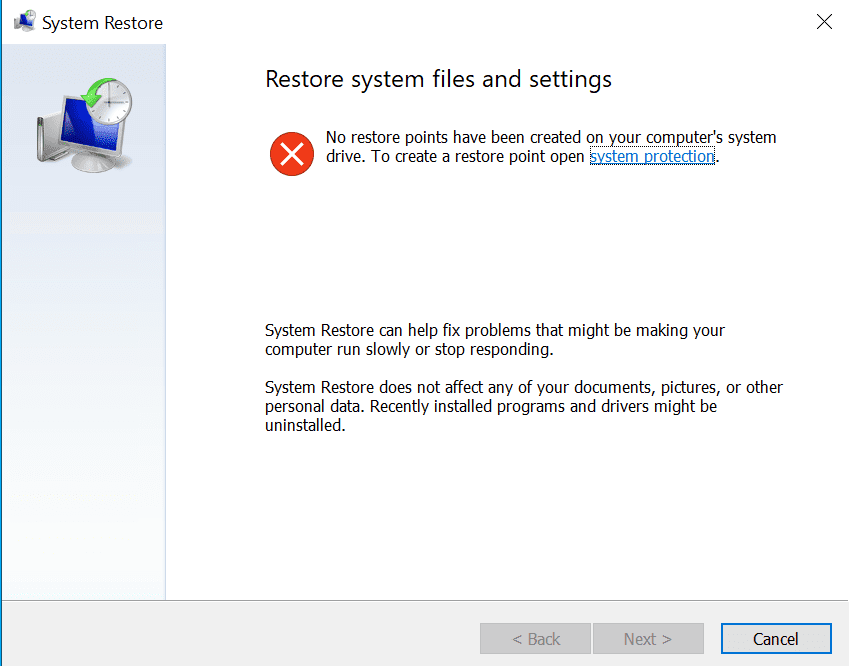
And, they’re gone. And, if you click the System Restore button now, you get a warning that no restore points exist and for you to create one.
How to restore individual files and folders to a previous state
Back in the Windows 7 days, a nice and very convenient ‘side-effect’ of enabling System Restore was the ability to ‘go back in time’ and view or restore the state of your personal files and documents right from the File Explorer interface. This was done completely outside the GUI for System Restore / System Protection.
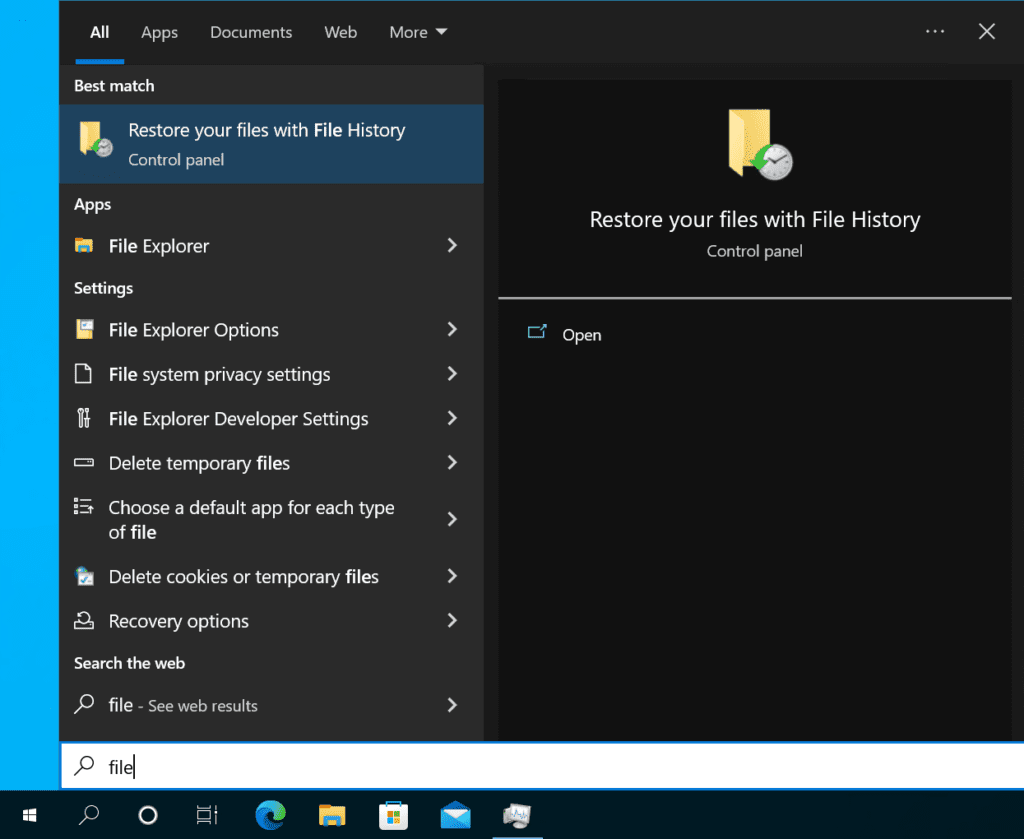
However, in Windows 10, the ‘Restore previous versions’ feature is no longer tied to restore points. File History needs to be enabled for this function to work. To enable the File History feature, click Start and type in ‘file‘. Click on ‘Restore your files with File History.’
Depending if the feature is turned on or not will dictate what screens you’ll see here. Let me go through one scenario.
Click the ‘gear’ icon in the upper-right corner and click ‘Set up file history.’
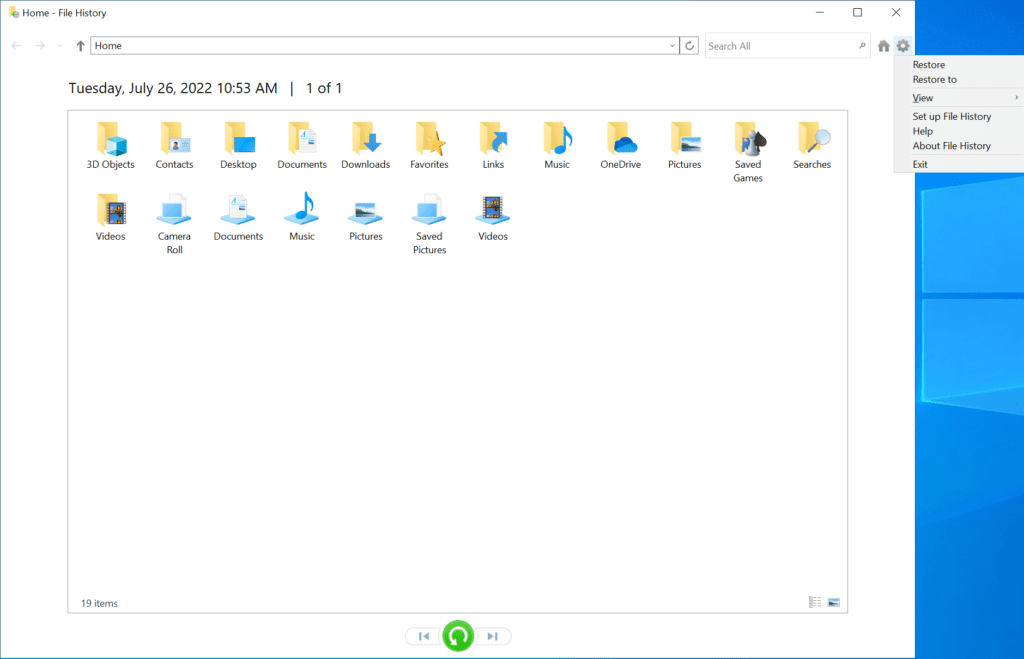
Click the ‘Turn on‘ button. You may need to choose either a local volume that’s not your system partition (C: drive), or you can add a network location as I did.
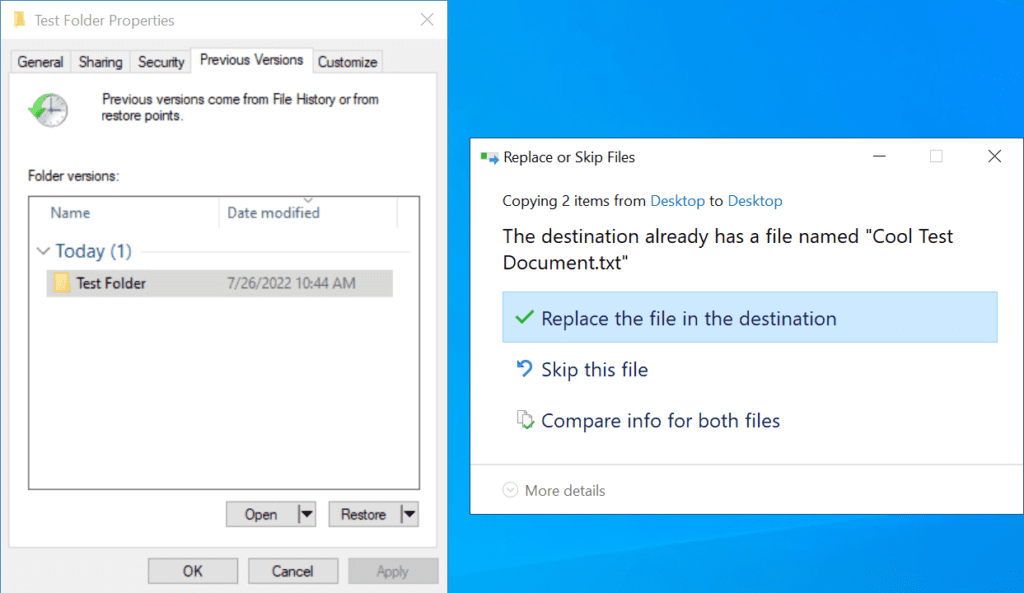
Now, when I right-click on my ‘Test Folder‘ folder on my Desktop and click Restore previous versions, I have an option to either ‘Open‘ the folder state at the time indicated, or blindly ‘Restore‘ the folder and its contents from that date and time. Nice and easy!
It’s a pretty slick and easy-to-use feature, especially for end users.
What is System Restore on Windows 10?
As an IT pro, you’re familiar with what the System Restore feature in Windows 10 is all about and its purpose. You may also have shied away from using it in the past as in its infancy, it was believed to be unreliable or to cause more harm than good.
However, it is a vital tool in your arsenal when more serious issues start plaguing Windows 10 PCs. System Restore is a tool designed to repair and protect the operating system. The feature takes a daily snapshot of key system files and the Windows registry and saves that information as a restore point.
When data corruption occurs or an installation failure causes headaches, System Restore can return a system to a much healthier state without having to reinstall Windows 10. This happens to be the key advantage when the feature rolled out way back in the Windows Me era.
How does System Restore work on Windows 10?
System Restore allows the user to revert the state of their computer to an earlier time. System files, installed applications, the Windows registry, and other related system settings are all reverted to the state they were in when the snapshot was taken. It’s a boon when you need to test application installs while having the option to restore your system to a previous point in case all hell breaks loose.
In prior versions of Windows, the technology behind System Restore was more simplistic – it used a file filter that monitored the condition of key Windows system files and then overwrote any unanticipated changes from a local file cache under the Windows folder.
With Windows Vista, System Restore started using Volume Shadow Copy Service as the backend tech: This allows block-level file changes to be noted anywhere on the volume (C: drive) and for those files to be backed up and later referred to and retrieved. Another nice result is the ability to use the Windows Recovery Environment (WinRE) to access the same functions.
Starting with Windows 10, Microsoft chose to turn System Restore off by default. The feature must now be enabled via the GUI or Group Policy to start offering protection.
What happens during the restoration?
During a restoration, the following areas of Windows are read from the chosen restore point and pushed onto the existing Windows installation:
- Windows registry.
- Files in the Windows File Protection folder (Dllcache).
- User profiles.
- COM+ and WMI databases.
- Specific file types monitored.
- IIS metabase.
After these changes are ‘staged’ in Windows 10, a reboot occurs. During the closing down of the OS, some of these changes are implemented, files are backed up, copied, etc.
After the reboot, the remaining changes are completed and you’re (hopefully) back at the login screen. When you log in, Windows will notify you if the restoration was successful or not.
How long does a system restoration take?
The time it takes to go through a restoration varies wildly due to the number of variables involved. This includes the general system performance of the computer, the number of changes that have been made to the system between the snapshot and the present time, and other factors.
As an example, say you create a restore point right now. You then proceed to install Visual Studio 2022, uninstall the Microsoft 365 Apps for enterprise, update your Windows 10 version from 1909 to 20H2, and install Putty. 🙂
In order for your restore operation to be complete, System Restore essentially needs to uninstall Visual Studio 2022, re-install the Microsoft 365 apps, revert the Windows 10 version from 20H2 back to 1909, and uninstall Putty (how cute).
All these operations will take a good deal of time, and you may run into some inherent limitations of the feature. However, it is certainly worth a shot!
Problems that can happen with System Restore
Although the System Restore feature is very helpful and can get you out of a very tight spot, there are times when it simply won’t work as expected. I’ll touch on a few scenarios here and offer advice on how to potentially overcome them.
Certain types of software may interfere with the creation of a restore point. Moreover, certain applications may not fully uninstall when you revert to a restore point that removed said application.
You also need to make sure you have sufficient free space on your C: drive for new restore points to be created.
The last item worth mentioning is the potential corruption of restore points: If a restore point is created ‘around’ an incompatible application, you may not even be aware of it. When you go to restore your system to that point in time, the process may start, and look like it’s working, then when you log in it shows that the restore failed. Unfortunately, there’s not much you can do at this point.
Conclusion
If you’re having any problems with your Windows 10 PC after recently installing an app or driver, you may want to use a system restore point to go back in time. In my mind, there is a good deal of value in System Restore. Keep in mind that the feature won’t affect your personal files, and it just removes apps, drivers, and Windows updates installed after the restore point was made. System Restore is definitely a handy and straightforward recovery option to use when your PC isn’t working well.
FAQs
Can I perform a Windows 10 system restore from boot if my PC won’t start normally?
Yes, you can perform Windows 10 system restore from boot even if your computer won’t start normally by pressing F11 repeatedly during startup to access the Advanced Boot Options menu, then selecting Troubleshoot > Advanced Options > System Restore.
What happens if Windows 10 system restore from boot gets interrupted by power loss?
If Windows 10 system restore from boot is interrupted by a power failure, your system may become unstable or unbootable. It’s crucial to have a UPS or stable power source when performing the restoration process.
Can I access my files during Windows 10 system restore from boot process?
No, during Windows 10 system restore from boot process, you cannot access your files as the system is in a special recovery environment dedicated to the restoration process only.
Will Windows 10 system restore from boot remove my BitLocker encryption?
No, performing a Windows 10 system restore from boot will not remove BitLocker encryption, but you’ll need your BitLocker recovery key to access the system after the restore is complete.
How can I verify if Windows 10 system restore from boot completed successfully?
After Windows 10 system restore from boot finishes and your PC restarts, you can verify success by checking the System Restore completion message at login, and reviewing the Windows System Restore logs in Event Viewer under Windows Logs > Application.
Related Article:

Michael has been an IT Pro since 1998. He has worked predominantly in the Windows world including client and server operating systems, on-prem systems engineering (AD, DNS, etc.), and over the last ten years or so has embraced and immersed himself in...
