How to Use Microsoft Entra Cloud Sync (Azure AD Connect Cloud Sync)
Implement Microsoft Entra Cloud Sync in your identity management infrastructure.

Many of you have been using Azure Active Directory Connect to manage your hybrid identities and synchronization of users from Active Directory to Azure Active Directory (recently renamed Microsoft Entra ID). This modern technology is called Azure AD Connect cloud sync.
In this article, I’ll walk you through the installation and basic configuration of Azure AD Connect cloud sync and explain how to implement it into your Active Directory/Azure AD infrastructure.
What is Azure Active Directory Connect cloud sync?
Many IT Pros are familiar with Azure AD Connect – the syncing software you use to sync your identities from your on-premises Active Directory to Azure Active Directory and offer seamless single sign-on. The next evolution is to bring everything to the cloud.
So, Microsoft has moved from a software application installed on a domain-joined server in your on-premises environment to a simple provisioning agent. A much lighter footprint as all the ‘heavy lifting’ is now done in Azure. No more need for a database on-premises – this is all done in the cloud.
Lightweight agents have been the way to go recently. This is a boon if you have gone through a merger or an acquisition recently or are planning for one.
Azure AD Connect cloud sync is designed to meet and accomplish your hybrid identity goals by syncing your users, contacts, groups, devices, and more to Azure AD. An important note – you can use Azure AD Connect side-by-side with the cloud sync provisioning agent!
What are the differences between Azure AD Connect sync and Azure AD Connect cloud sync?
Great question! Here is a table from Microsoft that shows the feature comparisons between Connect and Cloud Sync.
| Feature | Azure AD Connect sync | Azure AD Connect cloud sync |
|---|---|---|
| Connect to a single on-premises AD forest | ● | ● |
| Connect to multiple on-premises AD forests | ● | ● |
| Connect to multiple disconnected on-premises AD forests | ● | |
| Lightweight agent installation model | ● | |
| Multiple active agents for high availability | ● | |
| Connect to LDAP directories | ● | |
| Support for user objects | ● | ● |
| Support for group objects | ● | ● |
| Support for contact objects | ● | ● |
| Support for device objects | ● | |
| Allow basic customization for attribute flows | ● | ● |
| Synchronize Exchange online attributes | ● | ● |
| Synchronize extension attributes 1-15 | ● | ● |
| Synchronize customer-defined AD attributes (directory extensions) | ● | ● |
| Support for Password Hash Sync | ● | ● |
| Support for Pass-Through Authentication | ● | |
| Support for federation | ● | ● |
| Seamless Single Sign-on | ● | ● |
| Supports installation on a Domain Controller | ● | ● |
| Support for Windows Server 2016 | ● | ● |
| Filter on Domains/OUs/groups | ● | ● |
| Filter on objects’ attribute values | ● | |
| Allow a minimal set of attributes to be synchronized (MinSync) | ● | ● |
| Allow removing attributes from flowing from AD to Azure AD | ● | ● |
| Allow advanced customization for attribute flows | ● | |
| Support for password writeback | ● | ● |
| Support for device writeback | ● | Customers should use Cloud Kerberos trust for this moving forward |
| Support for group writeback | ● | |
| Support for merging user attributes from multiple domains | ● | |
| Azure AD Domain Services support | ● | |
| Exchange hybrid writeback | ● | |
| Unlimited number of objects per AD domain | ● | |
| Support for up to 150,000 objects per AD domain | ● | ● |
| Groups with up to 50,000 members | ● | ● |
| Large groups with up to 250,000 members | ● | |
| Cross-domain references | ● | ● |
| On-demand provisioning | ● | |
| Support for US Government | ● | ● |
There is one major and prevalent scenario that is currently not supported with the newer Azure AD Connect cloud sync feature, and that’s Exchange hybrid. Here is the current answer from Microsoft’s documentation:
The Exchange Hybrid Deployment feature allows for the co-existence of Exchange mailboxes both on-premises and in Microsoft 365. Azure AD Connect is synchronizing a specific set of attributes from Azure AD back into your on-premises directory. The cloud provisioning agent currently does not synchronize these attributes back into your on-premises directory and thus it is not supported as a replacement for Azure AD Connect.
Prerequisites for installing Azure Active Directory Connect cloud sync
Microsoft mentions a few prerequisites to take note of before starting the installation. Let’s go over those here.
- In the Azure portal:
- You need to have access to a cloud-only Global Administrator account.
- You will need a custom domain name in place in Azure to match the UPN domain name in your Active Directory. If you are migrating from Azure AD Connect this should already be in place, but it is worth nothing.
- In your on-premises environment
- You will need a domain-joined machine running Windows Server 2016 or newer. You need at least 4 GB of ram and .NET Framework 4.7.1 or greater. The server simply needs network access to at least one domain controller in your on-premises AD forest.
- Your edge firewall will need to allow outbound ports 80 and 443 to be made from your server here to Azure AD.
The only other (optional) step is to first uninstall Azure AD Connect if you have it installed. This is not required, but for the purposes of this article, I will walk through the simple steps next.
Oh, and it is very easy to take advantage of high availability with this setup. Simply install the provisioning agent on more than one server in your network. You’ll see the steps below.
Uninstalling Azure AD Connect (optional)
- Log into your Azure AD Connect server and open Control Panel.
- Open the ‘Uninstall a program‘ menu.
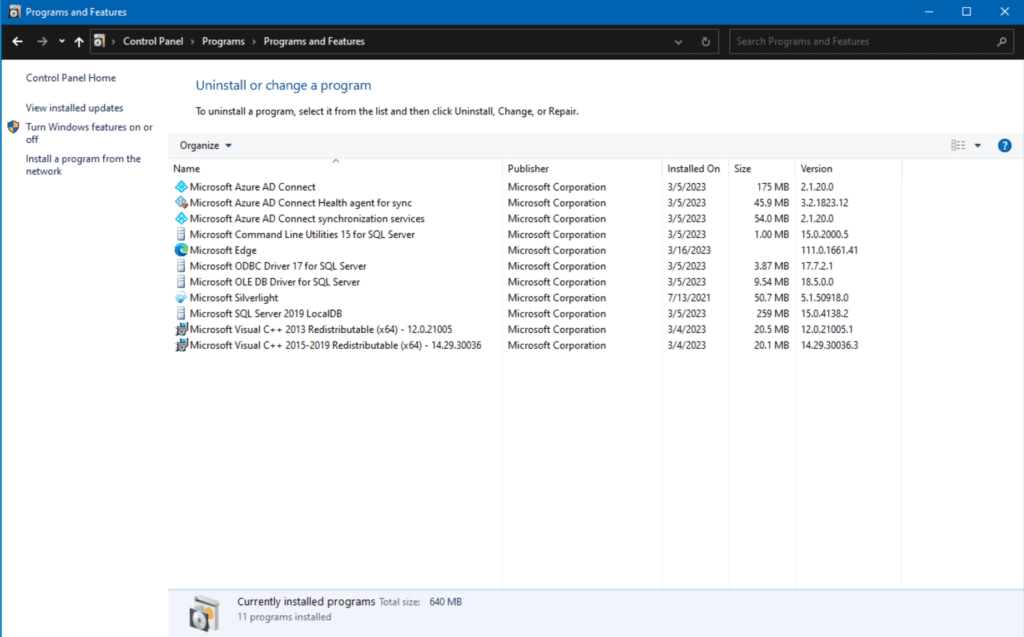
- Click the Microsoft Azure AD Connect entry and click the Uninstall toolbar button.
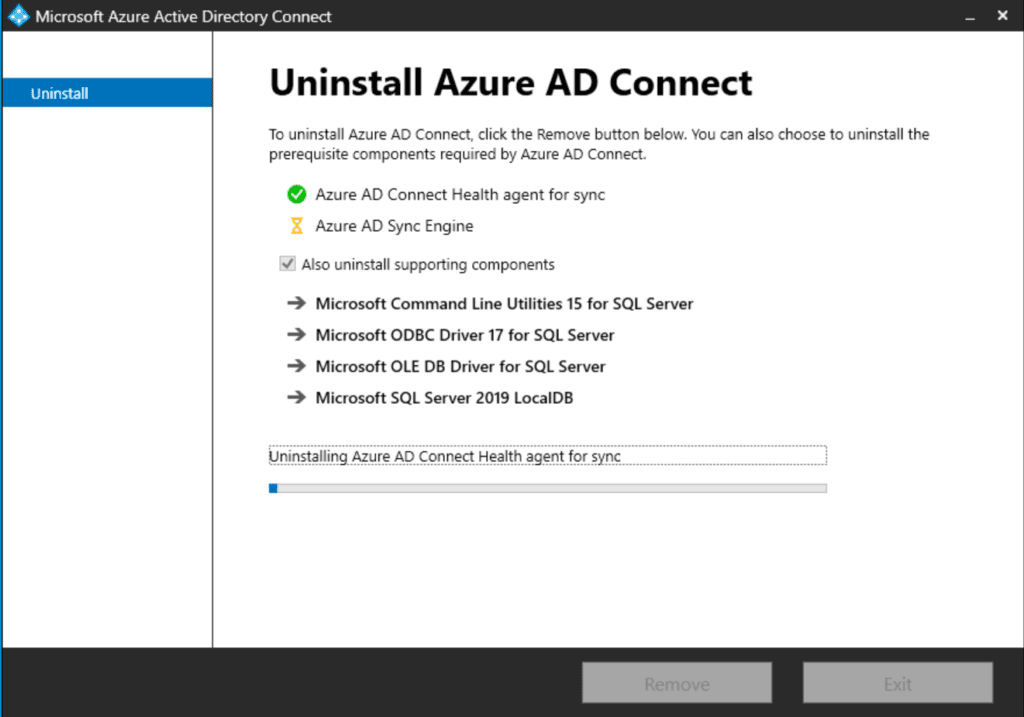
My suggestion here is to make sure the checkbox is checked to remove everything. I always like to uninstall software as cleanly as possible, doing my best to not leave any remnants lying around.
- Click Remove and allow it to finish.
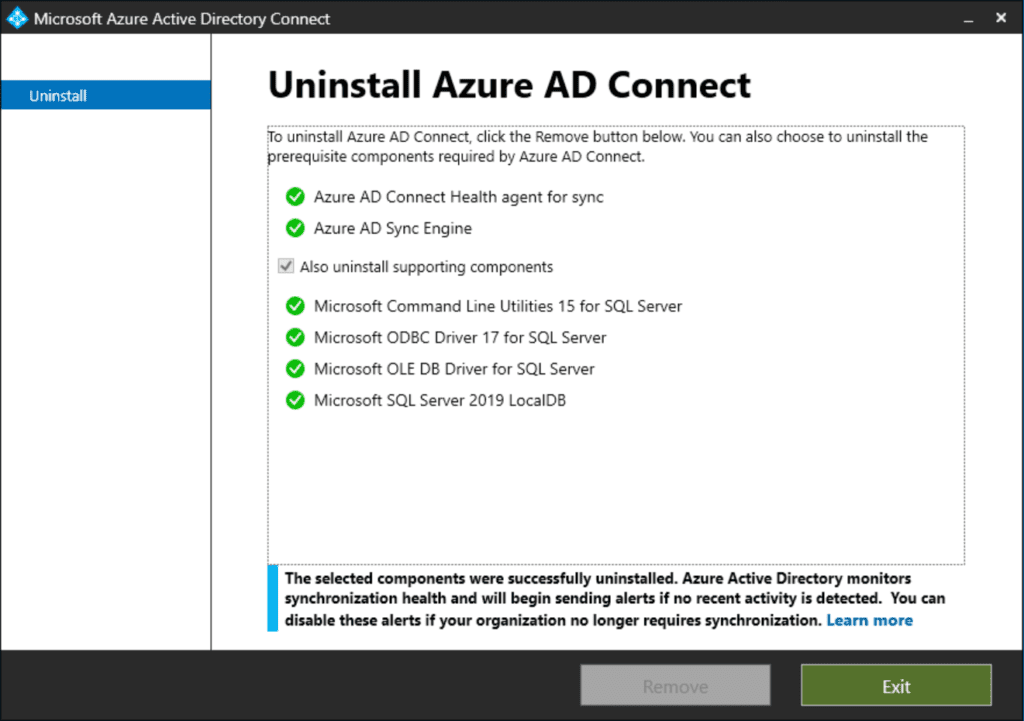
There, all gone. Now, we can move on to the new installation steps.
How to implement Azure AD Connect cloud sync into your AD / AAD infrastructure
As I have said, you can install an Azure AD Connect cloud sync agent with or without an existing Azure AD Connect installation in your environment. In this case, I just removed my existing Azure AD Connect software, so we have a clean slate. Let’s get started!
Installation
We will start on my Windows Server 2022 domain-joined server, WS22-FS02.
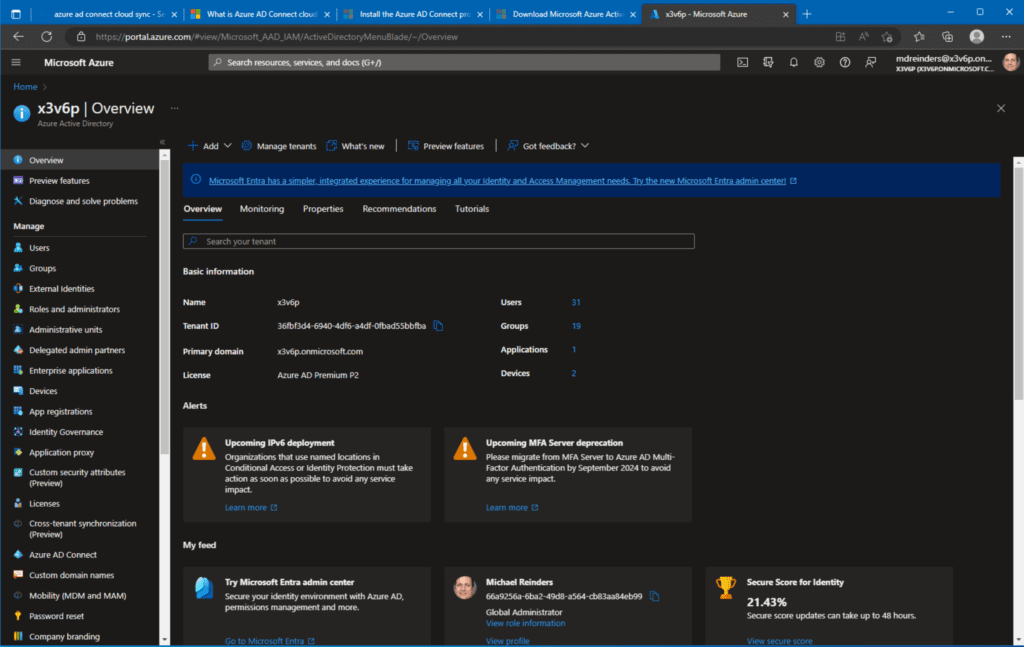
- First, log in to the Azure Portal and access the Azure Active Directory (Azure AD) site.
- On the navigation menu on the left, scroll down and click on Azure AD Connect. Then, click Cloud sync on the left again.

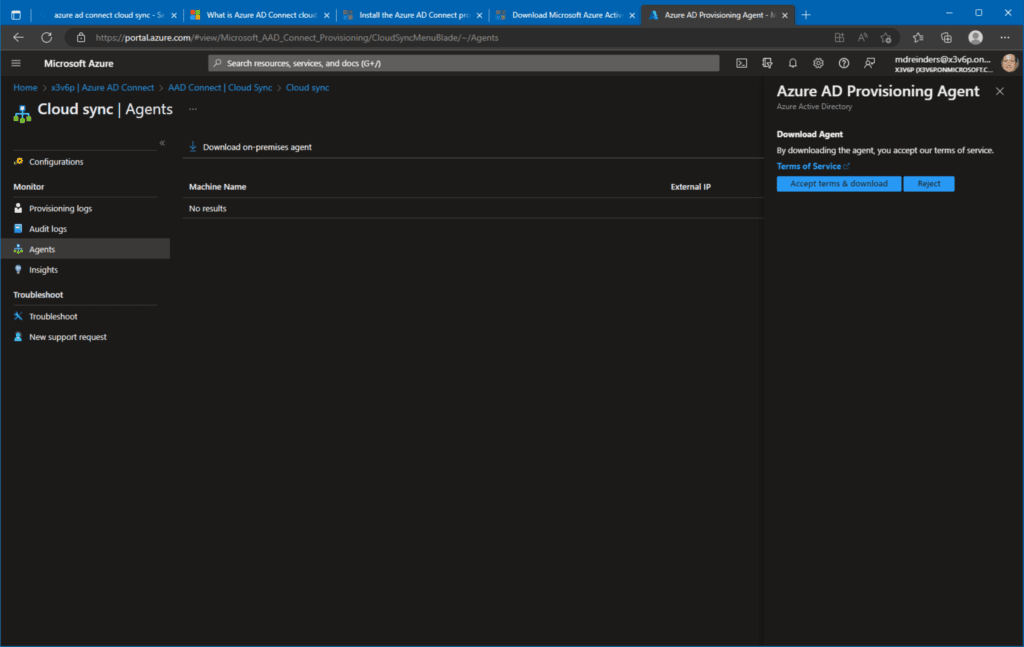
- It’s not surprising that we have a nice clean slate. Click on the Agents‘ menu on the left, then click Download on-premises agent.
- After you’ve downloaded the agent, go ahead and double-click on the MSI file. The installation will start.
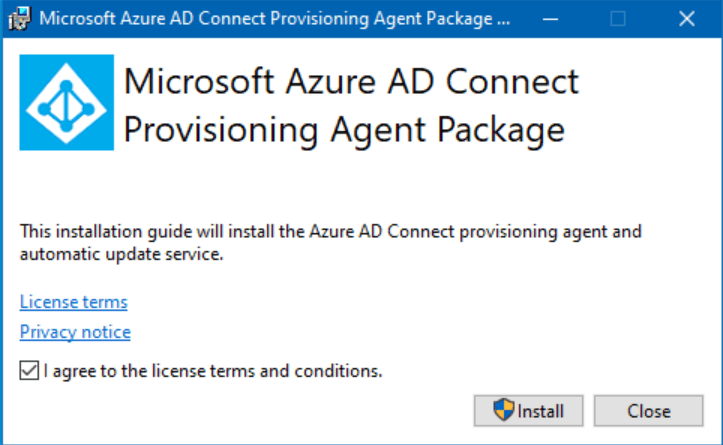
- Check the box and click Install!

Next, we move on to Configuration.
Active Directory Configuration
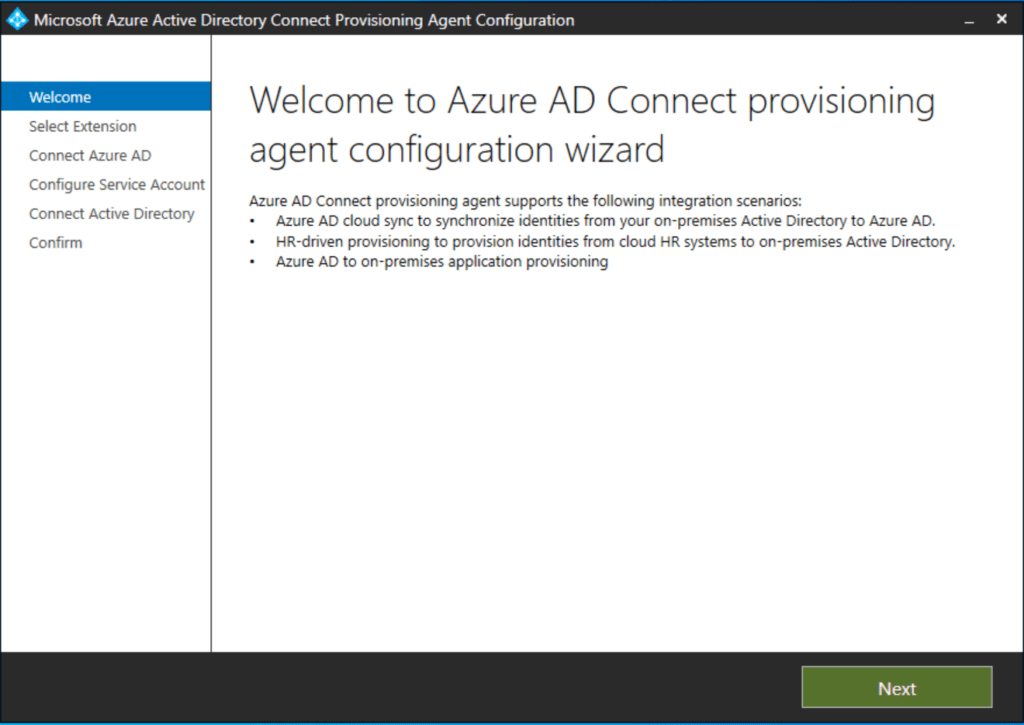
After the initial agent is installed, the Microsoft Azure Active Directory Connect Provisioning Agent Configuration wizard will start. Say that 5 times fast. Yikes, Microsoft. Always hitting home runs with product names!
- On the Welcome screen, click Next.
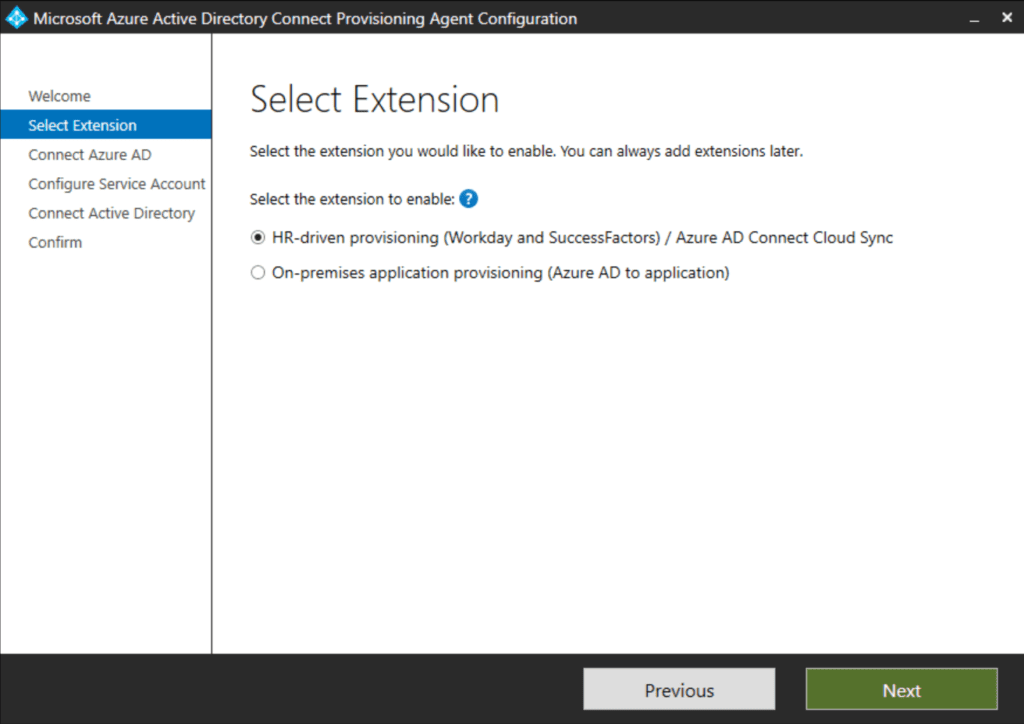
- On the ‘Select Extension‘ screen, choose HR-driven provisioning (Workday and SuccessFactors) / Azure AD Connect Cloud Sync. This is the most likely scenario. Only if you’re planning to provision on-premises applications to Azure would you choose the 2nd option.
- Click Next.
- Next, the Connect Azure AD screen comes up, asking for the credentials for your Azure AD Global Administrator. Enter those, and be ready for MFA!
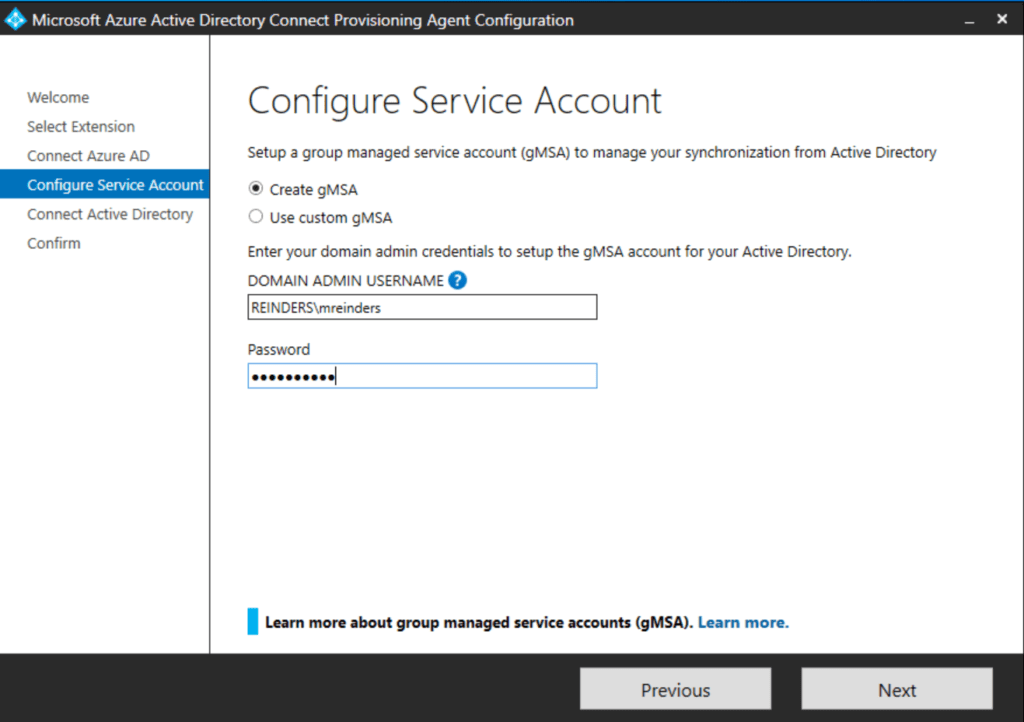
- Next up, the Configure Service Account screen. Here, we will accept the default, Create gMSA. Because we are asking it to create a gMSA account to manage the synchronization from AD to Azure AD, we need to enter an account with Domain Admin privileges. Enter that and click Next.
- Continuing, we come to the ‘Connect Active Directory‘ screen. Yes, you are right. This is rather similar to the installation wizard for installing Azure AD Connect.
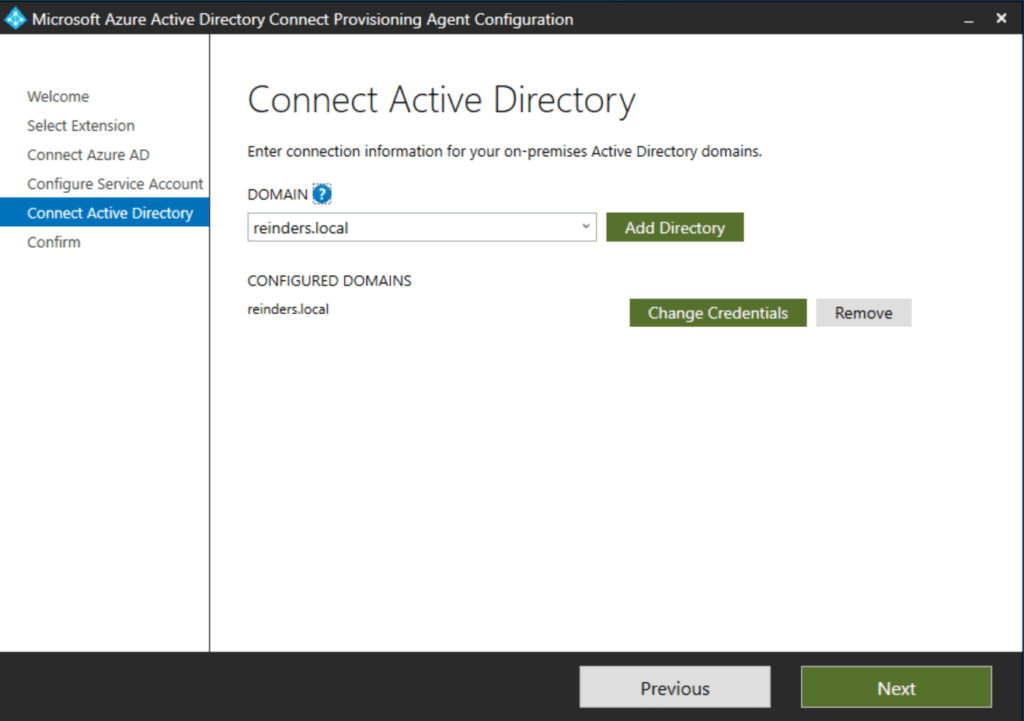
- Anyway, verify that the correct Active Directory domain is set. If you see any errors, you may have mistyped your credentials. Go ahead and correct if necessary and click Next.
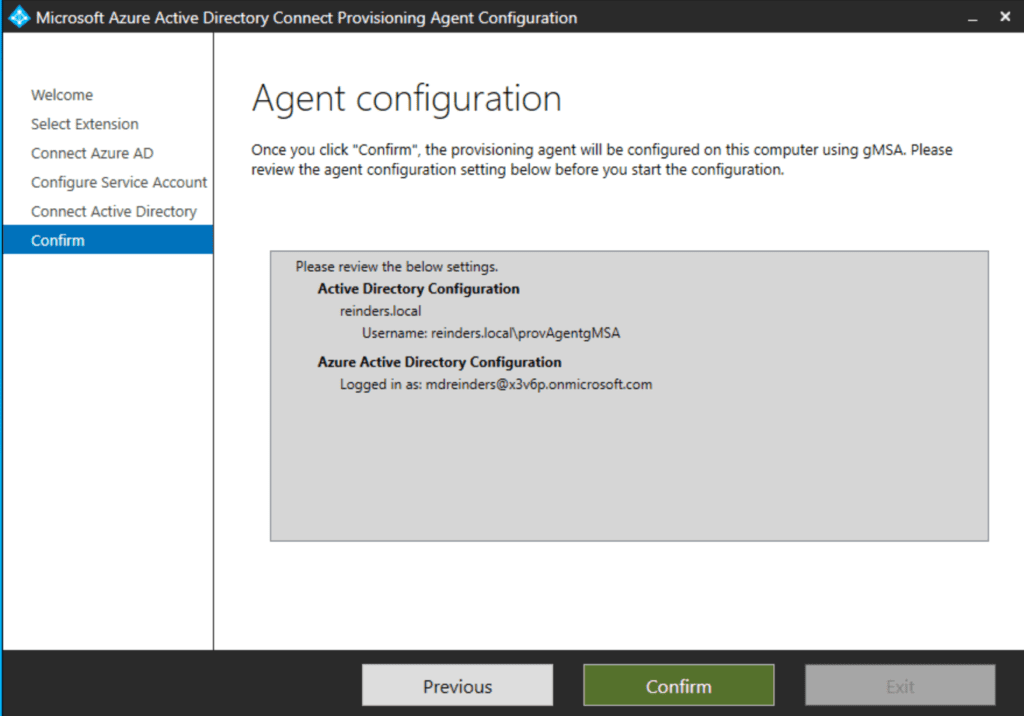
- We have come to the final Confirm screen. Verify all looks good and click that Confirm button.

Azure AD configuration
We now move to Azure Active Directory. To manage Azure AD cloud sync, browse again to the Azure Portal.
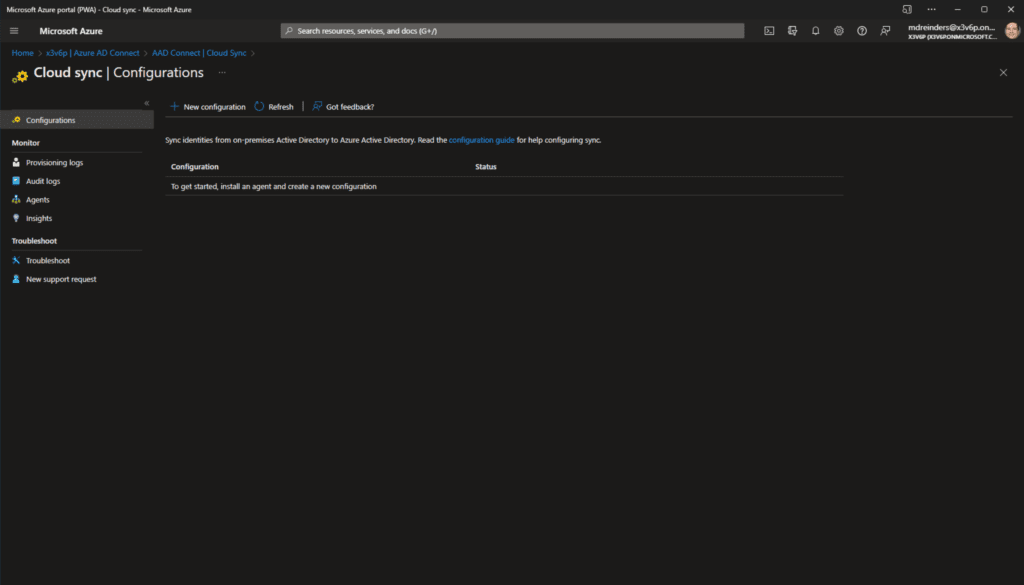
- Click on Azure AD Connect, and click Cloud sync.
- Click the ‘New configuration‘ button on the top to start the configuration process in the cloud.
- Here we have the New cloud sync configuration. The defaults should be OK assuming you only are syncing the one AD domain – in my case ‘reinders.local.’ We’ll keep ‘Enable password hash sync‘ checked to allow for automatic password management.
- Click Create at the bottom.
Well, check this out! We are done. I don’t know about you, but I almost ALWAYS prefer cloud-based configurations vs. traditional ‘thick’ client software. It’s cleaner. Plus, they can iterate on the UI and add features much faster. And, because it is cloud-based, you don’t need to worry about upgrades to the software, servers going down, etc. It just works. The cloud, 100% of the time, right?
Testing – Verification
Let’s go and simply enable the configuration. We can address the scoping filters, attribute mapping, etc. a little later.
- Click the Review and enable configuration button at the top, then click Enable Configuration.
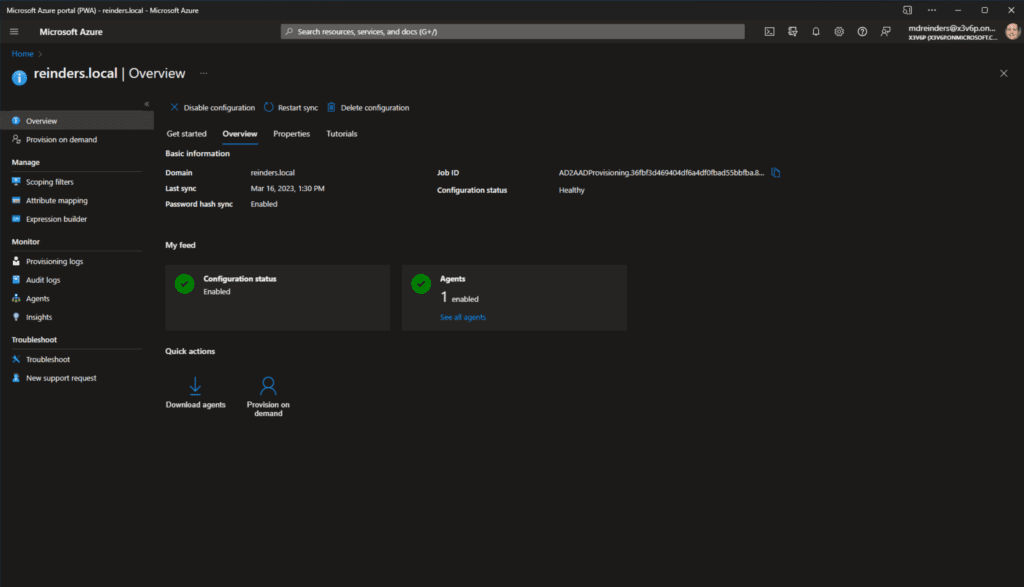
- After that is complete, wait about 2 minutes, then refresh your browser, and click the Overview tab on top.
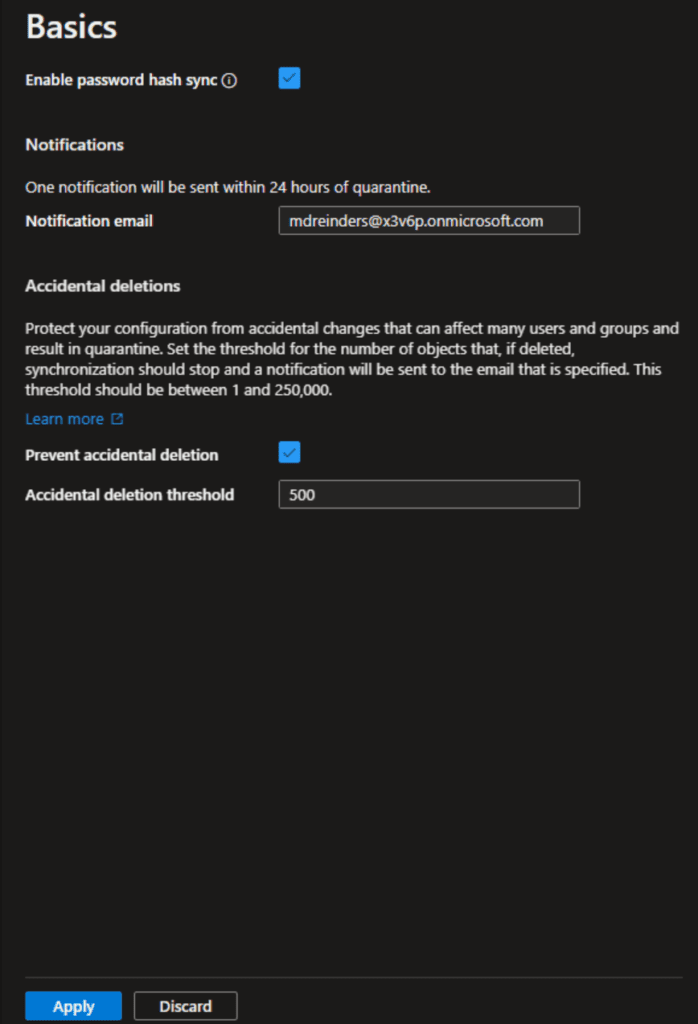
- First off, you’ll want to enter a notification email address. Click the Properties tab and click the pencil (Edit) icon next to Basics.
- Enter an administrator email to receive alerts about the syncing infrastructure. Click Apply at the bottom.
Now, regarding validation and advanced customization, click back to the Users view in the Azure AD portal to view all of your users. I took note that the number of users went from 31 to 32. So, I know SOMETHING happened. And, if you really are paying attention, you may have remembered that I filtered out a user in a specific OU when I configured Azure AD Connect. So, because I have not done any filtering yet, a new user has been synced – John Reinders.
Let me go through the three core configuration screens you’ll use to maintain and adjust your synchronization settings. The first is Scoping filters.
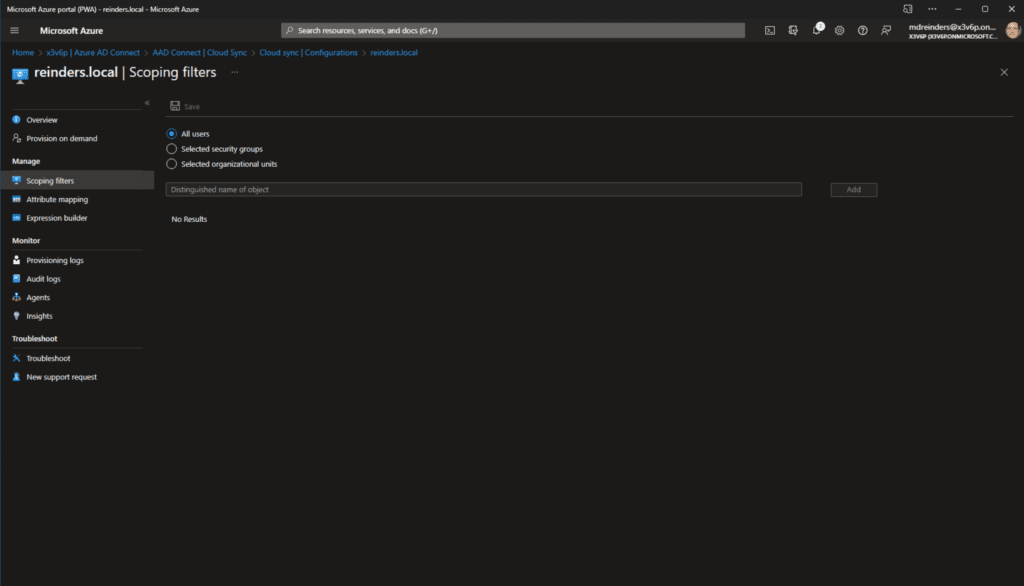
The default is to sync all the users in your Active Directory. You can choose to sync only select security groups OR select organization units (OUs). And yes, this is one example of cloud software being, for the moment, less configurable than on-premise software. But, this is continually changing. Eventually, they will incorporate ALL the features and options into Azure AD Connect cloud sync.
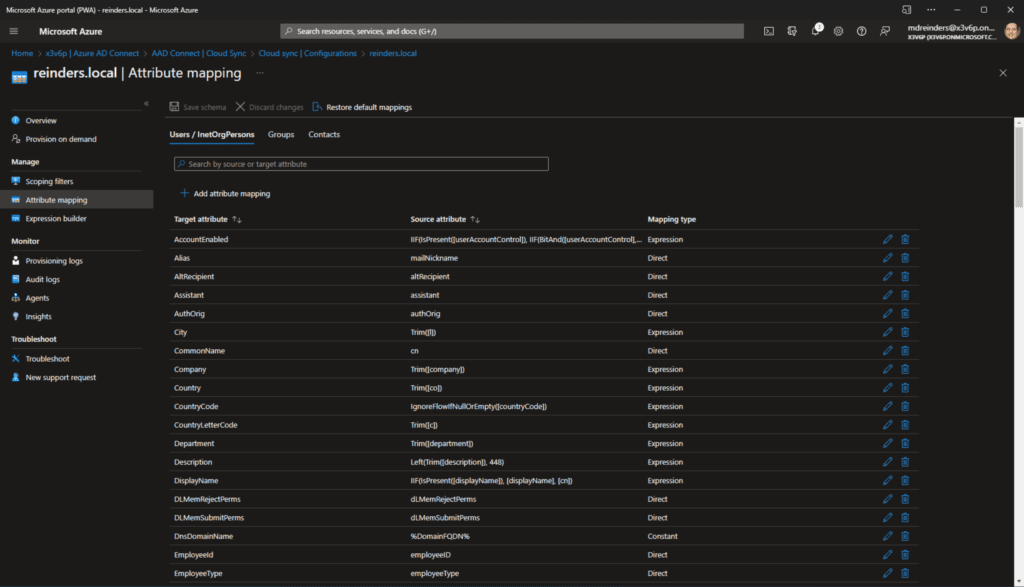
Next, let’s look at Attribute mapping. Here we can choose to edit the default list of attributes and how they are synced from Active Directory to Azure AD, and even add additional items by clicking ‘+ Add attribute mapping.’
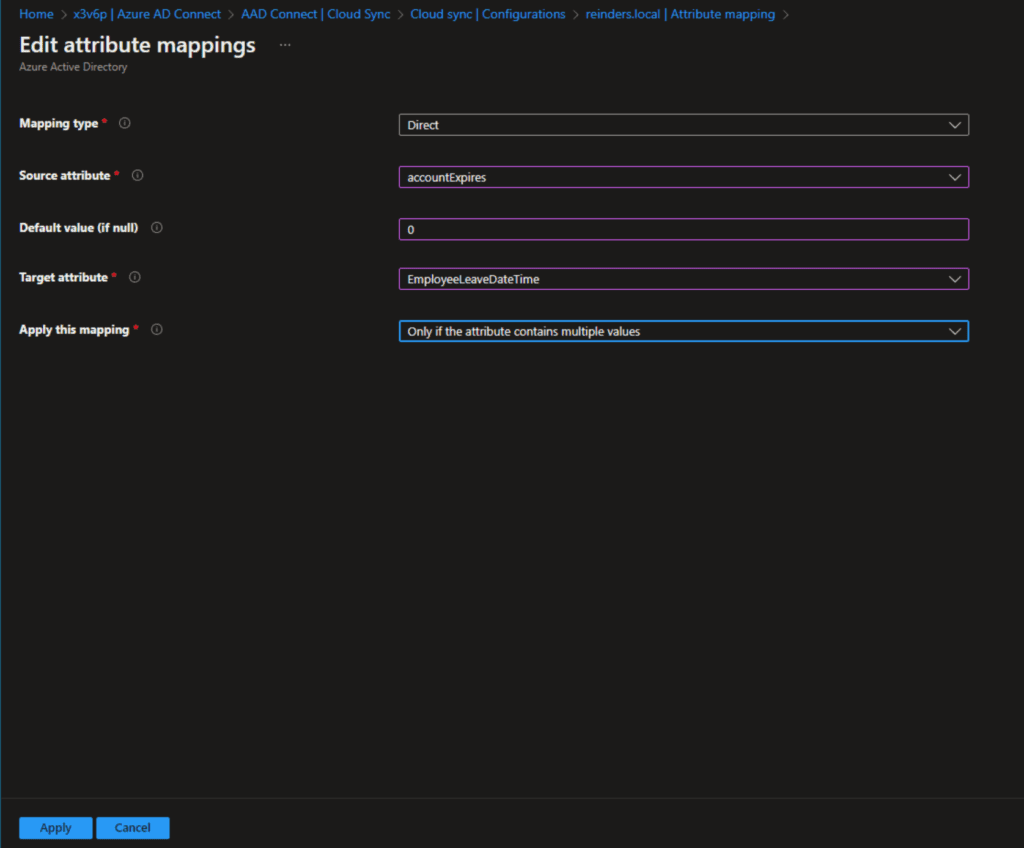
Rest assured there are a lot of options here. As I said, Microsoft is continually adding more features to this functionality. So, don’t be surprised if you notice some of these screens change around or add/remove bits. This is the cloud, folks!
Finally, let’s look at the Expression builder. This is where you can really add some customization to how certain attributes get synced, and how to use expressions to match specific user attributes from one Active Directory domain and other attributes from another AD domain to produce the best single object in Azure AD. Again, there is a lot of power here, and you’ll be familiar with the general setup if you’ve used custom features like synchronization rules in the Azure AD Connect software.
Conclusion
Well, that is a lot of information. And, I do want to point out the biggest disadvantage to Azure AD Connect cloud sync – it does have fewer features and can support fewer scenarios than Azure AD Connect.
This is normal and by design. Azure AD Connect has been around for years and Azure AD Connect cloud sync was released about a year ago. So, naturally, there is more functionality in the older software.
My advice: As soon as the supported scenarios with Azure AD Connect cloud sync match your environment, take the steps to migrate to it. After using Azure AD Connect for quite a few years in my ‘day jobs’, the cloud functionality looks very nice – and MUCH less to administer and keep tabs on.
Please feel free to leave a comment or question below and thank you for reading!

Michael has been an IT Pro since 1998. He has worked predominantly in the Windows world including client and server operating systems, on-prem systems engineering (AD, DNS, etc.), and over the last ten years or so has embraced and immersed himself in...