How to Download and Set Up Microsoft Entra Connect (Azure AD Connect)

In this guide, I’ll provide information on where to download Microsoft Entra Connect (previously called Azure AD Connect) and walk you through the installation and configuration of it.
Microsoft states that the most common topology is a single on-premises forest, with one or multiple domains, and a single Microsoft Entra ID tenant. My guide will follow this topology, using a new Windows Server 2019 forest and domain, an Microsoft Entra ID tenant using a Premium P2 trial license, and a verified custom domain.
🎬 Watch This Week in IT.
Please note that Microsoft Entra Connect and Azure AD Connect are used interchangeably in this article because Microsoft has yet to update the application to reflect the name change.
Download Microsoft Entra Connect
Before we delve into the detail, here are the 6 high-level steps required to get Azure AD Connect V2 set up and working:
- Download Microsoft Entra Connect
- Run the installer
- Configure user sign-in
- Connect your directories
- Configure advanced options
- Start directory synchronization
What is Microsoft Entra Connect?
Simply put, Microsoft Entra Connect allows you to synchronize your Active Directory (AD) with Microsoft Entra ID. This extends your old-school but still critically important Windows Server Active Directory to Microsoft’s cloud-hosted Microsoft Entra ID, and helps you achieve your goal of creating a hybrid identity.
If you are unfamiliar with these terms or need a refresher, that’s okay. We recommend taking the time to check out our comparison of Active Directory and Microsoft Entra ID before going further.
Microsoft Entra Connect contains features like password hash synchronization (PHS), pass-through authentication (PTA) and integration with Active Directory Federation Services (AD FS). These and other features are explained in Microsoft’s What is Microsoft Entra Connect support page.
Also, please note that Microsoft Entra Domain Services is a different offering by Microsoft, and it’s not covered in this guide.
What’s new in Microsoft Entra Connect?
Microsoft Entra Connect brings some significant changes:
- SQL Server 2019 LocalDB
- MSAL authentication library
- Visual C++ Redist 14
- TLS 1.2 (1.0 and 1.1 are no longer supported)
- All binaries signed with SHA2
- Windows Server 2012 and Windows Server 2012 R2 are no longer supported
- PowerShell 5.0
Microsoft has already announced that all Azure AD Connect V1 versions will be retired on August 31, 2022. This alone should be a good incentive to upgrade to Microsoft Entra Connect.
Please see Petri’s Russel Smith’s article about what’s new in Azure AD Connect V2 for more information about the biggest changes in Microsoft Entra Connect. Also, Microsoft’s Entra Connect: Version release history support page contains more important details on new features and functionalities.
Prerequisites for Microsoft Entra Connect
Before we can install Microsoft Entra Connect, there are a few things that we’ll need:
- A Microsoft Entra ID tenant, which can be a free or premium (paid for) one
- An on-premises or cloud-hosted (on an Infrastructure as a Service virtual machine) Windows Server running as an AD domain controller (older versions of Windows Server work but some features like password writeback will require 2016 or later)
- Your domain controller must be writable, read-only domain controllers (RODC) are not supported
- Ideally, Microsoft Entra Connect should be installed on a dedicated domain-joined server, but you can also install it on your domain controller (Windows Server 2016 or later with Desktop Experience is required for Microsoft Entra Connect)
- AD and Microsoft Entra ID accounts for your Microsoft Entra Connect server. Microsoft differentiates accounts used for operating Azure AD Connect and those used for its installation and configuration.
For this guide, we’ll simply use a Global Administrator account for the Microsoft Entra ID tenant and a member of the AD Enterprise Admins group for the AD connectivity. In your production environments, make sure you use dedicated accounts that cover just the minimum permissions required for your situation and keep your password safe. See Microsoft’s Microsoft Entra Connect: Accounts and permissions support page for full details.
Installing and Configuring Microsoft Entra Connect
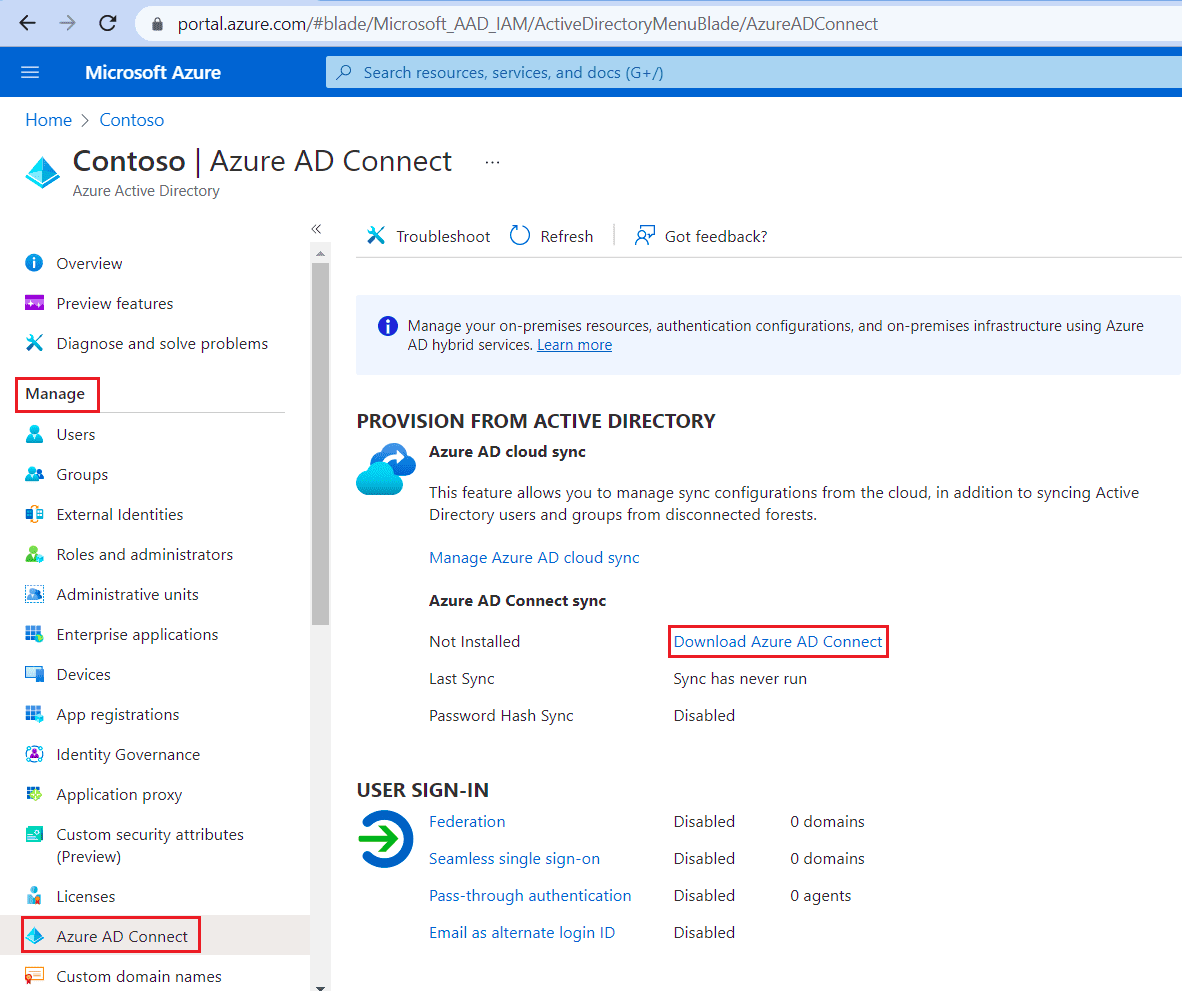
The first thing we’ll need to do is download the Microsoft Entra Connect installer. Here’s how to proceed.
Download Microsoft Entra Connect
- Log into your Azure Portal
- Navigate to Microsoft Entra ID
- In the Manage section, select Azure AD Connect, and click the Download Azure AD Connect.
Execute the Microsoft Entra Connect installer
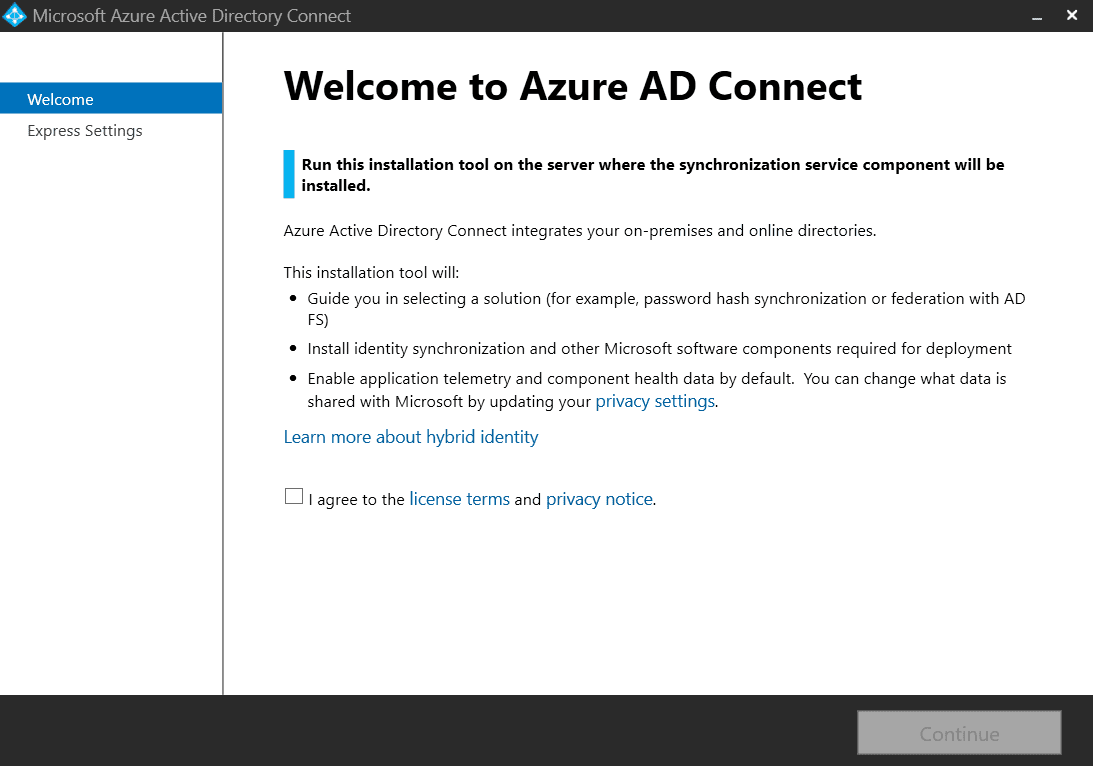
Once downloaded we’ll execute this installer (AzureADConnect.msi) on our Microsoft Entra Connect server (domain controller or dedicated server). Elevated privileges are required for this, so make sure you select Yes when prompted.
Once the installer loads, you’ll be greeted by the Welcome to Azure AD Connect screen. Once you’ve accepted the license terms and privacy notice, click Continue.
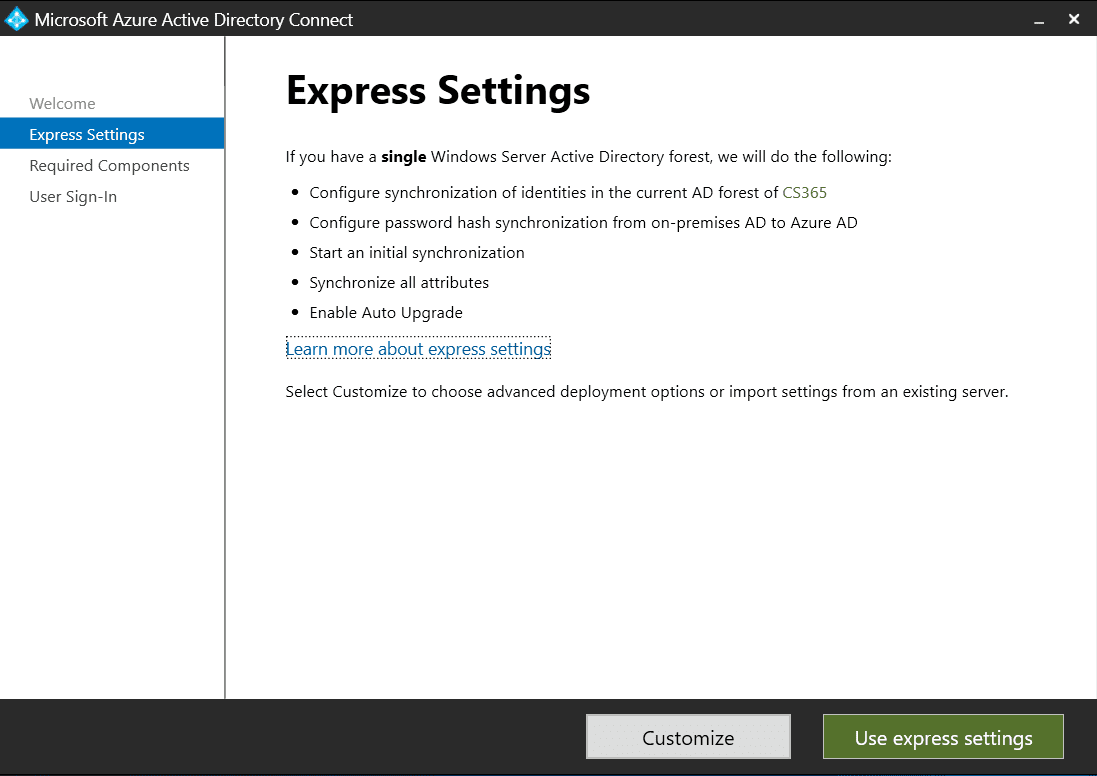
Choose customized settings
In the Express Settings screen, you’ll need to select Customize at the bottom of the page. The Express Settings might be suitable for many environments, but certain settings can only be set using the Customized Settings installation.
On the Install required components screen, you can customize settings affecting Azure AD Connect:
- Specify a custom installation location
- Use an existing SQL Server (for larger environments and high-availability requirements)
- Use an existing service account (you might be required to use a pre-created account in your environment)
- Specify custom sync groups (allowing you to set your own local security groups instead of the default ones)
- Import synchronization settings (which have been exported from another install of Azure AD Connect)
Once you’ve completed your selection, click Install. The installer will install the required components like the Synchronization Service.

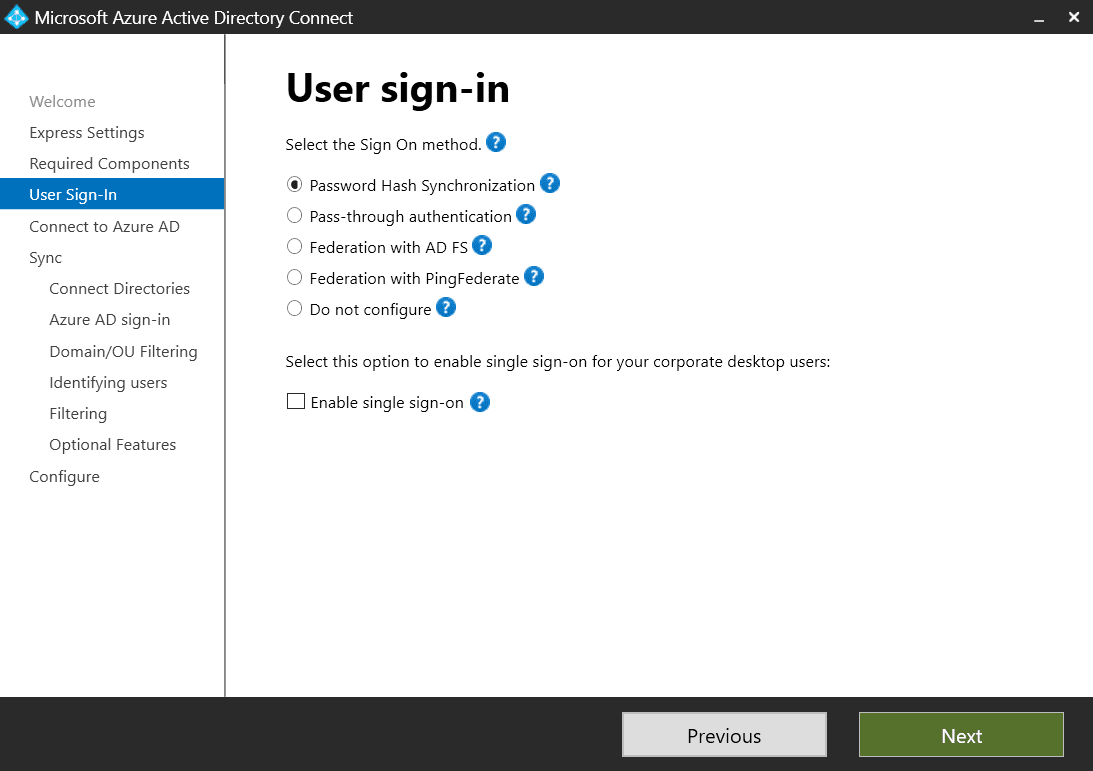
Configure User sign-in
After a few moments, the User sign-in screen will be displayed. You can select one of the following options:
- Password Hash Synchronization (default choice)
- Pass-through authentication
- Federation with AD FS
- Federation with PingFederate
- Do not configure
You can also enable single sign-on for your users. Pick your desired method (we’re using Password Hash Synchronization for this guide), and click Next.
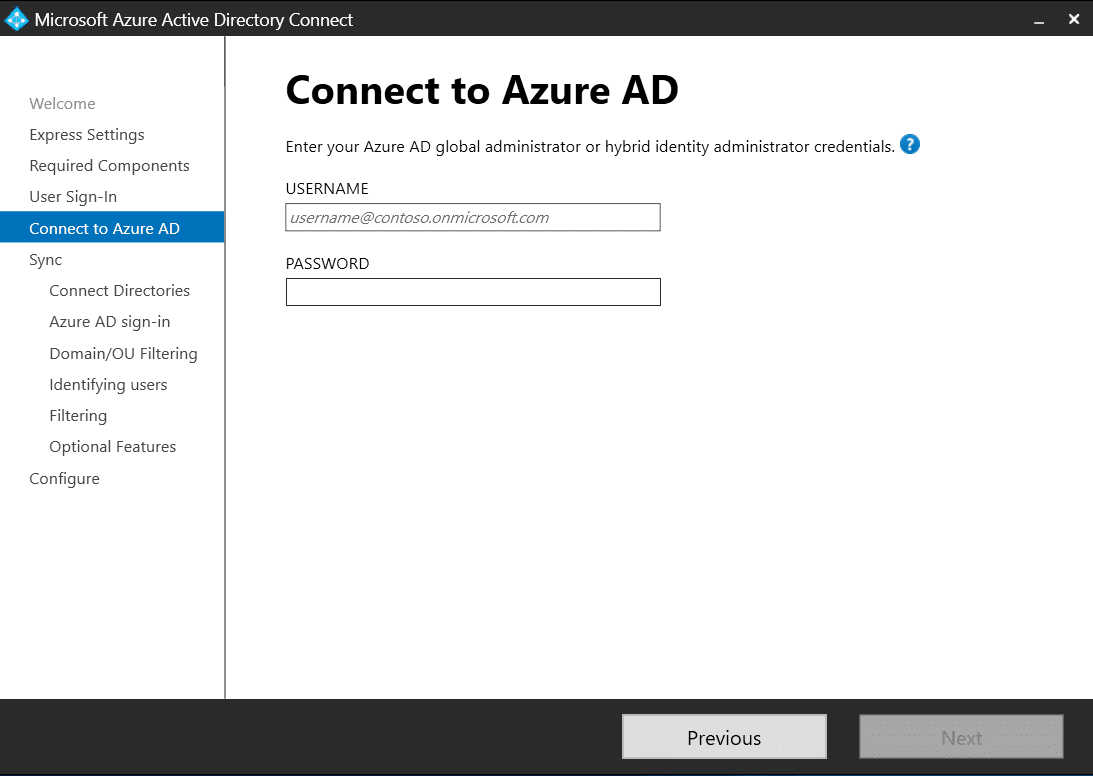
On the Connect to Azure AD screen, enter your Azure AD account credentials (see prerequisites in the previous section). You might be prompted to change your password if you haven’t logged in with this account before. Also, if MFA is enabled on your account, then you might get challenged to satisfy whatever requirements your organization has set.
Click Next to continue.
Connect your directories
On the Connect your directories screen, under FOREST, select your directory and click Add Directory.
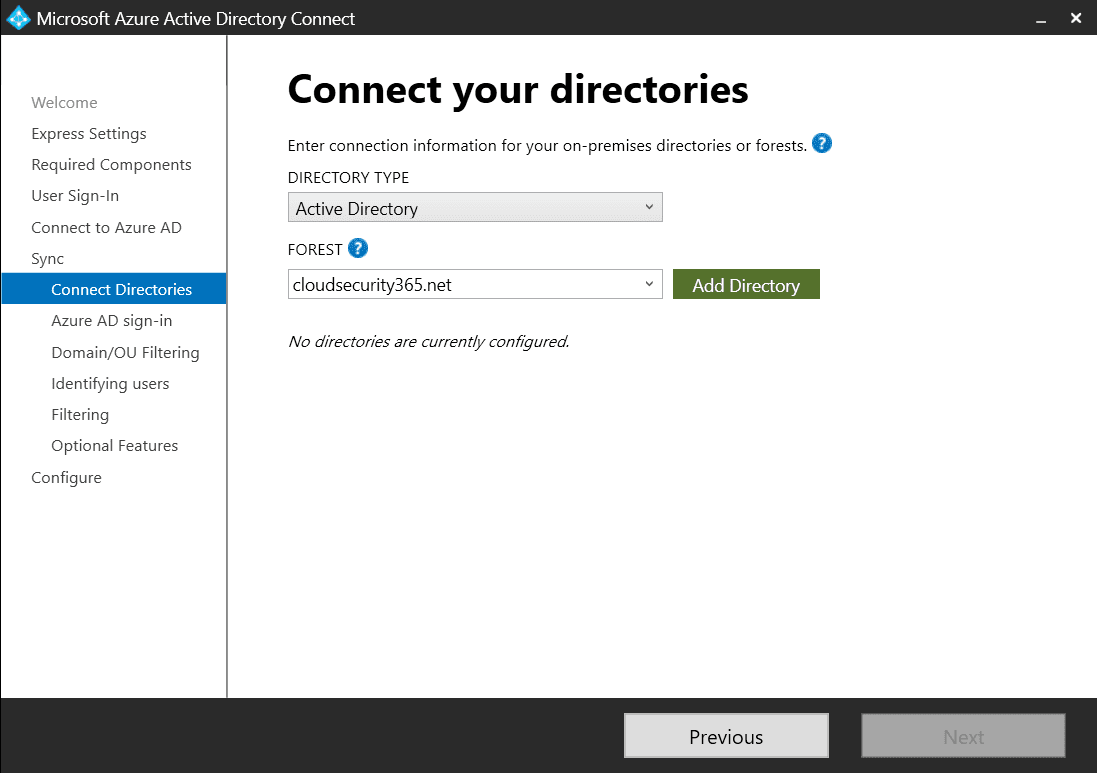
In a pop-up window, you’ll be prompted to select either Create a new account or Use existing account. This account will be used for directory synchronization.
If you have already created an account for this, then make sure that it is NOT a member of the Enterprise Admins or Domain Admins group. For this guide, we’ll create a new account.
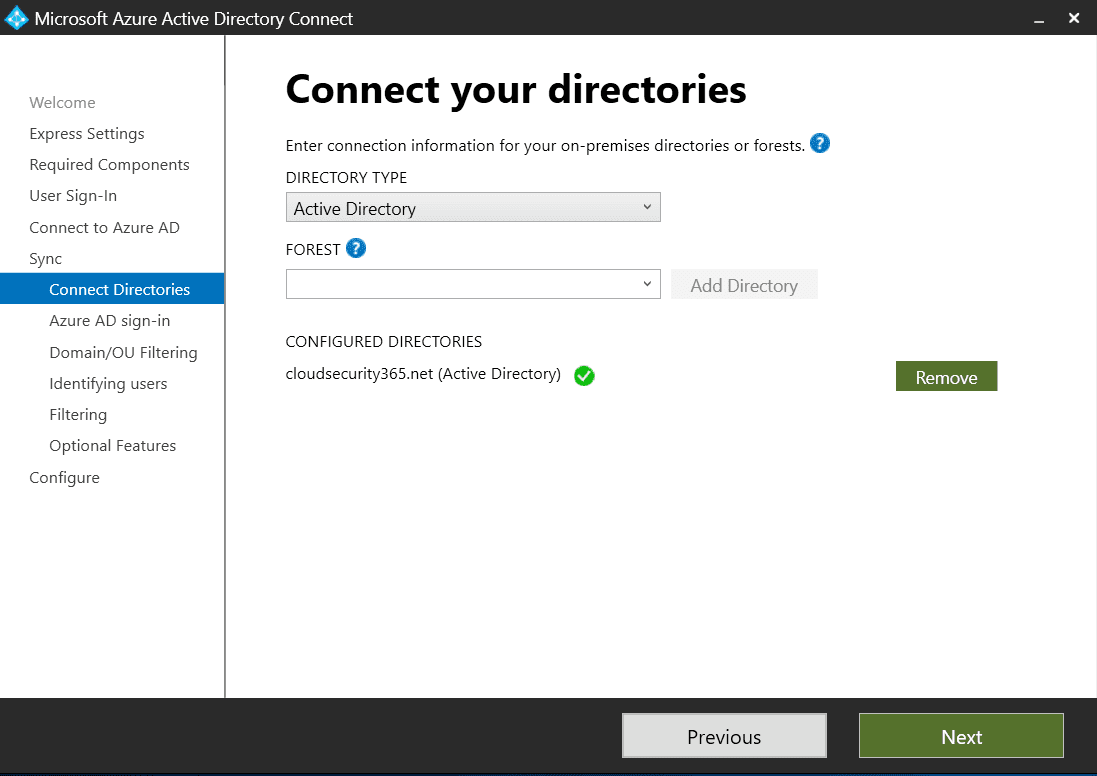
You’ll see your added directory listed under CONFIGURED DIRECTORIES. You also have an option to remove one or more added directories should your requirements or circumstances have changed.
Once completed, click Next.
Choose how your users will be identified in Azure AD
On the Azure AD Sign-in configuration screen, you’ll see the Active Directory UPN Suffix and corresponding Azure AD Domain status for all your added directories. If any of your domains aren’t verified or added, then you can fix this and refresh this screen using the Refresh icon below the table.
On the same page, you’ll also get to customize your User Principal Name (UPN), the on-premises attribute that will be used as the Azure AD username.
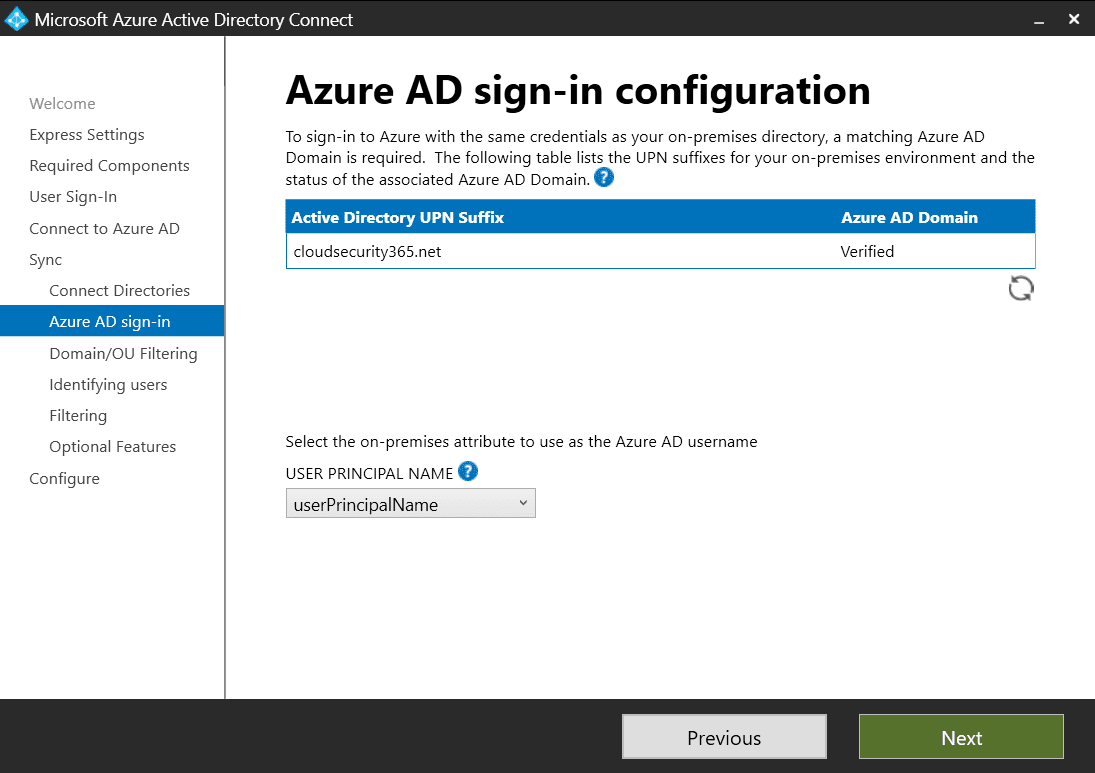
You are required to make a critical decision on how your users will be identified in Azure AD. Unlike Active Directory, Azure AD does not allow duplicates.
Strictly speaking, AD doesn’t allow duplicates either, but it doesn’t really enforce this. You could have duplicated UPNs in your AD and get away with it, whereas Azure AD will only synchronize the first account, ignoring any subsequent ones. You could also have the same usernames in multiple directories and the same limitation will apply.
If you are concerned that this might apply to you, then you can verify your AD using idFix before initiating the Azure AD Connect setup. See Microsoft’s GitHub page on idFix for further information.
Typically, you can leave this set to the default userPrincipalName value, but your specific circumstances may differ. Non-routable domain names (common ones are .local or .internal) are also a good reason to change your UPN, but this can also be addressed by adding an alternative (and routable) UPN suffix via Active Directory Domain and Trusts.
Click Next to continue.
Choose the domains and OUs you want to synchronize
On the Domain and OU filtering screen, you can either sync all domains and Organizational Units (OUs) or customize which ones you’d like to synchronize. Microsoft states that certain OUs are essential for functionality and you should leave them selected. Microsoft’s Organizational unit–based filtering includes further information on those OUs.
Click Next to continue.

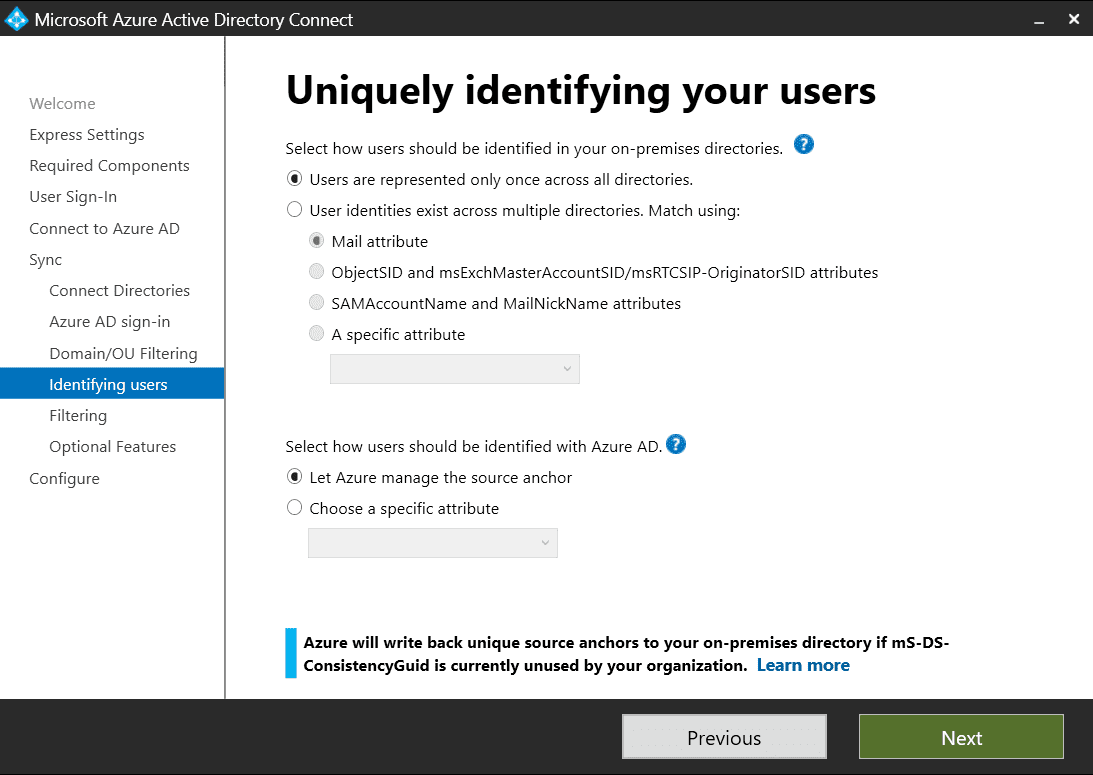
On the Uniquely identify your users screen, select the options best in line with your infrastructure. As in the previous section, it is critical to get this right.
While the default values may suit many organizations, your environment might require you to spend some time and effort identifying the values best for you. See Microsoft’s Uniquely identifying your users support page for further information.
Once ready, click Next to continue.
Choose which users and devices will be synchronized to Azure AD
On the Filter users and devices screen, you can limit which users and devices will be synchronized to Azure AD by specifying a single group. This is a convenient way to limit your initial pilot deployment.
These settings can be changed after you have completed your pilot and worked out all the problems of your deployment, should you encounter any. If you want to use this, then simply enter the name of your pilot group and click the Resolve button.
Bear in mind that Microsoft warns that this feature is not meant to be used in a production deployment, so make sure you change it before going live.
For this guide, I have created a group called HybridUsers and added all my test users to it.
Click Next to continue.

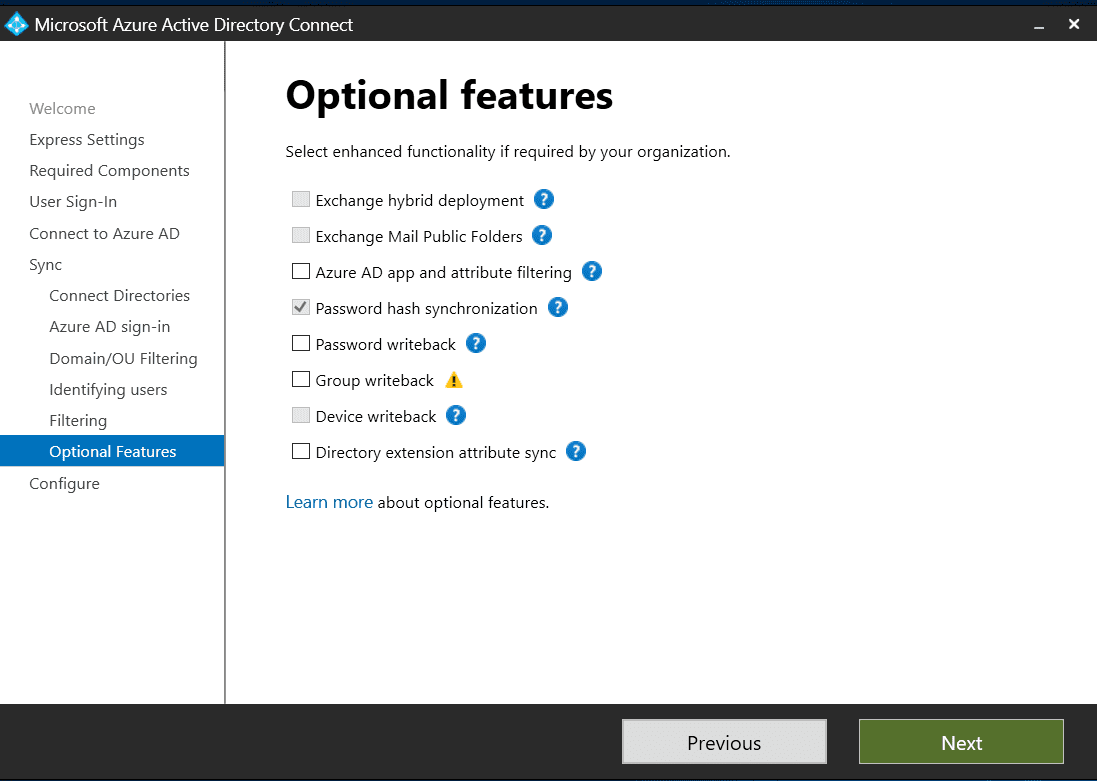
Choose the optional features your organization needs
On the Optional features screen, you can set additional settings unique to your organization’s requirements:
- Exchange hybrid deployment (for co-existence with Exchange on-premises and Exchange Online)
- Exchange Mail Public Folders (to synchronize mail-enabled public-folder objects from your on-premises instance of Active Directory to Azure AD)
- Azure AD app and attribute filtering (to limit which attributes to synchronize to Azure AD)
- Password hash synchronization
- Password writeback (to enable your users to self-service password reset their accounts, allowing you to cut down on helpdesk calls)
- Group writeback (to write back specific Azure AD groups to your AD)
- Device writeback (to write back Azure AD registered devices to your AD)
- Directory extension attribute sync (to sync custom AD attributes to your Azure AD)
For this guide, I’ll keep the default values. For your environment, make sure you select the most appropriate settings and bear in mind that some have specific requirements. Microsoft has further information on its Optional features support page.
Click Next to continue.
Choose your options before starting the sync process
We’ve made it to the Ready to configure screen, which provides you with a selective overview of your choices. It also allows you to set the following two options:
- Start the synchronization process when configuration completes (deselecting this defers starting the synchronization process)
- Enable staging mode: When selected, synchronization will not export any data to AD or Azure AD (this Azure AD Connect instance will still import settings)
It might be useful to have a second Azure AD Connect server ready for ingesting your data in case your primary one becomes unavailable. This allows you to (manually) turn the second server into the actively synchronizing one, skipping the whole installation process or the need to restore from a backup. You’ll be the best person to determine how to best set up your Azure AD Connect server(s).
Click Install once you’ve confirmed that all settings are correct.
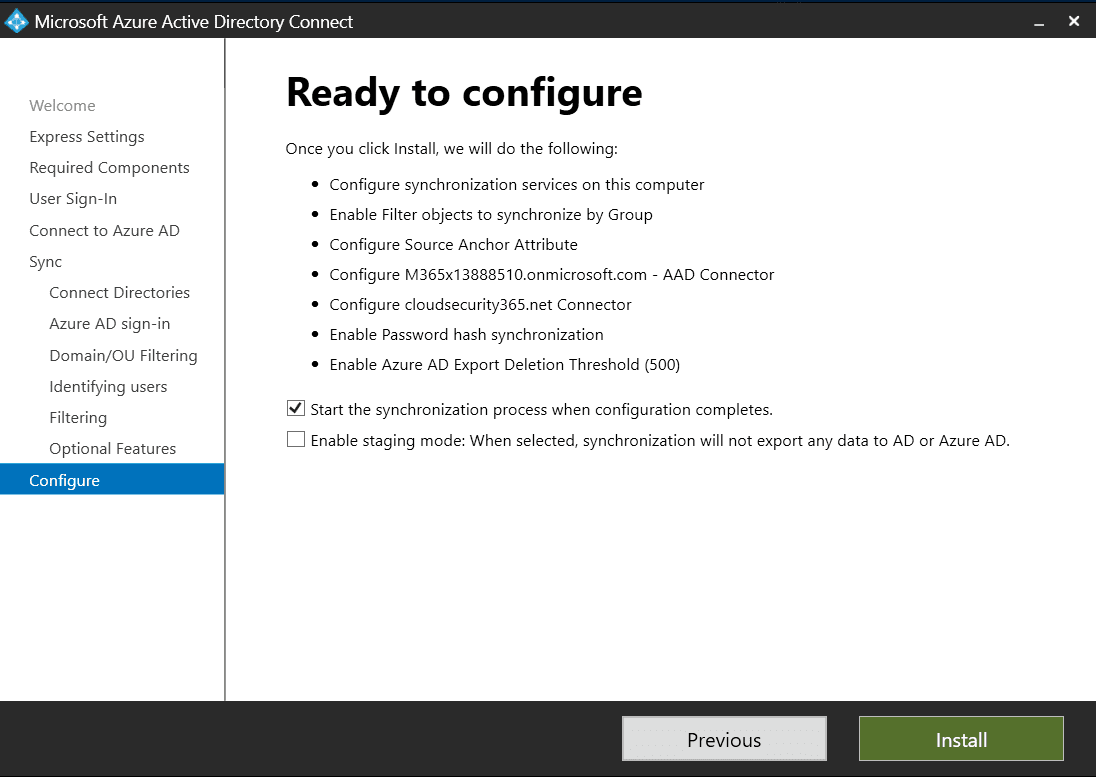
Now, Azure AD Connect will deploy your settings, install several components, and then kick off the initial sync between your AD and your Azure AD. This might take a while depending on the size of your AD.
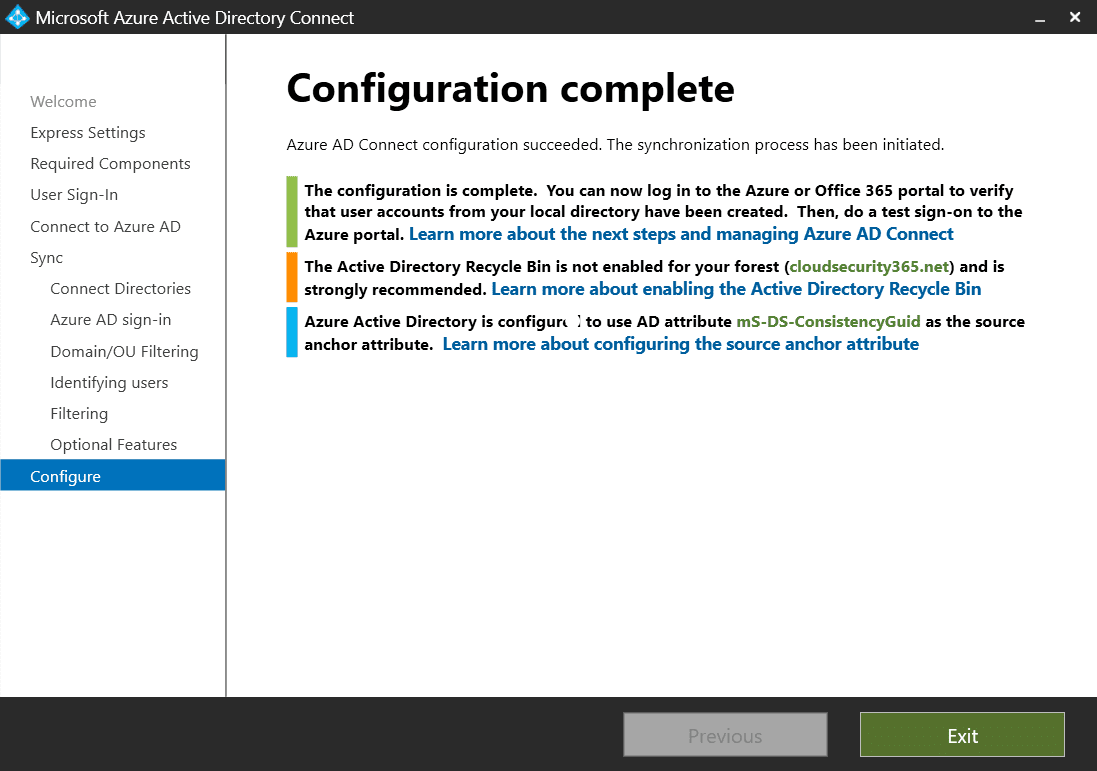
Verifying that Microsoft Entra Connect is working properly
What you’ll see now will depend on your choices during the installation. If you’ve followed my instructions, then your environment should look similar.
In your Azure Portal, navigate to Azure Active Directory, and in the Manage section select Azure AD Connect. You’ll see that the Sync Status, Last Sync and Password Hash Sync values have changed, reflecting that the service has been enabled.

Still in Azure Active Directory, in the Manage section, select Users. You’ll find all your selected on-prem (AD) users synchronized to Azure AD. Note the Directory synced column, this will allow you to easily determine if an account was synced from your on-prem AD or born in the cloud (Azure AD).

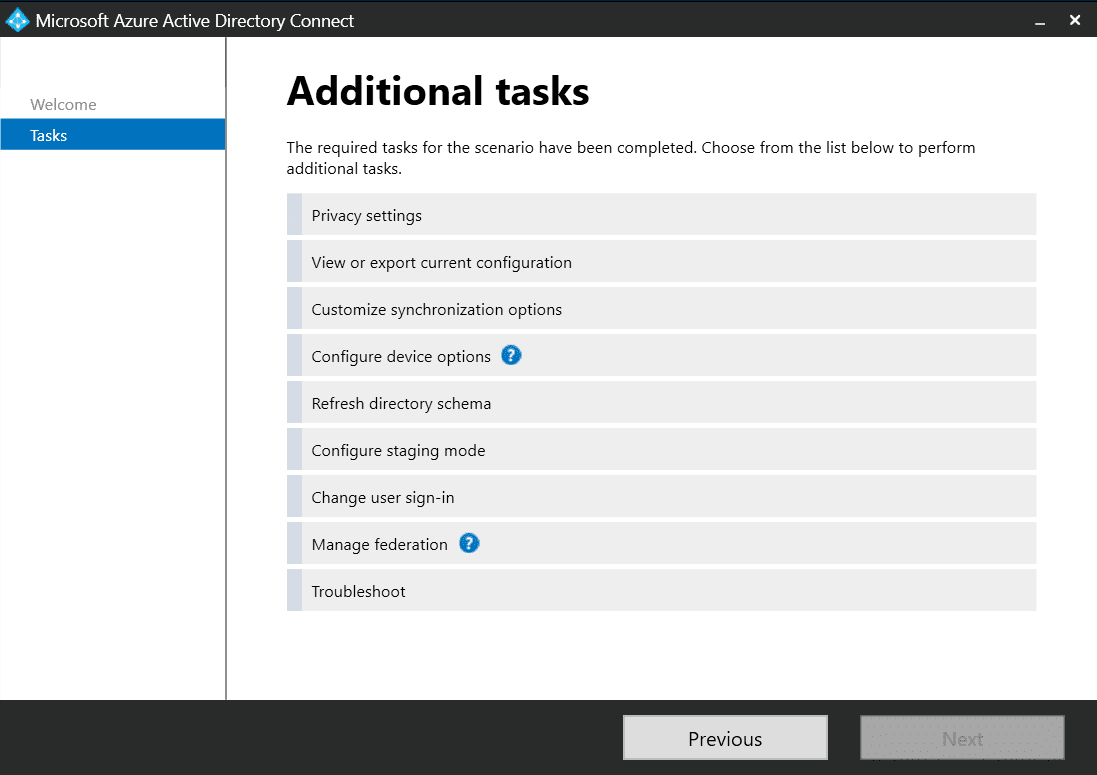
Reconfiguring your Microsoft Entra Connect and further tools
You’ll find a new shortcut (Azure AD Connect) on your desktop, allowing you to reconfigure some of the Azure AD Connect settings. You might see a different selection of options, depending on your original installation choices.
Additionally, the View or export current configuration task allows you to conveniently take a backup of your Azure AD Connect settings, which could also satisfy some of your documentation requirements. Troubleshoot lets you launch the Azure AD Connect Troubleshooting Tool which opens in a PowerShell window.
The synchronization service scheduler is suspended while the wizard is running, even if you don’t make any changes, so make sure you don’t accidentally leave it open.
Azure AD Connect installs and enables further tools and portals that will help you get the most out of your hybrid identity setup:
Now that we have installed Microsoft Entra Connect and checked that the two directories are in sync with each other, it might be time to check out some of the more advanced use cases like enabling Single Sign-On (SSO) and Pass-through authentication. Also, you’ll need to stay up-to-date on new versions of Microsoft Entra Connect, as Microsoft likes to release new features and occasionally remove some that you might be using in your environment.
Related Article:

Michael Taschler is an IT veteran with over two decades’ worth of experience designing, building, securing, operating and troubleshooting cloud and enterprise systems. He is passionate about innovation, digital transformation and how we can crea...