How to Enable and Use the Active Directory Recycle Bin

The Active Directory Recycle Bin is a tool that IT pros can use to recover lingering objects on a network. In this article, I’ll explain how to enable and use the Active Directory Recycle Bin and recover objects without the need to use System State backups.
There are two main ways to enable the Active Directory Recycle Bin on a network. You can do that using PowerShell commands, but you can also use the GUI and the Active Directory Administrative Center.
How to Enable and Use the Active Directory Recycle Bin
The Active Directory Administrative Center (ADAC) is where you can see if the Active Directory Recycle Bin is already enabled. If not, you can enable the AD Recycle Bin in just a couple of clicks.
Here’s how to proceed:
- Open the ADAC from the Administrative Tools folder.
- locate the root of your domain on the left and right-click on it.
- Click ‘Enable Recycle Bin
- Click OK on the pop-up message.
You’ll need to wait until all the domain controllers in your forest have replicated the Recycle Bin configuration change. Once it’s done, you can re-open ADAC and you’ll see the Deleted Objects container.
Keep reading for more details on how to enable and use the Active Directory Recycle Bin!
What is the Active Directory Recycle Bin?
First introduced as an optional feature in Windows Server 2008 R2, the Active Directory Recycle Bin changes the way deleted objects are stored in your Active Directory (AD) database. This feature creates a new hidden container in your domain tree and stores deleted objects for a specified number of days before permanently removing them.
This obviously adds a layer of robustness to your AD environment allowing you to recover accidentally (or purposefully) deleted users, groups, computers, and even organizational units (OUs). The Active Directory Recycle Bin allows you to recover deleted objects much more quickly and efficiently than having to use backup and restoration tools/software, restart Active Directory Domain Services, or having to reboot domain controllers.
What happens to deleted Active Directory objects?
When you delete an object in a domain without the Recycle Bin enabled, most of its properties are erased. The object is then “tombstoned” and stored in the partition’s deleted objects container for a specified amount of time.
Each domain has a tombstone lifetime value for this specific purpose. Even though the object is still restorable, the vast majority of its properties are gone for good (unless they were backed up). When the tombstone’s lifetime value is reached, the object is bye-bye. There is an attribute called Tombstone-Lifetime in the domain. If an administrator does not modify the default value, it is set at 60 days.
If the Recycle Bin is enabled, the deleted object is first stored in the Deleted Objects container with all of its attributes intake for a specific time period. The object can be restored via the Active Directory Administrative Center or PowerShell until this time period expires. After it expires, it is moved to the Recycled Object state. Now, we are in line with the scenario above – most of the object’s attributes are erased and the object is deleted from the AD database.
What are the advantages and disadvantages of using the Active Directory Recycle Bin?
Let’s go through some advantages of using Recycle Bin first.
- The AD Recycle Bin offers an easy way to restore deleted objects without needing to initiate large, enterprise software solutions or multiple-step processes.
- Using this AD Recycle Bin does not require an AD domain controller restart.
- The Recycle Bin feature, when used on Windows Server 2012 or later, provides an easy-to-use GUI in the Active Directory Administrative Center allowing you to recover objects with just a few clicks.
- The attributes of ‘deleted’ objects remain intact in the database with the Recycle Bin.
- The tombstone lifetime value of 60 days gives IT pros plenty of time to recover objects across the vast majority of scenarios
Now, we should also list some drawbacks of using the AD Recycle Bin as well:
- If your forest functional level in your domain is not at least Windows Server 2008 R2 or greater, you will not be able to use the AD Recycle Bin.
- Because you still have a limited timespan to recover and restore deleted objects in their full fidelity, you can’t (really shouldn’t) characterize this as an ‘enterprise-class backup solution’ in your environment.
- The enabling of the AD Recycle Bin is an irreversible process. The only way to ‘turn it off’ is to perform a full-forest recovery (You do NOT want to do this…).
- It is essentially not possible to perform a recovery with the Recycle Bin on changed objects.
- Important – When you enable the AD Recycle Bin, all existing tombstoned objects in the forest will be deleted!
How to enable the Active Directory Recycle Bin
Well, we have some good background on what the Active Directory Recycle Bin is and its purpose, including advantages and things to consider. Before we show you how to enable it, let’s go through some very brief, but vital prerequisites.
- Your forest functional level in your forest needs to be at least Windows Server 2008 R2-level. If not, you won’t be able to enable the feature.
- On a related note, this means that within your forest (including other domains or child domains), all domain controllers must be running at least Windows Server 2008 R2.
How do I know if the Active Directory Recycle Bin is enabled?
There is a very easy visual indicator you can watch for to know if this AD Recycle Bin feature is enabled or not. Open the Active Directory Administrative Center and click on your domain root on the left. On the right, you should see a ‘Deleted Objects‘ container.

How to enable the Recycle Bin in the Active Directory Administrative Center
The steps to enable the AD Recycle Bin in the Active Directory Administrative Center (ADAC) is nice and easy. Let’s go!
- First, open the ADAC from the Administrative Tools folder.
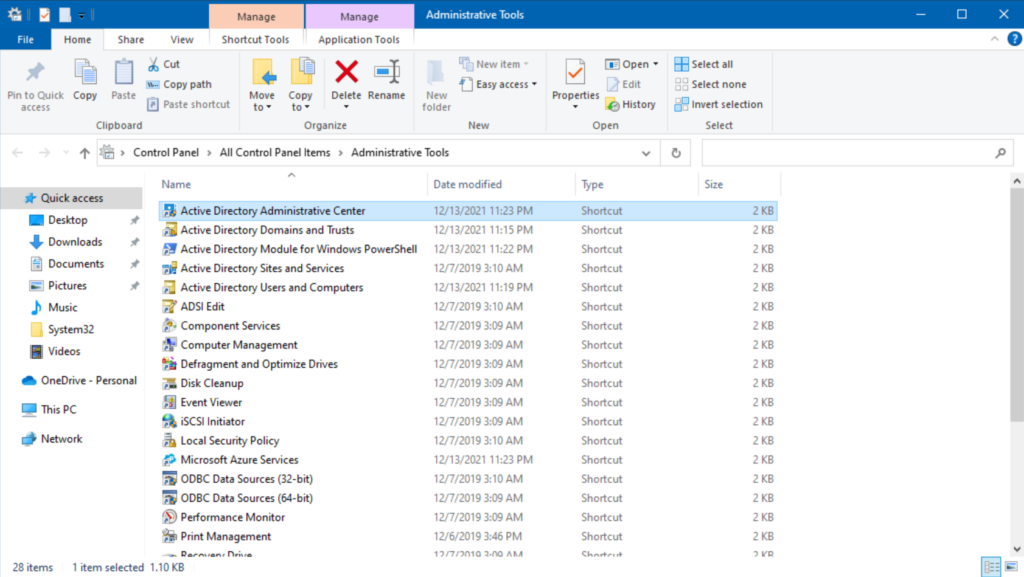
- Next, locate the root of your domain on the left and right-click on it. Click ‘Enable Recycle Bin …‘
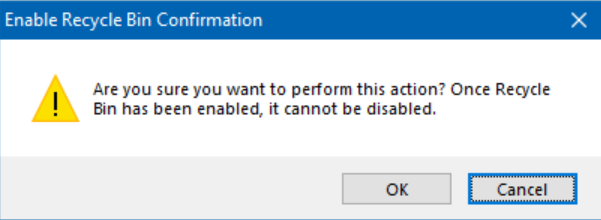
- Heed the warning appropriately. There is no way to reverse this step without reverting to drastic and very time-consuming procedures. Click OK when you’re ready.
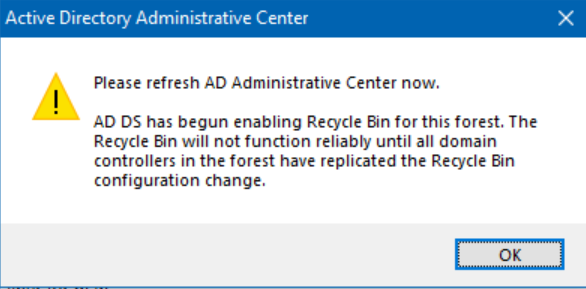
We have liftoff. As the dialog states, we may need to wait a while before the change is replicated to all DCs. Of course, depending on your environment, this could take an hour or more, especially if you have a geographically ‘diverse’ AD environment for your domain, with replication occurring over slower WAN links, etc.
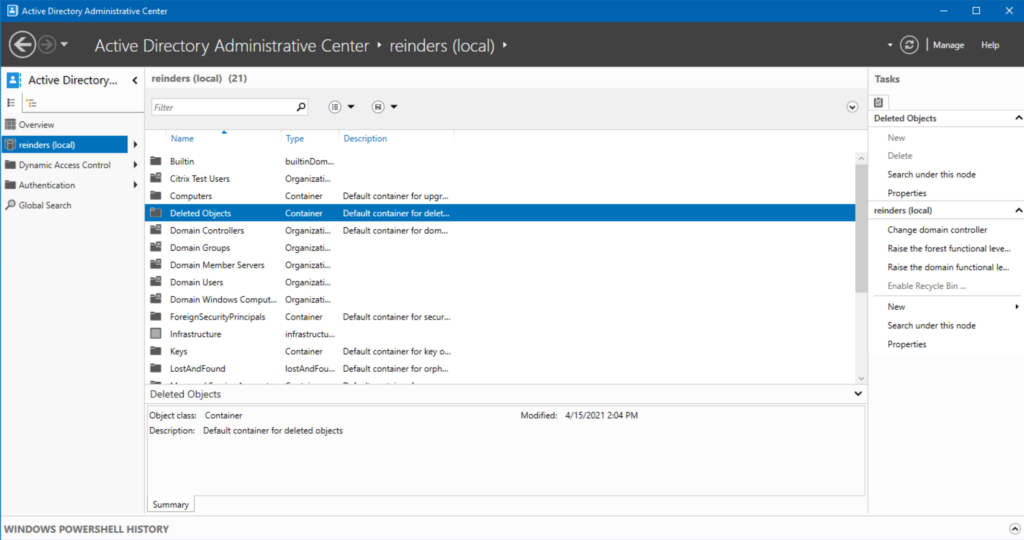
As you can see above, after closing and re-opening ADAC, there is our Deleted Objects container!
How to enable the Active Directory Recycle Bin with PowerShell
Now, let’s perform the same steps using PowerShell. OK now, pay attention, this is kind-of-like sort of tricky:
- First, from the Administrative Tools folder, launch Active Directory Module for Windows PowerShell (No, I never understood that lovely title).
- Now, enter this command:
Enable-ADOptionalFeature –Identity “CN=Recycle Bin Feature,CN=Optional Features,CN=Directory Service,CN=Windows NT,CN=Services,CN=Configuration,DC=reinders,DC=local” -Scope ForestOrConfigurationSet –Target “reinders.local"
- Of course, you will replace my domain (reinders.local) with yours.
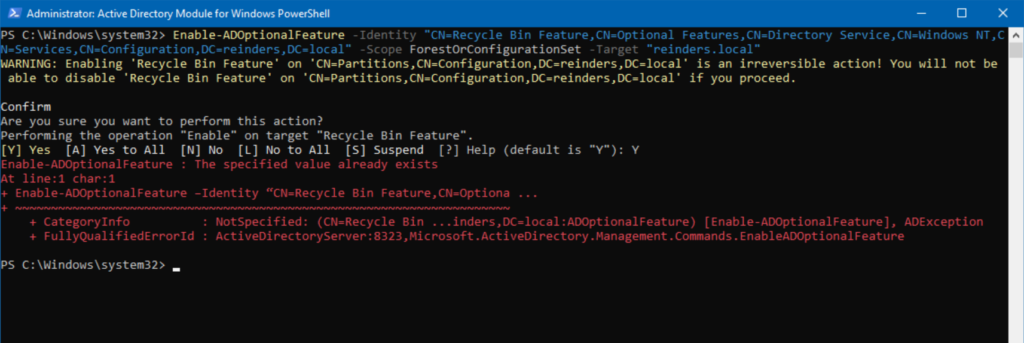
Now, because I already enabled the feature, I received the simple and logical ‘error’ that the value (enabled) already exists. But, you get the idea. Simple as that!
How to control the lifetime of deleted Active Directory objects
Let’s next discuss the various timelines of deleted and tombstoned objects in AD. We will go through the defaults, the actual attribute names, and finally how to change them. Here we go.
What is the default tombstone lifetime of deleted objects?
The default lifetime of tombstone objects is 180 days. It has been this way since Windows Server 2003 SP1 (!). The attribute in question is called msDS-deletedObjectLifetime. This lives in the Directory Service container in AD.
How to modify the tombstone lifetime period
Even though Microsoft wishes you would leave this alone, they know you won’t. So, you can use the Set-AdObject PowerShell command to change the number of days of the attribute:

Just like that!
How to restore deleted objects from the Active Directory Recycle Bin
How fitting that I waited until the end to actually show how to restore something deleted with the Recycle Bin enabled! I know, but, this topic warrants the background and explanation of the nuances and idiosyncrasies of the feature.
Using the Active Directory Administrative Center
In the ‘Test Users’ OU in my domain, I deleted two users: ‘Cassandra Reinders’ and ‘Peter Cetera.’ Now, let’s go back to Active Directory Administrative Center to restore them:
- Double-click on the ‘Deleted Objects‘ container and you’ll see all deleted objects in your domain.
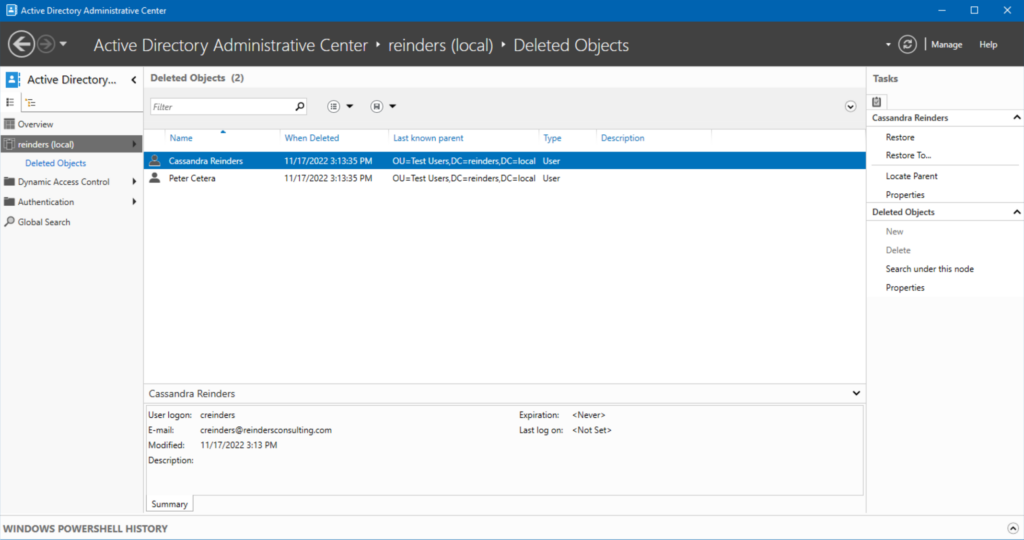
- Let’s restore Cassandra: We will click the ‘Restore‘ link on the right under the Tasks menu.
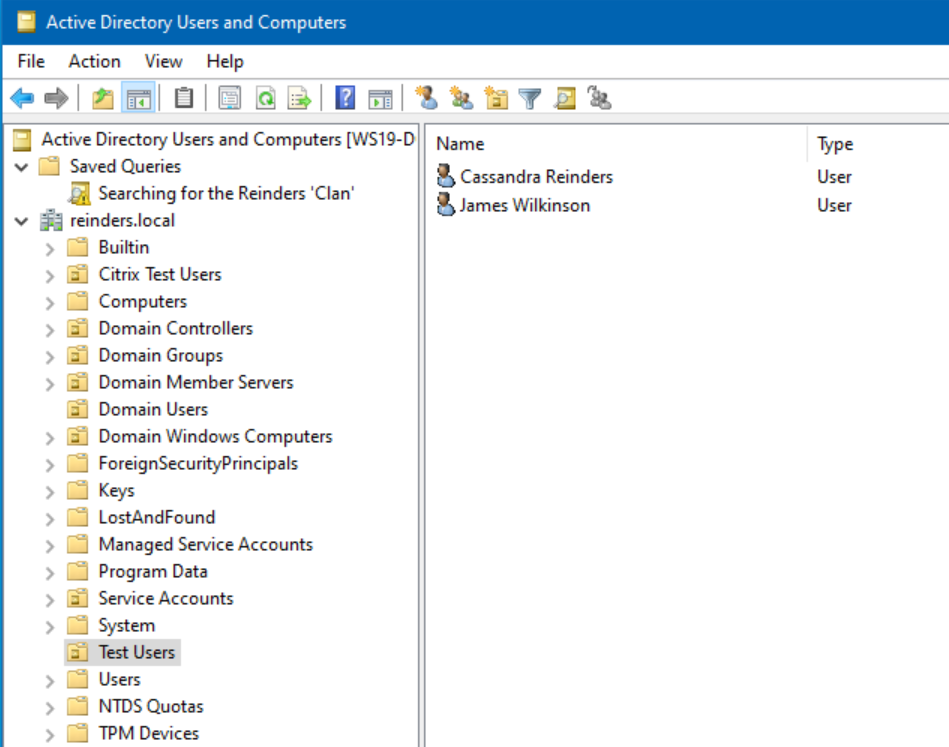
- I then opened Active Directory Users and Computers and clicked the Test Users OU.
Remember, you may need to wait for DC replication to occur if you are connecting from different DCs using these various tools. As you can see below, Cassandra has now been restored.
Using PowerShell commands
Now, we can use PowerShell to restore Peter. Let’s see how it’s done. First, use the Get-ADObject command to view current objects:
Get-ADObject -ldapFilter:”(msDS-LastKnownRDN=*)” – IncludeDeletedObjects

As we peruse the output, the first item we see is Cassandra. However, note that the ‘Deleted’ attribute is blank, or NULL, meaning she is not deleted, because I just restored her. However, Peter is showing as ‘True.’ So, we can proceed to restore him.
Again, we’ll be using the Get-AdObject cmdlet to do that:
Get-ADObject -Filter {displayName -eq “Peter Cetera”} -IncludeDeletedObjects | Restore-ADObject

No news is good news. Let’s check Active Directory Users and Computers again and verify he’s back.
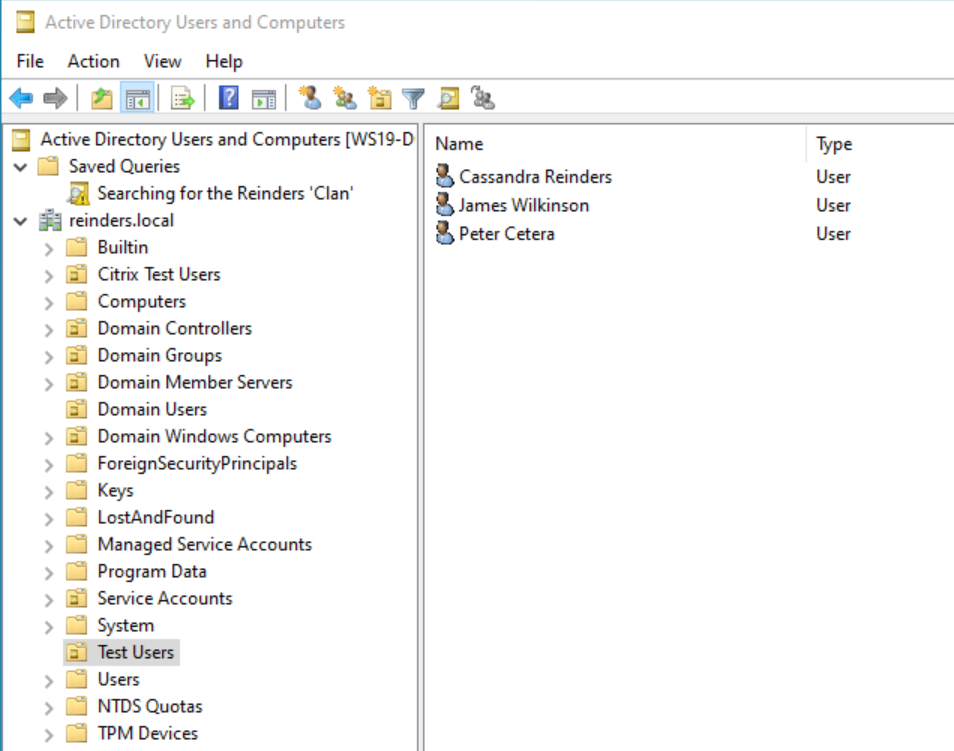
Very good. All safe and secure, sir.
Best practices for using the Active Directory Recycle Bin
There are a few general best practices for using the AD Recycle Bin. Let me go through and list them here.
- Enable AD Domain Services auditing. This will allow you and your IT Pro team members to discover why, where, when, and who deleted objects.
- Try not to reduce the lifetime of deleted and tombstones objects in your domain to save space in your database. There’s really no need. The longer the timeline, the more time you’ll have to restore objects.
- Continue to back up your System State as part of your normal Active Directory backup and recovery policies. The AD Recycle Bin will not help you to restore the contents of the SYSVOL folder, Group Policy, and other system-related files in Active Directory.
Conclusion
Enabling the Active Directory Recycle Bin brings immediate goodness and happiness to your IT team knowing they can now very easily recover deleted users, groups, computers, printers, and OUs in your domain(s). There is one main prerequisite – to be running your forest on Windows Server 2008 R2 or higher. However, once you satisfy that, you are free to enable this using the Active Directory Administrative Center.
Thank you for reading. If you have any comments or questions, please feel free to leave them below!
Table of contents
- How to Enable and Use the Active Directory Recycle Bin
- What is the Active Directory Recycle Bin?
- How to enable the Active Directory Recycle Bin
- How to control the lifetime of deleted Active Directory objects
- How to restore deleted objects from the Active Directory Recycle Bin
- Best practices for using the Active Directory Recycle Bin
- Conclusion


