How to Whitelist a Domain in Office 365

As an IT Pro, it is crucial to your organization to make sure that your users receive legitimate emails. Sometimes, Exchange Online Protection (EOP) can flag these emails as spam. Safely creating whitelists — also sometimes referred to as allowlists — for specific domains/email addresses allows you to efficiently manage email flow in your organization and protect your users from malicious activity. In this guide, I will show you how to whitelist a domain in Office 365 using a mail flow rule, the Microsoft 365 Defender portal, and PowerShell.
Why you may need to whitelist a domain in Office 365?
A typical scenario encountered by IT pros managing Exchange Online is to have users complain that important emails are “hiding” in their ‘Junk Email’ folder in Outlook. There are two main reasons why this can occur:
- Users have configured Outlook’s Junk Mail Options feature and added the sender’s email address or entire domain to the Blocked Senders tab.
- The Exchange Online Protection (EOP) feature that comes with the Exchange Online service has flagged the email as spam using Microsoft’s score-based algorithm. You can determine this by doing a Message Trace in the Exchange Admin Center. The log entry will show the final status as ‘FilteredAsSpam.’
The first reason is specifically tied to the Outlook desktop application. The important point is that the feature only works when Outlook is open.
I will be covering the second reason here in this post. Before the email ever gets to the user’s mailbox, the protection service acts on the email. It puts it directly in the ‘Junk Email’ folder, so the email is never delivered to the user’s Inbox folder. So, in terms of email flow, this occurs before the email enters Outlook.
In order to avoid these legitimate emails being delivered to ‘Junk Email’ folders, we can create a whitelist rule or change in the Microsoft 365 service. However, you must be careful to choose the best and most secure method. In some cases, configuration changes will open the door to spammers and malicious actors to exploit the settings you modify. I will go through the security aspect of each method below.
Should users create their own whitelists?
Well, not really. The main reason I say that is because it’s not nearly as effective. As I said earlier, when users create whitelists, they’re setting up what’s called client-side rules. This means that the Outlook desktop application itself is processing the user’s Inbox only when it’s open and running. If there happens to be an issue with Outlook, this processing will not occur.
The advantage of using the methods in this post is that they create server-side rules. That means that they process before any emails enter a user’s mailbox, period. It’s simply safer that way. And, more efficient – it simply happens automatically behind the scenes.
How to whitelist a domain in Office 365 using a mail flow rule
Arguably, the most secure method of allowing an email address or domain to bypass spam filtering is to create a Mail Flow Rule in Exchange Online. However, there are very important settings you need to understand.
- First, navigate to the Exchange Admin Center.
- On the left, expand Mail flow, then click on Rules.
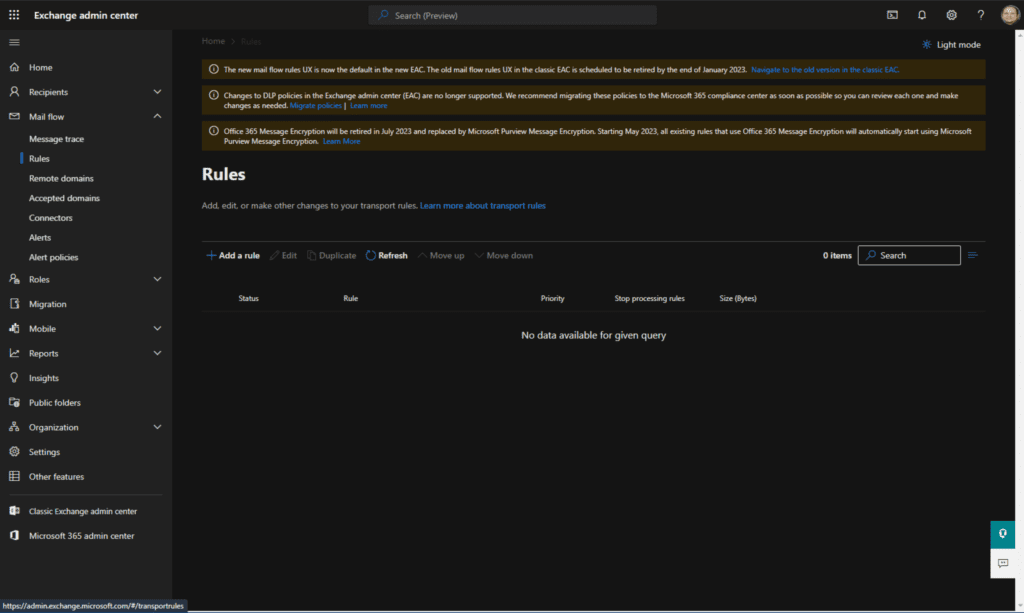
- Click the + Add a rule button and choose Bypass spam filtering.
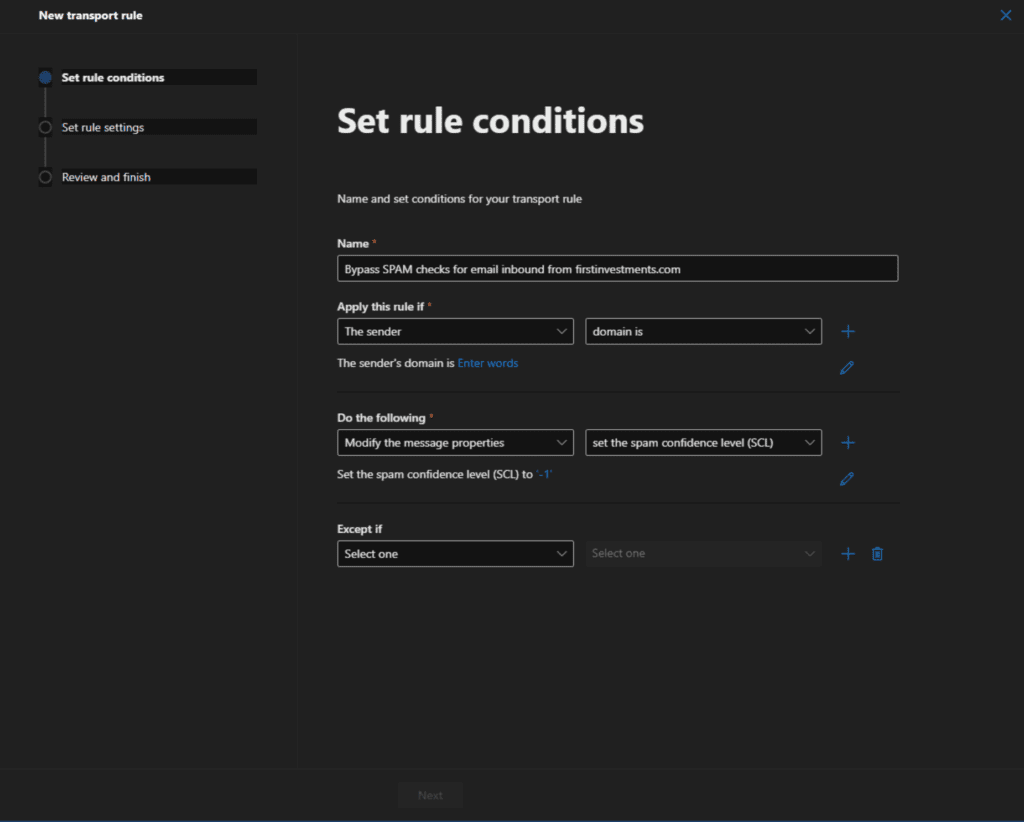
- Write a brief description in the ‘Name‘ field.
- For the ‘Apply this rule if‘ field, choose ‘The sender.’ Next to that, choose ‘domain is‘ from the dropdown menu. A new screen will open up.
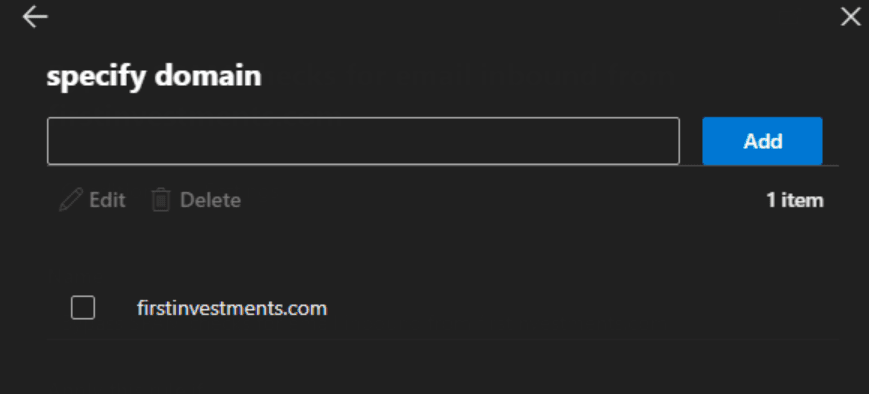
- In the ‘specify domain‘ field, enter the domain name and click Add, then click Save.
- Next, click the + button to add another condition. Choose ‘The message headers…‘, then ‘includes any of these words’, and type in ‘dmarc=pass‘. The rest should be good!
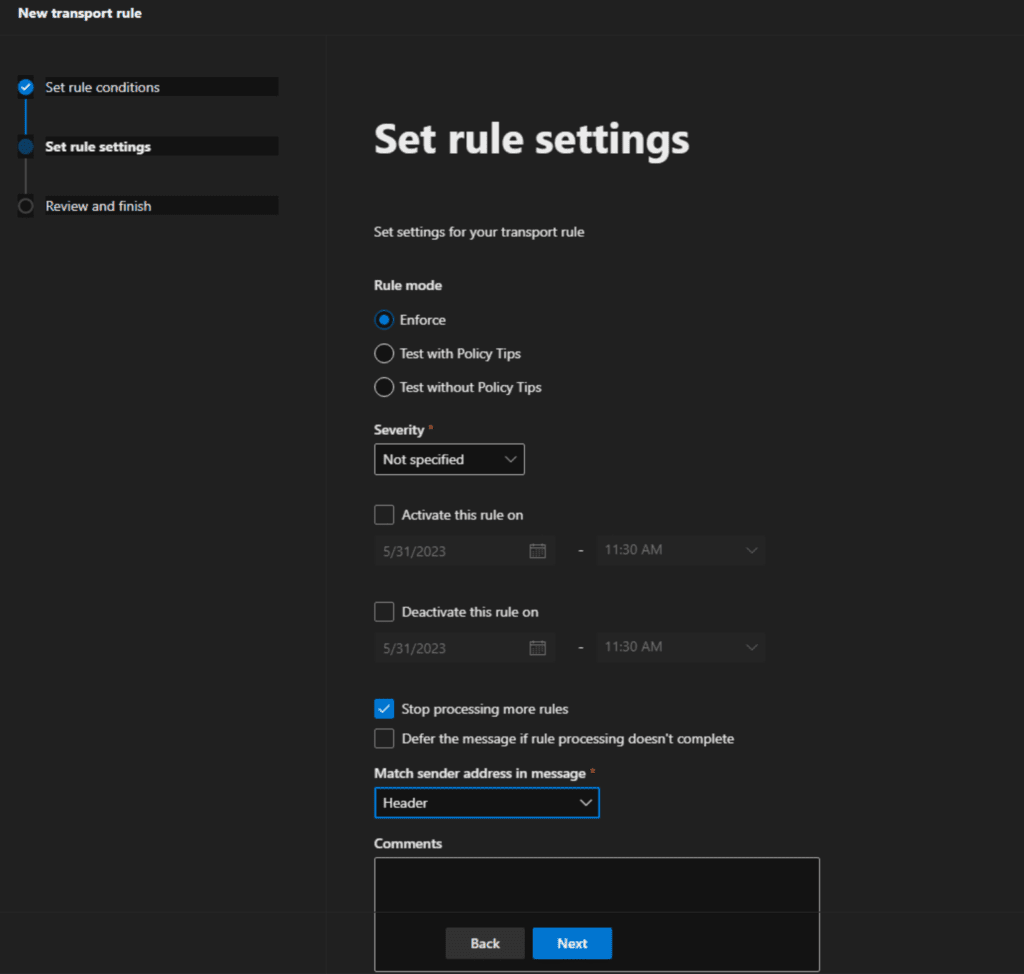
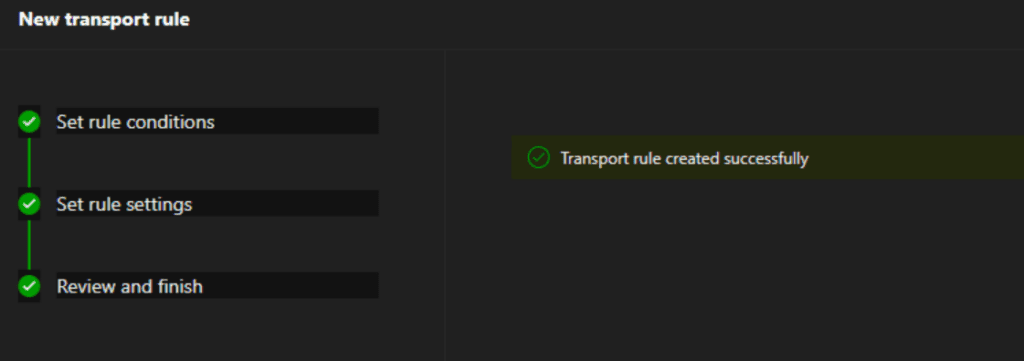
- The ‘Set rule settings’ screen should be fine. You can make adjustments as you see fit. Click Next.
- On the Review and finish screen, click Done.
That’s all there is to it. Here’s the crucial part – adding the check in the message headers for a passing grade for DMARC and authentication! If you don’t put those checks in, the rule opens a relatively large hole for hackers to exploit it. Potential attackers can send malicious emails to your organization by spoofing that domain, bypassing your critical security checks and balances.
How to whitelist a domain in Office 365 using Microsoft 365 Defender
Another relatively safe method to whitelist a domain in Office 365 is to use Microsoft 365 Defender. Here, we’ll update the default anti-spam inbound policy.
- To get there, open the Microsoft 365 Defender portal.
- Browse to Email & collaboration -> Policies & rules -> Threat policies -> Anti-spam policies.
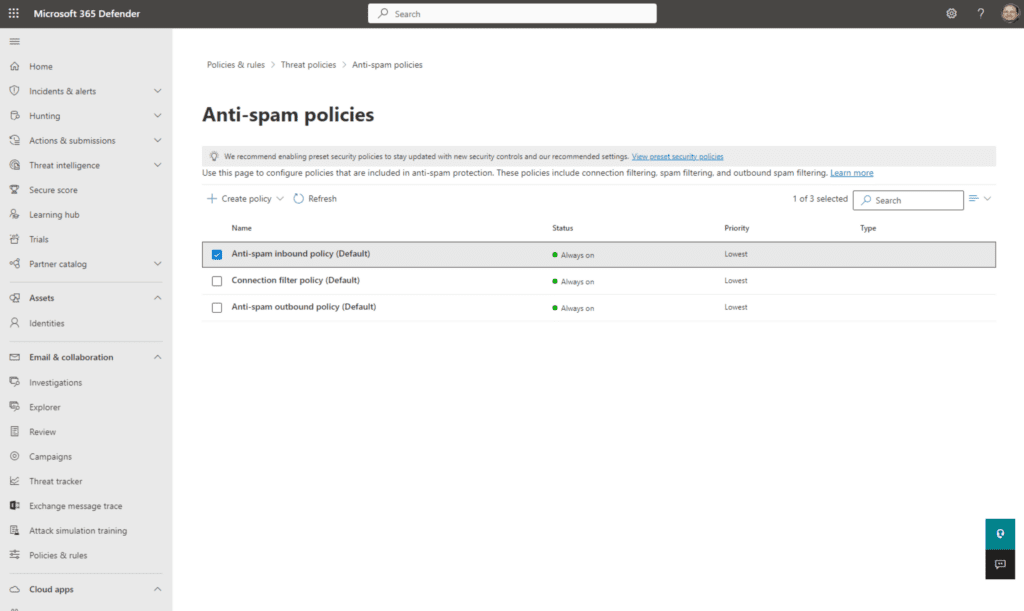
- Click on the Anti-spam inbound policy (Default) item. This will allow you to make changes.
- Scroll all the way down to the ‘Allowed and blocked senders and domain‘ section and click the link titled Edit allowed and blocked senders and domains.
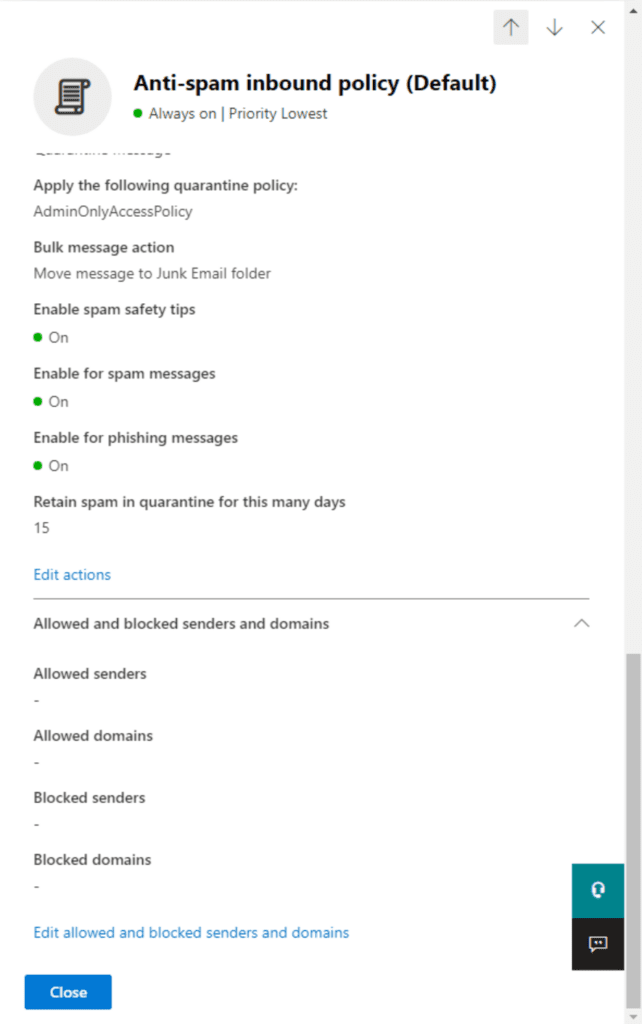
- Here, you will find the policy graciously offers some helpful granularity. It allows you to enter an email address or domain to allow (options 1 and 2), as well as an email address or domain to block (options 3 and 4). Let’s choose Allow domains.
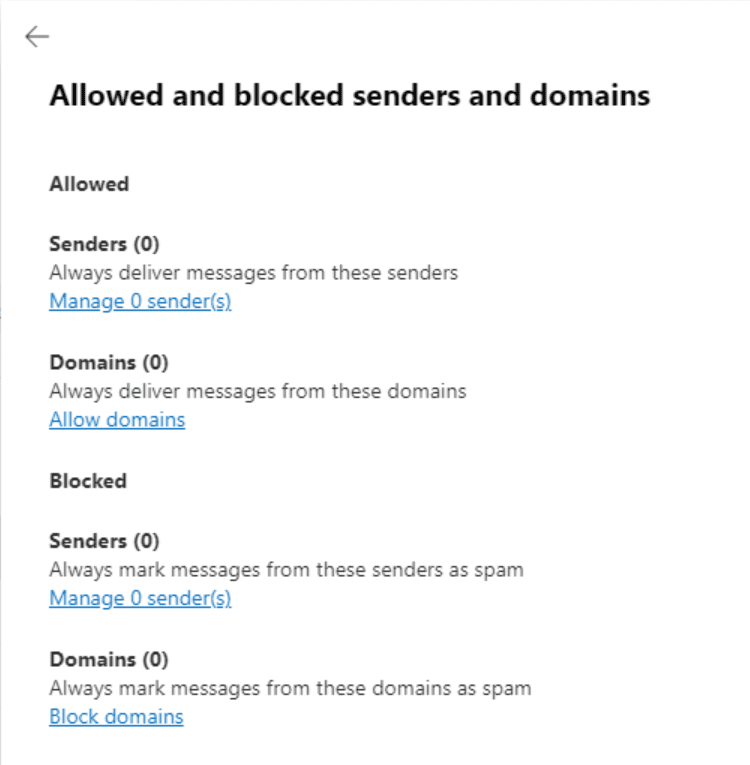
- Here, I will click on the ‘+ Add domains‘ button, then I’ll enter the domain in the ‘Domain‘ field and click Add domains at the bottom.
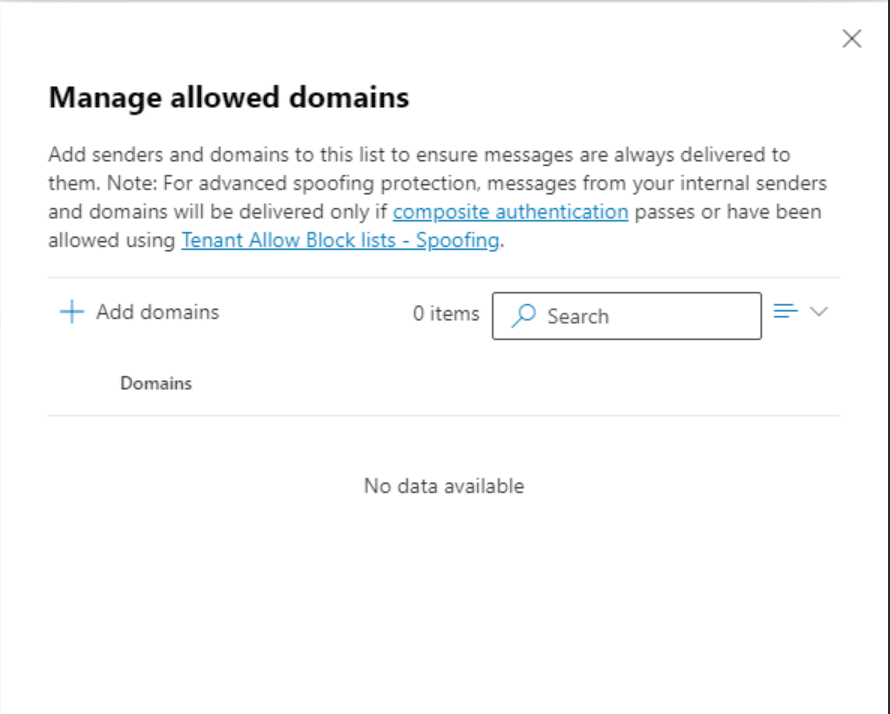
- Then, I’ll click Done again at the bottom. Finally, click Save.
- We can now see there is one domain added to the Allowed domains section of the policy!

How to whitelist a domain in Office 365 by IP address
Granularity strikes again! We are also able to whitelist a connection by using its IP Address. When an email is inbound from the Internet and it routes through your tenant, Exchange Online (EXO) will check the IP Address of the sending SMTP server.
This is not commonly used and can sometimes be spoofed. However, there are business cases where this is the easiest way to always allow emails into your employee’s Inbox folders. Again, we’ll be using the Microsoft 365 Defender portal here.
- Navigate to the same location – Email & collaboration -> Policies & rules -> Threat policies -> Anti-spam policies.
- This time, click on Connection filter policy (Default).
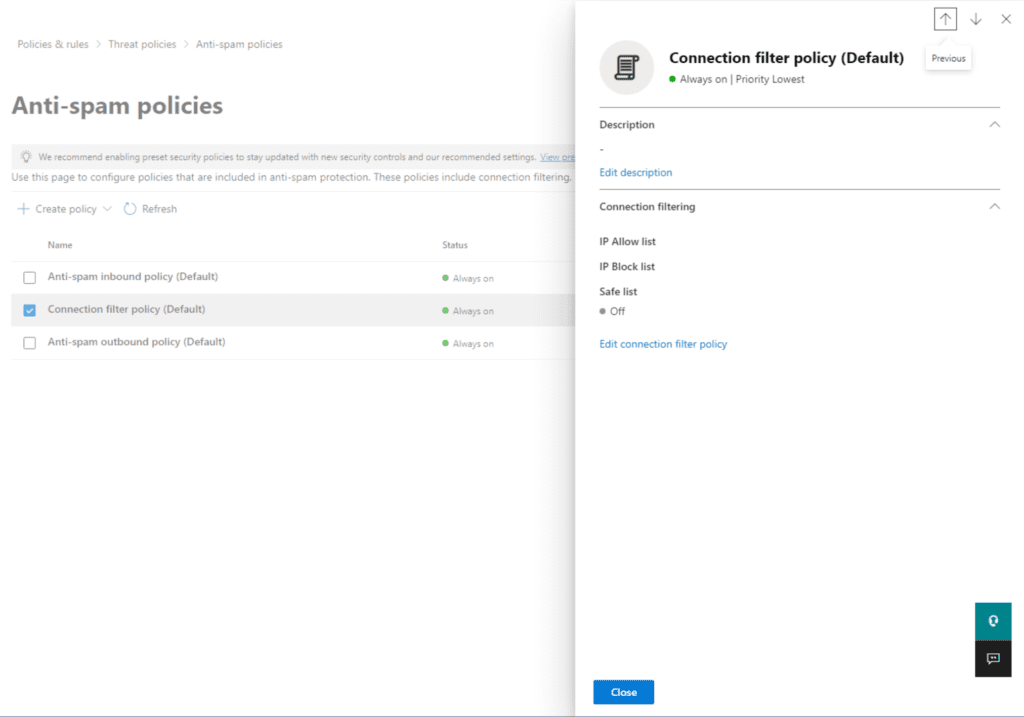
- Next, click the Edit connection filter policy link.
- In the ‘Always allow messages from the following IP addresses or address range:‘ field, go ahead and type in either individual IP addresses or IP ranges using standard notation (152.4.45.179, 8.6.4.0/24, etc.)
- Click Save.
That’s all there is to it!
How to whitelist a domain in Office 365 using PowerShell
I hope you didn’t think I would forget PowerShell! Whitelist domain Office 365 processes can often be streamlined with PowerShell scripts, providing efficiency for IT professionals. You’ll probably be amazed at how simple it is to make a similar change with one command.
Let’s go through the steps to add another email domain to the default anti-spam policy.
- Once you’ve connected to Exchange Online, start by entering this command. This gives us the ‘Name’ of the policy we modified earlier -‘Default‘.
Get-HostedContentFilterPolicy
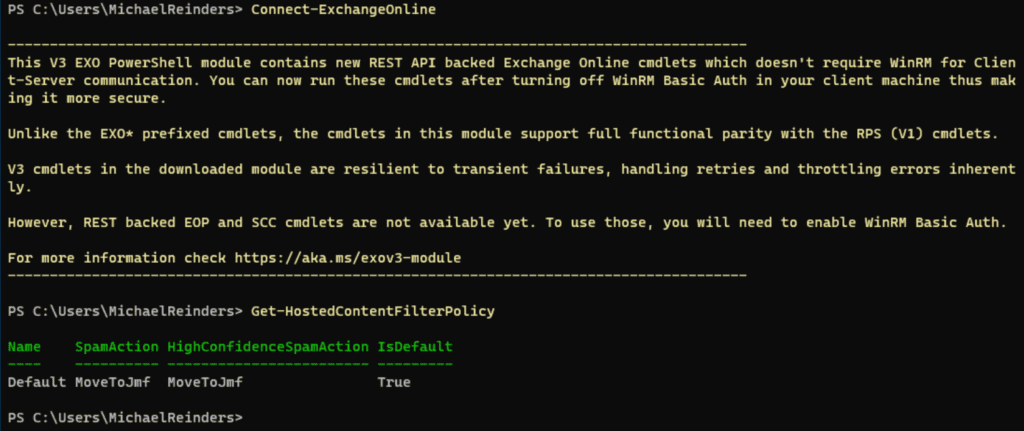
- We can now use the associated ‘Set-‘ command to add another domain. Watch this.
Set-HostedContentFilterPolicy -Identity 'Default' -AllowedSenderDomains 'secondinvestments.com'

Now, THAT was easy. Instead of browsing all around the GUI of the Microsoft 365 Defender website, you can run that simple command to whitelist a domain in Office 365.
You should only whitelist domains that you trust
Whitelisting a domain in Office 365 is an excellent and effective way to ensure that specific emails are not filtered as spam. This can be useful if you receive emails from a specific domain that are frequently marked as spam. Once you have whitelisted a domain, this will no longer happen.
It is important to note that whitelisting a domain can also increase your risk of receiving spam. This is because spammers can often spoof the sender’s address, making it appear as if the email is coming from a legitimate domain. If you whitelist a domain that is being used to send spam, you may end up receiving more spam!
For this reason, it is important to only whitelist domains that you trust. You should also regularly review your whitelisted domains and remove any that are no longer needed.
Please feel free to leave a comment below – thank you for reading!
FAQs
Can I whitelist a domain in Office 365 for specific user groups instead of the entire organization?
Yes. You can create a mail flow (transport) rule in the Exchange Admin Center that applies only to specific users or groups. Here’s how to do it:
- Go to the Exchange Admin Center
- Create a new mail flow rule
- In the left-hand menu, go to Mail flow > Rules.
- Click + Add a rule, then select Create a new rule or choose Bypass spam filtering from the template options.
- Set the conditions
- In the Apply this rule if… section, choose The sender > domain is, then specify the domain you want to whitelist.
- Add another condition by clicking Add condition, then select The recipient > is a member of this group, and choose the distribution group or mail-enabled security group you want the rule to apply to.
- Add optional DMARC checks (recommended for security)
- Add a condition for message headers to include the words dmarc=pass.
- This ensures the whitelisted domain passes authentication checks, reducing the risk of spoofed emails.
- Finish rule setup
- Click Next through the remaining settings, review your rule, and click Finish to save.
Once applied, the rule will allow messages from the specified domain to bypass spam filtering only for the selected users or groups — not the entire organization.
Does whitelisting a domain in Office 365 affect both incoming and outgoing emails?
No. Whitelisting domains in Office 365 only affects incoming emails. For outgoing emails, you’ll need to configure separate SPF, DKIM, and DMARC records to ensure proper email authentication and delivery.
How long does it take for domain whitelisting changes to propagate across the system?
Most domain whitelisting updates in Office 365 take effect within 30 minutes to 1 hour, but it can take up to 24 hours for changes to fully propagate across all Microsoft’s data centers and email infrastructure.
Can I use wildcards when setting up domain whitelist rules in Office 365?
Yes, Office 365 supports wildcard entries for domain whitelisting, allowing you to whitelist multiple subdomains using patterns like *.example.com, though this should be used cautiously for security reasons.
What happens if my Office 365 domain whitelisting settings conflict with other security policies?
When conflicts occur, Office 365 typically applies the most restrictive security policy first. However, if you’ve explicitly whitelisted a domain using a mail flow rule or the anti-spam policy, that setting usually takes precedence and allows the message through.
That said, higher-level security tools like Microsoft Defender policies, zero-hour auto purge (ZAP), or advanced phishing protection may still override the whitelist if the message is considered a high risk. Always test and monitor after applying whitelist rules to ensure they behave as expected.
Related Article:

Michael has been an IT Pro since 1998. He has worked predominantly in the Windows world including client and server operating systems, on-prem systems engineering (AD, DNS, etc.), and over the last ten years or so has embraced and immersed himself in...


