How To Block Senders in Office 365 – o365 Block Sender Guide

There are quite a few methods IT Pros can use to block malicious and harmful emails from flowing into their organizations. Similar to my previous post on adding a whitelist email address or domain to your Microsoft 365 settings, I’m going to detail different methods to block senders in Officer 365 and offer some commentary and recommendations for each of them.
What can IT Pros do to block senders in Office 365?
Let’s start off by going back to the basics and defining the fundamentals of an email message. First of all, you have a message envelope and the message content.
The message envelope contains all the delivery information required to send from one SMTP server to another. You can think of it as a TCP/IP packet header – a small bit of info designed to help the email message flow from sender to recipient. The recipient never sees the message header as it is dynamically created during the message transmission process, then discarded.
Blocked sender lists and blocked domain lists in anti-spam policies in Exchange Online Protection (EOP) only inspect the ‘From address’ of the email message. They do not inspect the ‘MailFrom’ address which is used by the sending SMTP server.
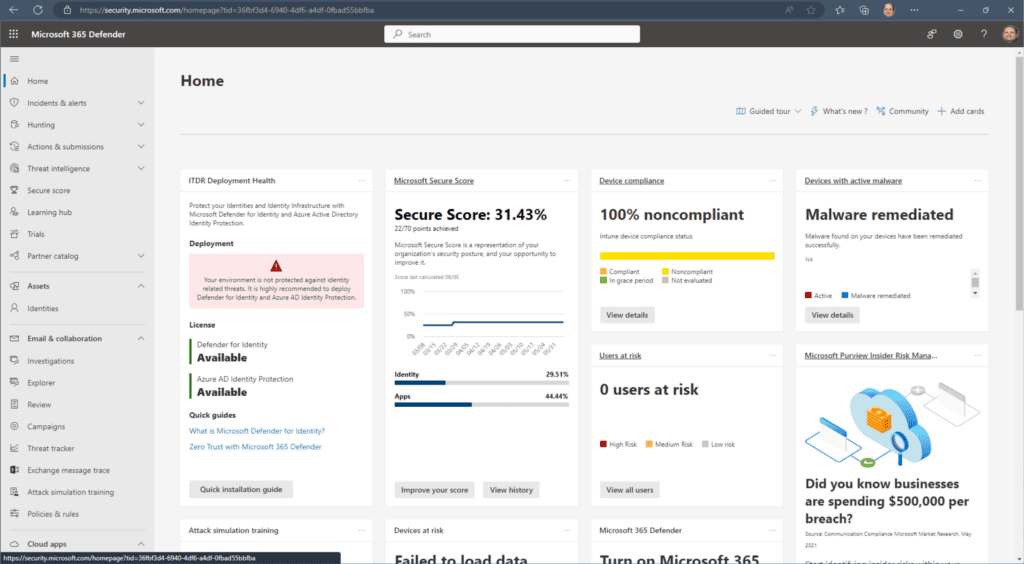
The number one recommended option for o365 block sender capability is the Tenant Allow/Block List. I will explain how to add entries to the Microsoft 365 Defender portal website. The steps are similar to creating whitelists for email addresses and domains. I will also list out alternative methods IT Pros have in Office 365 to perform similar functions.
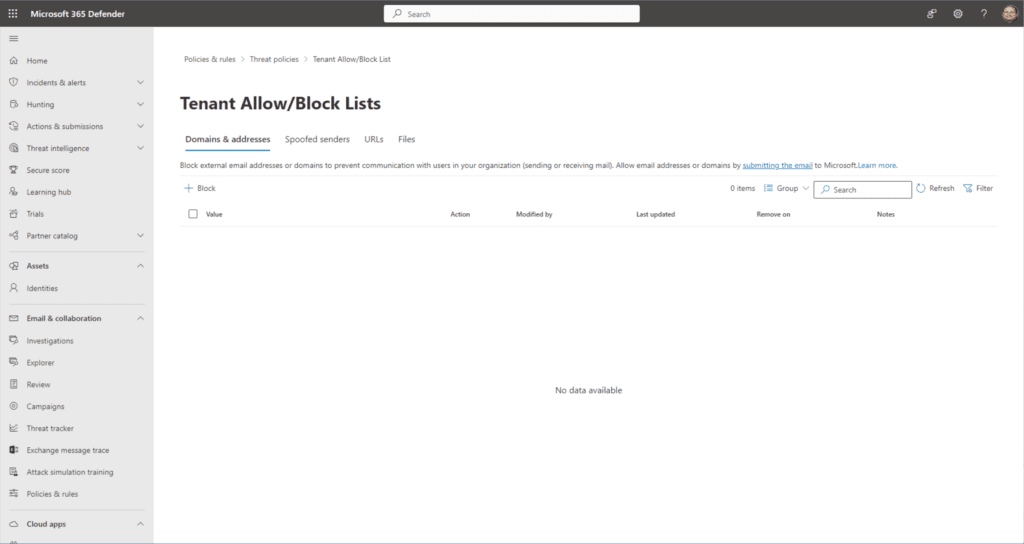
Use the Microsoft 365 Defender ‘Tenant Allow/Block List’ feature
Microsoft’s number one recommended option for blocking email from particular senders or domains is to use the Tenant Allow/Block List. This functionality is found on the Microsoft 365 Defender website.
- From the homepage, under the Email & collaboration heading on the left, click Policies & rules -> Threat policies -> Tenant Allow/Block Lists (under the Rules category).
- With the default Domains & addresses tab highlighted, click the ‘+ Block‘ button below.
- Here, we can enter email addresses and entire domains. For clarity, I recommend one entry per line. I will put in some fictional entries.
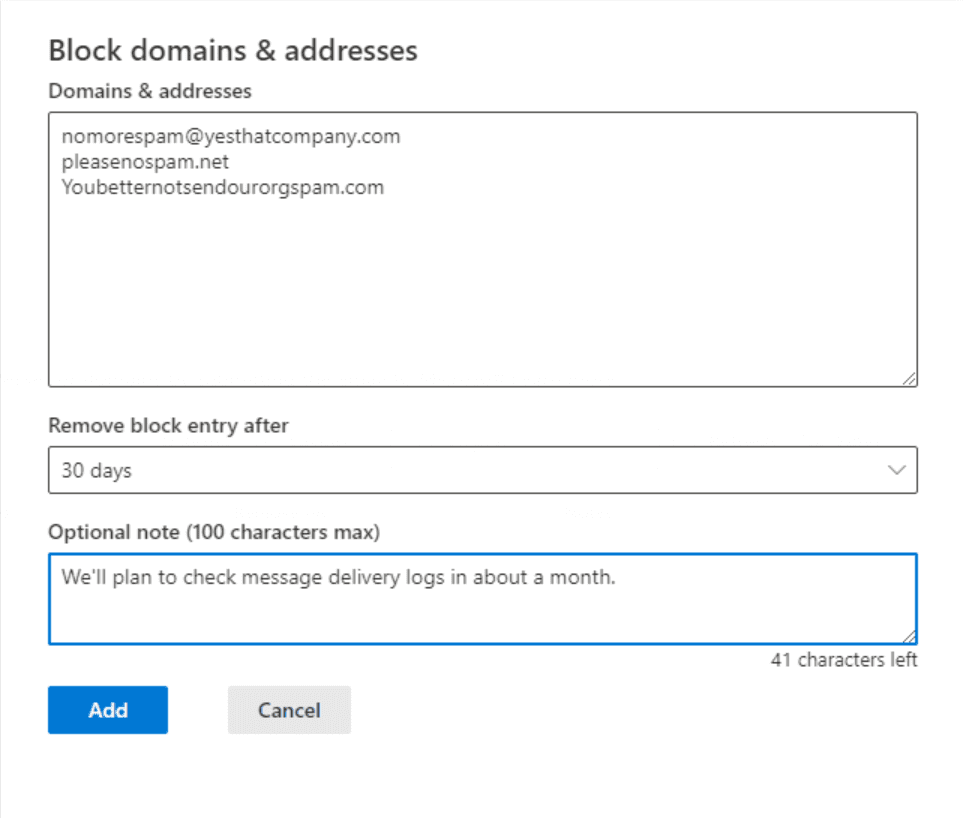
- Under the ‘Remove block entry after’ dropdown, we can choose how long to keep this specific block in place. You can choose between 1 day, 7 days, 30 days, Never expire, or a specific date.
Honestly, these are good options. You may want to only block something for 1 day or 7 days so you can analyze message trace logs. Remember that you don’t want to block any legitimate emails. I will set it for 30 days and leave a note so other admins understand the nature of this entry.
Use PowerShell to update Outlook Blocked senders
The next option is to update the Blocked Senders category in the mailbox’s Junk Email configuration. Although this is possible to update from the Outlook desktop app, it is less than ideal and efficient for obvious reasons – you would need to remotely access that device or access the user’s computer directly. IT Pros love remote access, again for obvious reasons!
Thankfully, we are able to use PowerShell to make these configuration changes directly in the user’s mailbox. We will be updating what’s called the ‘safelist collection’. This includes Safe Senders, Safe Recipients, and for this post, the Blocked Senders list.
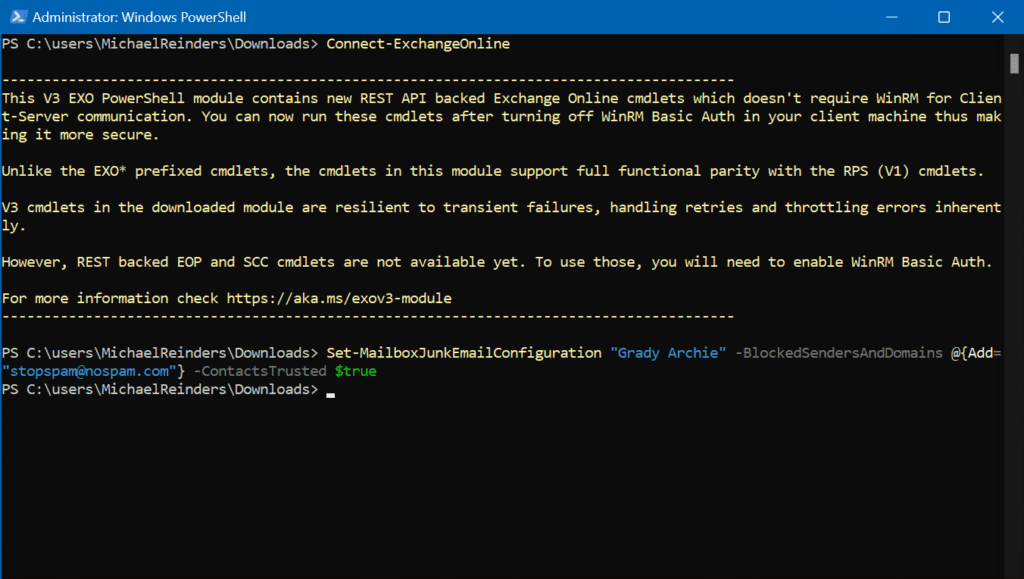
Let’s say we want to update Grady Archie’s Blocked Senders list. We can use the Set-MailboxJunkEmailConfiguration cmdlet to accomplish this.
Set-MailboxJunkEmailConfiguration "Grady Archie" -BlockedSendersAndDomains @{Add="[email protected]"} -ContactsTrusted $true
That was easy! If you wanted to update this for all your users, you could use a variable and then make the change for all mailboxes.
$All = Get-Mailbox -RecipientTypeDetails UserMailbox -ResultSize Unlimited; $All | foreach {Set-MailboxJunkEmailConfiguration $_.Name -BlockedSendersAndDomains @{Add="naughtyspamcompany.com"}}
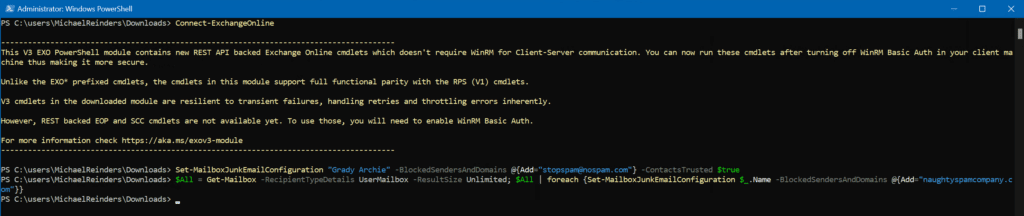
Instead of sitting in front of each computer in your company, you can enter one command and it is all done. What a time saver!
Use blocked sender lists or blocked domain lists
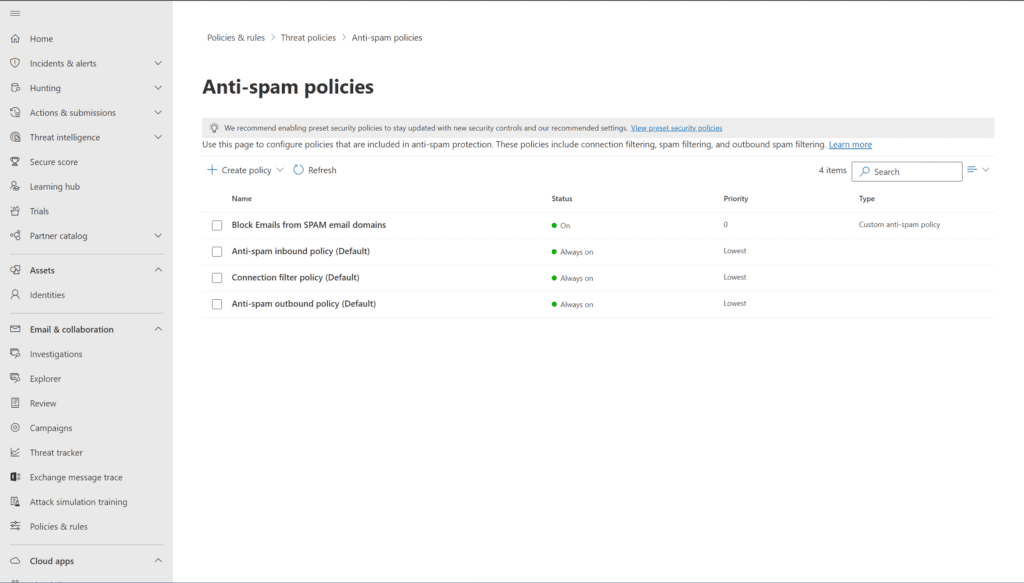
The next best option to block senders in Office 365 is to use anti-spam policies in Microsoft 365 Defender. This will allow us a more efficient administrative option.
We can pick up right where we left off from the Teant Allow/Block List above on the website.
- Under Email & collaboration, browse to Policies & rules -> Threat policies -> Anti-spam policies.
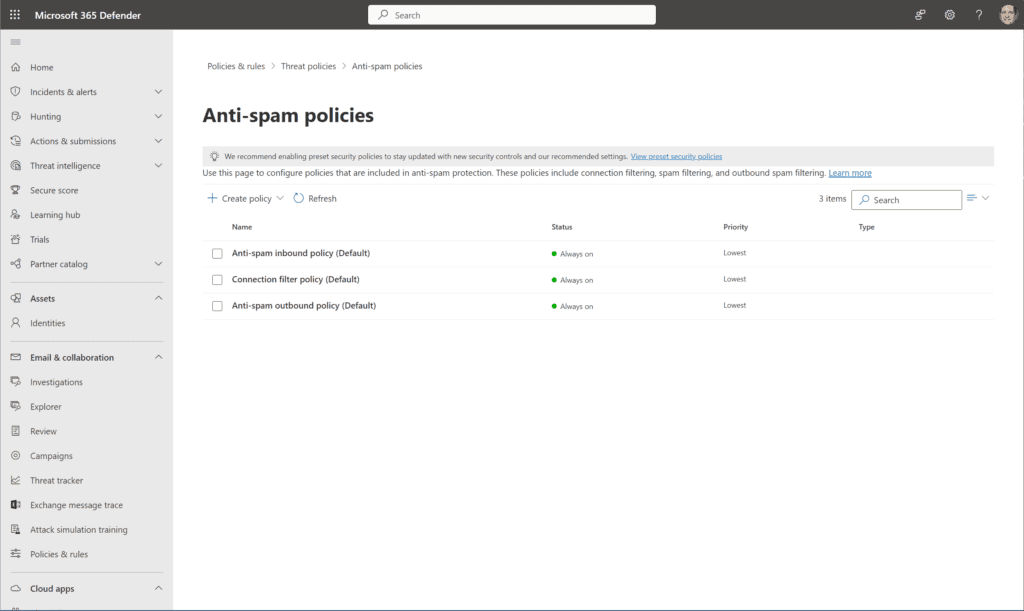
- We’ll create a new policy by clicking + Create policy and then choosing Inbound from the dropdown.
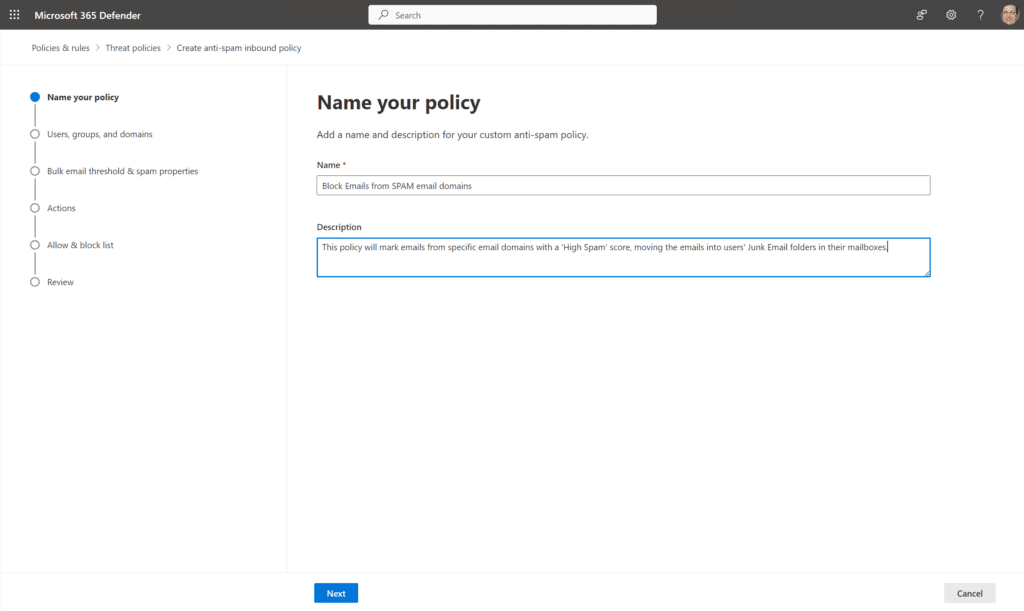
- I’ve entered a Name and Description for this policy. Click Next.
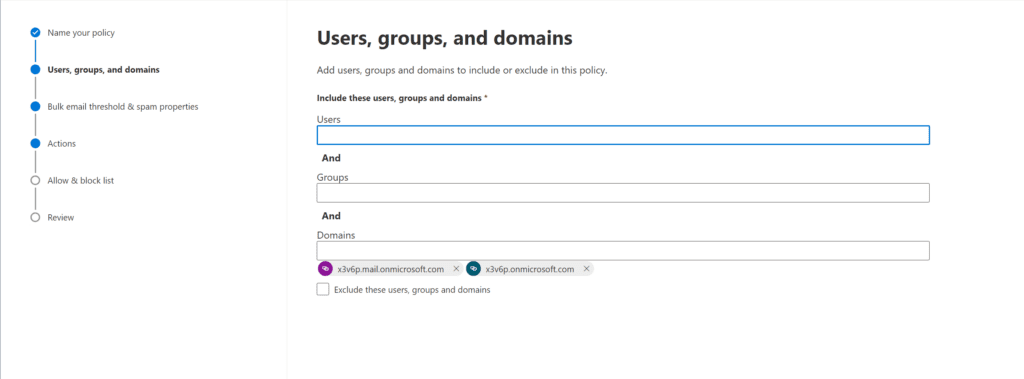
- As this is meant to blanket the entire tenant, I’ll go to the Domains field and put in both domains for completeness, and click Next.
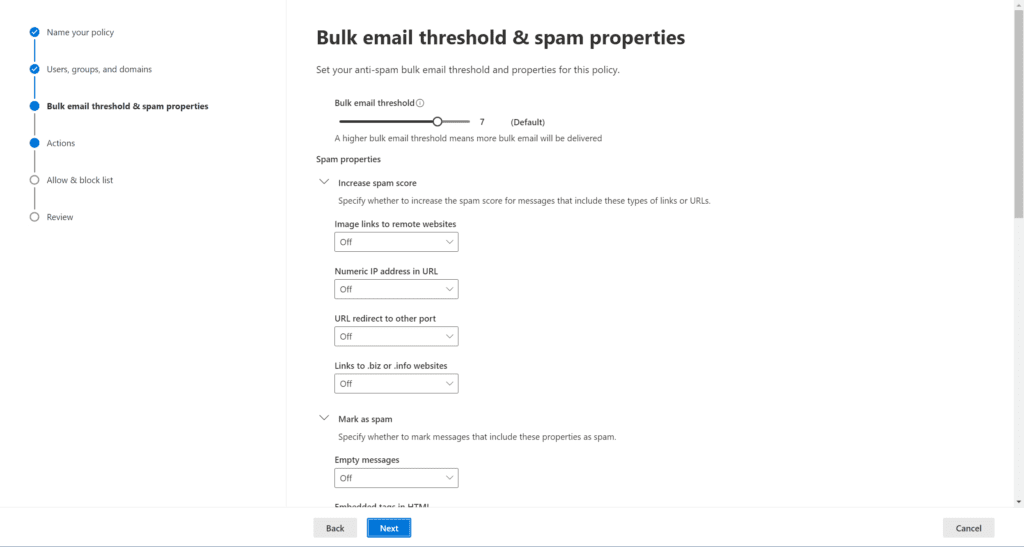
- On the Bulk email threshold & spam properties page, we can leave the defaults for now. Click Next.
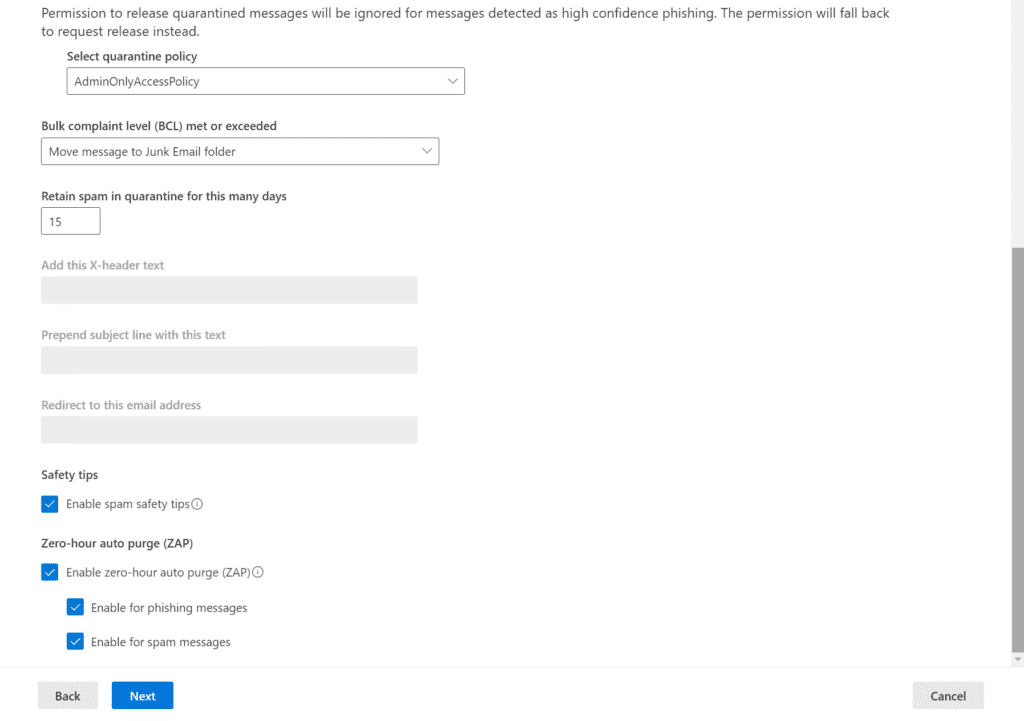
- On the Actions screen, the defaults are generally pretty decent. The action for messages scored as ‘Spam’ will be moved to the Junk Email folder in a user’s mailbox. If a ‘Phishing’ email is detected, it will be quarantined and will stay there for 15 days, per the form.
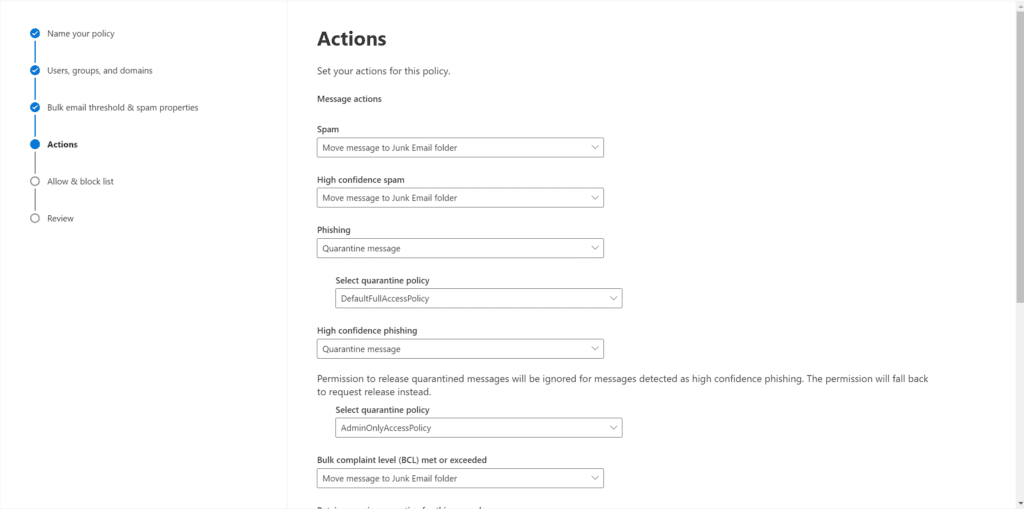
- Under ‘Safety tips‘, you’ll see a checkbox for Enable spam safety tips. This places a color-coded banner in the email body warning users when viewing the message. Click Next.
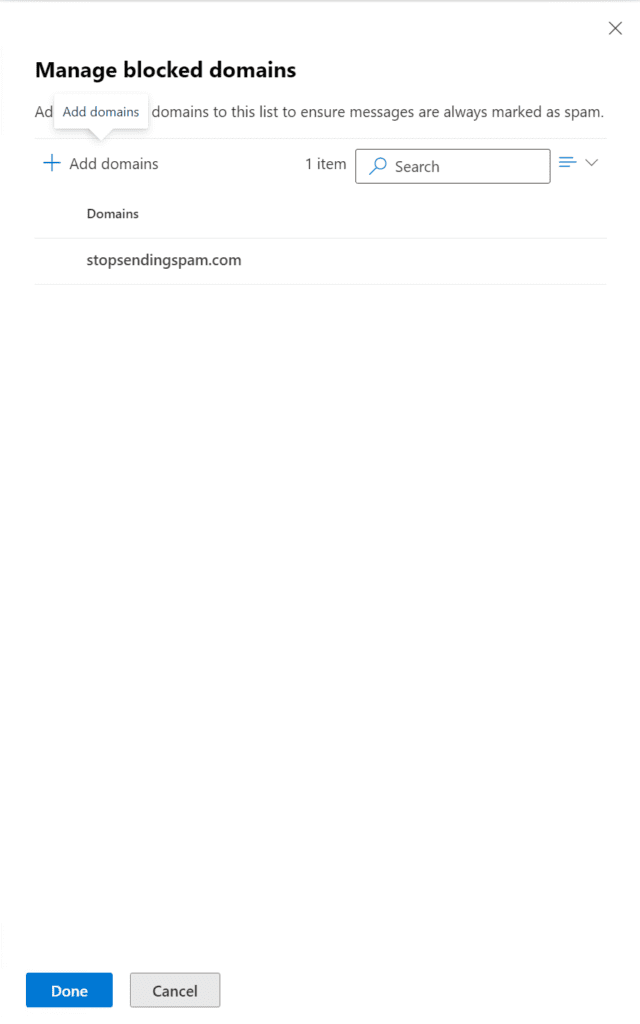
- Finally, on the Allow & block list, we have the option to choose specific Sender email addresses and domains to raise the score on. These will receive a score that will guarantee they are marked as spam; meaning they will be delivered into the Junk Email folder.
Our policy is set, and live!
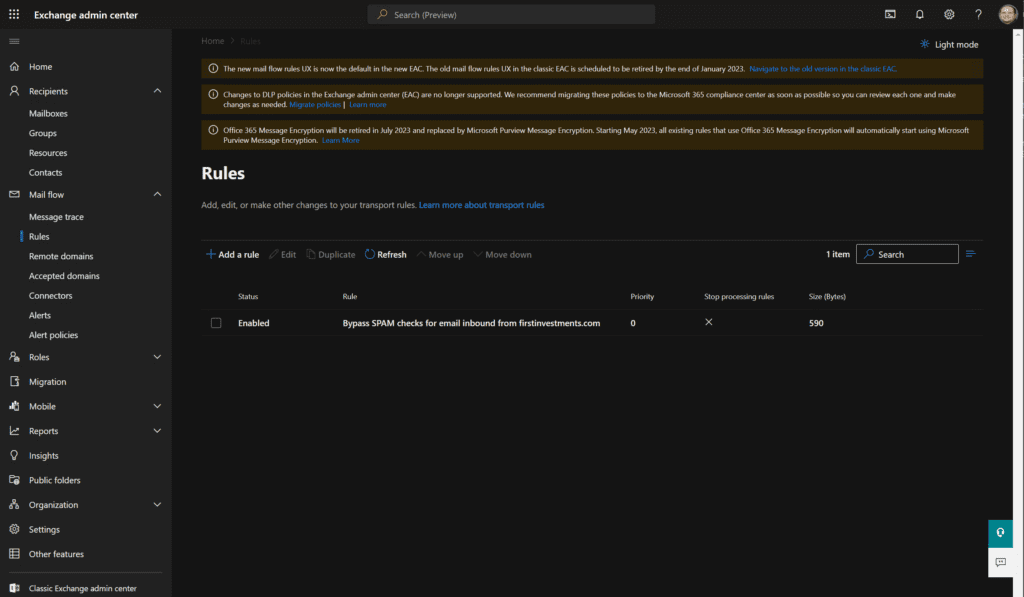
Use Mail flow rules to block senders in Office 365
If you’re struggling with spam, learning how to implement the o365 block sender function can help. Mail flow rules can look for keywords or properties in your undesirable messages. Regardless of the exceptions you use to identify the emails, we will set the spam confidence level (SCL) to 9, marking it as High confidence spam.
For this method, we’ll once again use the Exchange Admin Center:
- From the homepage, navigate to Mail flow on the left, click Rules, then click on ‘+ Add a rule‘.
- In the Name field, enter an appropriate name. For the ‘Apply this rule if‘ dropdown, choose ‘The sender‘ then choose ‘domain is‘ and type in your domain name (thebadone.net).
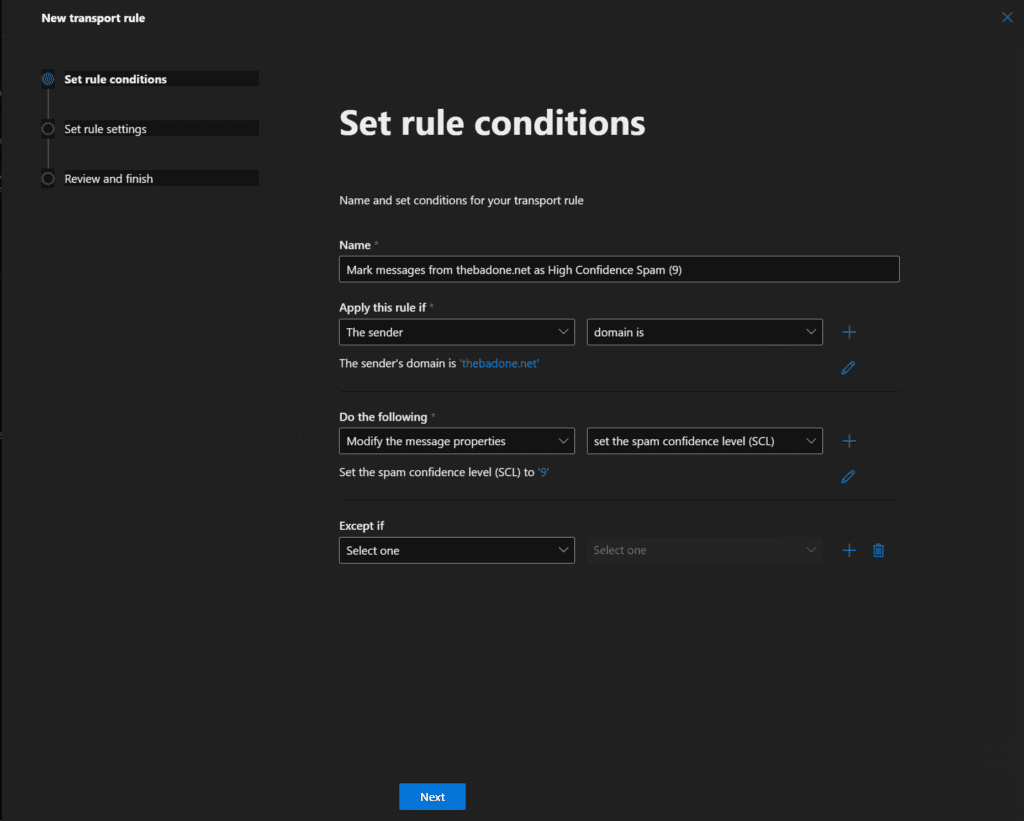
- For the ‘Do the following‘ dropdown, choose ‘Modify the message properties‘ and then ‘set the spam confidence level (SCL)‘ to 9. Click Next.
- The remaining settings should be fine. Go ahead and review it then click Finish.
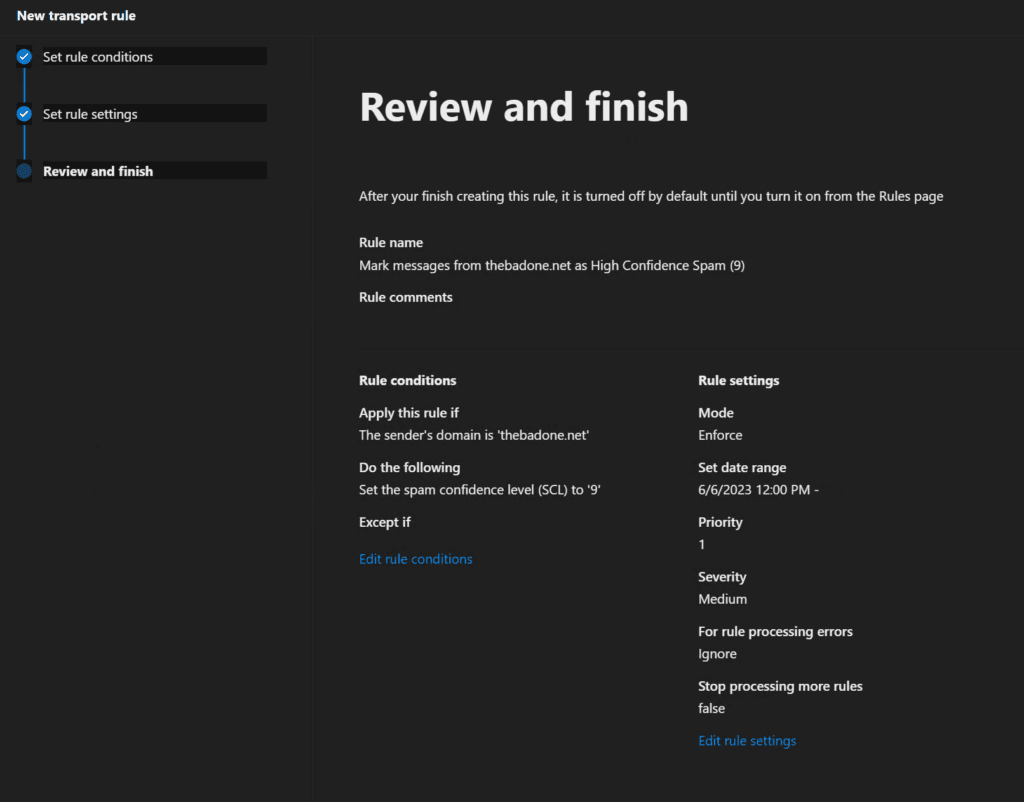
You can now turn on this rule from the Rules page in the Exchange Admin Center.
Use Connection filter policies for O365 Block Sender to block an IP Address
As we get lower on the scale here in terms of best practices, we encounter methods that aren’t as robust and reliable as others above. This method is a classic example – adding an IP Address to a connection filter policy in Microsoft 365 Defender to block any sending SMTP servers coming from these IP addresses.
The blocking of legitimate email increases substantially with this method (and the last in this post). The IP addresses of SMTP servers are generally static, but they do occasionally change. So, if you’re using o365 block sender to block one IP address that is known today to send emails from the badone.net domain, that address could get purchased or assigned to another ISP/company. If Microsoft, by chance, started sending emails from that IP address, your tenant would block it.
However, for completeness, let’s show you the steps to use connection filter policies to block an IP address. Again, we’re starting in the Microsoft 365 Defender portal:
- Browse to Policies & rules -> Threat policies -> Anti-spam policies.
- Click on the Connection filter policy (default) item. Then click the Edit connection filter policy link.
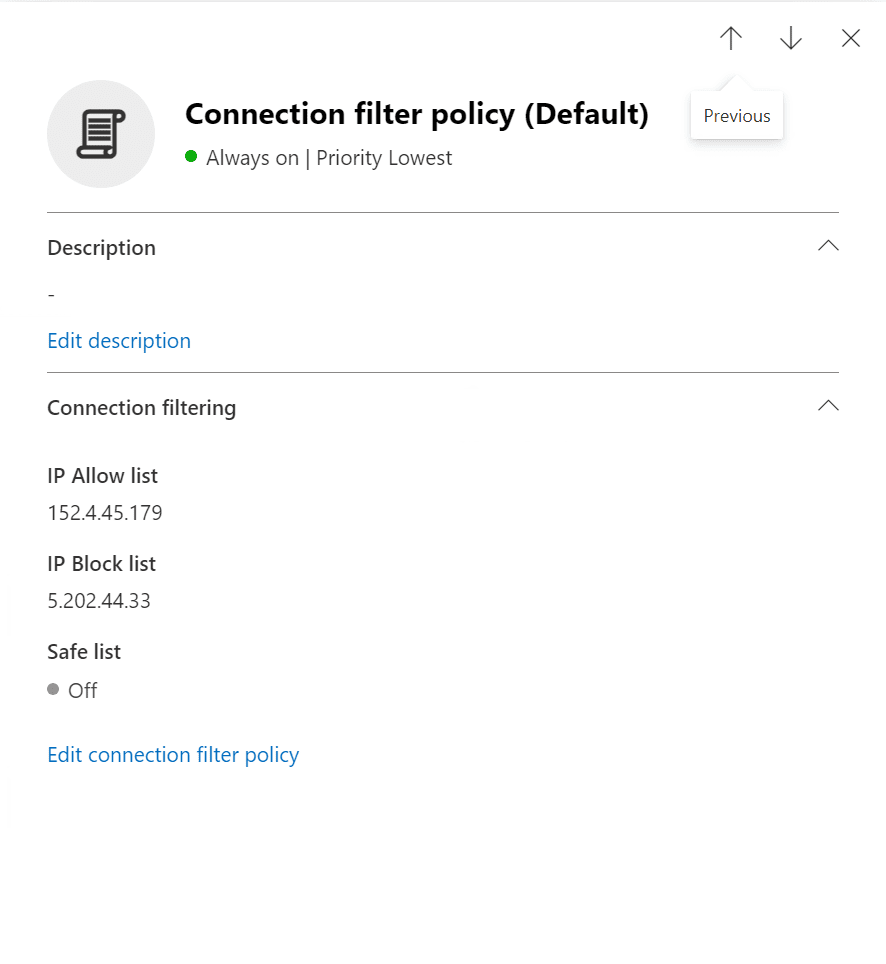
- In the ‘Always block messages from the following IP addresses or address range:‘ field, we’ll type in an IP address and click Save.
That’s all there is to it!
Using wildcards in domain pairs to combat spoofed senders
There’s one more method we’ll describe today, but it is a little more complicated, and not as efficient and robust as the others. However, this post is about informing you of all your options, right?
The tenant Allow/Block List also includes a domain pair for a spoofed sender. Here are some more details from Microsoft Learn documentation:
- Spoofed user: This value involves the email address of the spoofed user that’s displayed in the From box in email clients. This address is also known as the
5322.Fromaddress. Valid values include:- An individual email address.
- An email domain.
- The wildcard character (for example, *).
- Sending infrastructure: This value indicates the source of messages from the spoofed user. Valid values include:
- The domain found in a reverse DNS lookup (PTR record) of the source email server’s IP address (for example, fabrikam.com).
- If the source IP address has no PTR record, then the sending infrastructure is identified as <source IP>/24 (for example, 192.168.100.100/24).
- A verified DKIM domain.
- The wildcard character (*).
Remember – adding a domain pair only blocks the combination of the spoofed user and the sending infrastructure. Plus, you can specify wildcards in the sending infrastructure or in the spoofed user, but not in both at the same time. For example, *, * is not permitted.
There are a good number of processes and features in Microsoft 365 IT Pros can use to block harmful and malicious emails from their users’ mailboxes. Blocking email addresses can be a helpful way to reduce the amount of spam and unwanted email you receive. If you are receiving a lot of unwanted emails from a particular sender or domain, blocking them can help to keep your inbox clean and organized.
I hope this guide on o365 block sender techniques will help you when you need to block senders in Office 365! Please leave a comment or question below. Thanks for reading!
FAQs
How quickly do o365 block sender settings take effect after implementation?
O365 block sender settings typically take effect within 30 minutes to 1 hour after implementation, though in some cases it may take up to 24 hours for the changes to fully propagate across all Microsoft’s data centers.
Can I use o365 block sender features to prevent internal employees from sending emails?
Yes, o365 block sender capabilities can be configured to restrict internal email communications, though it’s recommended to use Microsoft Groups or Teams management features instead for better control of internal communications.
Will o365 block sender settings sync across all my devices and platforms?
Yes, once configured, o365 block sender rules will automatically sync across all devices and platforms connected to your Microsoft 365 account, including desktop, web, and mobile versions of Outlook.
Does using o365 block sender affect email storage quota or system performance?
No, implementing o365 block sender rules does not impact your storage quota or system performance as blocked messages are filtered at the server level before reaching your mailbox.
Can I create temporary o365 block sender rules for specific time periods?
Yes, o365 block sender rules can be set with specific durations ranging from 24 hours to custom dates, making it ideal for temporary blocking during specific events or campaigns.

Michael has been an IT Pro since 1998. He has worked predominantly in the Windows world including client and server operating systems, on-prem systems engineering (AD, DNS, etc.), and over the last ten years or so has embraced and immersed himself in...