- Blog
- PowerShell
- Post
How to Use a PowerShell Array

A PowerShell array is a data structure designed to store an item or a collection of items. These item types can be the same or of varying types.
In this article, we’ll explain how PowerShell arrays work, how to use an array of objects, and everything you need to know about PowerShell arrays to become a power user.
What is a PowerShell array?
As you may already know, arrays are used by most programming languages. Starting with PowerShell 3.0, a collection of zero or an object has at least some properties of arrays.
A PowerShell array is your answer whenever you need to gather or even manipulate multiple pieces of data, especially when you’re using PowerShell scripting. That’s because when working with an array, you can use a single command to perform the same service on a collection of items or individually manipulate them. It provides a beautiful and adaptable tool in this regard.
Data types in a PowerShell array
There are several different data types you can have in an array including Object and Int32. Each of the items in an array can contain any number of these data types. This is precisely what makes them so versatile.
Each of the data items has an index. Somewhat strangely, the index starts at 0. The first item in an array will be given an index of zero, and the next, 1. And so on…
We’ll learn more about the different types of arrays and their syntax throughout the remainder of this guide.
PowerShell array example
By illustrating what a PowerShell array is with an example, I’ll be able to show you how this works easily.
First, let’s create an object array with the following command:
$ArrayOne = @("Title", "Files", "c:\Install")
We can determine the type of the array with the GetType() command.
$ArrayOne.GetType()
Then, let’s try an [int32] or integer array.
[int32[]]$ArrayListing1 = 10,20,30,40,50
$ArrayListing1.GetType()
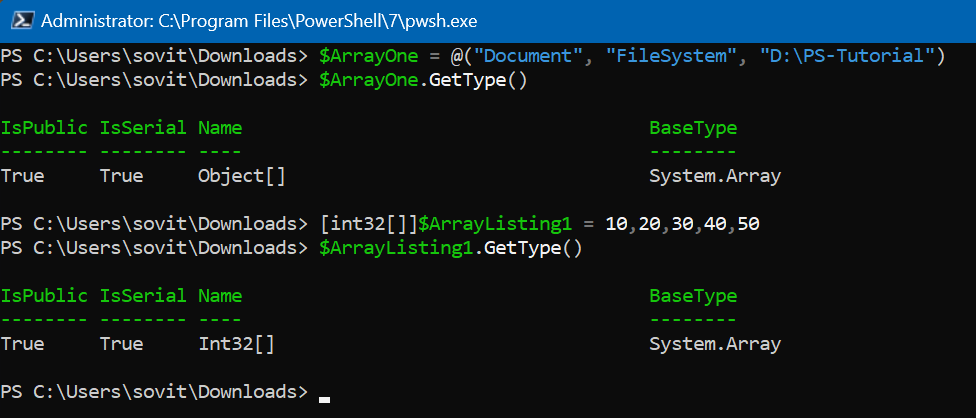
From the first example, we see it’s an ‘Object’ array. The second is an ‘integer’ array.
How to create and edit a PowerShell array
Alright, let’s create some content, shall we? Again, a PowerShell array can take any type of data. An array type defines the structure of data. We will also pursue creating arrays that can take only specific types of data, per our wishes.
Let’s start with creating an array that will contain any data type. We’ll create an array variable – ‘$ArrayOne’.
Per our previous example:
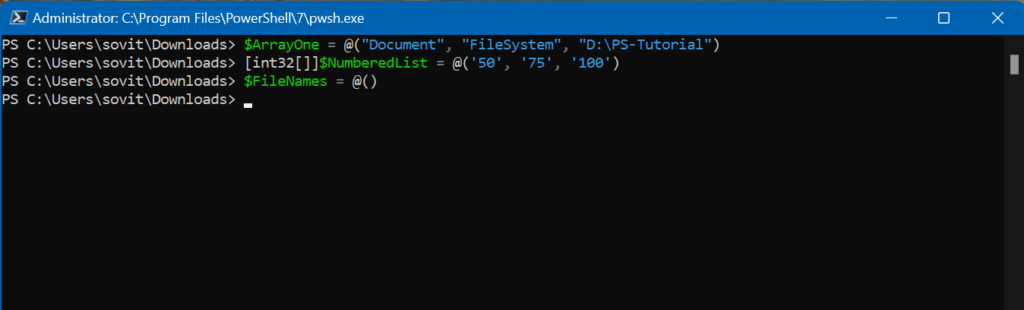
$ArrayOne = @("Document", "FileSystem", "D:\PS-Tutorial")
Because we didn’t specify a data type, the array can take any. However, I’ll now show you how to create an array while specifying a specific data type. We will prepend the variable name with the data type. Watch this:
[int32[]]$NumberedList = @('50', '75', '100')

I’ll sneak another topic here – the strongly typed array. We can set an array to ONLY contain a specific data type. As an example, this command will force the array to only allow integers:
[int[]] $integers = 55,66,77
How to add or remove data to an array
Next, I’ll describe how we can add, remove, and append data on an existing array. Actually, up to this point, we’ve created arrays adding data right from the start. The default size of arrays, incidentally, is defined by the initial creation of the array.
Let’s first create an empty array:
$FileNames = @()
I know, not much there. So, before we add an entry to this array, we need to convert it into a list so it can accept additional indexed entries of data. We accomplish this with the [System.Collections.ArrayList] command:
[System.Collections.ArrayList]$FileNamesList = $FileNames
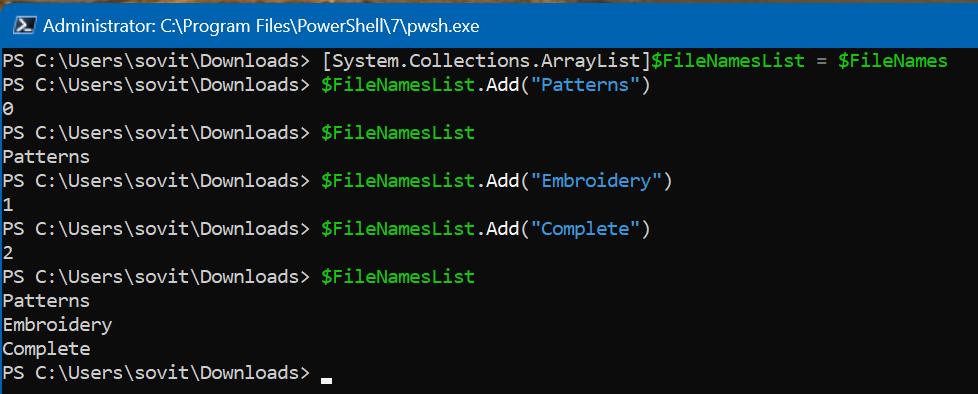
$FileNamesList.Add("Patterns")
$FileNamesList
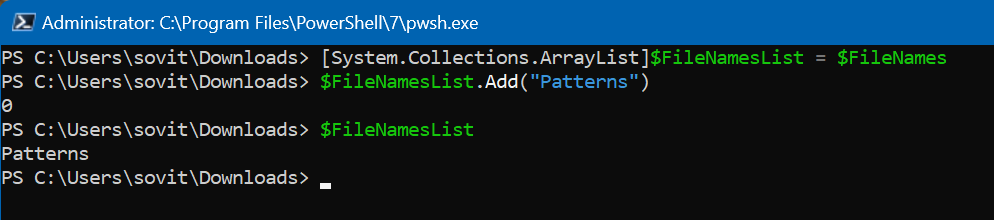
We’ve created a new ‘list’ array – FileNamesList – based on our existing and empty ‘$FileNames’ array. Then, we added the first indexed entry (at 0) – ‘Patterns’ – Not too bad, huh? I’ll add a few more items to our array, then show you how to remove an item or two.
And, by the way, you can get easy access to your array elements by typing the variable name by itself – ‘$FileNamesList’ above.
Let’s remove the last data piece – ‘Complete’. We use the corresponding Remove command.
$FileNamesList.Remove("Complete")

Piece of cake.
Updating existing items in an array
It’s pretty easy to make a change to an item in your array. As long as you know the index record of the data point you wish to change, you can make the change right away.
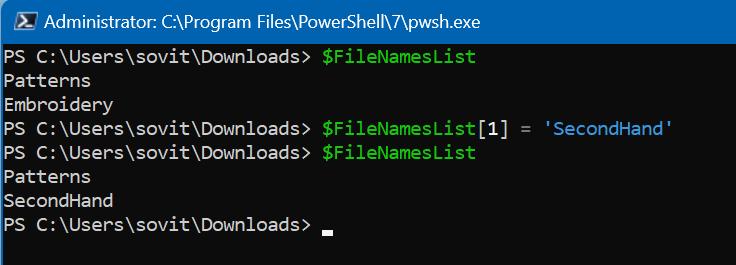
First, let’s list the contents of our ‘$FileNamesList’ array:
$FileNamesList
Here, I would like to update the 2nd entry (Index ‘1’) from ‘Embroidery’ to ‘Secondhand’. Here’s how to do it:
$FileNamesList[1] = 'Secondhand'
I do like how simple the manipulations of arrays can be, don’t you?
Iterated actions
One of the most powerful aspects of PowerShell is being able to perform repetitive actions or tasks on many objects at once. In a similar fashion, we can add a description to the beginning of our data points by using the ForEach-Object command.
Let’s try adding ‘Preferred’ at the beginning of our data points:
$FileNamesList | ForEach-Object {"Preferred: [$PSItem]"}

Very cool.
How to use PowerShell operators in an array
Pretty much all of the operators that we use for single data items in PowerShell also work with arrays. However, there are some differences. Let’s take a look at the most common operators and how you can use them in your arrays.
Join
The join operator is arguably the most often used command in PowerShell, and it’s extremely useful when working with arrays. You can use it iteratively (efficient!) on the items in an array to join items together for the output purpose.
Let me show you how it works. First, we’ll create an array:
$List = @(100,150,200,250,300)
Then, we’ll use the ‘-join’ command to add a ‘-‘ in between each item when showing the output.
$List -join '-'

Very nice. It’s relatively easy to discover how these operators could make it simple to manipulate on-screen data and even logged output!
Contains
We can use the contains operator to find out if an array has an existing data point or not. The Boolean True or False terms signify to us the answer.
$List -contains '150'
$List -contains '175'
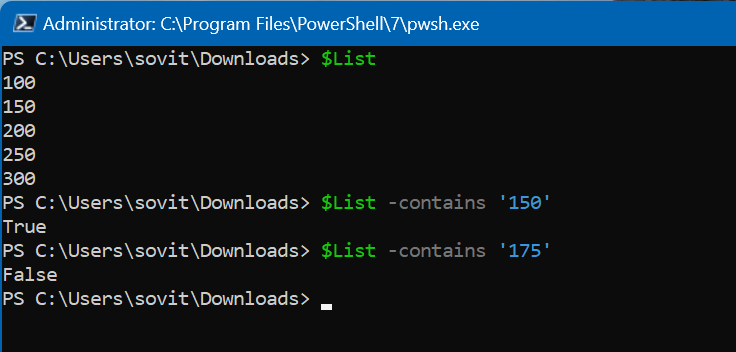
My goodness, even a Ferengi could figure THIS out…
Equals / Not equals
Lastly, I’ll explain a subtle difference in how to use the equals and not equals comparison operators. These are the same as -eq and -ne.
When you use the -eq switch, PowerShell will output the value if it is True, not False. The –ne switch (not equal) will output every value in your array that does NOT match your request. Yes, it’s a little different.
Let me show you how it works with an example:
$List -eq '200'
$List -ne '100'
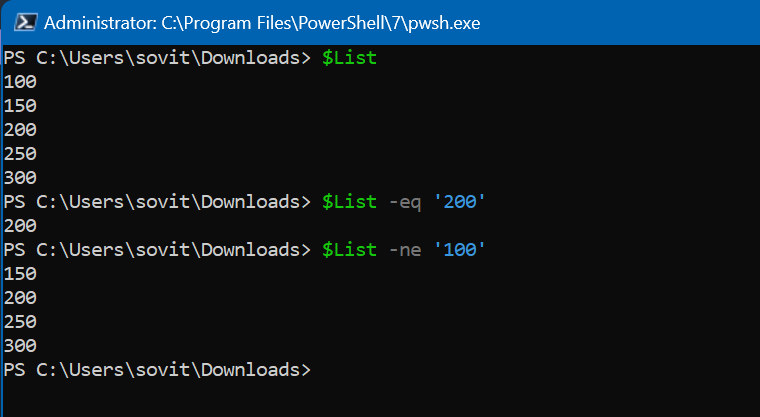
On the first line, it simply outputs the entry matching the request, ‘200’. On the second line, it listed all the array members that were not equal to ‘100’. Using the correct format (syntax) of these commands is crucial!
Multi-dimensional arrays
You can also create a multi-dimensional array by altering the syntax of the array. This allows you to easily create a multi-data type array from the start.
Let me show you an example:
$MultiList = @( ("files","folders","containers"),(300,500,700))
$MultiList[1][1]
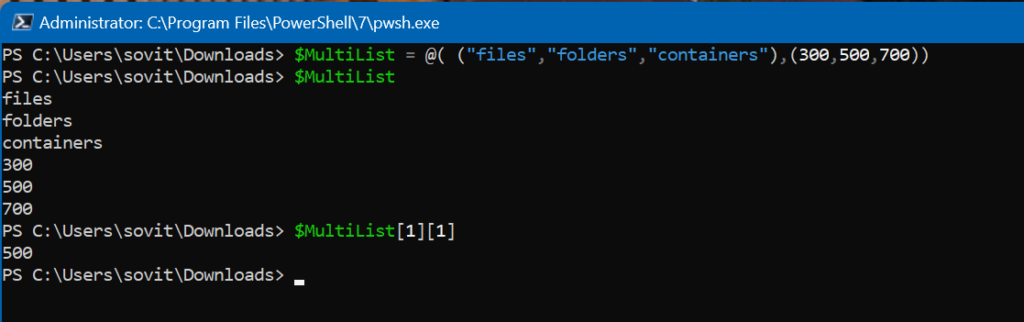
The second command requests the output of the data entry at the row and column of [1,1]. Think about this as an Excel table where we’re looking at the cell in the second column over and the second row down.
How to access array objects
You’ve seen an example or two sprinkled into my post thus far on how to retrieve the information in an array. Let me show you the basic syntax on how to do this for your arrays.
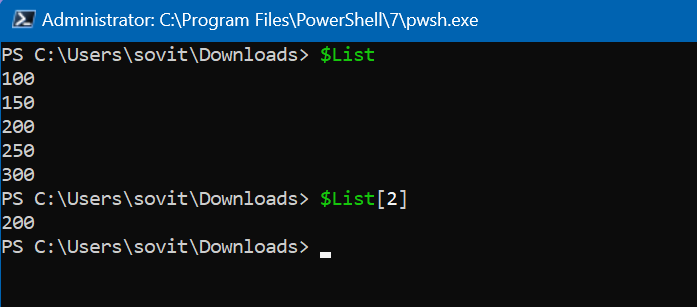
If we look at our $List array, we see 5 indexed entries. If we want to retrieve the third entry, we use the index of ‘2’.
$List
$List[2]
How to loop through an array
There are two fundamental examples of using the ForEach statement with PowerShell arrays – the method and the loop. We use this to process every item in an array to gather the information we’re looking for, or to manipulate all the entries in our array at once.
Using the ForEach method
To use the ForEach Method to loop through an array, here’s how we will proceed:
- We first enter a period next to the variable for the array.
- Next, we enter ‘ForEach’ followed by square brackets.
- Within the ‘()’ brackets, we include the other brackets, ‘{}’.
- We enter the command to run against all the items and include the automatic pipeline variable ‘$_’.
Let me show you an example. We can get the 10 newest entries from the Event Viewer from each of the 3 ‘core’ log types – System, Application, and Security. We just separate each entry with a comma.
$LogNames = @("System", "Application", "Security")
$LogNames.ForEach({ Get-EventLog -LogName $_ -Newest 10 })

We first store the 3 types of logs in our variable. Then, we use the ForEach method to grab the 10 newest log entries from each type and output them. Very powerful, and very efficient.
Using a ForEach loop
Now let’s use a similar loop structure (script block) to perform the same request. The main difference here is instead of using ‘$_’ as a temporal variable, we store each run-through in a temporary variable (LogNames).
Let me show you how it works with an example:
ForEach ($LogName in $LogNames) { Get-EventLog -LogName $LogName -Newest 10 }
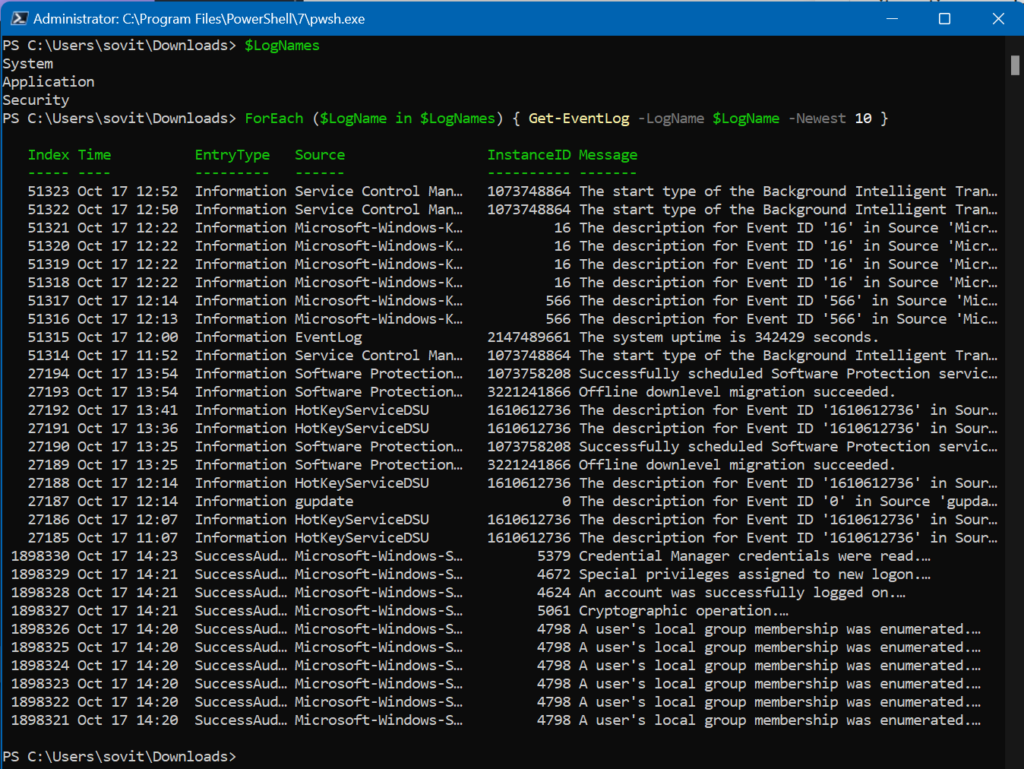
Voila. And, let me point out a massive performance boost in using PowerShell vs. the GUI. Running this command, which outputs the 10 most recent log entries from the System log, the Application log, and the Security log takes a blink of an eye. Opening the Event Viewer MMC tool, navigating to each of these logs, and saving the most recent 10 entries takes a minute even on a fast computer. What amazing time savings!
How to create an array of objects
So far, we’ve shown you how to create an array with basic data. Most notably a string or an integer. However, arrays can also contain objects. Many of the most common uses of PowerShell, especially when working in Office 365 dictate that you use objects instead.
We can use similar functions to create an array of objects. It’s all about the syntax. We’ll create a (very) basic directory of users. Let’s use this example.
$users = @( [pscustomobject]@{FirstName='Billy';LastName='Reinders'},[pscustomobject]@{FirstName='Michael'; LastName='Reinders'} )
$users
We’ve entered the two names into the array and shown the output. Nice and easy. We can also access the individual properties of each object by specifying them as we’ve done already.
$Users[1].FirstName
As this is index #1, we know this is the second entry. So, we should get back ‘Michael’. Let’s see.
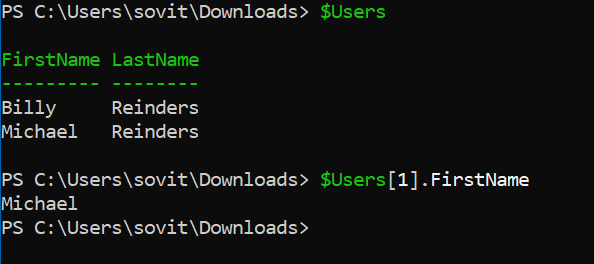
Yes, that worked as expected!
How to iterate through an array of objects
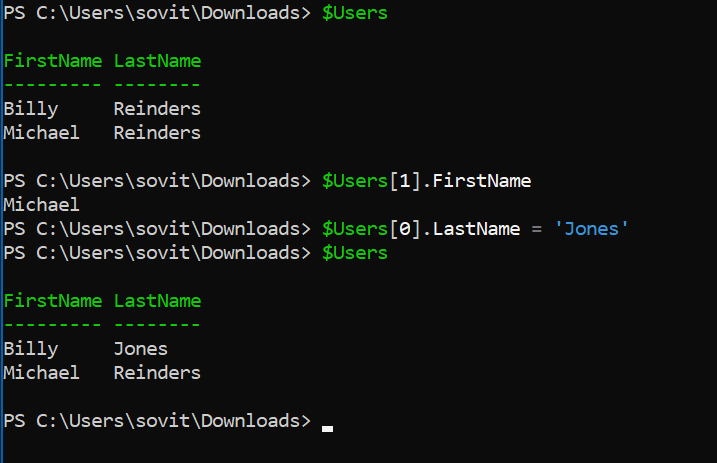
Using similar syntax, we can iterate through our entries and make a change. Let’s say Billy got married and is taking his spouse’s last name (Jones). We can update our array with one step!
$Users[0].LastName = 'Jones'
You have to hand it to Microsoft, they really built a nice scripting language.
I’d like to show a more pointed example of going through our entire array for a purpose. We can access the same property of all of our objects and get that output using the ForEach-Object cmdlet.
$Users | ForEach-Object {$_.LastName}

Pre-sized arrays, multiplying arrays, and nested arrays
Lastly, I’ll show you some more advanced array functions in your arsenal that can definitively boost your efficiency when scripting with arrays.
Pre-sized arrays
Taking a step back briefly, creating an array up to this point we’ve determined the size of the array by the number of items in it. However, we can create a pre-sized-array, which is an array with a specified size.
To create a pre-sized array, we’ll use the new($size) constructor. Here’s an example.
$Table = [Object[]]::new(8)
$Table.Count
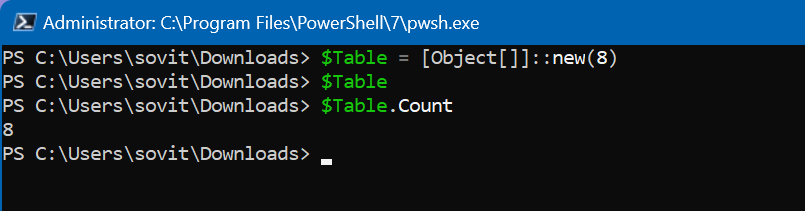
Even though there are no entries yet in our new array, the ‘Count’ does list 8 (empty) entries.
Multiplying arrays
Multiplying arrays can be rather confusing for some users, but it really comes down to repeating values the specified number of times. Let me show you.
$Table = @('Michael','Billy','Fred')
$Table * 3

Here, we simply took the original 3 entries and multiplied them 3 times. Now we have 3 *3 = 9 entries.
Nested arrays
Similar to other programming languages, we can use nested arrays to create a classic matrix, so to speak. Let me demonstrate with a two-dimensional array.
$Array1 = @(@100,200,300),@(400,500,600),@(700,800,900))
$Array1[0,2]
$Array1[0][2]
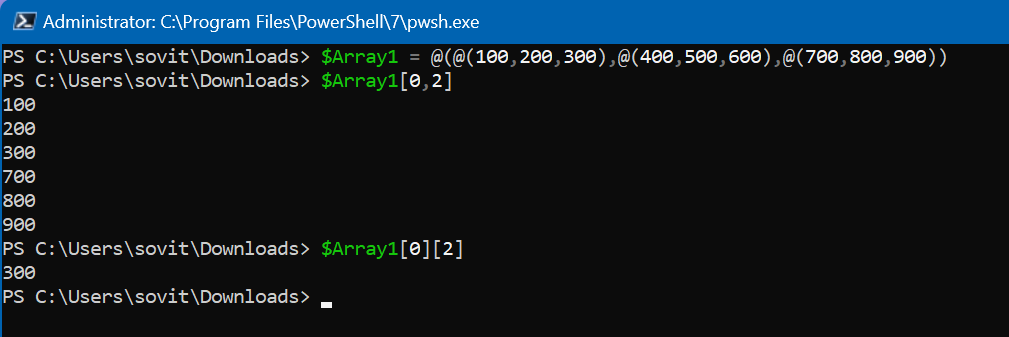
So, first, we add the 9 entries to the array, 100 – 900. Then, when we specify the second command, we are asking for the entries in the first row and the third row. And, with the last command, we are asking for the single entry at row 0, column 2 – ‘300’. Piece of cake!
Conclusion
Well, I hope you learned as much as I did! Yes, seriously, I am on a learning module of sorts with PowerShell as I go through this series of posts. Catching up on some of the ‘basics’ of PowerShell is ALWAYS fruitful for me. I often times use something I learned or re-learned just days before in my professional IT life.
If you have any questions or comments, please feel free to leave a comment below. Thank you for reading!

Michael has been an IT Pro since 1998. He has worked predominantly in the Windows world including client and server operating systems, on-prem systems engineering (AD, DNS, etc.), and over the last ten years or so has embraced and immersed himself in...


