- Blog
- PowerShell
- Post
How to Move Files Using PowerShell: Efficient Techniques and Best Practices

Learn how to leverage Microsoft PowerShell to move files efficiently with the various parameters and related cmdlets. This guide covers the basics and includes more advanced topics, such as bulk file operations, filtering, and verbose logging for improved file management and automation.
To move files in PowerShell, use the following syntax as a quick example:
Move-Item -Path "<source>" -Destination "<destination>"Intro – Using Move-Item in PowerShell
When working with files and folders in Windows PowerShell, one of the most common tasks is moving data from one source location to a destination folder. The Move-Item cmdlet is the tool for the job, allowing you to relocate files, directories, and other items within the file system (or even between providers, such as from a file system to a registry path).
The Move-Item cmdlet does exactly what you’d think: it moves an item to a new location and removes it from the original location once the operation completes. This is different from copying (Copy-Item), which leaves the original in its location. Moving can be useful for organizing files and archiving large directories of log files.
Basic file move operations and examples
Let’s start the nuts and bolts of this article by describing the most common operations you’ll complete with this cmdlet and some examples.
Common syntax of Move-Item
Using the command line, the most basic syntax to move a single file looks like this.
Move-Item -Path "C:\Original\File.txt" -Destination "C:\Target"In this example, PowerShell moves the existing file (File.txt) in the source folder (C:\Original) to the C:\Target directory. Now, if C:\Target doesn’t exist, the command will fail. You can use logic to handle this contingency.
Note – by default, PowerShell will not overwrite an existing file in the destination directory unless you use the ‘-Force’ parameter. More on that soon.
Key parameters of Move-Item
The example above is the simplest usage of the cmdlet. But there are several common parameters you can use to be safer and more flexible with Move-Item. These include:
- -Path (wildcards supported): move all items matching the pattern. Example:
Move-Item -Path "C:\Logs\*.log" -Destination "C:\Logs\Archive"- -Force: override restrictions. Example:
Move-Item -Path "C:\Source\secret.txt" -Destination "C:\Archive" -Force- -Verbose: show detailed information about the execution. Example:
Move-Item -Path "C:\users\sovit\downloads\PowerShell_Scratch\*.*" -Destination "C:\users\sovit\Downloads\PowerShell_Scratch\Archive\" -VerboseMoving multiple items
Move-Item can work with more than one file at a time, of course. This makes it ideal for bulk file management tasks, especially in scripting. You can specify multiple files using wildcards, several file paths, or by piping results from/to other commands.
Move-Item -Path "C:\Begin\*.txt" -Destination "C:\End"I just showed you this, indirectly, above. But using wildcards is an obvious example of moving multiple files. This command will move all the txt files from the C:\Begin directory to the C:\End directory.
You can also move a list of files, separated by commas.
Move-Item -Path "C:\Start\File1.docx","C:\Start\File2.docx" -Destination "C:\Finish"This will move the File1.docx and File2.docx files to the C:\Finish directory. Nice and easy. Don’t worry, I’ll offer more powerful examples soon.
How do I move a directory?
We can also move entire folders (including their contents) with Move-Item. When moving a directory, the cmdlet transfers the folder and its subfolders and files to the new location. There are nuances though.
Let’s get started.
Move a complete directory and its contents
Move-Item -Path "C:\Projects\OldProjects" -Destination "D:\Archive"This will move the ‘OldProjects’ folder and all of its contents to the D:\Archive folder. The nuance here is that no file or no wildcard with files is used. The -Path ends with a folder name.
This is the distinction between moving a file and a directory.
Note – there is no need to use the -Recurse parameter with Move-Item…moving a folder automatically moves its entire directory tree.
Move all files with a specific extension to another directory
If we want to move all files with a specific extension to a new directory, we can do this with help from the Get-ChildItem cmdlet.
Get-ChildItem -Path "C:\Logs" -Filter "*.log" -Recurse | Move-Item -Destination "C:\Logs\Archive"This will first gather all the files with a .LOG extension anywhere in and under the C:\Logs directory and move them to the C:\Logs\Archive directory. You do need the -Recurse parameter with Get-ChildItem.
Moving files to a network share
When moving files on your network, you need to specify the destination location using a UNC path. Let me show you.
Move-Item -Path "C:\Reports\Budget.xlsx" -Destination "\\Files01\Finance\Reports"This will move the Budget.xlsx file in the C:\Reports folder to the ‘Files01’ file server in the Finance share and Reports subdirectory. Nice and clean. You can also use a mapped drive in the same context.
(-Destination “F:\Budget\Reports”)Using -WhatIf and -Confirm for validation checks
Besides using the ‘-Verbose’ parameter, you can also use non-destructive (a strong word) parameters, including ‘-WhatIf’ and ‘-Confirm’, to make sure you know what you’re doing. Using these parameters will NOT perform any actual file operations without you saying ‘Yes’ to them.
Move-Item -Path *.msix -Destination "C:\Users\sovit\Downloads\PowerShell_Scratch" -WhatIf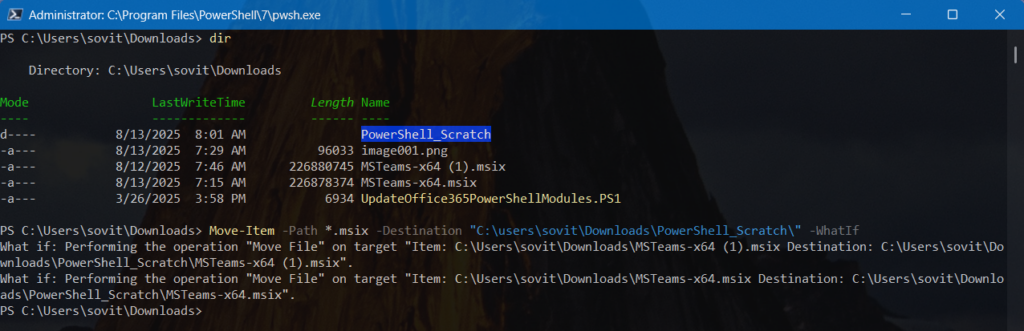
This will show the ‘What if’ scenario on each operation – it will show what it would do IF you ran the command without the parameter. In my example, it would move the two MSIX files in the current directory to the destination directory. Very useful tool!
Advanced topics – Filtering files
While wildcards (*.txt) work in a pinch, you’ll often want PowerShell to give you some more granular options when filtering. This is where these parameters shine – -Filter, -Include, -Exclude, and the Where-Object cmdlet. These options allow you to move files based on more specific conditions, such as extension, size, date, or name patterns.
Including and excluding file extensions from wildcard usage
Let’s cover include and exclude with this one command. It’s rather intuitive, but if you need help, one moment.
Move-Item -Path "C:\Screenshots\*" -Destination "C:\No-GIFs” -Include "*.jpg","*.png" -Exclude "*.gif"In the C:\Screenshots folder, Move-Item is told to move all files (*). However, using -Include and -Exclude, PowerShell will move all the JPG and PNG files to the C:\No-GIFs directory, but it will not move the GIF files.
Moving files starting with a string
We can also use name-matching strings with Where-Object to selectively move files based on their filename. Let’s go.
Get-ChildItem -Path "C:\Finance\Reports" -File | Where-Object { $_.Name -like "Report_2025*" } | Move-Item -Destination "C:\Reports\2025"In this example, Get-ChildItem first assembles all the files in the C:\Finance\Reports directory. Then, Where-Object says to only get files that start with ‘Report_2025’. Those files are then moved to the C:\Reports\2025 directory.
This is very powerful and can do wonders in your file management and archiving tasks.
Utilizing timestamps to selectively move files
We can also use File Age as a criterion to selectively move files from one location to another. Let’s try this.
Get-ChildItem -Path "C:\Logs" -File | Where-Object { $_.LastWriteTime -lt (Get-Date).AddDays(-60) } | Move-Item -Destination "C:\Logs\Old"Well, let’s go through this one step at a time. Get-ChildItem gathers all files in C:\Logs. Then, all files that were written within the last 60 days (-lt means less than) are selected.
These files are then moved to the C:\Logs\Old directory.
How to move only files of a certain size threshold
To close out this informative post on moving files in PowerShell, let me show you how to only move files within a specific size threshold.
Get-ChildItem -Path "C:\Users\sovit\Downloads*.*" -File | Where-Object { $_.Length -lt 10MB } | Move-Item -Destination "C:\Users\sovit\Downloads\PowerShell_Scratch"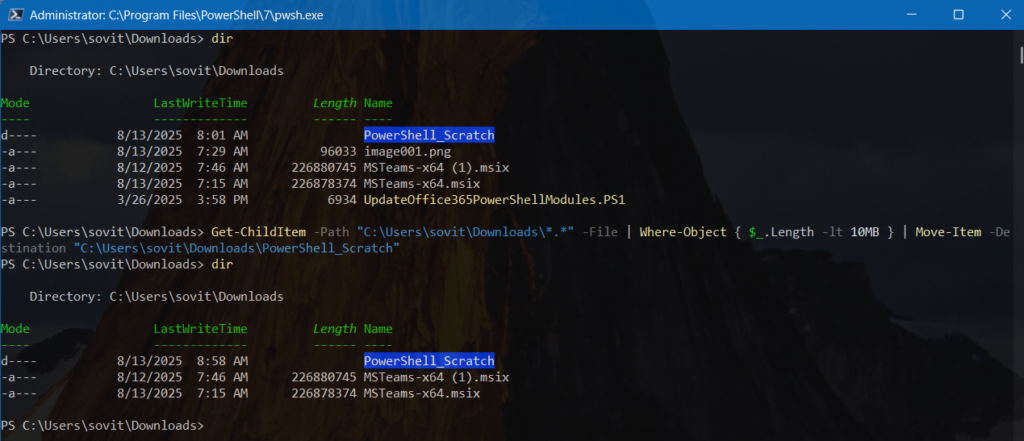
From the 4 files that were in my Downloads folder, after running the command to only move files less than 10 MB in size, the two smaller files are moved after running the ‘dir’ command. Very cool and useful.
If you have more complex requirements, check out Robocopy. It’s a built-in command-line tool in Windows and Windows Server. And if you would like to delete files using PowerShell, read How Can I Delete a Folder or File from the Command Line Using Windows PowerShell? on Petri.
FAQs
What cmdlet do I use to move a file in PowerShell?
Use the Move-Item cmdlet to move files or folders—it transfers the item to the new location and removes it from the source. You can specify wildcards, rename during the move, and apply parameters like -Force or -WhatIf for safety.
How do I move a file to a folder using PowerShell?
Run a command like:
Move-Item -Path C:\source\file.txt -Destination C:\destination\folder\
This moves the specified file into the target folder—just adjust the paths as needed.
Can I move multiple files at once in PowerShell?
Yes. Use wildcards to move multiple items. For example:
Move-Item -Path .*.txt -Destination C:\Logs\
This moves all .txt files from the current directory to the destination.
Can I move a directory and everything inside it?
Absolutely. Move-Item is recursive by default, so moving a folder with its subfolders and files works with a command like:
Move-Item -Path C:\Temp -Destination C:\Logs\
This relocates the entire Temp folder into Logs.

Michael has been an IT Pro since 1998. He has worked predominantly in the Windows world including client and server operating systems, on-prem systems engineering (AD, DNS, etc.), and over the last ten years or so has embraced and immersed himself in...


