Deep Dive: Understanding How Outlook Room Finder Uses the Places Service

Outlook Room Finder uses the Places service to find free conference rooms available in your organization’s building. Here’s what you need to know about how it works.
What is the Outlook Room Finder?
Over the years, the various iterations of what we refer to as ‘Outlook’ have gotten better at helping users schedule meetings. The importance of this post is to describe how the engineering teams behind Outlook have made considerable progress around reserving conference rooms and equipment.
Microsoft has been adding new features for years and has kept meeting scheduling enhancements on the roadmap. The Outlook Room Finder was built specifically to assist users in locating appropriately sized and equipped conference rooms and equipment nearby geographically. You can use Outlook on the Web, the Outlook desktop app, and the Outlook mobile app!
Where does the Outlook Room Finder grab its information from? One moment…
What is the Outlook Places service?
Microsoft released the Places Service back at the end of 2019 to help facilitate the discovery of meeting locations with room mailboxes. The ‘suggested calendar locations’ feature at the time was the genesis and laid the groundwork for more recent innovations like Room Finder.
The Places Service uses the details and metadata (when you add it) of room mailboxes as the main source of information about locations. Administrators can update metadata using the PowerShell ‘Set-Place’ cmdlet including city, country, building, capacity, and other equipment (screens, projectors, Surface Hubs, etc.). You’ll learn more about how this works later on.
The role of the OWA Room Finder
The Outlook Web App (OWA) Room Finder is part of Microsoft’s ‘One Outlook’ vision. It was first released to Outlook on the Web (like many features) because the engineering teams can ship production code faster to the web. Features then start to roll out to the Outlook desktop app, Outlook mobile, etc.
As part of Microsoft’s ‘One Outlook’ initiative, the Outlook desktop app now actually uses the ‘OWA Room Finder’ code using the Edge WebView2 runtime. As you may recall, this started to roll out to all computers running Microsoft 365 desktop apps last year.
Supported platforms
The Outlook Room Finder is currently available on various Outlook clients including Outlook on the Web and the Outlook desktop app. The Outlook mobile clients also utilize these features. Eventually, sometime this year (hopefully), the One Outlook application, also codenamed “Project Monarch” will also support this functionality.
What information uses the Places Service?
Room mailboxes
The first items that we’ll discuss that use the Places Service are room mailboxes. These are special mailboxes in Exchange Online that incorporate custom attributes to allow for a schedulable meeting.
You can create a room mailbox using the Exchange Admin Center. Just expand Recipients and click on Resources. Then, click Add a resource.

What’s the difference with workspaces?
A workspace is a variation of a room mailbox. It is meant to describe other spaces to work including a hotel space, an individual cubicle, and small offices to temporarily inhabit. You’ll need to use PowerShell to utilize workspaces using the Set-Mailbox cmdlet. I’ll show this later on, too.
Room lists
To make the Room Finder shine, you’ll want to create a room List, which is a special distribution list for rooms and workspaces. Each room list contains room mailboxes, ideally in the same building (or city).
That way, when a user is scheduling a meeting with the need for conference space, they can select a building (room list), and all available conference rooms (room mailboxes) will be displayed. As of this writing, PowerShell is your only option for creating and working with room lists.
Using room lists to mirror a building layout
Let me take you through an example here. I have created a few conference rooms (room mailboxes) in my developer Microsoft 365 tenant.
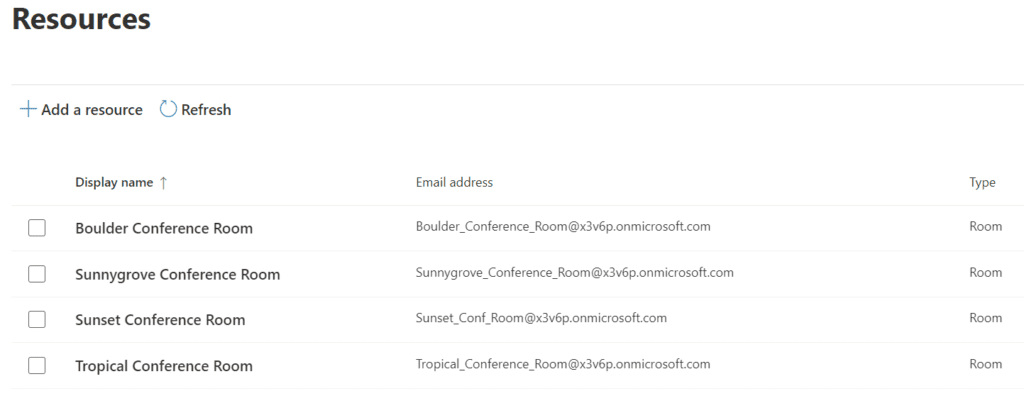
Boulder and Sunset are in Milwaukee, and Sunnygrove and Tropical are in Chicago. Let’s create two room lists, one for Milwaukee and one for Chicago.
New-DistributionGroup -Name "Milwaukee Conference Rooms" -RoomList
New-DistributionGroup -Name "Chicago Conference Rooms"-RoomList


Now, we need to add our 4 conference room mailboxes to these lists. More PowerShell to the rescue!
Add-DistributionGroupMember -Identity "Milwaukee Conference Rooms" -Member "Boulder Conference Room"
Add-DistributionGroupMember -Identity "Milwaukee Conference Rooms" -Member "Sunset Conference Room"
Add-DistributionGroupMember -Identity "Chicago Conference Rooms" -Member "Sunnygrove Conference Room"
Add-DistributionGroupMember -Identity "Chicago Conference Rooms" -Member "Tropical Conference Room"

Note – It often will take 24 hours or more after creating room lists and populating them with members before the Room Finder will see the new information!
Floor plans
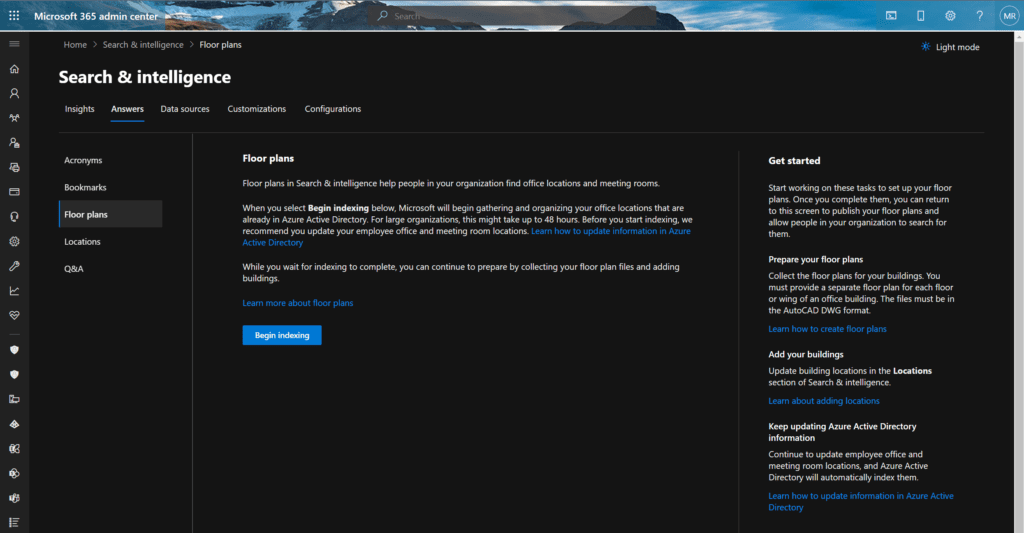
Another note that may help some organizations – Workplaces also support floor plans to assist people to find a location they’ve booked. Floor plans are available in the Calendar feature in Outlook and can be found in Microsoft Search. The floor plans and their locations are configured via the Search & intelligence section of the Microsoft 365 admin center.
The importance of metadata for improving suggestions
The default attributes included in room mailboxes allow users to schedule meetings. However, the Room Finder is most useful when additional metadata is made available to it.
Instead of populating ALL user and room mailboxes with the additional mailbox properties needed here, Microsoft instead opted to create a separate store to manage location metadata and other attributes.
Room equipment and geo-coordinates
The metadata in Outlook Places can include room equipment and geographic locations. You could include custom features that are suited to your business such as a conference room requiring badge access, or if it is equipped for large, catered meals. Other equipment could include a Surface Hub or Teams Rooms devices.
Just a reminder, using geocoordinates is used with floor plans above. You can visit this link to learn more about how to set this up in your organization.
How updating metadata works
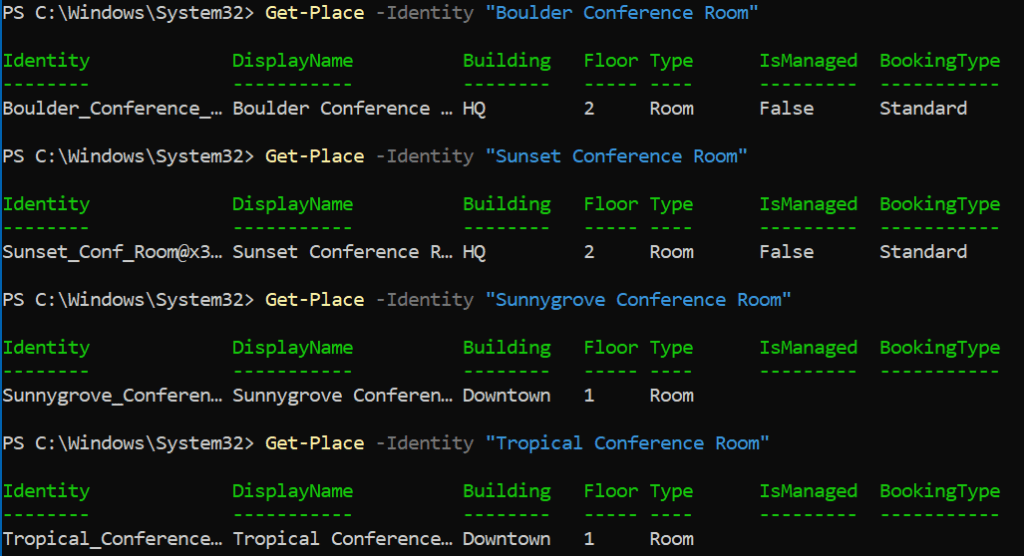
You use the Set-Place cmdlet to populate this additional information in room mailboxes. Let me demonstrate.
Set-Place -Identity "Boulder Conference Room" -Building "HQ" -Floor 2
Set-Place -Identity "Sunset Conference Room" -Building "HQ" -Floor 2
Set-Place -Identity "Sunnygrove Conference Room" -Building "Downtown" -Floor 1
Set-Place -Identity "Tropical Conference Room" -Building "Downtown" -Floor 1
How the Outlook Room Finder works
How to get a list of rooms
Administratively, you can use PowerShell to determine all the room mailboxes in your tenant.
Get-EXOMailbox -RecipientTypeDetails RoomMailbox | fl DisplayName, RecipientTypeDetails

Of course, you can display more pertinent info to our discussion by including the Places metadata including city, building, and floor.
Get-EXOMailbox -RecipientTypeDetails RoomMailbox | Sort DisplayName | Get-Place | ft DisplayName,City,Building,Floor

How room suggestions work
When the Outlook Room Finder is utilized, it first checks for the last building you selected thinking it plausible that you’d use a similar conference room now. If the user has not used one previously, the Room Finder will display the first 20 rooms in your tenant.
These ‘suggestions’ are not geographic and not specific to a location. Machine Learning or AI are definitely not used in retrieving this list.
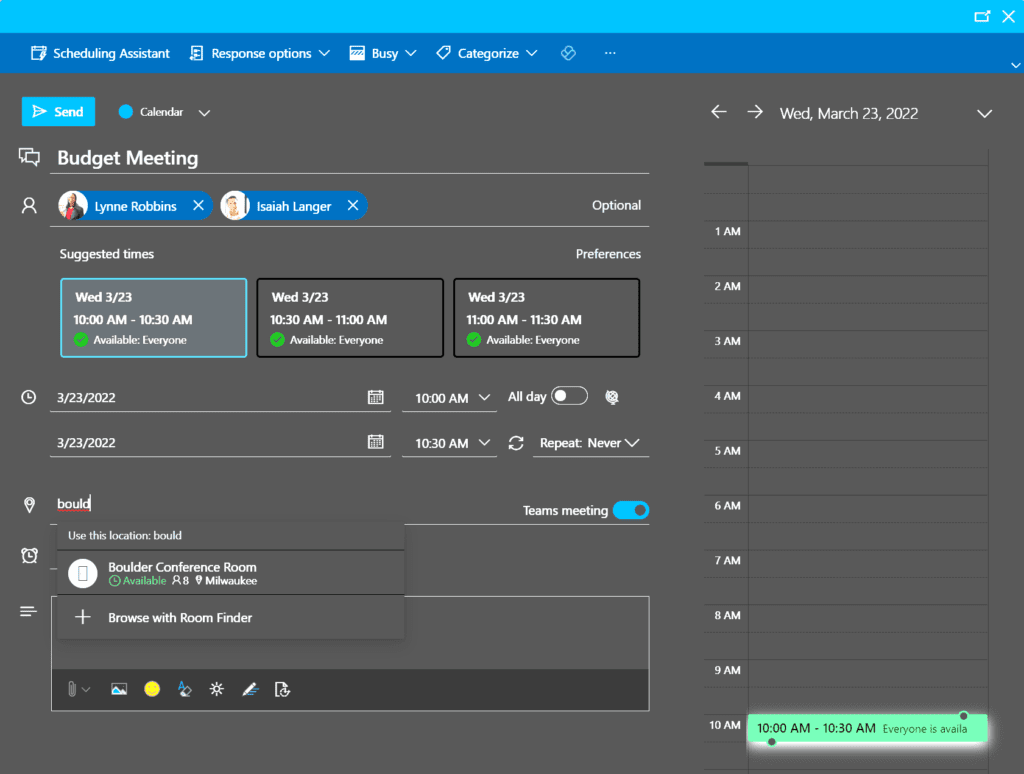
How to search for a room by name
When creating a meeting, click in the ‘Search for a room or location field. If you happen to know the names of conference rooms nearby, you can start typing in their name, and Outlook should suggest an appropriate (and available) conference room. Room Finder utilizes the metadata previously entered and the current free/busy information in your conference rooms (room mailboxes) to make accurate suggestions.
Using filters to find rooms
Users can use filters to find rooms appropriate to their location and how equipped various conference rooms are. Items such as projectors, screens, video conference devices, etc. can be filtered in the Room Finder experience.
Find a room by specifying a room type
If you are utilizing workspaces, you’ll be able to specify a room type in the Room Finder. You’ll be able to choose between conference room and workspace. Let’s go ahead and create a workspace.
New-Mailbox -Room "Colorado Space" | Set-Mailbox -Type Workspace
Next, we’ll use the Set-Place cmdlet to add some more metadata.
Set-Place -Identity "Colorado Space" -City "Milwaukee" -Floor 2 -Building "HQ"

The (almost) last step is to add the new workspace to an existing room list.
Add-DistributionGroupMember -Identity "Milwaukee Conference Rooms" -Member [email protected]

Finally, let’s enforce the capacity limits of the workspace and set a minimum booking duration for the workspace to three hours.
Set-CalendarProcessing "Colorado Space" -EnforceCapacity $True -MinimumDurationInMinutes 180

How to find current room availability
As long as you’ve taken care of the ‘working hours’ for your conference rooms, Outlook will only make suggestions for meeting times by taking into account everyone’s free/busy information. When setting up your meeting, the key items to add are the participants and the length of the meeting. Don’t worry about the actual time, yet.
Outlook will utilize the meeting length time, the participants, and the potential conference rooms/workspaces to make suggested meeting dates and times. Now that all the new room lists, conference rooms, workspaces have been processed by all the necessary background processes in Microsoft 365, let’s see how all this works now when scheduling a new meeting.
First, I’ll create a new meeting in Outlook on the Web, fill in the title, some attendees, and set the length to one hour.
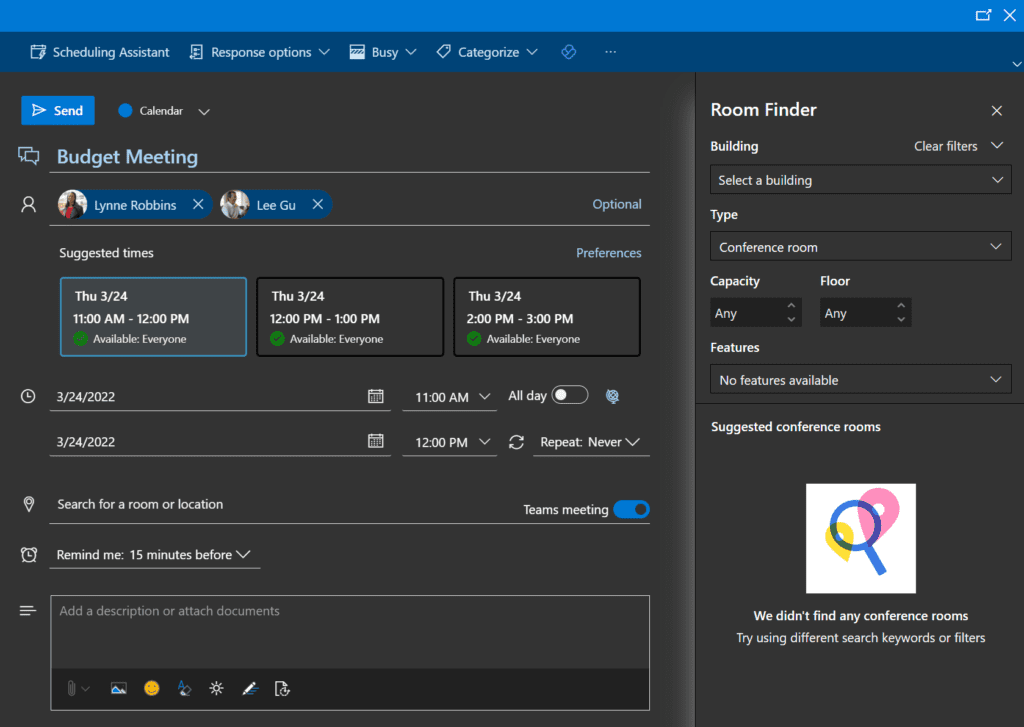
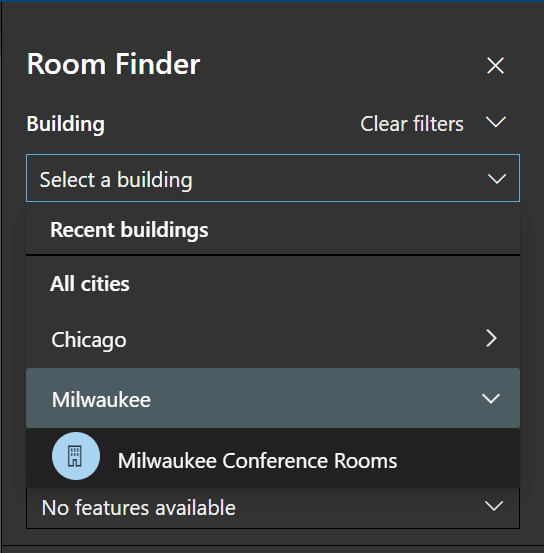
Now, as this meeting will take place in Milwaukee, let’s set the Building to ‘Milwaukee’ and we’ll see our new room list, ‘Milwaukee Conference Rooms.’ I’ll click that.
Now that the new room list has been processed, you can see that we can choose between our new conference rooms.
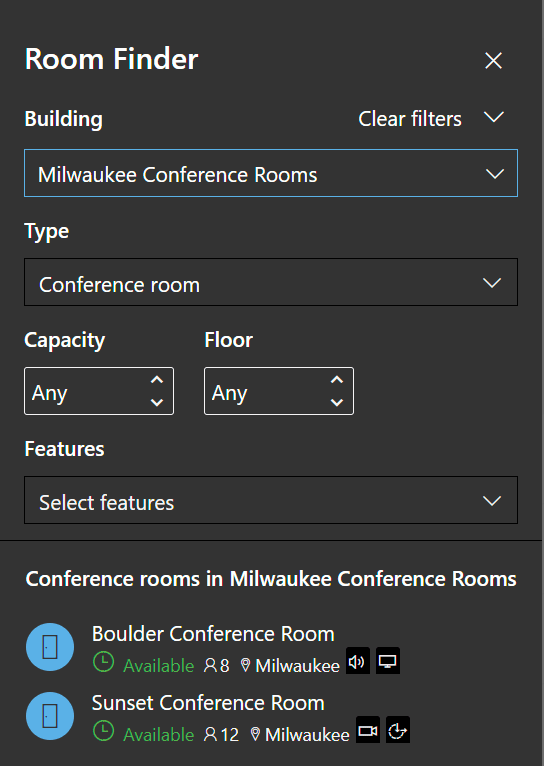
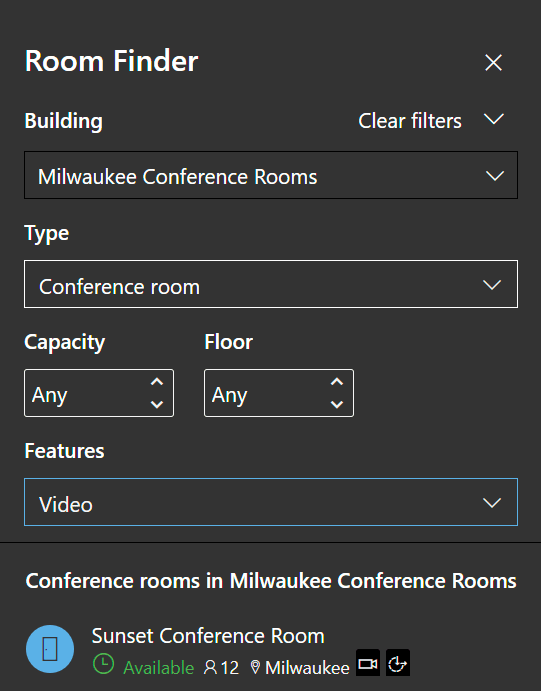
We can choose either the Boulder or Sunset conference rooms. And, as you can see, the capacity and features are listed for our convenience.
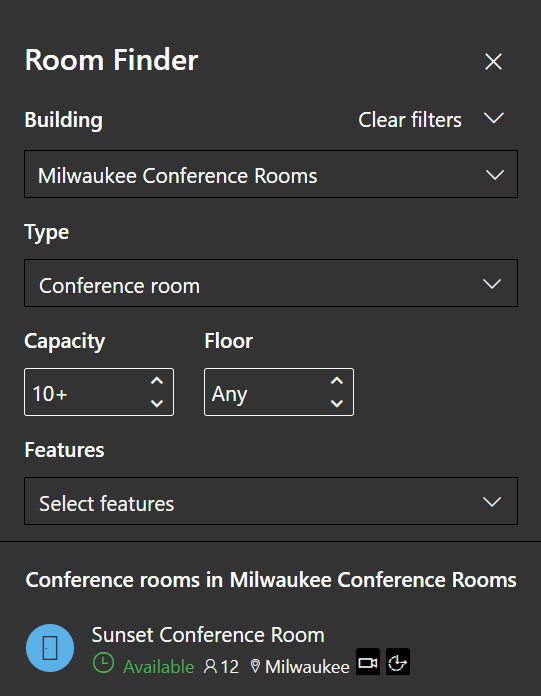
So, let’s say we have 10 guests to accommodate. If I bump up the Capacity to 10, you’ll notice the ‘Boulder Conference Room’ disappears from the list dynamically as it only has a capacity for eight attendees.
Next, if I go to Features and select ”Video”, now the Boulder conference room is missing as it doesn’t have those capabilities.
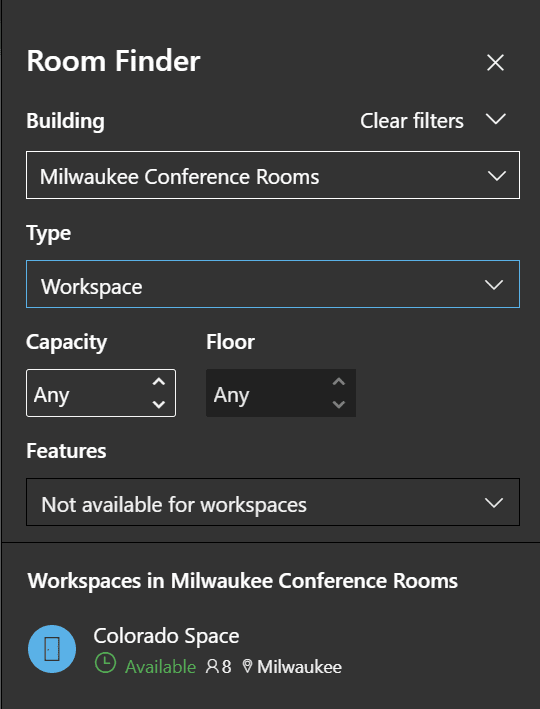
And, why don’t we touch on Workspaces. If I wanted to reserve a Workspace for the day, I can change the ‘Type’ field to Workspace and there’s our ‘Colorado Space’ ready to choose.
How can I create availability information?
In order to keep all your resources’ availability accurate, you’ll want to double-check the working hours and time zone information for your conference rooms. First, verify their current settings using the Get-MailboxCalendarConfiguration command
Get-MailboxCalendarConfiguration -Identity "Boulder Conference Room"

We’re going to need to update the time zone and the working hours using Set-MailboxCalendarConfiguration. We’ll change the time zone to Central and the start time to 7:00 AM.
Set-MailboxCalendarConfiguration -Identity "Boulder Conference Room" -WorkingHoursTimeZone "Central Standard Time" -WorkingHoursStartTime 07:00:00

Conclusion
The Outlook Room Finder is an extremely helpful and useful feature for your users, especially as ‘hybrid mode’ becomes more prevalent in the workplace throughout 2022. However, out of the box, a lot of these settings are missing, making the Room Finder not so helpful. Hopefully, this guide gives you a great jumpstart into this feature to boost the efficiency and end-user experience for your employees.
Incidentally, another very welcome feature is coming to Outlook – RSVP enhancements for meetings. When accepting a meeting request, you’ll be able to click Yes, and then choose ‘Virtually’ or ‘In Person.’ This is scheduled to be released to Outlook on the Web sometime in the 2nd quarter of 2022.

Michael has been an IT Pro since 1998. He has worked predominantly in the Windows world including client and server operating systems, on-prem systems engineering (AD, DNS, etc.), and over the last ten years or so has embraced and immersed himself in...