- Blog
- SQL Server
- Post
SQL Server Essentials: Create a SQL Database

Databases are the primary containers for your SQL Server relational database objects. Some of the main relational database objects that are contained in SQL Server databases include: tables, schema, indexes, views, logins, security and roles. You can create a SQL database plus there are a number of built-in SQL system databases including the master, model, msdb and tempdb databases.
Technically, SQL Server supports a maximum of 32,767 databases but in practice you will never use anywhere near that many. Let’s take a closer look at SQL Server databases and explore some of the different ways that you can create SQL databases.
Create SQL Database
SQL Server databases can be created in a variety of ways. SQL Server Management Studio’s (SSMS) has an option that enables you to create a table interactively. Likewise, Azure Data Studio also provides an interactive option for creating databases.
PowerShell can create databases using the Invoke-SqlCmd cmdlet. In addition, you can use SQL Management Objects (SMO) to create SQL Server databases. However, the most basic way to create databases and other database objects is by executing T-SQL commands. T-SQL commands are text based and they are executed using the SSMS Query Editor, Azure Data Studio or sqlcmd.
Let’s look at a few examples of each of these create database methods.
Using SQL Server Management Studio
Microsoft offers SQL Server Management Studio (SSMS) as a tool for managing SQL Server databases. You can use it to carry out a number of tasks including navigating databases, writing and running SQL queries, and like you might expect for creating and modifying databases.
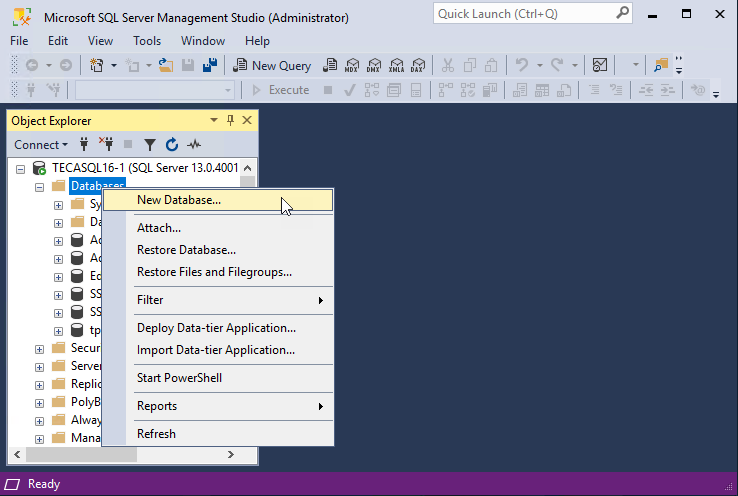
- To create a database using SSMS, open SSMS and connect to a SQL Server instance by entering the server’s login information. This will open SSMS and Object Explorer will be displayed on the left side of the SSMS window.
- Right click the Databases node and then select New database from the context menu like you can see in the following figure.
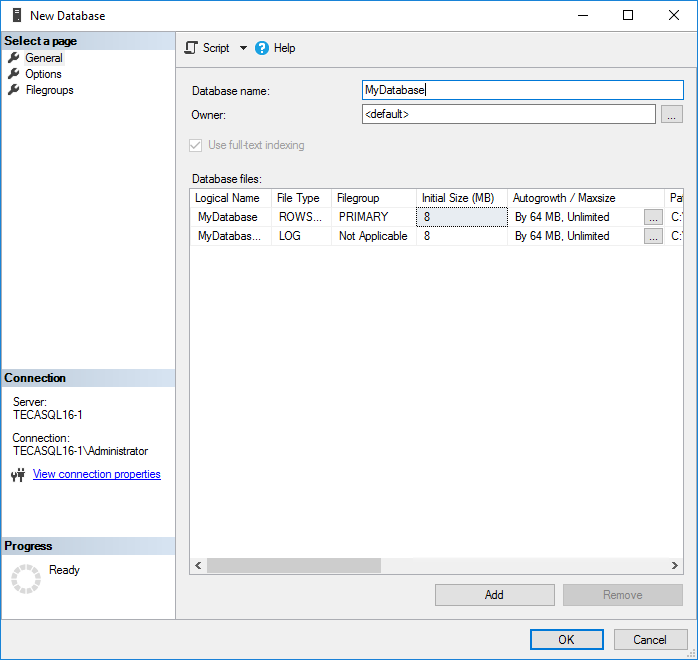
This will display the New Database dialog that you can see in the figure below.
- Provide a name for the database. Here you can see that I used the name MyDatabase and then you can optionally set the other parameters to meet your needs. This dialog allows to optionally change the owner of the database as well as the initial sizes of the data and log files.
- To make more advanced changes you can click on either the Options or Filegroups pages that you can see listed on the lefthand Select a page portion of the dialog.
The use of either the Options or Filegroups pages is not required but they do enable you to set more advanced options for the new database. You can see the database Options page shown in the following figure.
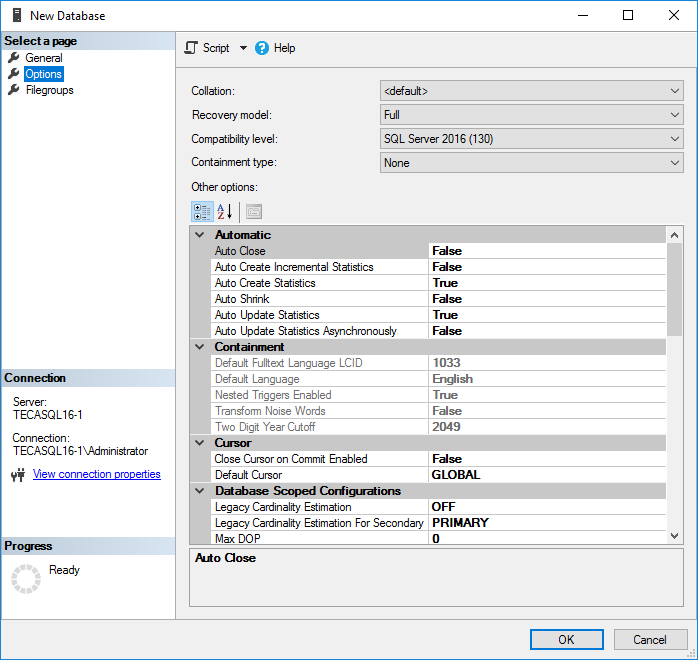
Here you can see some of the more advanced options that you can set when creating a database using SSMS. SSMS is essentially capable of setting all the same options that you can set if you were using native T-SQL to create a database.
Like you would expect, the Options page allows you set various configurations like Auto Close and Auto Shrink while the Filegroups page enable you to specify the database’s underlying storage filegroups and their locations.
- To alter any of the default values, simply type over the supplied value and click OK.
Using Azure Data Studio
Azure Data Studio (ADS) is also capable of interactively creating databases. However, it’s not designed for management the way SSMS is. And the requirements and process make using its interactive database creation capabilities daunting. You need prerequisites like the .NET runtime and the .NET Framework installed. As well as having the ADS database management extensions installed.
Plus, you need to use developer-styled options like Build then Publish just to create a simple database. It’s actually far easier to just use its query window to execute the native T-SQL commands. That said, to interactively create a database with ADS, once the prerequisites are installed first:
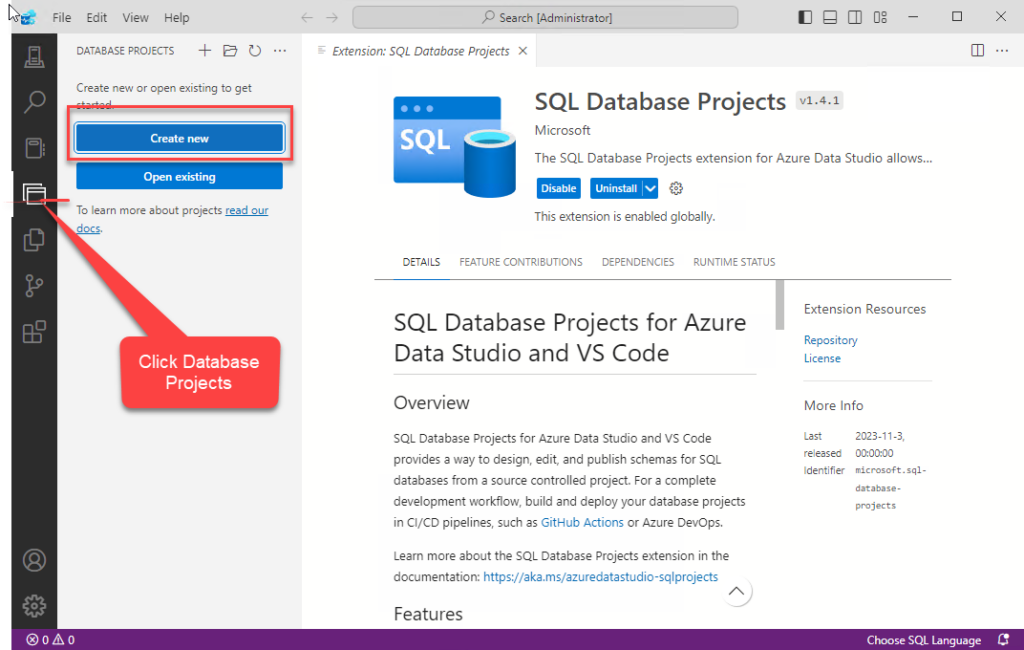
- Select the Database Projects icon on the left toolbar and then click the Create new button like you can see in the following figure.
This will display the Create new database dialog that you can see below. Remember the Database Project provides a description of the database – it is not the database itself. The Database Project must be built and published in order to actually create the database on SQL Server.
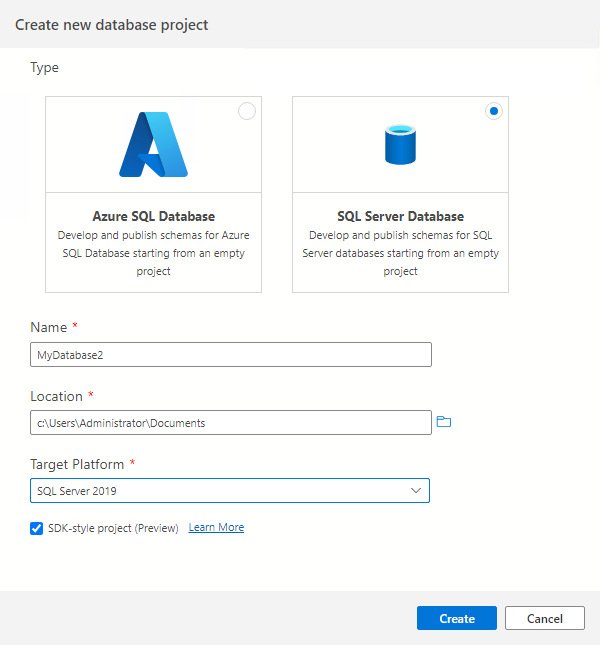
This dialog enables you to choose what type of new database project will be created. You can create an Azure SQL Database or an on-premises SQL Server database.
Next, you need to provide the name of the database, the location of the project files, and the target platform. In the figure above, you can see that we are creating a local SQL Server database and that the database will be targeting the SQL Server 2019 platform.
- Clicking Create will create the project.
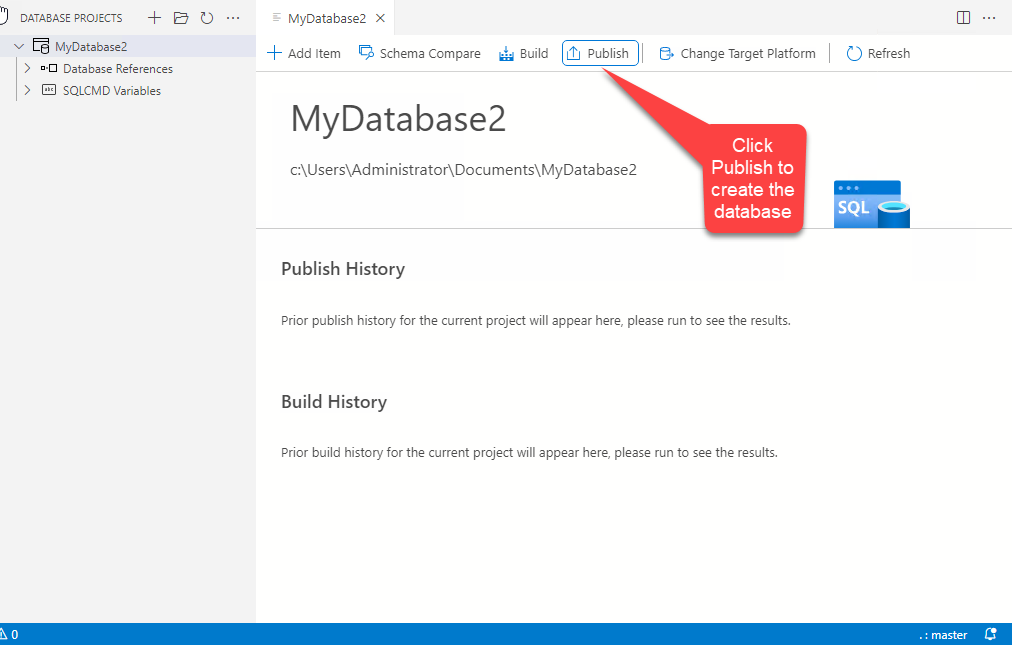
- You can begin the process to create the database on SQL Server by clicking the Publish button in the upper menu. Publish will automatically kick of the build process and after the build is completed it the database will be published (a.k.a created) on the target platform.
- Clicking the Publish button at the bottom of the dialog will display the following figure.
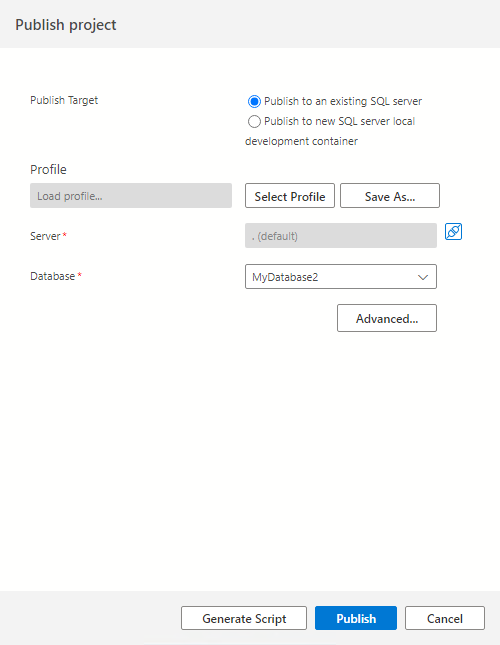
You can choose publish the new database to an existing SQL Server system or as a SQL Server container. In this example, we are publishing the database to an existing SQL Server system.
- The Server prompt enables you to supply the name of the SQL Server system. If this server is on the same system as ADS, you can simply supply a “.” (period) for the server name. Otherwise, fill in the DNS name for the SQL Server system.
- The Database prompt allows you to change the name of the database before it is created. Here the database will be named MyDatabase2. Clicking the Publish button will connect you to the target SQL Server system and create the database.
You can see the results in the following dialog.
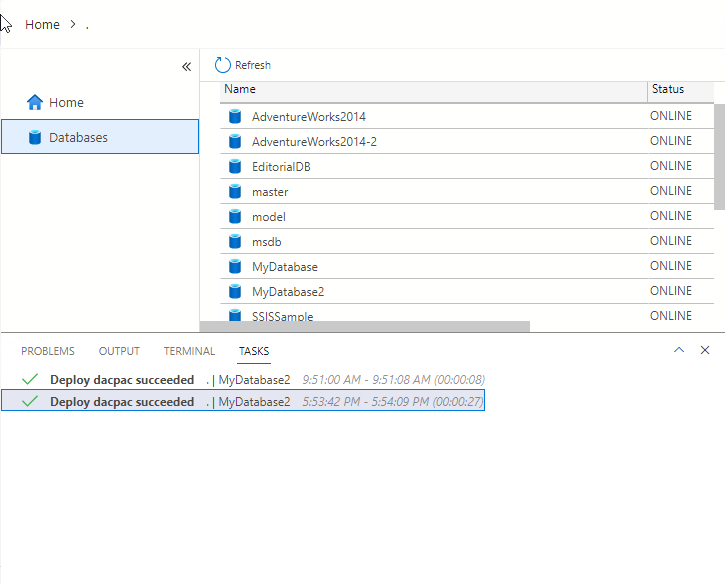
You can see the new MyDatabase2 database listed in the upper portion of the window and the results of the deployment operation are shown in the bottom portion of the screen.
Using the T-SQL CREATE DATABASE statement
While you can create SQL Server databases using the interactive tools, the most basic way to create a SQL database is by using T-SQL CREATE DATABASE command. The T-SQL CREATE DATABASE statement can be executed by the SSMS Query Editor or the ADS query tool by selecting the new query option as well as the command line tools like sqlcmd. Creating a SQL Server database using T-SQL is pretty straightforward. You can see the simplest form of the CREATE DATABASE statement in the following code.
CREATE DATABASE myDatabase3;This creates a database named myDatabase3. The database name is the only required parameter for the CREATE DATABASE statement.
Like you might guess, you can specify a number of additional parameters. If you don’t specify any other parameters, the command will use the default values. That said, most DBAs and database administrators typically also specify the location of the data and log files – placing the data files on drives with good read performance and the log files on drives with good write performance.
You can see an example of specifying the location of the data and log files in the following listing.
USE [master]

GO

CREATE DATABASE [MyDatabase3] ON PRIMARY

( NAME = N'DBA', FILENAME = N'D:\Microsoft SQL Server\MSSQL.1\MSSQL\DATA\DBA3.mdf' , SIZE = 1303552KB , MAXSIZE = UNLIMITED, FILEGROWTH = 10240KB )

 LOG ON

( NAME = N'DBA_log', FILENAME = N'D:\Microsoft SQL Server\MSSQL.1\MSSQL\DATA\DBA_log3.ldf' , SIZE = 2052672KB , MAXSIZE = 2048GB , FILEGROWTH = 10%)

GO
The T-SQL CREATE DATABASE command can be executed using a number of different tools, including the SSMS Query Editor, the ADS Query Editor, and the command line sqlcmd or go-sqlcmd tools.
Create a SQL database using PowerShell
PowerShell is a popular alternative to T-SQL and it’s often used by part time SQL Server administrators or administrators who also manage Windows Server or other systems. You can use the PowerShell Invoke-Sqlcmd cmdlet to create databases on SQL Server.
You can see a simple example in the following listing:
# Define SQL Server connection parameters
$serverInstance = "."
$databaseName = "MyDatabase4"

# Define the SQL query to create the database
$query = "CREATE DATABASE [$databaseName];"

# Execute the T-SQL command using Invoke-Sqlcmd
Invoke-Sqlcmd -ServerInstance $serverInstance -Database "master" -Query $query
Write-Host "Database '$databaseName' created successfully."
At the top, two variables are created to specify the server systems and the name of the database that will be created. These are optional and you could use constants for these values. But variables are more likely to be used in production code.
Next, a variable name $query is assigned the T-SQL CREATE DATABASE command. Finally, Invoke-Sqlcmd is used to execute the command.
Using SQL Management Objects (SMO)
You can also create SQL Server databases by invoking SQL Server Management Objects (SMO) from PowerShell, Visual Basic (VB) or C#. SMO is a programable object framework designed to manage Microsoft SQL Server. SMO is compatible with SQL Server 2005 (9.x) and later versions.
Before you use SMO from PowerShell, you might find that you need to load the SMO assemblies. You can get the script to load the SMO assemblies into PowerShell at Load the SMO Assemblies in Windows PowerShell.
The following listing illustrates how you can use SMO from PowerShell to connect to SQL Server and create a new database.
#Specify the local server instance

$server = “.”

#Create a new database named MyDatabase5

$db = New-Object -TypeName Microsoft.SqlServer.Management.Smo.Database -argumentlist $server, "MyDatabase5"

$db.Create()

Write-Host "Database '$databaseName' created successfully."
Here again at the top, a variable is created to specify the name of the server system. In this example, the “.” (period) indicates the server will be the local system.
Next, a new SMO database object is created that uses the name “MyDatabase5”.
Then the database object’s Create method is called to actually create the database on the host SQL Server system. Then a completion message is written to the console.
Different methods for creating SQL databases
In this tutorial you learned about the different methods for creating SQL Server databases. You saw how to create SQL Server database interactively using both SSM and ADS. Then you learned about using the core T-SQL CREATE Database statement which can be run from any tool that supports querying SQL Server.
Finally, you saw how to use PowerShell to create a database using the Invoke-Sqlcmd cmdlet as well as how to use SMO in PowerShell to create a SQL Server database.
- Further reading on Petri.com: SQL ALTER TABLE – Modifying Table Structure in SQL Server

Michael Otey is president of TECA, a technical content production, consulting and software development company in Portland, Ore. Michael is a former SQL Server MVP and was Senior Technical Director for Windows IT Pro and SQL Server Pro. He covers the...