- Blog
- SQL Server
- Post
Master SQL Server: SQL Server Management Studio Tutorial

In this SQL Server Management Studio tutorial (SSMS), I will show you the primary database management and development capabilities provided by the tool.
Microsoft SQL Server Management Studio (SSMS) is the primary management and development tool for SQL Server and has been since its release back with SQL Server 2000. SSMS provides a graphical interface for database management and it only runs on Windows. Microsoft provides Azure Data Studio (ADS) for Linux and Mac clients. However, ADS is primarily a development tool and it does not contain the range of management capabilities that are provided by SSMS.
The current release of SSMS is version 19.1, which can connect to SQL Server 2022 and has backward compatibility with SQL Server 2014 and higher. It also supports working with the latest cloud databases like Azure SQL Database, Azure Synapse Analytics, and Microsoft Fabric. SSMS is not a part of SQL Server you need to download SQL Server Management Studio. SSMS is a separate but free download for SQL Server. After downloading SSMS you need to run its setup program. The installation process is straightforward but it takes several minutes.
You can learn more about installing SSMS at SQL Server Essentials: Installing SQL Server Management Studio and Azure Data Studio.
SQL Server Management Studio tutorial – SSMS basics
SSMS allows you to view and manage SQL Server database components like databases, security, linked servers, replication and scheduled jobs. If you look at the SSMs navigation pane in the left side of the following figure you can get a better idea of the management breadth offered by SSMS.
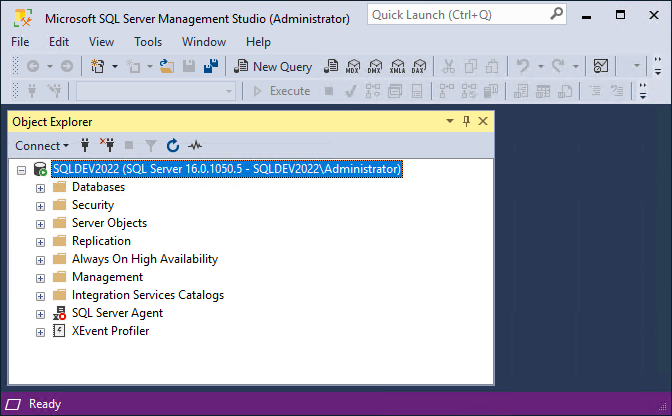
Here you can see SSMS’s Object Explorer enables you to work with the following SQL Server components:
- Databases
- Security
- Server Objects
- Replication
- Always On High Availability
- Management
- Integration Services Catalogs
- SQL Server Agent
- XEvent Profiler
Let’s take a closer look at the primary management and development capabilities provided by SSMS.
Connecting SSMS to SQL Server
The first step to managing SQL server with SSMS is to launch SSMS and connect to a SQL Server instance. To launch SSMS, open the Start menu and look for Microsoft SQL Server Tools 19. Expand the node and then select SQL Server Management Studio 19. The first screen that you’ll see is the following Connect to Server dialog.
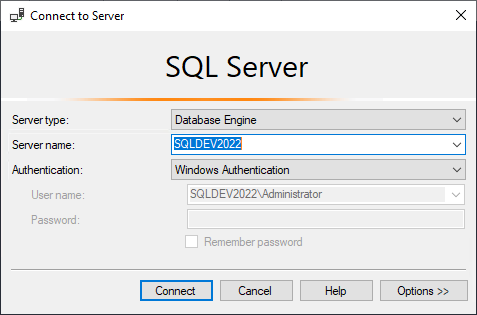
First, use the Server type dropdown to connect with your SQL Server instance. SSMS can be used to connect with Database Engine, Analysis Services, Integration Services, Reporting Services, Azure Storage or Azure-SSIS Integration Runtime. To connect to the relational database server, select Database Engine from the Server type dropdown, and then enter the name of the SQL Server instance that you want to connect to. If you are on a development system or SSMS is on the same system as the SQL Server instance, you can enter just a “.” (a dot or period – no quotation marks) for the Server name. Next, supply the authentication method. In most cases, this should be Windows Authentication, which will use your current login credentials to connect to the SQL Server instance. However, you can also choose SQL Server Authentication or Azure Active Directory. To use SQL Server authentication, you would need to supply a SQL Server login ID and password. Clicking the Connect button will attach SSMS to the SQL Server relational database engine.
Navigating databases with Object Explorer
The first thing that you’ll want to do is use Object Explorer to view, navigate and work with the various SQL Server components listed. The relational database is the core SQL Server feature. To work with the different relational database objects, expand the Databases node to see all the databases available on the server. The System Databases folder contains the four default system databases: master, model, msdb and tempdb. The Database Snapshots node displays any available database snapshots. The Databases node displays user created databases like you can see in the following figure.
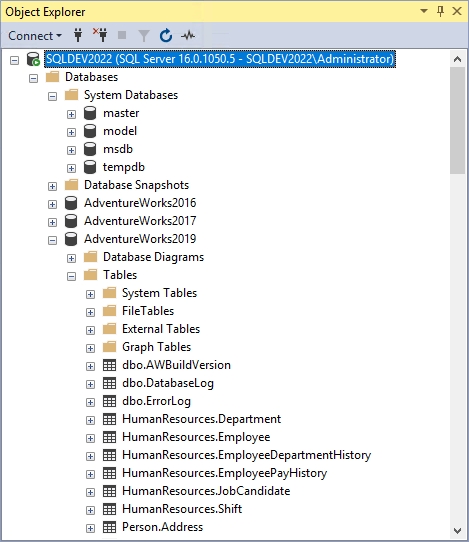
Expanding the user database shows the different Tables, Views, External Resources, Synonyms, Programmability, Service Broker, Storage and Security nodes that comprise each database. When a plus sign is displayed you can further drilldown into the objects. For instance, tables are proceeded by a plus sign and clicking on that will expand the columns, keys, constraints and triggers that are used by each table. Similar functionality is provided for most database objects.
Working with database properties
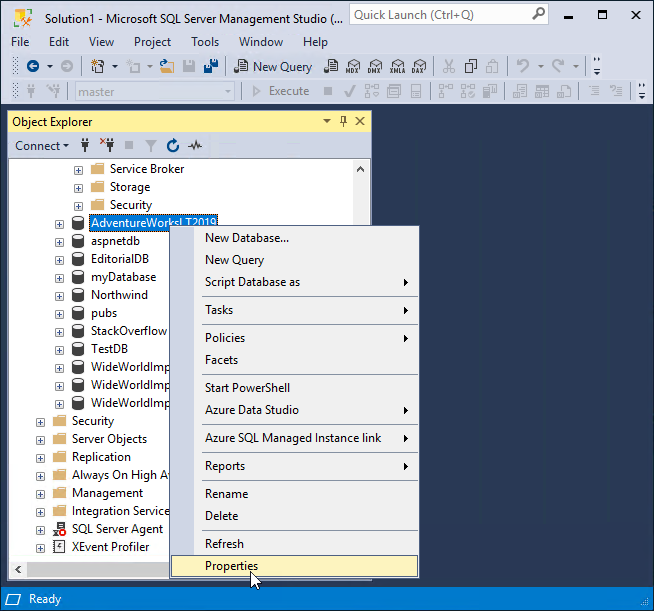
You can use SSMS to configure both server and database properties just like you can using T-SQL (Transact-SQL) commands. For example, to work with the properties of a given database select the database in Object Explorer and right click on it to display the context menu. Then click on the Properties item like you can see in the figure below.
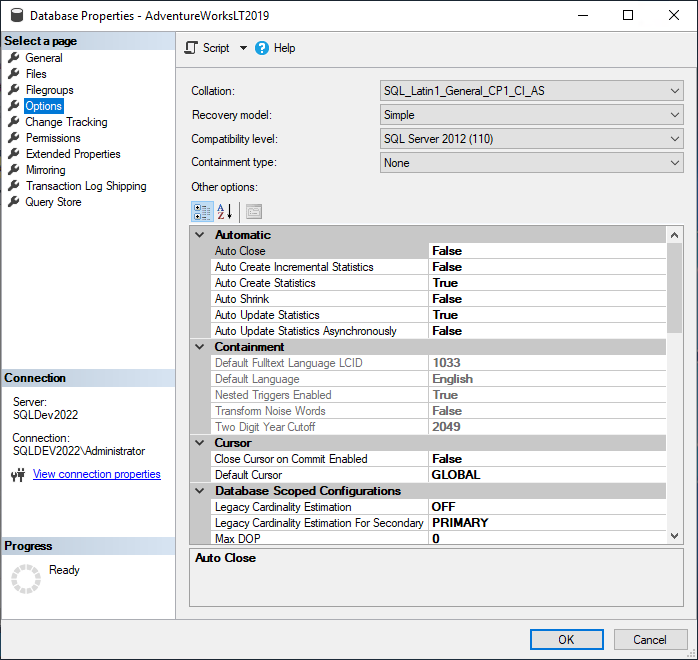
This will display the Database Properties dialog like you can see in the following figure. The Database Properties dialog has numerous settings spread across the multiple pages that you can see on the left side of the screen. The following figure shows the top portion of the Database Options page. To change any of the properties adjust the value shown on the dialog and then click OK. You need to have ALTER permissions on the database to change the properties of a database.
Viewing and editing table data
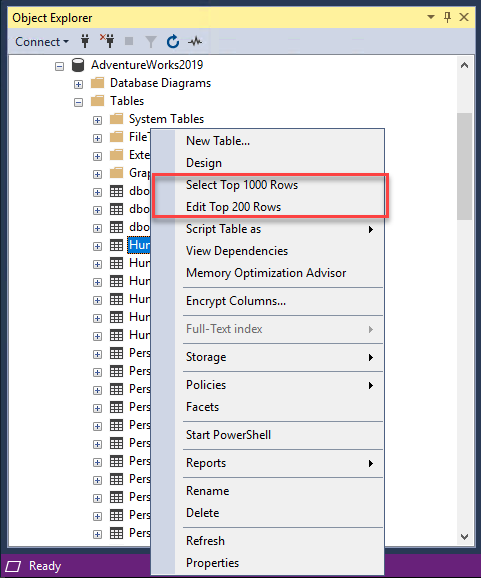
You can also use SSMS to view, manage and update SQL Server table data. For example, to view or modify the data that in a table you can use Object Explorer to expand a database and then navigate down to the desired table and right click on the table to display the context menu. Then from the content menu you can select either the Select Top 1000 Rows or Edit Top 200 Rows options like you can see in the figure below.
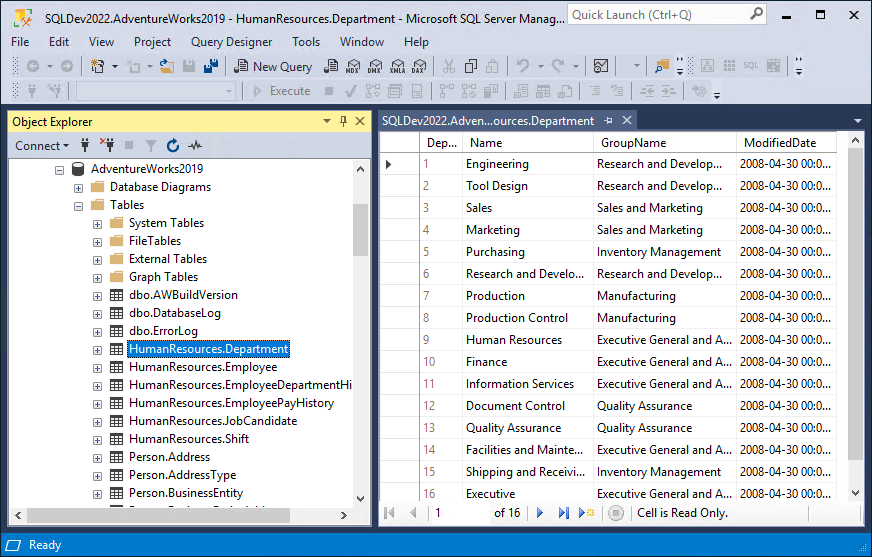
Like you might expect the Select Top 1000 Rows option displays the data from the top 1000 rows in the select table using a SELECT statement while the Edit Top 200 Rows opens up a grid that enables you to update the column data. You can see the grip displayed by the Edit Top 200 Rows option in the following figure.
SQL Server Management Studio tutorial – Modifying table schema
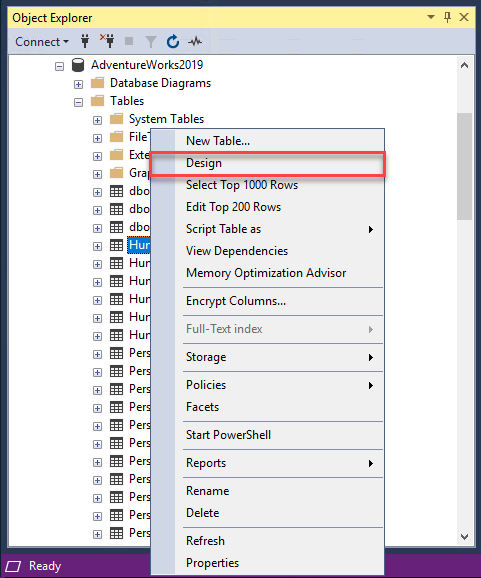
SSM’s Object Explorer also allows you to change a table’s schema by adding or removing columns and/or changing data types. To a table’s schema you can use Object Explorer to expand a database and then navigate down to the desired table and right click on the table to display the context menu. From the content menu you can select the Design option like you can see in the figure below.
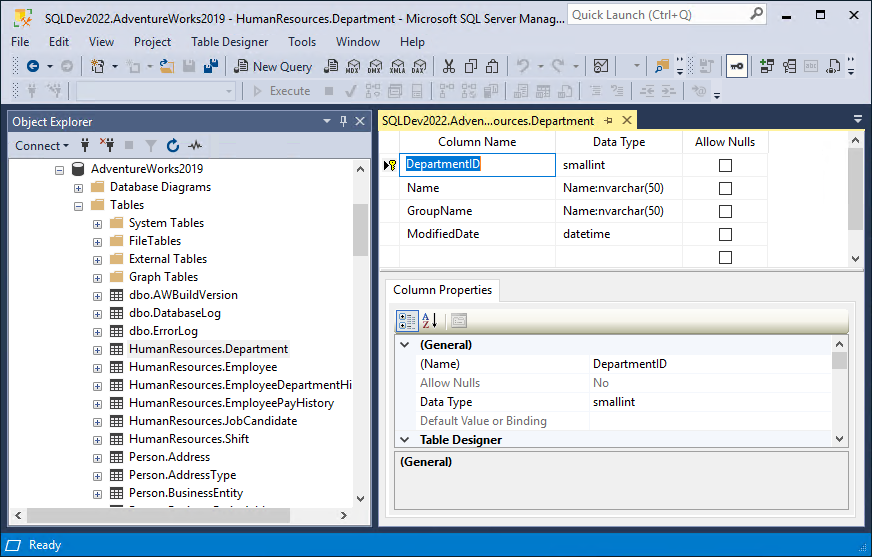
This will display the SMSS Table Designer that you can see in the following figure. The Table Designer allows you to make changes to the column names, data types, nullability as well as adding or deleting columns. When you’ve finished with your changes closing the Table Designer will prompt you to save the changes you’ve made. If the Table Designer is able to make the changes all of the data in the table will be preserved.
Creating new tables
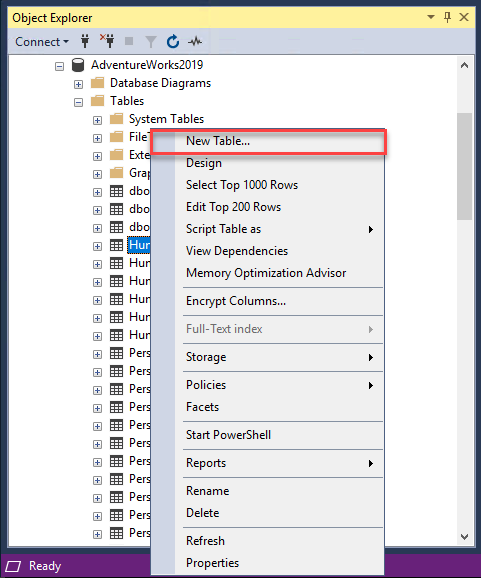
In addition to modifying existing table schema, SSMS can also be used to create new tables by adding different columns and data types. To add a table, you can use Object Explorer to expand a database and then navigate down to any of the existing tables and right click the table to show the context menu. Then select the New Table option like you can see in the following figure.
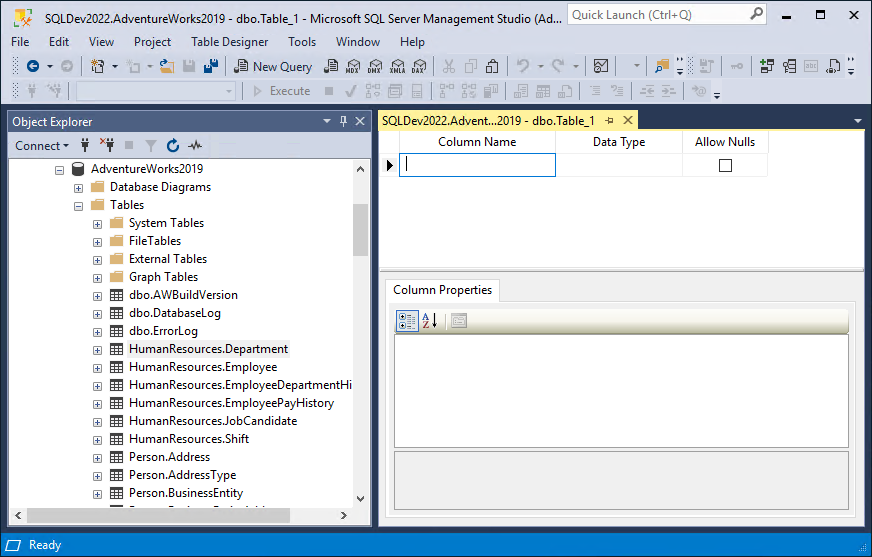
Selecting the New Table option will display an empty instance of the Table Designer like you can see in the figure below. To create a new table simply type in your column names then select the appropriate data types and nullability option. When you have finished closing the Table Designer will prompt you to save your changes. If the table specifications meet SQL Server’s requirements for column names and data types a new empty table will be created in the current database.
Creating and updating T-SQL queries with Query Editor
So far most of the SSMS options that we’ve covered have focused on database management. However, SSMS is also a primary development tool for SQL Server. The SSMS Query Editor allows you to write, run and save various types of T-SQL queries, including ad-hoc queries, dynamic SQL, stored procedures, as well as triggers and functions. You can open the Query Editor by clicking on the New Query on the tool bar like you can see below.
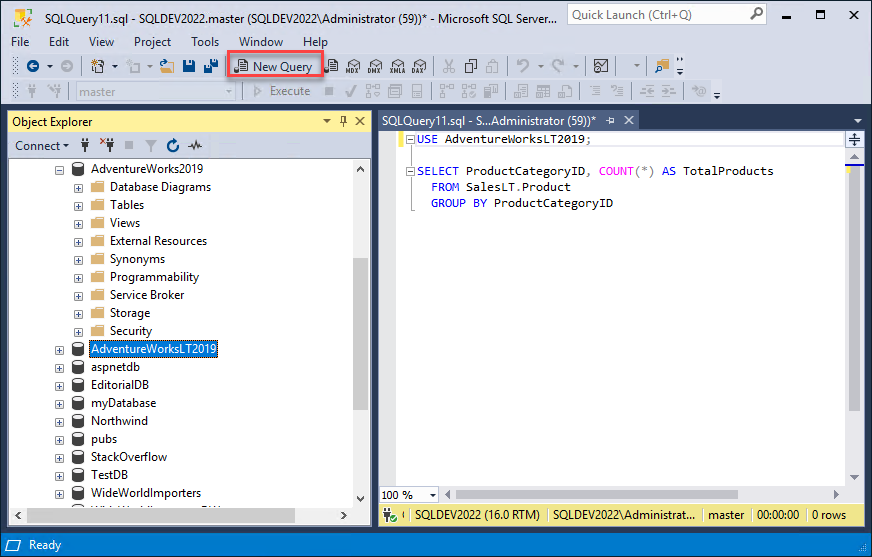
This will open the Query Editor window that you can see in the right side of the previous figure. The Query Editor lets you create, edit & execute Transact SQL (T-SQL) statements. It provides IntelliSense support and auto-completion to help you write T-SQL statements. You can see some of the Query Editor options in the following figure.

- Databases dropdown — Allows you to choose the current database to run your queries
- Execute button — Allows the user to execute the query or selected lines in the editor
- Cancel Executing Query button –Stops the execution of a query
- Parse button — Validates the query’s syntax but doesn’t execute the query
- Include execute plan button – Causes the query to appear as a graphical query plan in the execution window
- Include live query statistics button — Provides real-time feedback about the queries’ execution process
- Changing query result destination buttons — Set the query result’s destination to text, grid or file
- Comment/Uncomment buttons – Toggle the selected lines between commented and uncommented
Creating users and securing objects
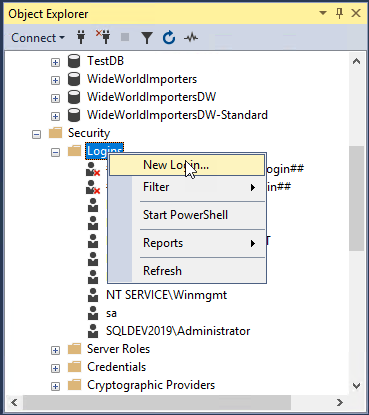
SSMS can also be used to manage SQL Server users and permissions using Object Explorer’s Security node. The Security node is below the Databases node in the Object Explorer. You can create logins and assign Server roles for your different database instances. In addition, you can assign role-based security to logins and users. To create a new SQL Server login, expand the Security node then right click Logins to display the context menu. Next, select New Login like you can see in the following figure.
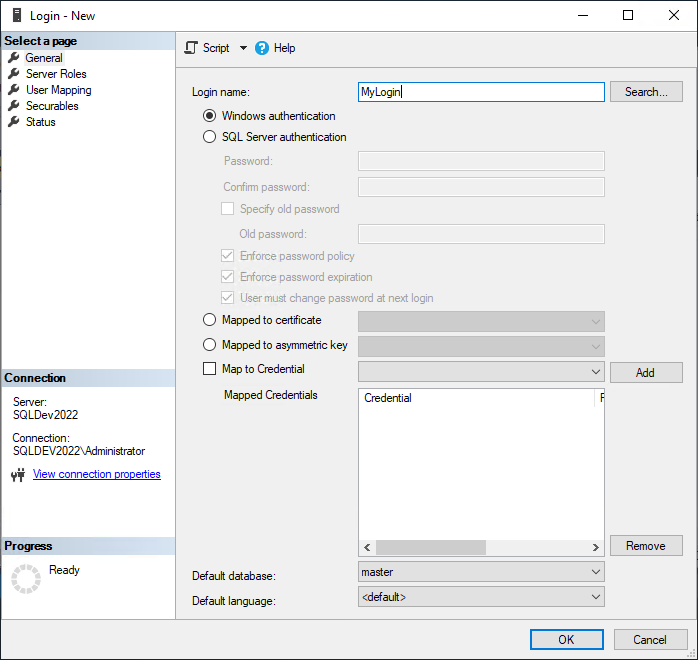
This will display the Login – New dialog that you can see in the next figure. This dialog enables you to create new SQL Server logins where you provide a login name and select whether the login will be using Windows authentication or SQL Server authentication. The links on the left portion of the screen allows you to define additional security attributes including assigning Server Roles, User Mapping and specifying Securables.
Scheduling Jobs with SQL Server Agent
Another major management function of SSMS is to create and schedule jobs using the SQL Server Agent. SQL Server Agent jobs typically perform a number of different automated functions including backing up databases, performing routine database maintenance and running different batch or ETL (Extraction-Transfer-Load) jobs. In order to use SQL Server Agent to schedule jobs the SQL Server Agent service needs to be running.
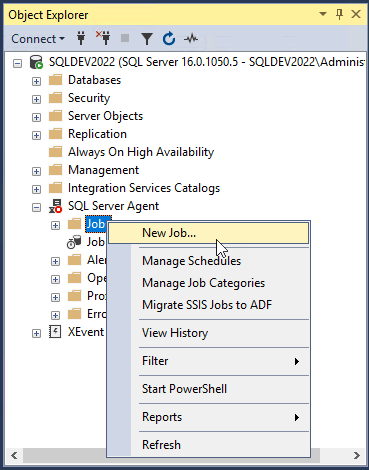
To create a new SQL Server Agent job expand the SQL Server Agent node and then right click on the Jobs node to the display the context menu. Next, select the New Job option like you can see in the next figure.
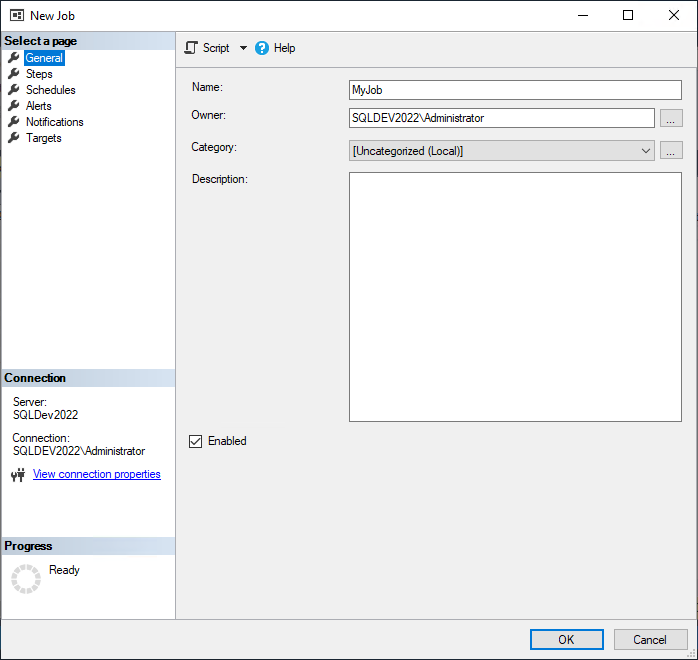
This displays the New Job dialog that you can see below. The New Job dialog enables you to create new SQL Server Agent jobs. As you can see in the following figure there are several different pages that are used to define a new SQL Server Agent job. The General page allows you to provide a job name, category and description. The Steps page allows your to define the different processes that will run as a part of the job and the action taken at the end of each successful or unsuccessful step, the Schedules page allows you to define when the job will run, the Alerts page defines any SQL Server Alerts that you want to raise, the Notifications page lets you send job completion or error notifications to email targets or the event log, and Targets page specifies the SQL Server system that the job will run on.
Managing Linked Servers, Replication and Always On Availability Groups
In addition to these primary functions there are several other functions provided by SSMS that we should touch on briefly including Linked Servers, Replication and Always On High Availability.
- Linked Servers – Let’s you configure a connection that allows one SQL Server to connect to other SQL Server instances using ODBC or .NET Providers. This enables you to run queries that span multiple SQL Server systems.
- Replication — Is a set of technologies that enable you to copy, distribute and synchronize databases between multiple SQL Server systems.
- Always On High Availability – Enables you to provide high availability and disaster recovery for multiple databases.
Summary
In this tutorial you got a tour of the primary database management and development capabilities provided by SSMS. As you can see SSMS is a deep, feature-rich application that has more functionality than we can cover in a single article. In this article you learned about some of the core SSMS features including navigating database objects, viewing and changing table data, creating and changing table schema, creating new logins and permissions as well as creating SQL Server Agent jobs. SSMS has additional functionality that we didn’t cover including auditing, policy management, Extended Events, Maintenance plans, Databases mail and more. You can get more information about using SSMS at What is SQL Server Management Studio (SSMS)?

Michael Otey is president of TECA, a technical content production, consulting and software development company in Portland, Ore. Michael is a former SQL Server MVP and was Senior Technical Director for Windows IT Pro and SQL Server Pro. He covers the...