Managing Users with Teams Messaging Policies
Managing Teams with Policies
When Microsoft launched Teams in November 2016, the tenant-wide settings to control the application were in the Office 365 Admin Center. With the introduction of the Teams and Skype for Business Online Admin Center in April 2018 (now renamed the Teams Admin Center), some of those settings are replaced by a set of policies (messaging, meeting, and live events)
The major advantage of this approach is that you can apply different policies to different users instead of a single setting for the entire tenant. Where it makes sense to have global settings, like those governing guest user access, the Teams Admin Center manages these under org-wide settings.
Teams Messaging Policy
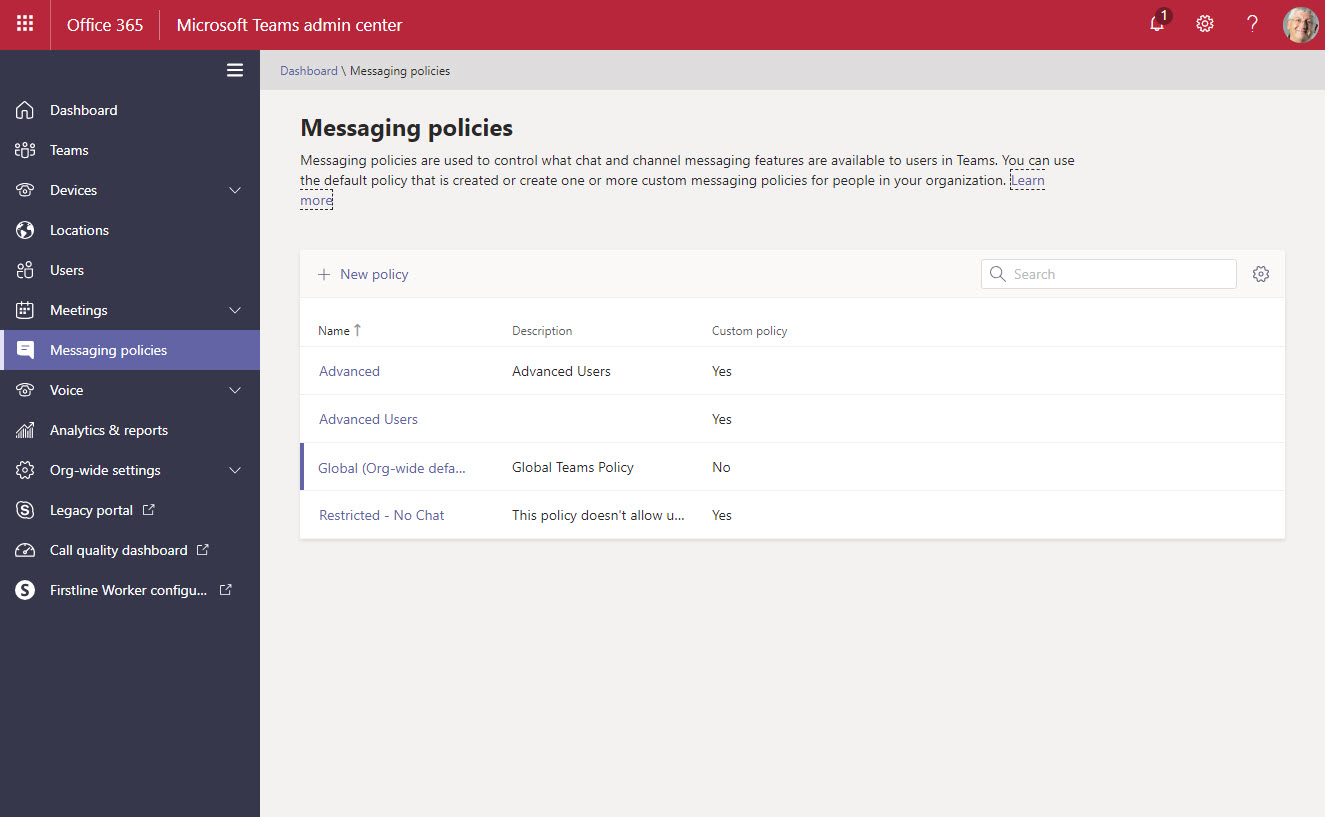
Microsoft publishes default policies for tenants, so there’s no need to go near them unless you have good reason. In small tenants, you might never need to use anything other than the global policy. Larger tenants are more likely to find circumstances when they wish to restrict user behavior in some way. Figure 1 shows a set of messaging policies in a tenant.

What a Messaging Policy Does
Each team has owners that can restrict what users can do inside the team using options controlled through the Settings section of the Manage team menu. The settings messaging policy assigned to a apply to all teams in the tenant. Policy settings don’t allow users to override a restriction set by team owners. Instead, they further restrict what users can do inside a team.
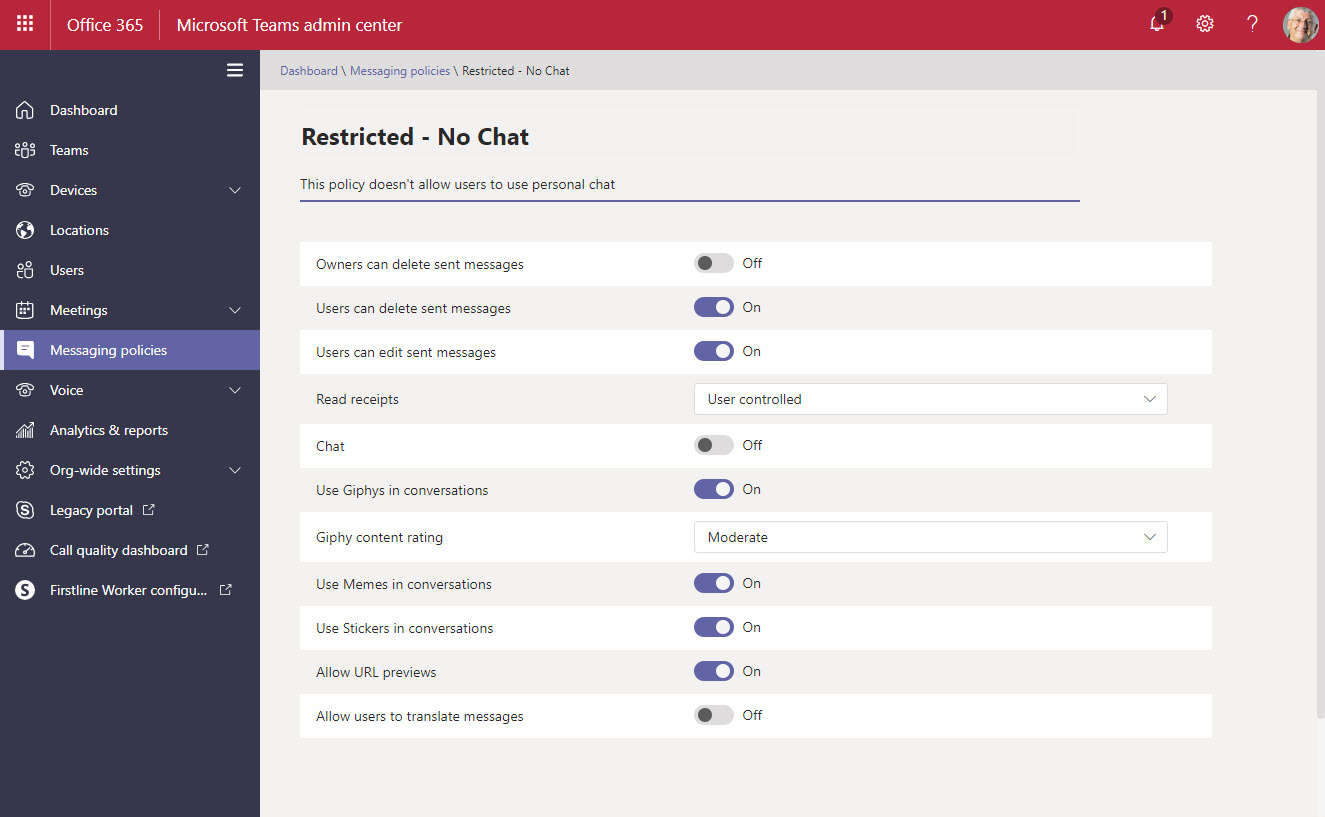
For example, in Figure 2 we see a messaging policy with two important settings disabled. The first stops the user participating in personal chats. In other words, this user can only send messages to channel conversations. The second disables the user’s ability to translate messages.

Applying a Teams Messaging Policy to a User
To apply a policy to a user, go to the Users section of the Teams Admin Center and select their account. By default, the Teams Admin Center lists all accounts, including guest accounts, room accounts, and equipment accounts. You can only apply policies to accounts enabled for Teams, so it’s a good idea to set a filter of Account status = enabled to ensure that the portal only shows accounts which support policies. If you try to set a policy to a non-enabled account, the portal returns an error.
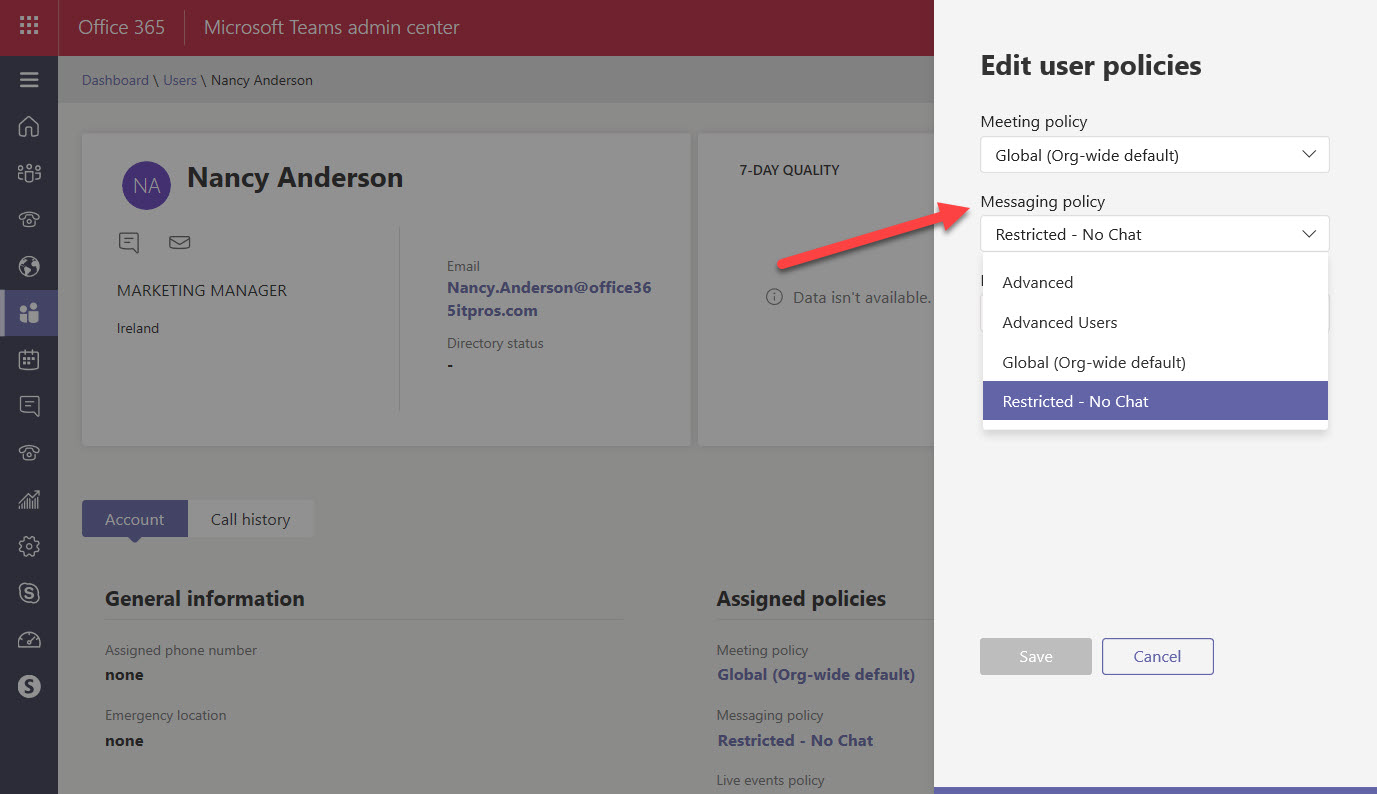
After selecting the user, click the Edit (pencil icon) beside the Assigned Policies heading. You can now edit the policies assigned to the user (Figure 3). Remember to Save your changes. It takes a little time before the change is effective to allow the new policy setting to synchronize to clients.

Users aren’t informed that an administrator has applied a different policy to their account. Unless they’re told in some way (it would be polite to do so), the first time they know that they’re operating under a new regime is when Teams removes some functionality in line with the policy. For instance, when chat is removed, Teams doesn’t display the Chat icon in the app bar. In addition, if someone tries to contact the user through Chat, they’re told that they can’t (Figure 4).

You can’t set messaging policies on groups. If you want to use a group to control messaging groups, read the members of the group and then use PowerShell to grant the policy to each member.
Working with Teams Messaging Policies Through PowerShell
The Teams PowerShell module doesn’t include the cmdlets to work with policies. Instead, you must download and use the Skype for Business Online module (which isn’t the easiest module to work with).
For example, to view the settings in the restricted messaging policy, run the Get-CsTeamsMessagingPolicy cmdlet:
Get-CsTeamsMessagingPolicy -id "Restricted - No Chat"

Identity                      : Tag:Restricted - No Chat
Description                   : This policy doesn't allow users to use personal chat
AllowUrlPreviews              : True
AllowOwnerDeleteMessage       : False
AllowUserEditMessage          : True
AllowUserDeleteMessage        : True
AllowUserChat                 : False
AllowRemoveUser               : True
AllowGiphy                    : True
GiphyRatingType               : Moderate
AllowMemes                    : True
AllowImmersiveReader          : True
AllowStickers                 : True
AllowUserTranslation          : False
ReadReceiptsEnabledType       : UserPreference
AllowPriorityMessages         : False
ChannelsInChatListEnabledType : DisabledUserOverride
AudioMessageEnabledType       : ChatsAndChannels
To change a setting in a messaging policy, run the Set-CsTeamsMessagingPolicy cmdlet. For example, this command disables the ability to add memes, stickers, and GIFs to messages.
Set-CsTeamsMessagingPolicy -Identity "Restricted - No chat" -AllowMemes $False -Allow Stickers $False -AllowGiphy $False
To assign a policy to a user, run the Grant-CsTeamsMessagingPolicy cmdlet. For example:
Grant-CsTeamsMessagingPolicy -PolicyName "Restricted - No Chat" -Identity "Oisin.Johnston"
And to check that the policy is set, use the Get-CsOnlineUser cmdlet to examine the settings for the user:
Get-CsOnlineUser -Identity Oisin.Johnston | Format-Table UserPrincipalName, TeamsMessagingPolicy

UserPrincipalName                  TeamsMessagingPolicy
-----------------                  --------------------
[email protected] Restricted - No Chat
Teams Policies Goodness
Being able to control the functionality available to individual users is a nice feature for large tenants. Because you can assign policies to users through PowerShell, it’s another action that can be incorporated into user account provisioning scripts, if that’s how you choose to set up new Office 365 accounts. Even if you don’t have the immediate need to use messaging policies, keep them in the back of your mind. You never know when you might need some extra control.


