How to Install Windows 11 – The Ultimate Guide

In this guide you’ll see how to install Windows 11 or perform an upgrade to Windows 11 from Windows 10. Installing Windows 11 is quite different than the previous versions of Windows. For the earlier versions, you typically needed to plan for the installation then go get the installation media, insert it into your computer, boot from it and then begin the installation process. However, that’s not the case for Windows 11 as many users will simply be able to install it as a Windows update.
Let’s take a closer look at Windows 11 system requirements and then dive into the various ways to install Windows 11. If you are looking to install Windows 11 in VMware Workstation Pro, then check out Petri’s dedicated article.
How to Install Windows 11
You might vaguely remember that back in 2015 Microsoft was touting that Windows 10 was going to be the “last OS you’ll ever need”. Well, a few years later it turns out that wasn’t quite right. Unless you’ve been living under a rock somewhere, you’ll have heard that Microsoft released Windows 11 on October 5th, 2021. As a part of the release Microsoft has stated that Windows 10 will be supported until 2025 so you know that Windows 10 will be around for the next few years.
Windows 11 system requirements
Here are the main hardware requirements that you should be aware of if you want to install Windows 11:
- CPUs (Central Processing Units) — 1 Ghz or faster with 2 or more cores and appearing on Microsoft’s list of approved CPUs. The processor in your PC will be a main determining factor for whether your PC can run Windows 11. Unfortunately, a surprising number of CPU – even fairly new ones – are not included in this list of supported CPUs so you really need to check your CPU against the list of supported CPUs.
- RAM – A minimum of 4 GB or higher.
- Storage – A minimum of 64 GB or higher.
- System Firmware –UEFI ( Unified Extensible Firmware Interface) and Secure Boot capable.
- TPM: Trusted Platform Module (TPM) version 2.0.
- Graphics support — Compatible with DirectX 12 or later with a WDDM 2.0 driver.
- Display – A high definition (720p) display that is greater than 9” diagonally.
While I find it hard to believe anyone might still care about this, there isn’t a 32-bit version of Windows 11. Beginning with Windows 10, version 2004, Microsoft has stated that all new Windows 10 systems will use 64-bit builds and that Microsoft will no longer release 32-bit builds for OEM distribution. This does not impact earlier 32-bit versions of Windows 10 but don’t expect to see any 32-bit support for Windows 11 going forward.
Getting Windows 11
The process for getting and installing Windows 11 is quite different from any prior version of Windows. First, Microsoft began offering a free upgrade to Windows 11 on October 5, 2021, and they have stated that Windows 11 will be released in phased approach with new eligible devices upgraded first. The Windows 11 upgrade cycle will then roll out over time to supported devices based on hardware eligibility, reliability metrics, age of device and other factors that Microsoft has determined impact the upgrade experience. The ways that you can get Windows 11 are as follows:
- Installed on a New PC
- Windows 11 upgrade using Windows Update
- Windows 11 upgrade Windows 11 Installation Assistant
- Installed by creating and running Windows 11 installation media
Of course, when Windows 11 comes with a new PC there’s nothing for you to do. However, some of the other methods are quite different from the way previous versions of Windows were obtained and installed. Now let’s take a closer look at each of these Windows 11 installation methods.
Windows 11 upgrade using Windows Update
For many people, who have PCs that are just a couple of years old or less, they will be able to perform a Windows 11 upgrade, from their Windows 10 systems, using Windows Update . This installation method is extremely easy. In fact, it is almost exactly like installing a typical Windows update. To check if your system is compatible with Windows 11, you can go to Settings > Windows Update and select Check for updates. If your Windows 10 system meets with Microsoft’s prerequisites for Windows 11, then you’ll see Windows Update display a prompt like you can see in Figure 1.
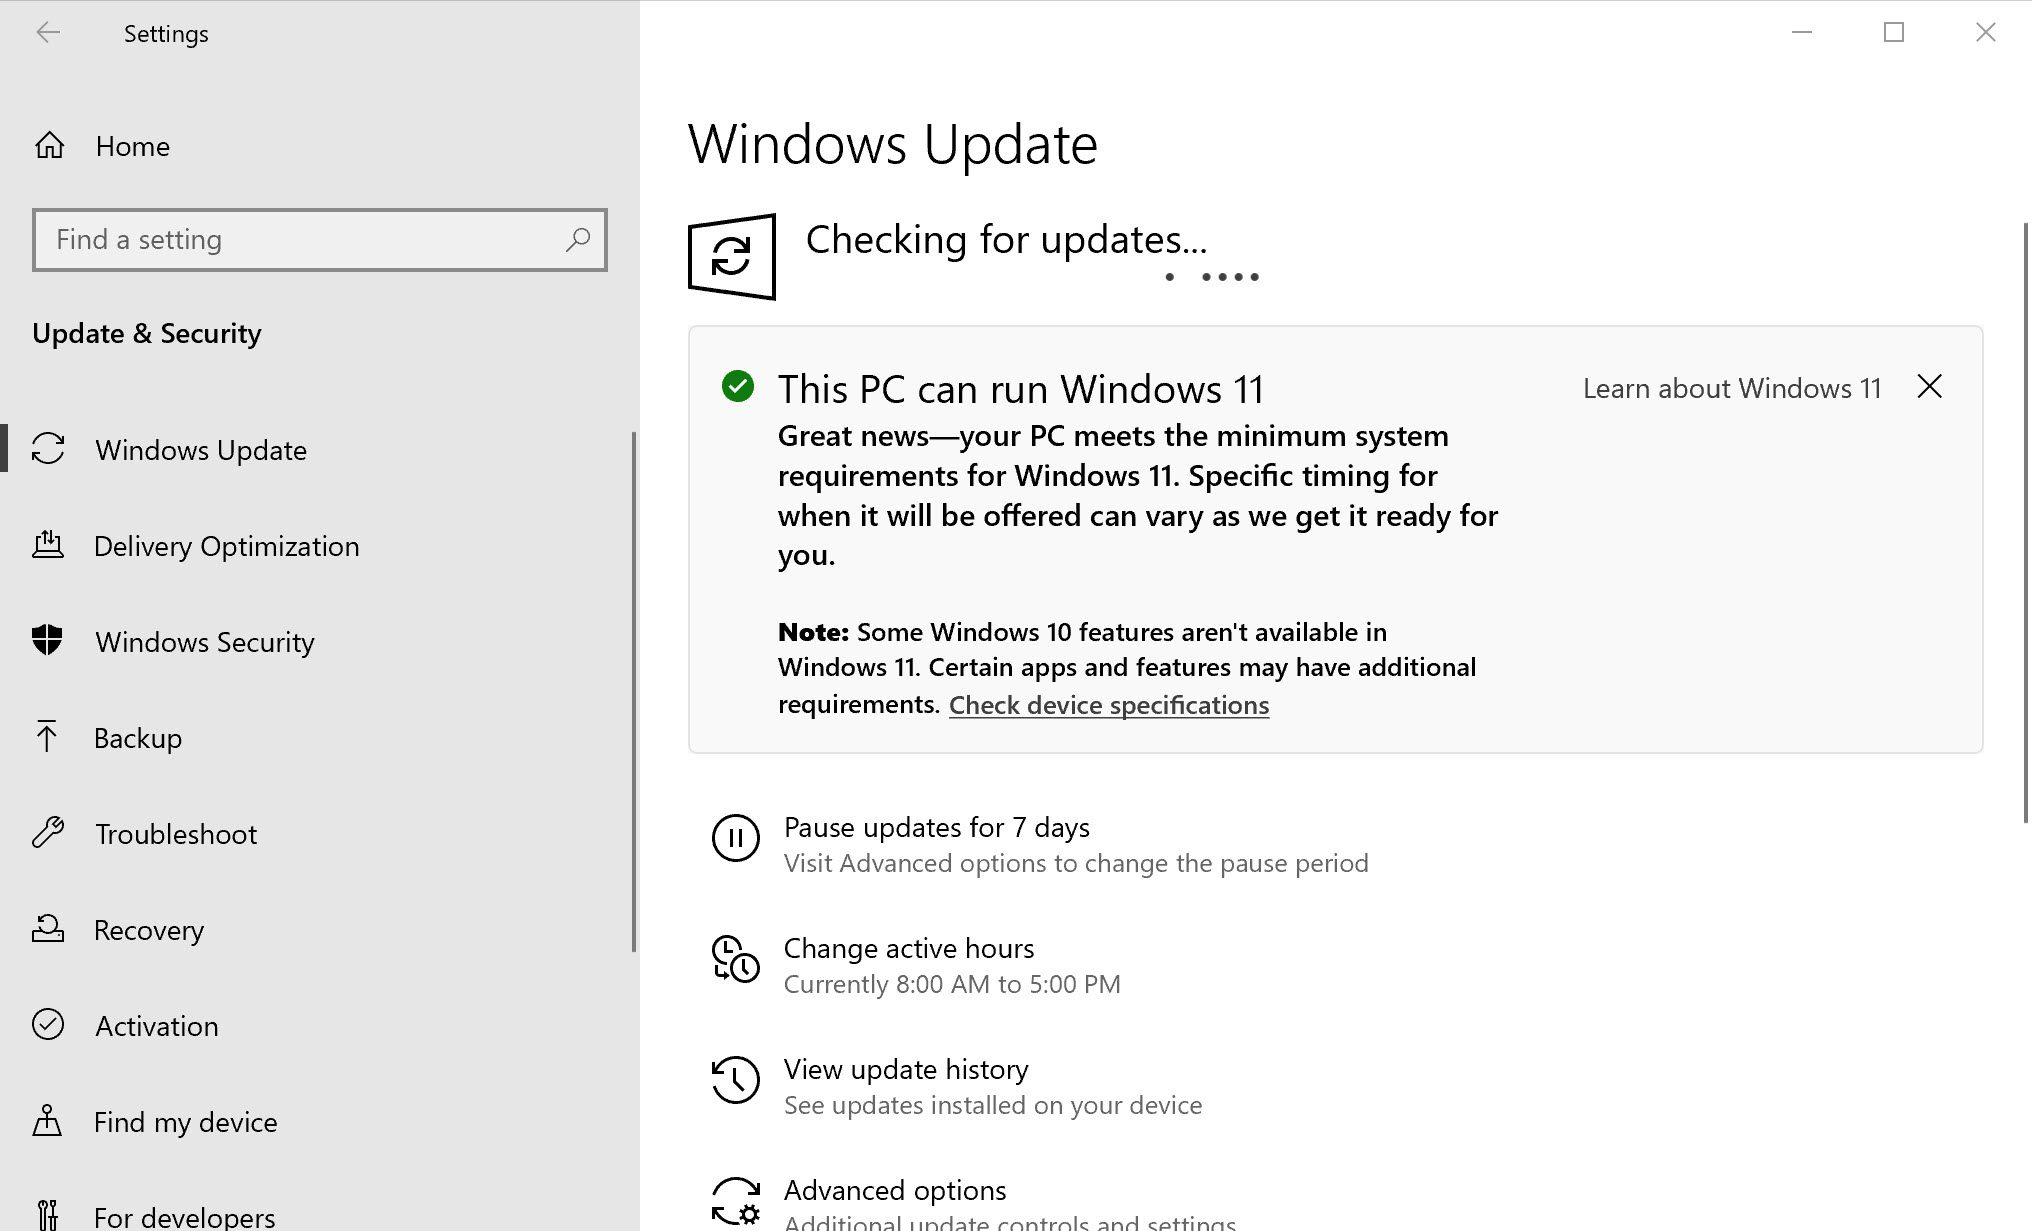
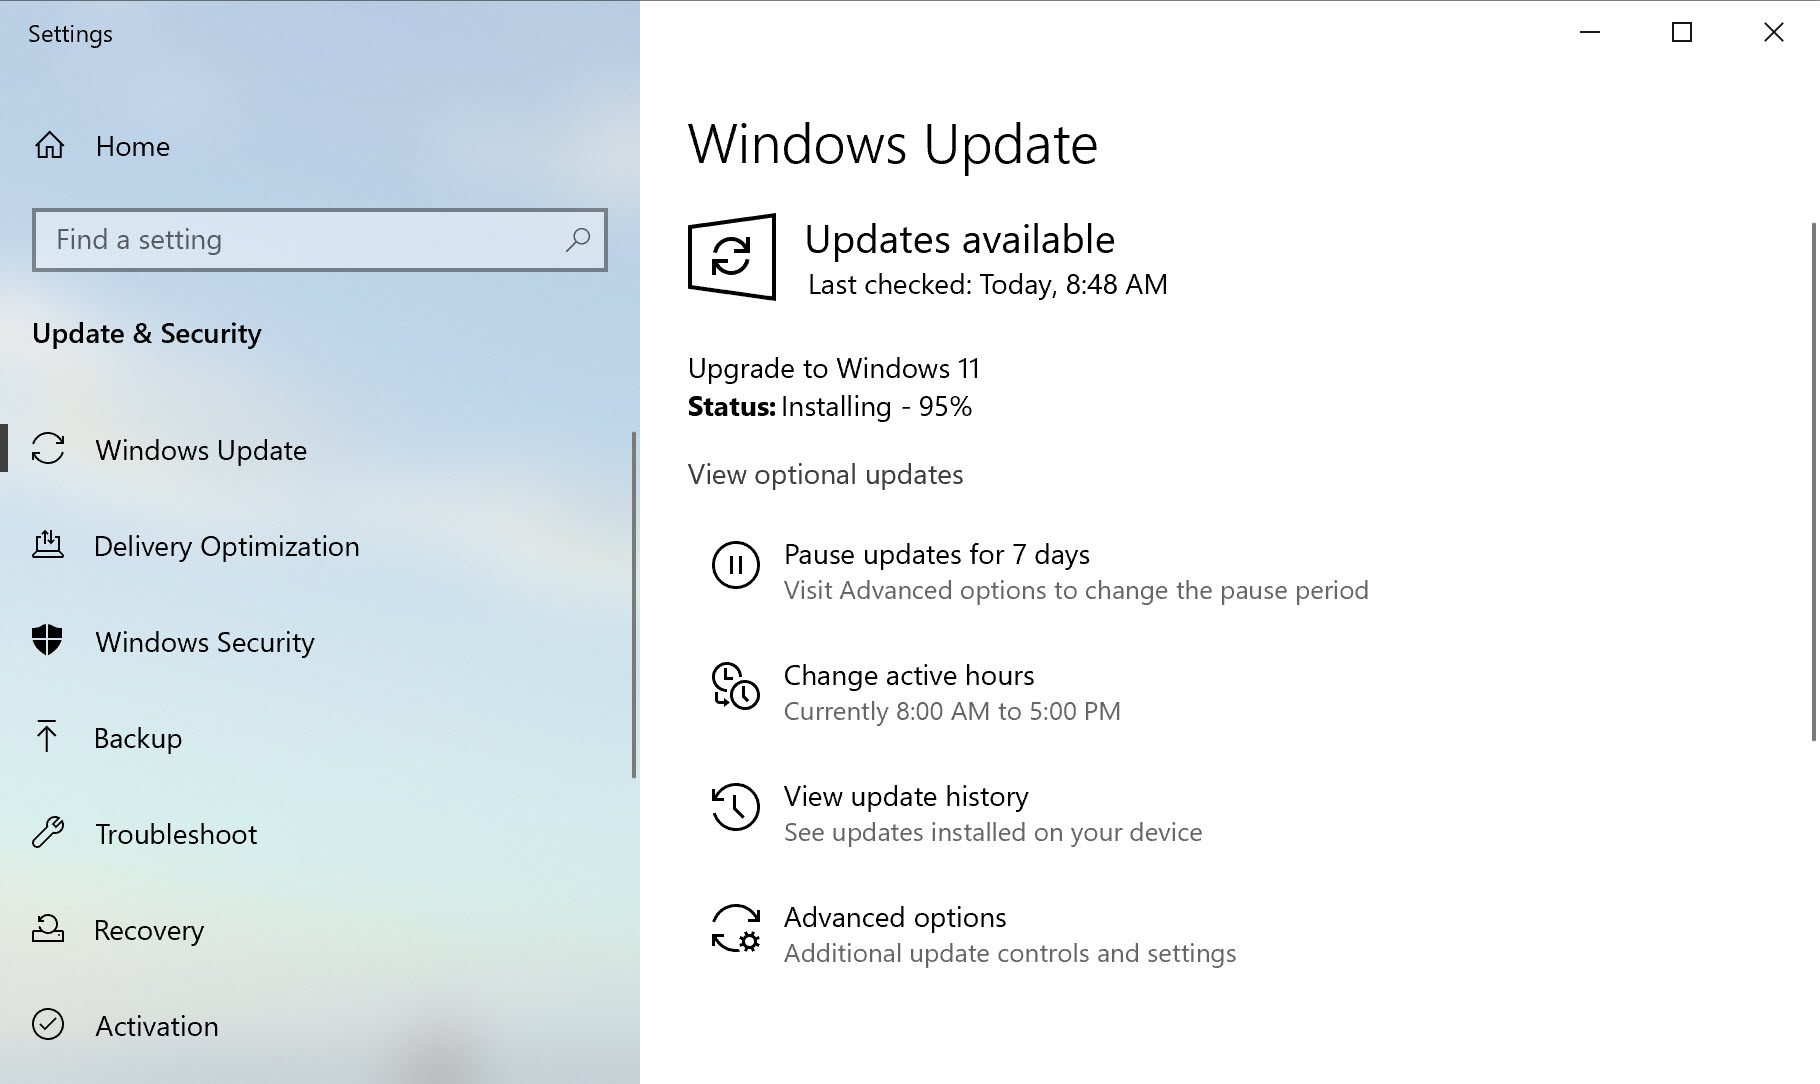
If your PC is not supported for running Windows 11, you can use PC Health Check to find out the specific causes. That doesn’t necessarily mean that you can’t install and run Windows 11. However, if you do, it will be an unsupported scenario. More details about how to install Windows 11 on unsupported hardware is presented in a later section of this article. If your system is supported, you can install Windows 11 when Microsoft makes it available to you. Microsoft uses a phased approach to provide the install for the update to Windows 11. The time it takes to see this installation prompt can vary considerably. It normally takes a couple of days but it can be longer. If you don’t want to wait, you can use the Windows Upgrade Assistant that is described in the following section. When Microsoft makes the Windows 11 upgrade available, the Windows 11 installation prompt that you can see in Figure 2 is displayed.

When you’re ready to actually perform the Windows 11 installation process, click the Download and install button. This will start the installation process. However, before it begins Windows Update first displays the Software License Terms dialog that you can see in Figure 3.

After accepting the license agreement by clicking the Accept and install button the download for the Windows 11 will start. The download can take a several minutes to an hour depending on your system and Internet connection. While the Windows 11 download is taking place, you’ll see a progress display like the one you can see in Figure 4.
The download and installation process will take some time. When it completes, you’ll be prompted to reboot the system to complete the Windows 11 installation procedure. You can see the reboot prompt in Figure 5.

In this example, the entire download and installation process went quite smoothly and took roughly an hour. All of the programs, files and system settings were preserved. If something goes wrong or you don’t like Windows 11, you have a period of 10 days where you can revert back to Windows 10. While the purpose behind this isn’t clear, there’s a warning that states if you wait longer than 10 days then you will need to perform a complete reinstall to move back to Windows 10, which would cause you to lose your programs and settings.
Overall, this was a very easy upgrade process. I’d like to say this is how most systems will get Windows 11 but with Microsoft’s fairly restrictive Windows 11 CPU and TPM requirements that won’t be the case for many. While Microsoft has stated that most PCs under four years old meet the requirements for Windows 11, it appears that the bar is actually much higher. Let’s look at a couple of other ways of installing Windows 11.
Install Windows 11 using the Installation Assistant
What if you’ve run the PC Health Check and determined that your PC is compatible with Windows 11 but you haven’t seen the update message and you haven’t been prompted to download and install Windows 11? That’s where the Windows 11 Installation Assistant comes into play. While Microsoft does not recommend this approach, you can use the Windows 11 Installation Assistant to jump start the Windows 11 installation process.
To get the Windows 11 Installation Assistant you need to go to the Windows 11 software download page that you can see in Figure 6.

The Windows 11 Installation Assistant is an app that you download to your Windows 10 computer and run. However, it’s important to note that you should only use it if you know that your PC meets the Windows 11 requirements. Otherwise, the Windows 11 Installation Assistant will fail and it will report that your PC doesn’t meet the minimum requirements.
You can download the Windows 11 Installation Assistant from the Download Windows 11 page. After downloading the WindowsInstallationAssistant.exe you can simply run it to begin the Windows 11 installation process. After successfully checking your system for compatibility, the Windows 11 Installation Assistant will display the license agreement that you can see in Figure 7.
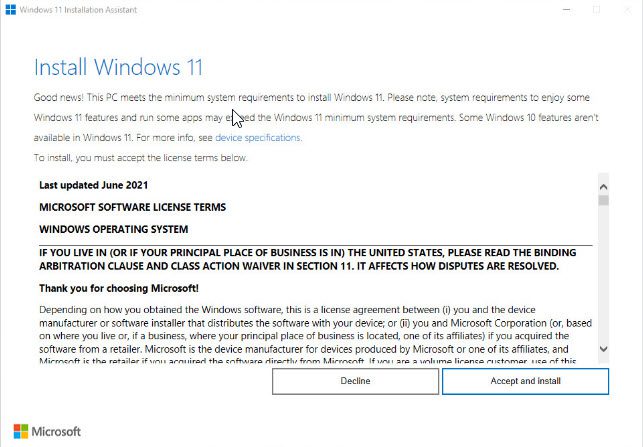
Click Accept and install to begin the download and installation process. Next, the Windows 11 Installation Assistant will display the Downloading dialog that you can see in Figure 8.

When the download and installation have completed, you’ll see the Your PC needs to restart to install Windows 11 dialog that you can see in Figure 9

Clicking the Restart now button will cause your PC to reboot to complete the Windows 11 installation. After your computer restarts the Windows 11 installation process is finished. Again, this is a very easy method of updating Windows 10 to Windows 11 and as long as your PC is compatible with Windows 11, you don’t have to wait for Microsoft’s official approval to get Windows 11 through the standard Windows Update process.
Install Windows 11 with the Windows 11 Media Creation Tool or the ISO download
Installing Windows 11 using the Windows 11 Media Creation Tool or the Windows 11 ISO is much more like the upgrade process that you would have followed for previous versions of Windows. Both of these methods essentially result in the creation of an installation program and files that you can run from bootable media in order to perform the Windows 11 installation.
The Windows 11 Media Creation Tool has the advantage of being able to automatically produce a bootable USB drive. Once you’ve booted from the Windows 11 media, the resulting installation process is essentially the same for both methods. Installing Windows 11 using either of these two methods gives you more options and control over the upgrade/installation process.
Install Windows 11 on unsupported systems
One of the main reasons to use the Windows 11 Media Creation Tool or the Windows 11 ISO is to install Windows 11 on unsupported hardware. Unfortunately, there are a lot of systems that don’t meet Microsoft’s hardware requirements for Windows 11. Plus, there are still a number of people who do custom system builds where the OS is not going to come preinstalled.
If you’re in either of these camps, then you will need to install Windows 11 using either the Windows 11 Media Creation Tool or the Windows 11 ISO. These methods can be used to update PCs that don’t meet Microsoft’s recommendation. A couple of very common problems is that either the system doesn’t support TPM 2.0 or the CPU is not supported. This can happen even with pretty new CPUs. In Figure 10 you can see where a reasonably new AMD Ryzen 5 PRO 2400G is not supported. You can find a list of supported CPUs at Windows Processor Requirements.

By using the Windows 11 Media Creation Tool or the Windows 11 ISO along with a registry hack from Microsoft, you can get around this problem and install Windows 11 on unsupported systems. However, like you might guess Microsoft advises not to install Windows 11 on a device that does not meet the minimum requirements.
That said, Windows 11 will actually run fine on most systems that run Windows 10 but Microsoft has stated that unsupported Windows 11 devices may not receive important security updates, which makes sense because the TPM chip and some of the modern processor features that are required by Windows 11 are security related. In order to successfully perform a Windows 11 upgrade an unsupported Windows 10 installation, Microsoft has provided a registry hack that will allow the Windows 11 upgrade to proceed even if the hardware is not supported.
You need to use Regedit and add the following registry key before performing the Windows 11 installation. Registry Key: HKEY_LOCAL_MACHINESYSTEMSetupMoSetup Name: AllowUpgradesWithUnsupportedTPMOrCPU Type: REG_DWORD Value: 1
If you choose to install Windows 11 on a device that does not meet these requirements, you should refer to Installing Windows 11 on devices that don’t meet minimum system requirements to ensure you understand the risks of running in this environment. It’s worth noting that if you do this and experience problems, you still have 10 days to roll back to your previous windows 10 installation.
Creating Windows 11 installation media
To get the Windows 11 Media Creation Tool or the Windows 11 ISO go the Windows 11 Software Download page that was previously shown in Figure 6. To use the Windows 11 ISO file, you essentially just download the ISO file and then mount it or burn it to bootable media and then run the setup.exe file. The Windows 11 Media Creation Tool can be used to create an ISO file or a bootable USB drive.
The USB option is a slightly handier, so let’s take a closer look at creating and using a USB drive to install Windows 11. If you refer back to Figure 6, you can see the Download Now button under the Create Windows 11 Media section. Clicking the button will download the MediaCreationToolW11.exe program. After the download is complete you can immediately run the Windows 11 Media Creation Tool and it will initially display the Applicable notices and license terms dialog that you can see in Figure 11.

Clicking Accept displays the Select language and edition dialog that you can see in Figure 12.

Like you might guess, this dialog allows you to choose your installation language and the edition of Windows 11. However, the only edition option that you can choose is Windows 11. You can also check Use the recommended options for this PC. For previous releases, this dialog controlled whether you got the 32-bit or 64-bit editions. However, in this release it doesn’t appear to actually do anything. Clicking Next displays the Choose which media to use dialog that you can see in Figure 13.

The Windows 11 Media Creation Tool can generate either a bootable USB drive or an ISO file. This ISO file is exactly the same as the one you can download from the link on the Download Windows 11 page that was shown in Figure 6. Using the USB drive option tends to be a bit more portable and convenient but the best option depends on your own installation plans. In Figure 13 you can see the USB flash drive option is selected. At this point you should insert a USB dive that has a capacity of at least 8GB. Clicking Next will display the Select a USB flash drive dialog that you can see in Figure 14.

This dialog will display any USB drives that you have connected to the system that’s running the Windows 11 Media Creation Tool. The drive needs to be at least 8 GB and all of the data on the drive will be erased – replaced with the Windows 11 installation files. Clicking Next will begin the process of preparing the USB drive and the Downloading Windows 11 dialog that you can see in Figure 15 will be displayed.

The Downloading Windows 11 dialog is displayed for a few minutes while the Windows 11 media is downloaded to the USB drive that you selected. When the download has completed and the USB drive is populated, you’ll see the Your USB flash drive is ready dialog that is shown in Figure 16.

Clicking Finish will cause the tool to clean up some temporary files and then the drive is ready to be used to install Windows 11.
Beginning the installation process with Windows 11 media
If you’re upgrading an existing Windows 10 system, you can begin the installation by running the setup.exe program that’s on the installation media. If you’re making a new install, then you can simply boot your system with using the bootable media – either the USB drive, a DVD disk that you burned from the ISO file, or a mounted ISO file for a VM. The first screen of the install process, Install Windows 11, is shown in Figure 17.

Clicking Next on the Install Windows 11 dialog will begin the installation process. By default, the installation process will connect to the Internet to retrieve any necessary updates and fixes. While this is happening, you’ll briefly see the Getting updates dialog that’s shown in Figure 18.

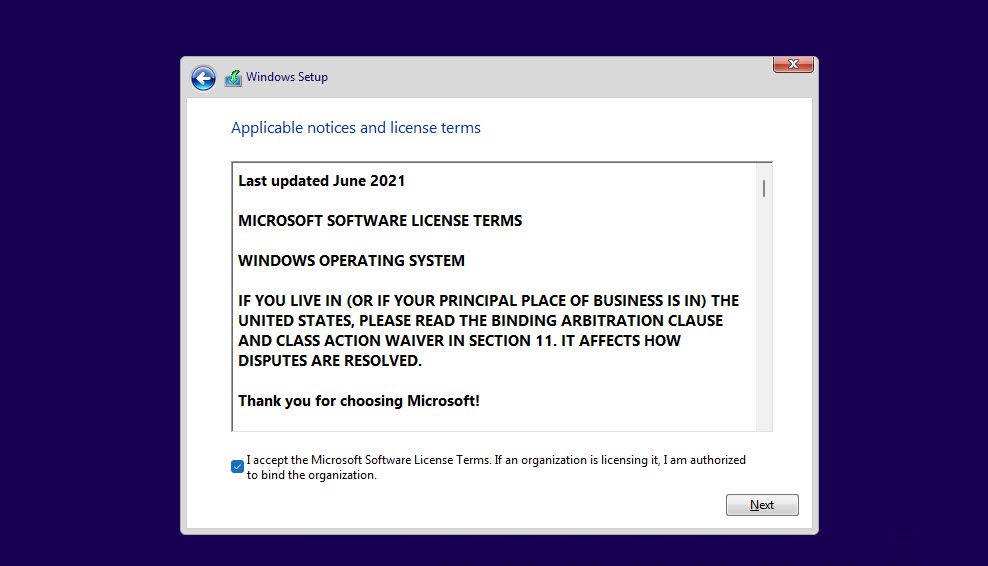
The Getting Updates dialog is informational and you don’t need to do anything while it is displayed. After the updates have been downloaded, then you need to accept the license agreement using the Applicable notices and license terms dialog that you can see in Figure 19.

Clicking Next will accept the Windows 11 license agreement and will display a second Getting updates dialog.

Here again there’s nothing you need to do. When the updates are complete, the Ready to install dialog that you can see in Figure 21 will be displayed.

Responding to this dialog will cause Windows 11 to install from the USB media. By default, the installation will perform a Windows 11 upgrade for your current system – keeping all of your files and applications. That is typically what you want and if you want to proceed with the upgrade, just click the Install button. However, you also have the option to perform a clean install deleting all of the existing programs and files. To change the installation option, click the Change what to keep link that you can see in Figure 21. This will display the Choose what to keep dialog that you can see in Figure 22.

By default, the Keep personal files and apps option is selected, which will essentially result in a Windows 11 upgrade on your existing installation of Windows. And in the process keeping all of your settings, files and programs. The Keep personal files only option will install a new instance of Windows 11 and the old instance of Windows 10 and its programs will be deleted. However, your files will remain untouched. The Nothing option will clear the volume that Windows 11 will be installed on and none of the existing Windows installation programs or files will remain.
Clicking either Install on the previous screen shown in Figure 21 or Next on the screen shown in Figure 22 will begin the installation process. The system will reboot and the Installing Windows 11 screen that you can see in Figure 23 will be displayed.
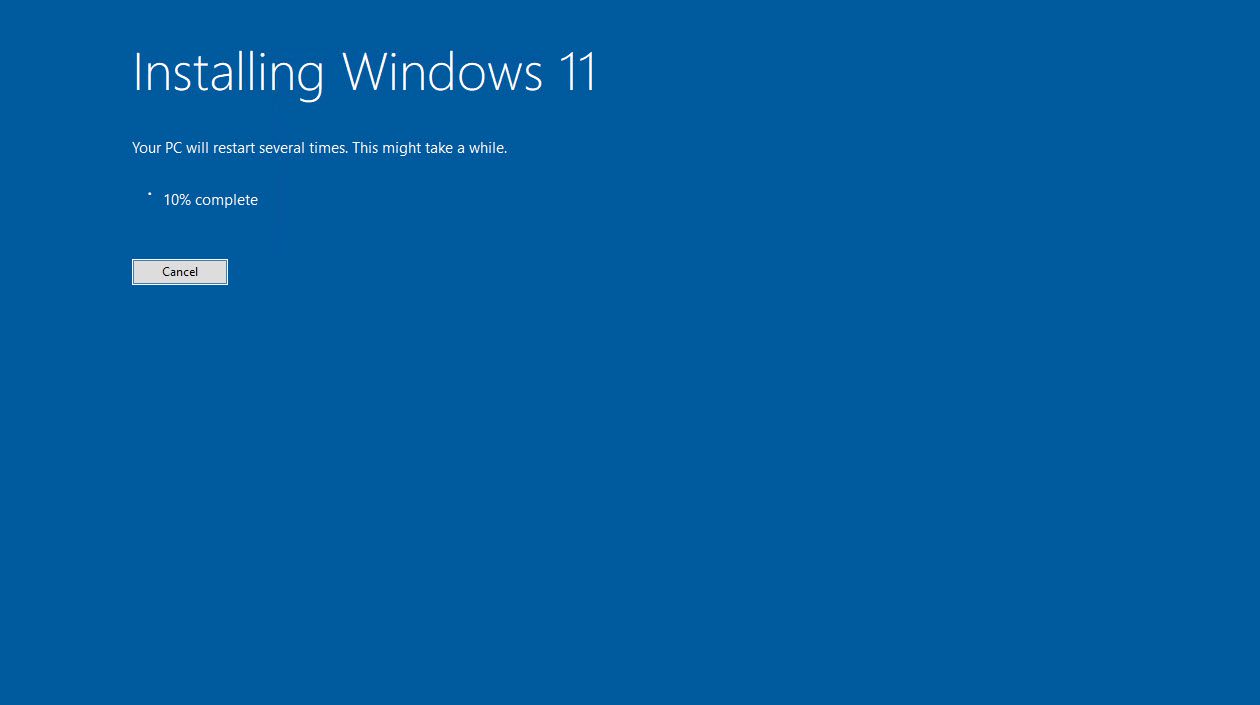
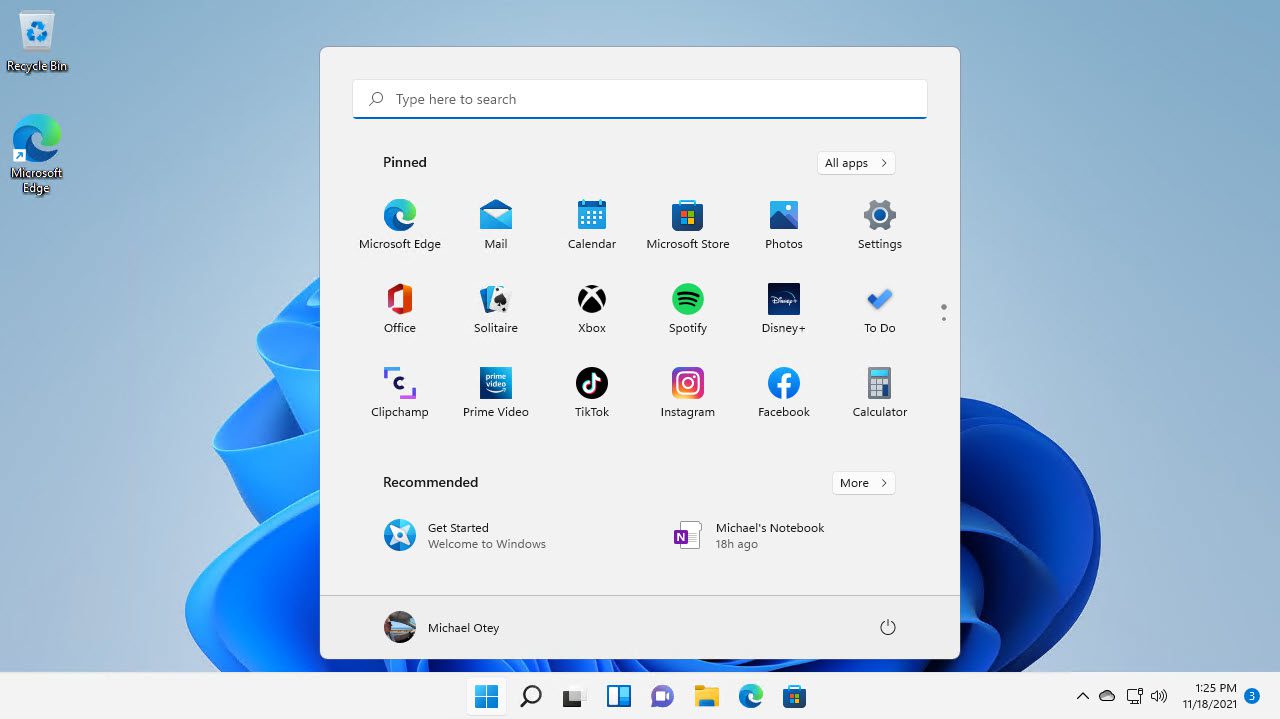
The Installing Windows 11 screen will be displayed for some time while the installation proceeds. A percentage meter shows the ongoing progress of the installation. You do not need to perform any actions while this is taking place. The Cancel button allows you to terminate the installation if you don’t want to continue. When the installation is complete, Windows 11 will have been installed, the system will reboot, and you’ll see the Windows 11 desktop like you can see in Figure 24.
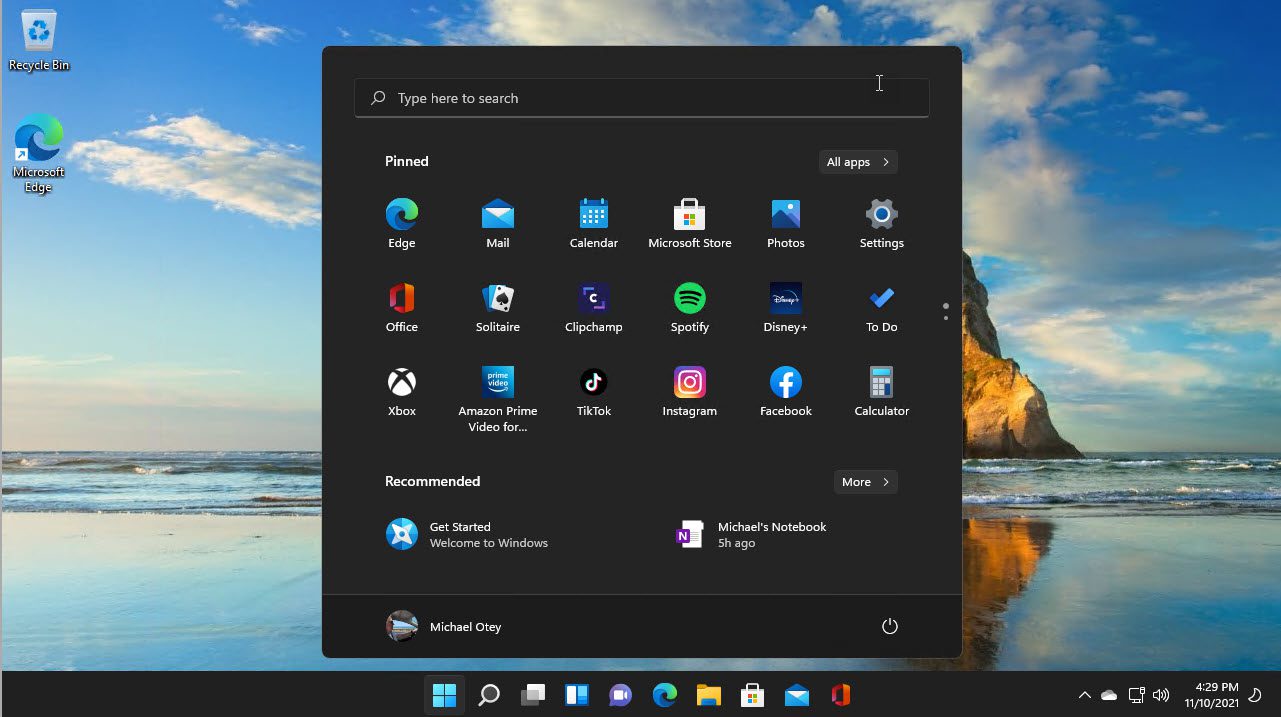
If you have selected the default installation options, all of your old programs and files will be present and you will be running a new copy of Windows 11. If you find you don’t like Windows 11 or there are problems running it, you have 10 days to roll back to the previous Windows 10 installation by selecting Settings>System>Recovery and choosing Go Back.
Performing a clean install for a new Windows 11 instance
In the first part of this article, you learned about the different ways that you can install Windows 11 to update your existing Windows 10 system. However, what if you want to install Windows 11 on a new physical system or a virtual machine (VM) that doesn’t have an existing OS? In that case, you’ll need to start off with a system or VM that meets the Windows 11 system requirements that were listed earlier in this article.
Preparing a VM for Windows 11 installation
If you’re going to install Windows 11 to a VM, there are a few VM settings that you need to check before you boot the VM from the installation media or ISO file. The key requirements are:
- For Hyper-V – Generation 2 VM
- UEFI BIOS with Secure Boot
- 2 vCPUs – minimum
- 60 GB minimum of virtual disk storage
- Enable Secure Boot
- Enable Trusted Platform Module (TPM)
Booting a new Windows 11 installation
You can start the clean installation process by booting the system using bootable media like a DVD or USB drive. Either of these can be created using the Windows Media Creation Tool that was discussed earlier. You can also boot a VM by mounting the Windows 11 ISO file. When the system first boots up you’ll see a screen like the one shown in Figure 25.

The first screen that’s displayed during the initial Windows 11 media boot process allows you to select the language, time and currency formats, and type of keyboard that you want Windows 11 to use. After selecting your choices from the dropdown boxes, click Next to proceed with the installation process and display the Install now screen that you can see in Figure 26.

Clicking Install now will begin the Windows 11 installation process. You should note that if you need to repair your Windows 11 installation at some point in the future, you can boot from media and then select the Repair your computer link. After clicking Install now the Activate Windows dialog that you can see in Figure 27 will be displayed.
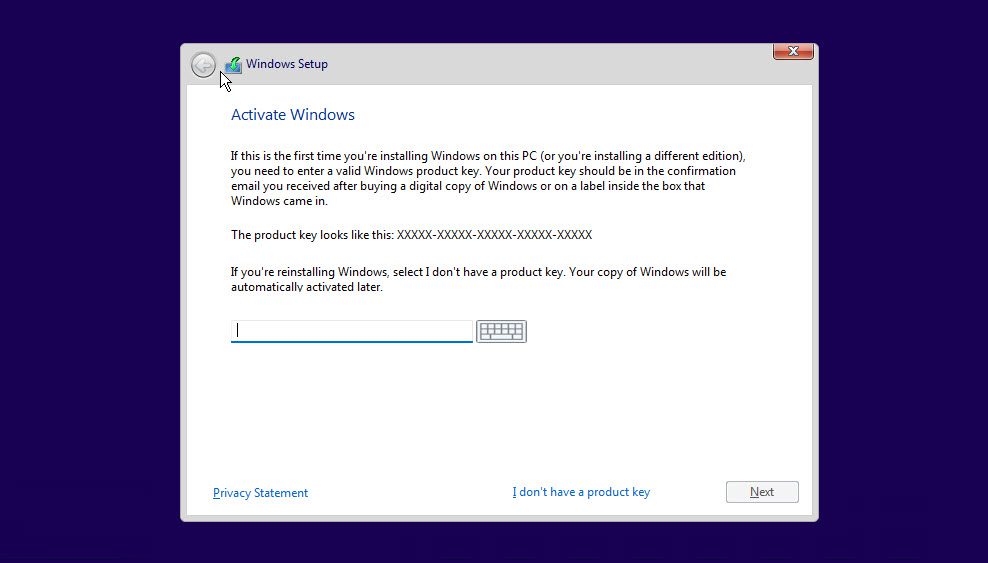
The initial installation of Windows needs to be activated by entering a product key. If you’ve purchased Windows 11 from a retain outlet, you can find the product key as part of the Windows 11 packaging or download that you received. It’s important to note that you don’t necessarily need to have the product key at this point. You can complete the installation and even use Windows 11 without activating it. However, that is not in compliance with the license agreement and there will be limitations with the installation.
For instance, if you don’t activate Windows 11 an Activate Windows watermark will be visible in the bottom-right corner of your screen as well as in Windows Settings. In addition, you cannot change any Personalization settings like wallpaper, theme, title color, Start Menu color and more. If you have the product key, go ahead and enter it and click Next. If you don’t have a product key handy, you can always enter one later by clicking the I don’t have a product key link. The next screen to be displayed is the Select the operating system you want to install that you can see in Figure 28.
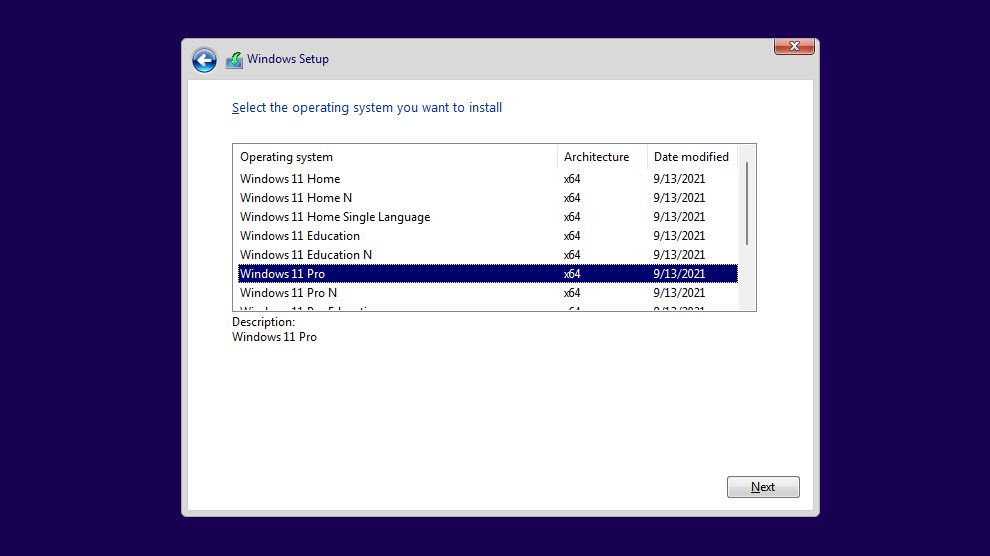
The Select the operating system you want to install dialog allow you to choose the edition of Windows 11 that you are installing. All of the different editions are on the same media. The most common selection would be either Windows 11 Pro or Windows 11 Home. Select the edition of Windows 11 that you want to install and then click Next to display the license terms.
Clicking Next on the Applicable notices and license terms dialog displays the Windows Setup screen that you can see in Figure 30.
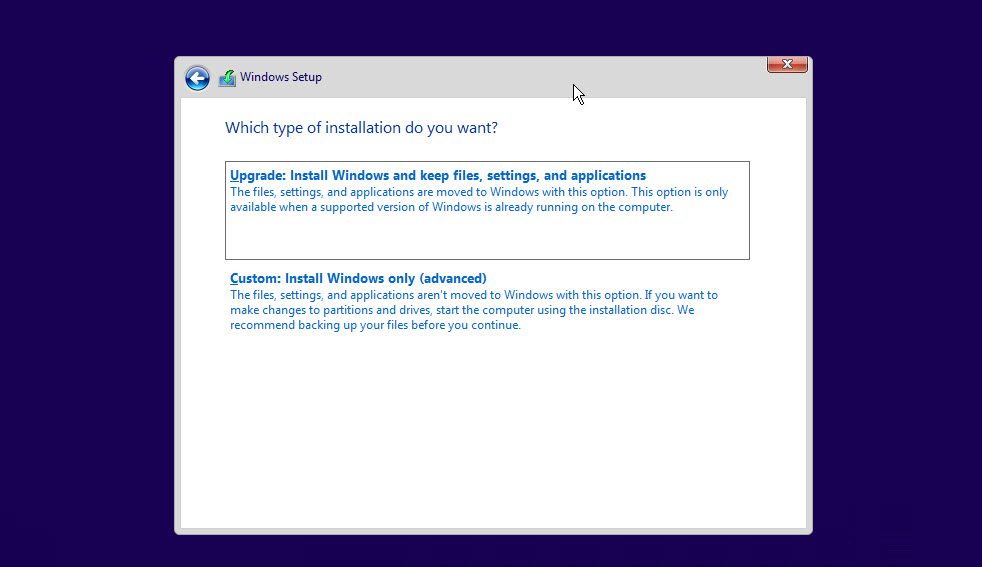
This Windows Setup screen controls whether you will be performing an in-place upgrade or a new clean install. To perform a new install on a bare metal computer or to a new VM, select the option Custom: Install Windows only (advanced). This will display the Windows Setup screen that you can see in Figure 31.
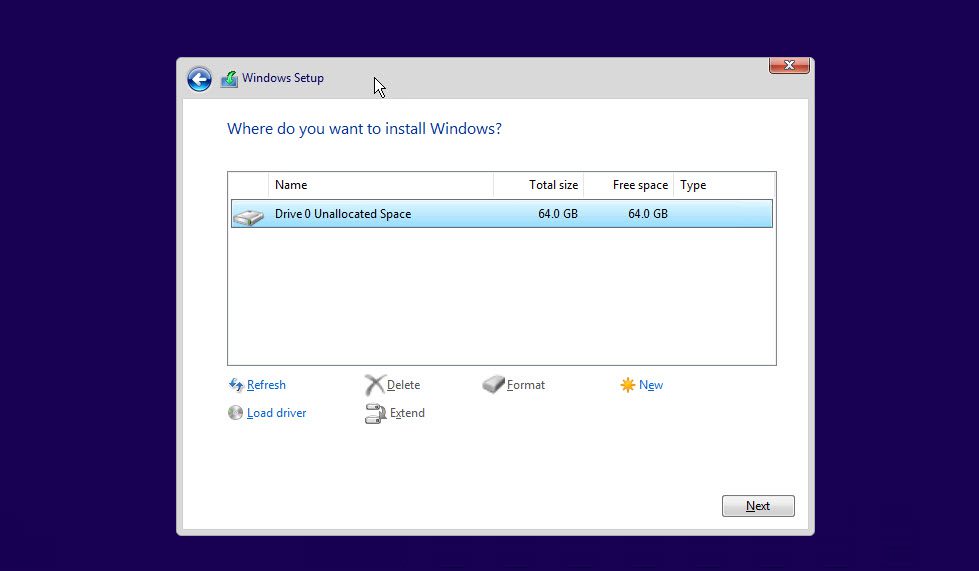
This Windows Setup screen allows you to select the drive where you want to install Windows 11. In Figure 31, you can see that there is only one 60 GB drive. If the system you’re installing to has multiple drives that are available, they would all be listed here and you would need to select the drive you want to use for the Windows 11 installation.
In most cases, Windows will be able to automatically sense the available drives. However, in the case of some specialized drives like those using RAID configurations you may need to select the Load driver link to load a device driver that will allow Windows to see the drive. You also have the option to Delete or Format the drive as well as to Extend a drive’s partition. For most single drive systems, you simply select the available drive (which is typically Drive 0) and then click Next to continue the installation.

The Installing Windows screen is displayed while Windows 11 is being installed on the drive that you selected. This process can take several minutes and the display provides updates as to the status of the installation process. You don’t need to select anything on this screen. When Windows 11 has been installed on the drive the system will reboot and Windows 11 will display the initial Windows 11 setup screen that you can see below in Figure 33.

The Is this the right country or region? screen is the first display shown on Windows 11 initial boot up. This screen allows you to select your geographical region. As you can see in Figure 33, I selected United States. Clicking Yes displays the next Windows 11 setup screen that you can see in Figure 34.

The screen shown in Figure 34 allows you to select your keyboard layout. US is at the top of the list. If you want a different keyboard layout, scroll through the list until you see the layout you want. Select the appropriate keyboard layout and then click Yes.

The next screen asks if you want to add a second keyboard layout. If you do want a second keyboard layout, click the Add layout link that you can see at the bottom of the screen. In most cases you won’t need a second keyboard layout so you can click the Skip button to proceed with the initial Windows 11 setup.

The Let’s name your device screen allows you to optionally create a custom system name for your new Windows 11 system. If you want to create a custom name, enter the name you want in the input box in the middle of the screen following the naming rules that are posted on the screen and then click Next. However, this step is optional. If you don’t care about creating a custom name, you can click the Skip for now link at the bottom of the screen and Windows will automatically generate a name for the system. The next screen in the initial setup process that you can see in Figure 37 asks about customizing your Windows 11 experience.

The How would you like to setup this device screen enables you to choose what type of experience you will have with Windows 11. Essentially, the Set up for personal use option gives you control over the installation while the Set up for work or school option creates an instance that is centrally authenticated and controlled by Active Directory (AD) and Group Policy. Like you might expect, Windows 11 Home does not provide this option.
After you select the type of experience that you want, clicking Next displays the account screen shown in Figure 38.

Next, you need to sign in using either your Microsoft account or your AD login. In this case, I previously selected the personal use option so setup prompted me for a Microsoft account. The Microsoft account can enable you to share settings between different devices. If you don’t have a Microsoft account, you can create one by clicking the Create one! link. There is no cost or charges associated with creating a Microsoft account.
First, provide the user ID for your Microsoft account and then click Next to display the Let’s add your Microsoft account screen that you can see in Figure 39.

This screen enables you to enter the password for your Microsoft account and then click Sign in. After you’ve signed on to your Microsoft account, you’ll be prompted to create a PIN like you can see in Figure 40.

The screen you can see in Figure 40 enables you to create a PIN for your Windows 11 login. Using a PIN can provide a faster and easier login experience. While you can include letters and symbols it’s typically best to make a four-digit PIN using just numbers. Enter the PIN you want to use and then validate the PIN by entering it again and then click OK to proceed with the initial Windows 11 setup.

If you use the same Microsoft account associated with other Windows installations, you can optionally select to restore your desktop settings and preferences from a previous Windows installation. If you do not want to do that and instead would rather set this system up as a completely new device, then select Set up as new device and then click Next to choose the privacy settings for your new device.
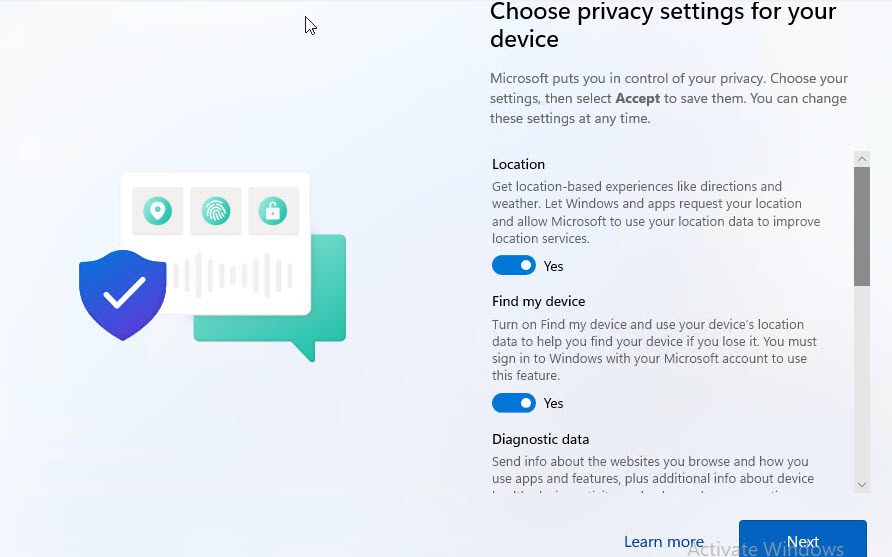
In total there are three different Windows 11 privacy screens that you can work with. You can change any of the settings on each screen or simply accept the defaults by clicking Next, Next, and then Accept. The next Windows 11 setup screen will be the Let’s customize your experience screen that you can see in Figure 43.

This screen allows you to customize the way Windows 11 will present its Start menu and desktop. You can select any, all, or none of the options shown on this screen. No matter what you select you can always manually customize the desktop later on. To select any of the items shown here simply check the boxes on the right side of the screen. If you’re unsure or you don’t want any of them at this time, click the Skip link at the bottom of the screen.

Next, the Windows 11 setup process asks if you want to back up your files to OneDrive. OneDrive is Microsoft’s cloud storage option and selecting this link will save your Desktop, Documents, and Pictures folders to OneDrive. If you want to use the OneDrive backup option, click Next. If you don’t want to do this or if you’re using another backup or cloud storage option, then you can go ahead and select the Only save files to this PC link. This will display the Office 365 trial screen that you can see in Figure 45.

The Try premium Office apps for free with Microsoft 365 is the final screen in the initial Windows 11 setup process. If you already have a Microsoft 365 subscription, you can click the I have a product key link and your licensed version will be installed. If you want the 30-day free trial, you can click the Try for free button. If you don’t want the trial or you’re using an on-premise version of Office or an Office alternative, then you can click the No, thanks link. This will complete the initial setup process and the next screen that you will see will be the Windows 11 desktop like you can see in figure 46.
Summary
Windows 11 has more installation options than any previous version of Windows. If you’re lucky enough to have a compatible Windows 10 system then the Windows 11 upgrade process is as easy as applying an update. Even if your system is not supported, you can still upgrade but the path is more difficult and it will leave you with an unsupported system. In this article, you’ve seen all the different ways that you can install Windows 10, both as an upgrade to an existing Windows 10 installation as well as for a new PC or VM.
Related Article:
FAQ
Can I install Windows 11 on multiple computers with the same license key?
When learning how to install Windows 11, it’s important to note that a retail license can be transferred between computers, while OEM licenses are tied to the original hardware. You’ll need to purchase separate licenses for multiple simultaneous installations.
What happens if I interrupt the Windows 11 installation process?
If the process of how to install Windows 11 is interrupted, the system has built-in recovery mechanisms. However, it’s crucial to ensure stable power and internet connection during installation to prevent potential data loss or system corruption.
Can I install Windows 11 without formatting my hard drive?
Yes, when learning how to install Windows 11, you can perform an in-place upgrade that preserves your files and applications. However, it’s recommended to backup your data before proceeding with any installation method.
Is it possible to install Windows 11 without an internet connection?
While learning how to install Windows 11, you should know that offline installation is possible using the Media Creation Tool or ISO file. However, you’ll miss important updates and drivers that are normally downloaded during online installation.
What should I do if Windows 11 installation fails repeatedly?
If you’re having trouble with how to install Windows 11, try running the Windows Update Troubleshooter, clearing the Windows Update cache, or using the Media Creation Tool instead of Windows Update. You may also need to update your BIOS and drivers before attempting installation again.

Michael Otey is president of TECA, a technical content production, consulting and software development company in Portland, Ore. Michael is a former SQL Server MVP and was Senior Technical Director for Windows IT Pro and SQL Server Pro. He covers the...