How to Customize the Windows 11 Start Menu and Taskbar
While there are some limitations, there’s a lot that you can do to make the Windows 11 Start menu and taskbar more like Windows 10, but you can also personalize them in other ways. Let’s take a closer look at some of the ways you can configure the Windows 11 Start menu and taskbar to be more to your liking.
If you’ve been a long-time Windows 10 user (and who isn’t?), the first things that you’ll notice on Windows 11 are, without a doubt, the changed Start menu and taskbar. In what seems to be a fairly blatant attempt to copy the Mac, Microsoft has moved the Start menu from the left bottom of the screen to the center of the bottom of the screen. In addition, the taskbar, which was previously moveable, is now glued to the bottom of the screen.
While some people may like these changes, I think it’s fair to say that there are quite a number of people that don’t. What you might not realize is the fact that the new Windows 11 Start menu and taskbar can be customized in many ways.
How to customize the Windows 11 Taskbar
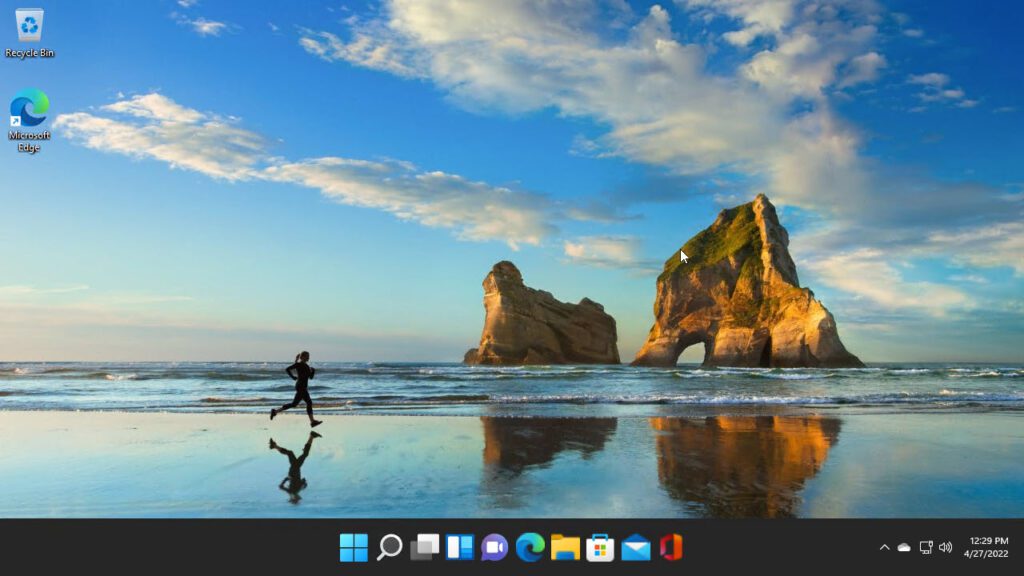
The taskbar is typically used as a quick launchpad, and it also lets Windows users keep track of all the apps that are currently running. You can see how the new Windows 11 default taskbar looks below.
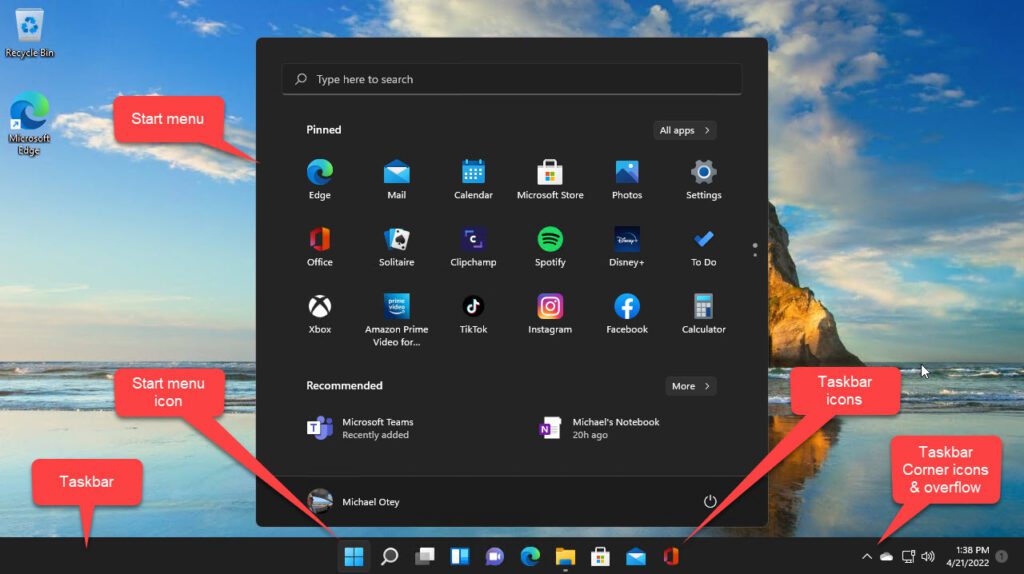
Before we start, it’s important to emphasize that the new taskbar is more limited than the Windows 10 taskbar, which was moveable and resizable. The new Windows 11 taskbar is not moveable, and there’s nothing you can do about it for now. However, there are many things that you can still customize.
In Figure 1, you can see the taskbar icons and the Start Menu are centered by default. One of the first things you might want to do is to move the Start menu back to the left corner of the taskbar.
After long-term usage, you can come to expect to find your apps in a specific place, and having to look for them elsewhere can be a waste of time. This is what you could call muscle memory
There are a couple of important advantages to having the Start Menu on the left corner as well. If you have a lot of items on your taskbar and you tend to use it as a shortcut for launching different apps, then you can run out of room pretty quickly if the icons are all centered.
Here’s how to move the Start menu to the left corner of your screen:
- Do a right-click on the taskbar and select Taskbar settings
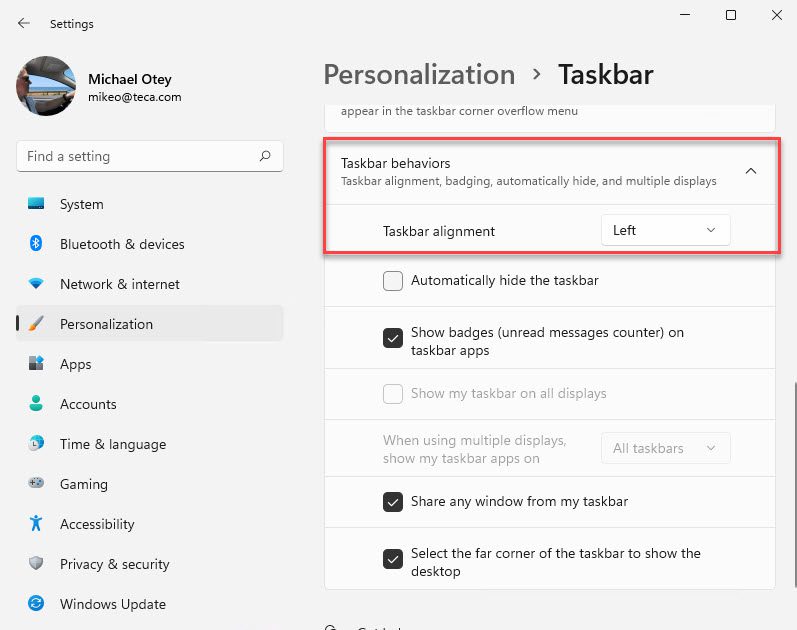
- In the Settings app, scroll down to the Taskbar behaviors section.
- Use the Taskbar alignment dropdown and select Center to Left, as you can see in the image below.
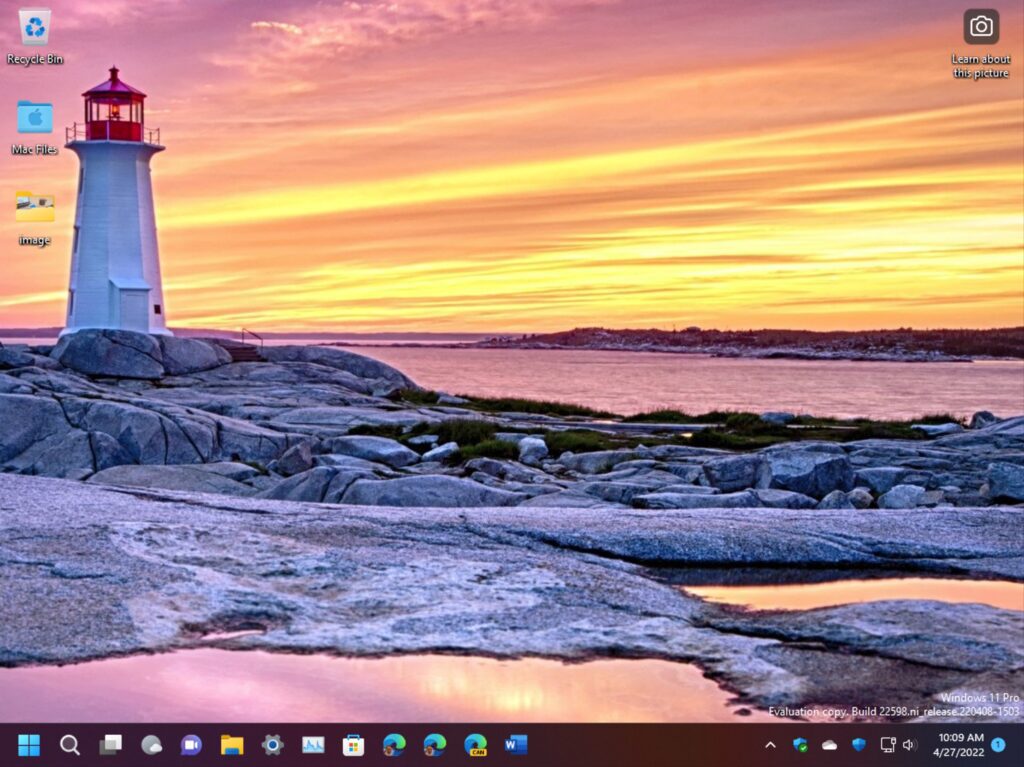
After closing the Settings window, the Start menu and app icons in the taskbar will move to the left, as seen below. Now, that looks much more familiar!
How to automatically hide the taskbar
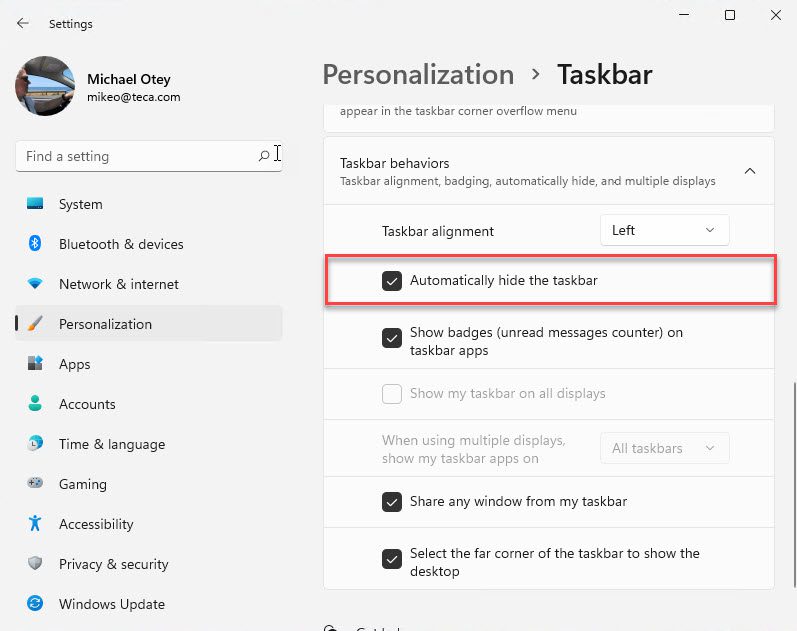
Just like on Windows 10, the Windows 11 taskbar can also be made to disappear when it’s not used. It will automatically reappear when you hover the mouse in the lower section of the screen where the taskbar is normally displayed.
Here’s how to make the Windows 11 taskbar automatically disappear:
- Right-click on the taskbar and select Taskbar settings.
- Scroll down to the Taskbar behaviors section, and check the Automatically hide the taskbar box as seen below.
How to customize which items show on the Taskbar
You can also control and customize which items are on the Windows 11 taskbar as well as how the taskbar displays the taskbar corner icons, just like on Windows 10.
How to pin apps to the taskbar for quick access
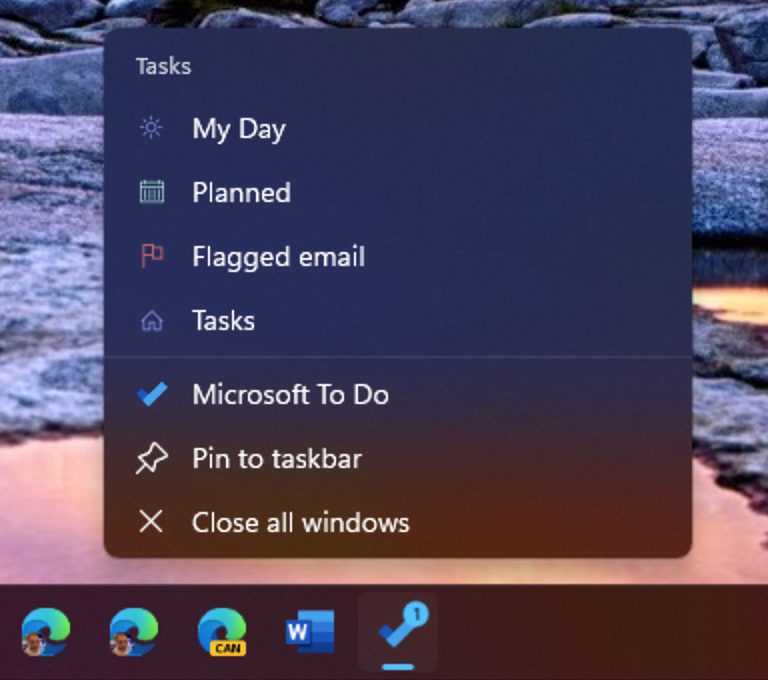
If an app is running then the icon for that app will be displayed in the taskbar and there will be a line underneath it indicating that the app is active. If you want that app’s icon to remain in the taskbar even after you’ve closed it, right-click on the icon and select Pin to taskbar.
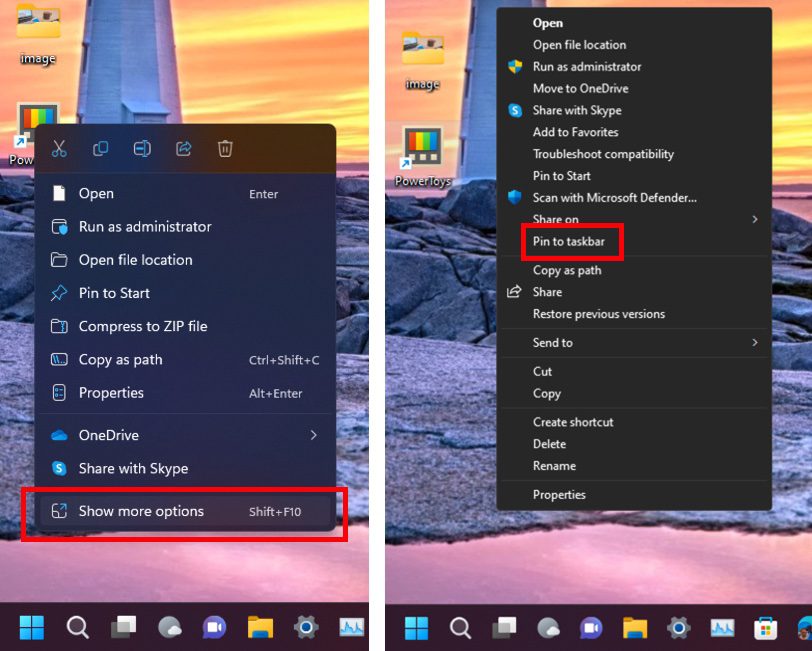
For an app that already has a desktop shortcut, you can pin it to the Taskbar by right-clicking on the desktop icon, then selecting Show more options from the context menu. This will display an expanded context menu where you can select Pin to taskbar.
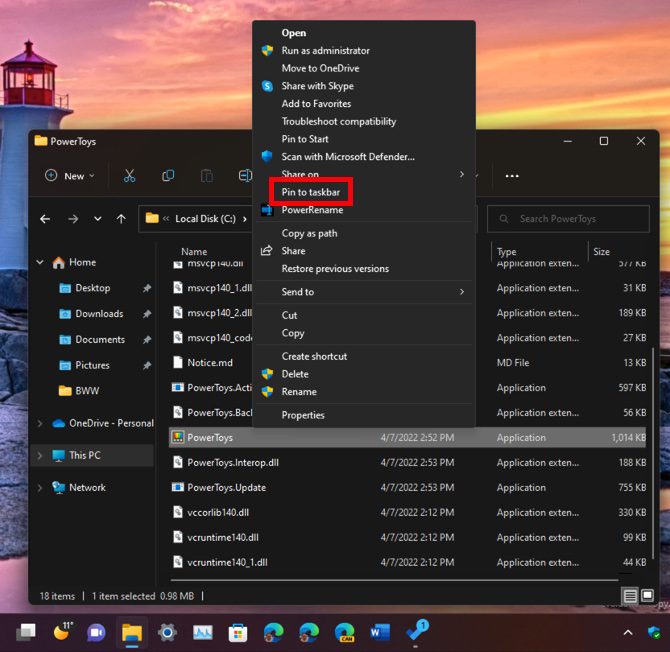
In File Explorer, you can also pin any .exe files to the taskbar by following the same procedure. Right-click on the .exe file that you want to pin, then select Show more options from the context menu, and select Pin to taskbar from the expanded context menu.
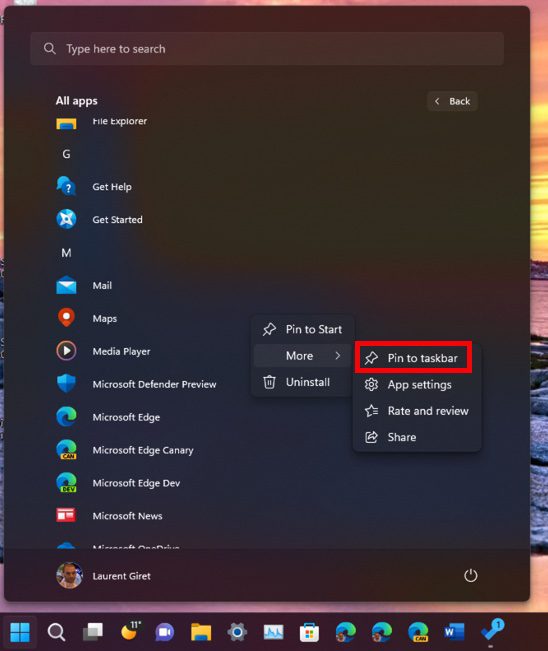
You can also pin all apps that appear in the Windows 11 Start Menu to the taskbar. Here’s how to do it:
- Open the Start menu and click the All apps button
- From the full list of apps, you can right-click on the app you want to add to the taskbar and move the mouse pointer over More from the context menu
- This will display an expanded context menu where you can click on the Pin to taskbar option.
How to remove apps from the taskbar
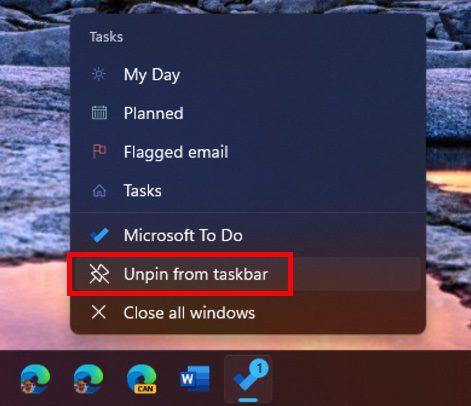
If you want to remove apps from the taskbar, right-click on the taskbar icon and select Unpin from taskbar. This works for most apps.
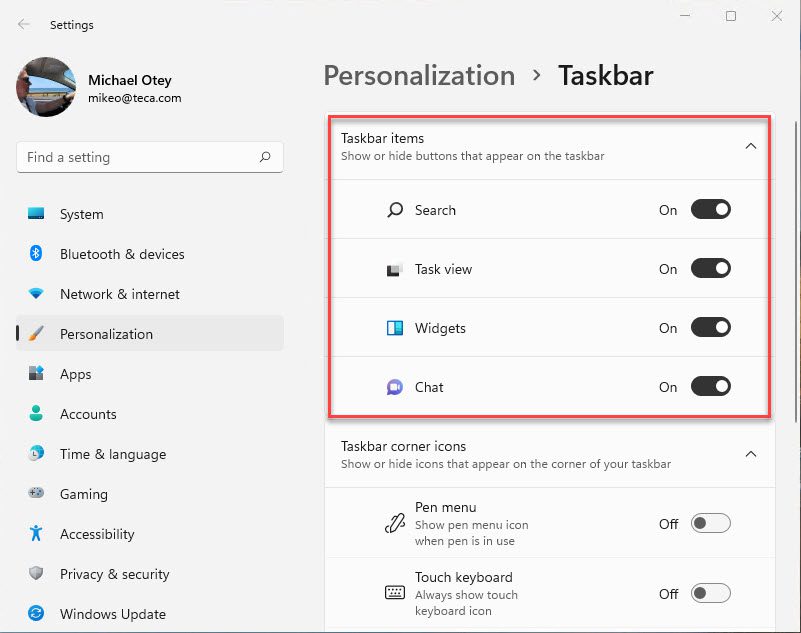
The Search, Task view, Widgets, and Chat icons can all be toggled on or off. Here’s how to do it:
- Right-click on the taskbar and select Taskbar settings
- In the Taskbar items section, you can toggle each icon on or off
As you might expect, the Start menu icon cannot be removed. Do you remember the original version of Windows 8 had no Start button on the taskbar? Yeah, those were the days.
How to customize taskbar corner icons and overflow
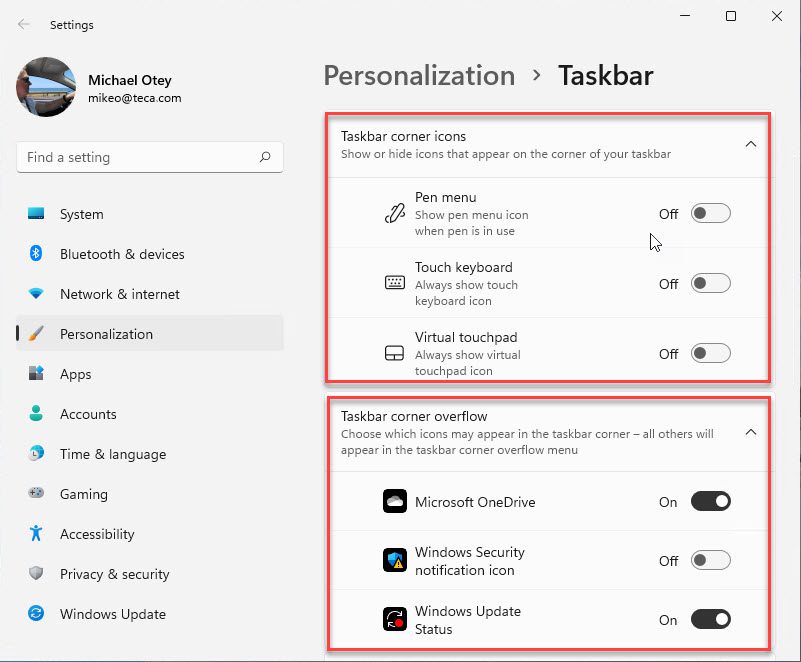
The taskbar corner icons are found in the right corner of the taskbar. That’s where you can see the time and date, your volume level, your network status, your OneDrive status, as well as various other things. The overflow is the pop-up menu that appears when you click on the arrow that is immediately to the left of the corner icons.
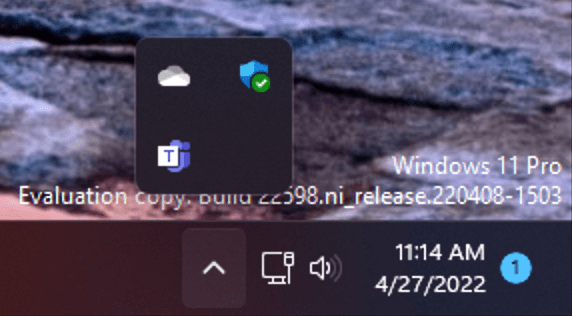
Many of the corner icons cannot be changed. However, a handful of them can be hidden from the taskbar settings:
- Right-click on the taskbar and select Taskbar settings
- Go to the Taskbar corner icons section, where you can to toggle the Pen menu, Touch keyboard and Virtual touchpad icons on or off.
- Likewise, you can toggle the Microsoft OneDrive, Windows Security, and Windows Update icons on or off in the overflow section.
How to show the taskbar on multiple displays
By default, the taskbar should stretch over multiple monitors. However, if for some reason the taskbar doesn’t appear on multiple monitors, you can open up taskbar settings and scroll down to the Taskbar behaviors section where you can check the Show my taskbar on all displays setting.
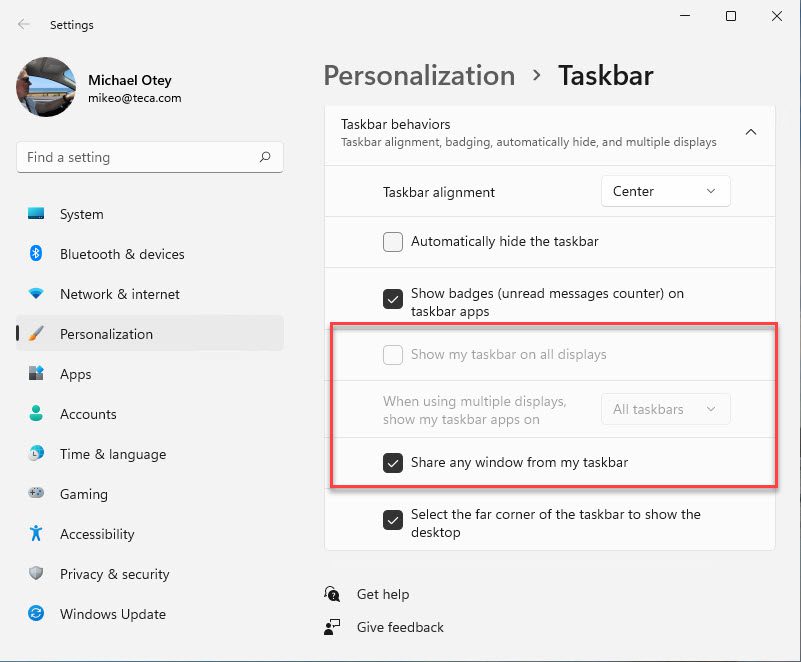
You can also use the When using multiple displays, show my taskbar apps dropdown to select which monitor the taskbar icons will be displayed on. Here you can choose All taskbars, Main taskbar and taskbar where the windows is open, or Taskbar where window is open from the dropdown menu.
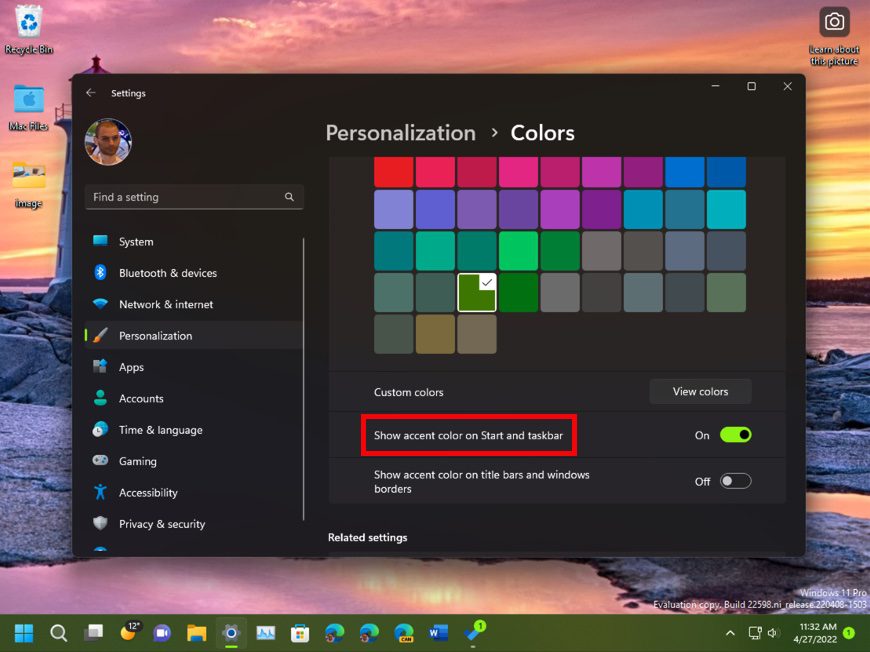
Just like Windows 10, Windows 11 lets you personalize your desktop in various ways. You can still choose between light and dark modes, and you can also use a custom accent color across your desktop.
Here’s how you can customize your desktop appearance on Windows 11:
- Right-click on the desktop to open the Settings menu, then select go to Personalizations > Colors
- If you want to carry your customized accents to the Start menu and taskbar, scroll to the Accent Colors section and toggle the Show accent color on Start menu and taskbar option.
How to resize the Windows 11 taskbar
While you can’t resize the Windows 11 taskbar with the mouse or with any settings, it can still be resized by editing the Windows 11 registry. This isn’t really complicated, though you always need to be careful if you decide to change anything in the Windows 11 registry.
Anyway, here’s how to proceed:
- Use Regedit to open the Windows 11 registry
- Navigate to the following registry key: HKEY_CURRENT_USER\Software\Microsoft\Windows\CurrentVersion\Explorer\Advanced
- Right-click the Advanced key and select New > DWORD (32-bit) Value.
- Add the name TaskbarSi as a new key.
- Next, double-click Taskbarsi to display an edit window.
- In the Value Data field, enter 0, 1, or 2. 1 represents the default size. 0 represents the smallest one while 2 represents the biggest one.
- Enter 2 to increase the taskbar size and click OK.
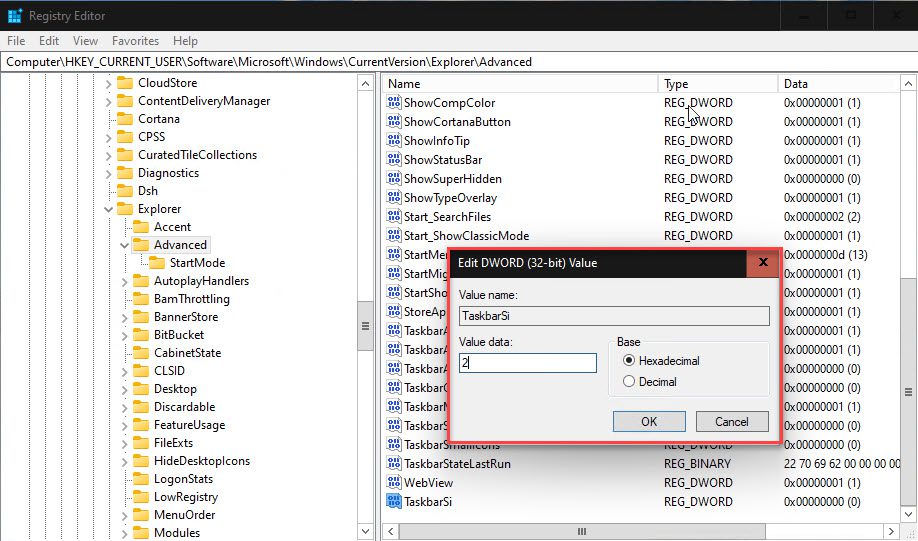
The change will take effect when you close the Registry Editor and restart your system. This change also alters the sizes of the icons that are displayed on the taskbar.
The default taskbar size can be restored by either deleting the TaskbarSi value or by entering the value of 1 and restarting the system.
Creating a custom taskbar
You can also create a completely custom taskbar that overrides the default set of apps with your own set of apps. However, that requires editing and deploying XML documents which is beyond the scope of this article. You can learn more about creating custom taskbars from the Microsoft docs at Customize the Taskbar on Windows 11.
After using Windows 10 for years, the spartan Start menu on Windows 11 can be rather jarring. While most people won’t miss the Live Tiles, I think just about everybody used icon grouping which is now MIA.
That said, the new Start menu is limited to 18 items per page – far smaller than the Windows 10 Start menu. Let’s have a closer look at some of the main ways to customize the Windows 11 Start menu.
The Windows 11 Start menu is primarily used as a quick launchpad to easily find and run apps. However, the new Start menu also incorporates elements from File Explorer, and it can show the most recently used files and apps.
One of the first things you’ll notice about the new Start menu is that all your favorite app groups are gone, replaced by recently used apps and a number of bloatware icons like Disney+, Amazon Prime Video, TikTok, and others. Some of these may be great on a personal system, but you typically don’t want them on a work system.
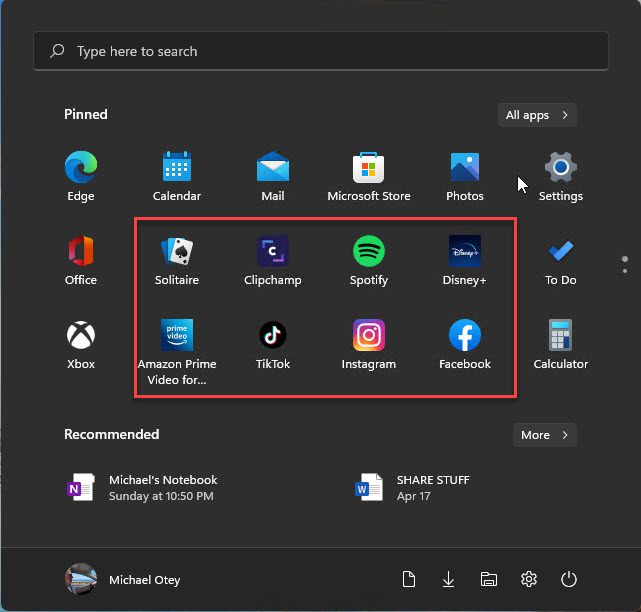
First, let’s look at adding and deleting items on the Start menu.
How to pin your favorite apps
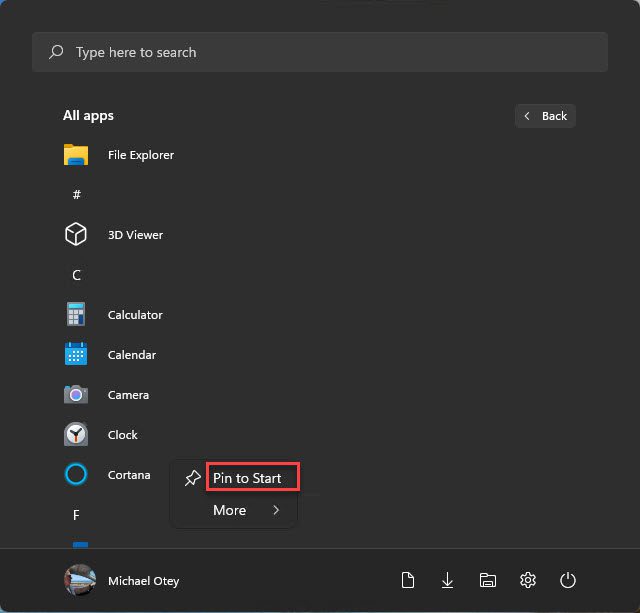
The easiest way to add missing apps to the Start menu is to select them from the All apps list:
- Click the All apps button in the top-right corner of the Start menu
- Scroll through the list until you see the apps that you want to pin to the Start menu
- Right-click the app and then select the Pin to Start option.
How to show or hide your recently added and most-used apps
You can customize the Windows 11 Start menu to show your recently added apps, your most-used apps, as well as your most recently used items. Here’s how to enable these customizations:
- Open the Start menu and click Settings
- Navigate to Personalization and Start.
- Here, you can toggle on Show recently added apps, Show most used apps, and Show recently opened items in Start, Jump Lists and File Explorer.
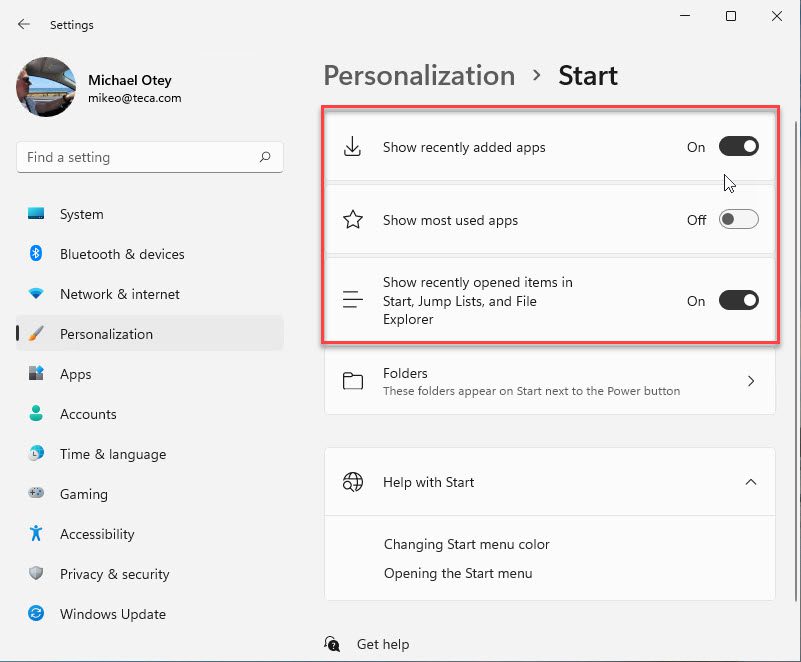
The Recommended section at the bottom of the Start menu will now show our recently opened items.
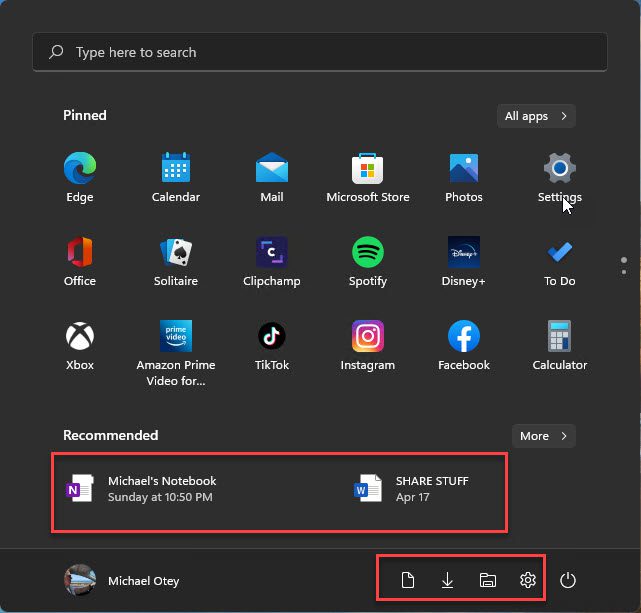
How to add shortcuts to library folders
By default, the Windows 11 Start menu doesn’t show the common system library folders. However, you can easily add them back, here’s how to do it:
- Open the Start menu and click Settings.
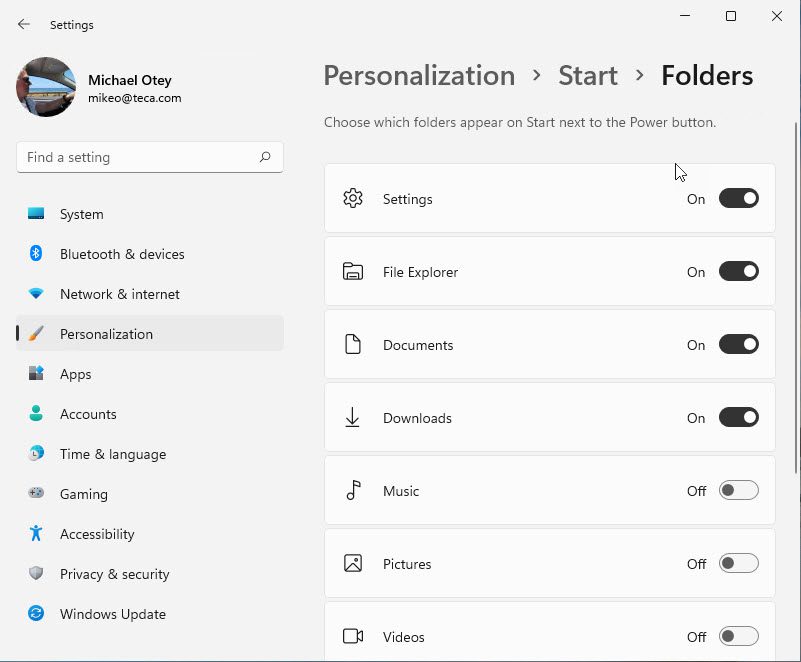
- Next, open Personalization and Start, and click the Folders option to display the Folders settings that you can see below
- You can choose the folders you want to display on the Start menu by toggling on or off the different system folder options including Settings, File Explorer, Documents and Downloads.
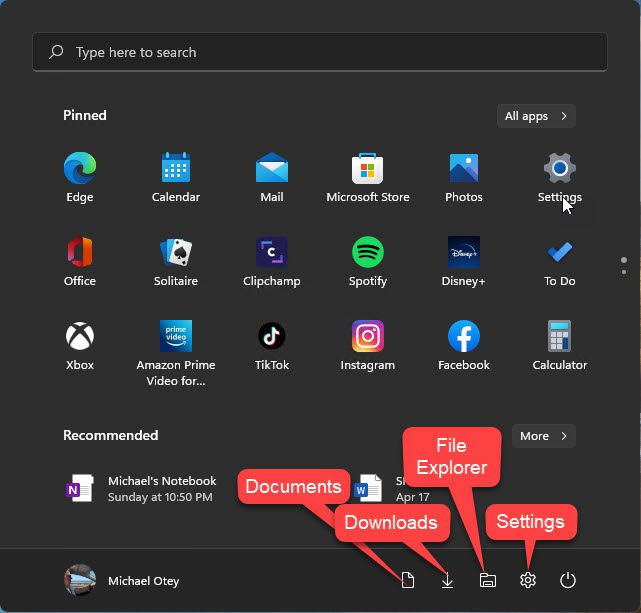
As you can see below, we now have shortcuts for File Explorer, Downloads, Documents, and Settings right next to the Power button.
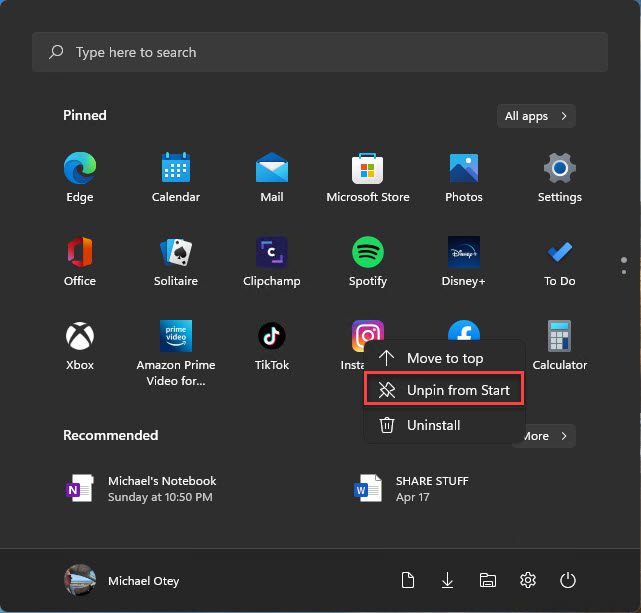
If you want to remove apps from the Start menu, right-click on the Start menu icon and select Unpin from Start. This works for most items on the Start menu. As you might expect, the account and power icons cannot be removed.
Like the taskbar, you can also create a completely custom Start menu layout that overrides the default Start menu. However, that requires editing and deploying XML and JSON documents which is beyond the scope of this article. You can learn more about creating a custom Start menu from the Microsoft docs at Customize the Windows 11 Start layout.
Early versions of Windows 11 supported a registry hack that enabled you to display a version of the Start menu that was a lot like the Windows 10 Start menu. However, Microsoft disabled that registry hack last year with the Windows 11 build 22000.65.
Fortunately, there are several Windows 11 Start menu alternatives that you can install that will customize how the Windows 11 Start menu works. Here’s a quick look at The some of the main Windows 11 Start menu alternatives are:
Start11
Provided by Stardock, Start11 customizes both the Windows 11 Start menu and the taskbar. It allows you to move the taskbar as well as restore the taskbar context menu. It supports both Windows 7 and Windows 10 styles of Start menus as well as adding folders to the Start menu and many more customizations. It integrates with the other Stardock desktop products.
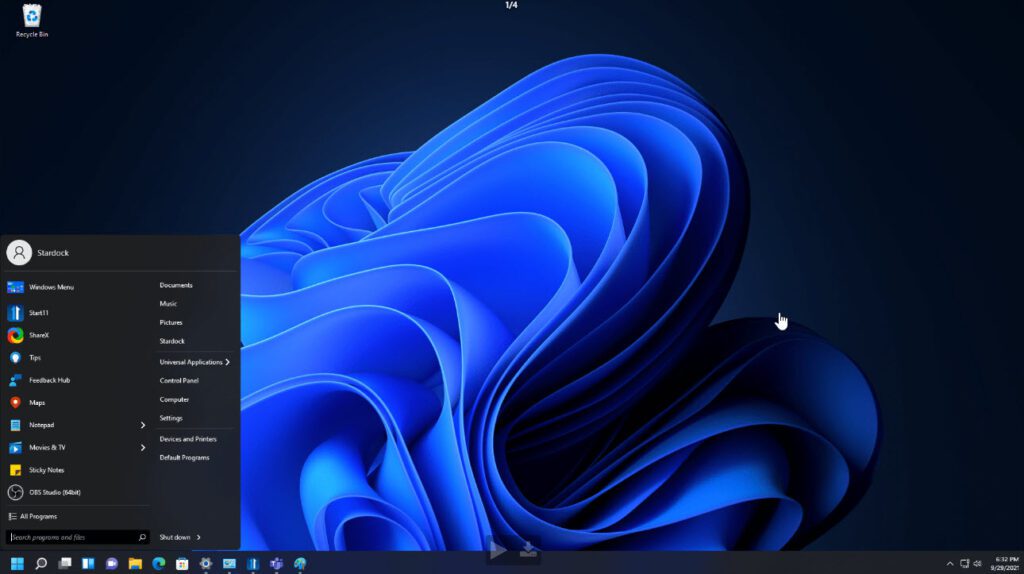
Start11 sells for $5.99 for 1 Active Install or for $14.99 you can get 5 Active Installs. You can try it free for 30 days.
StartAllBlack
StartAllBlack allows you to move the taskbar and provides taskbar jump lists. It also provides Windows 7 and Windows 10 style Start menus.
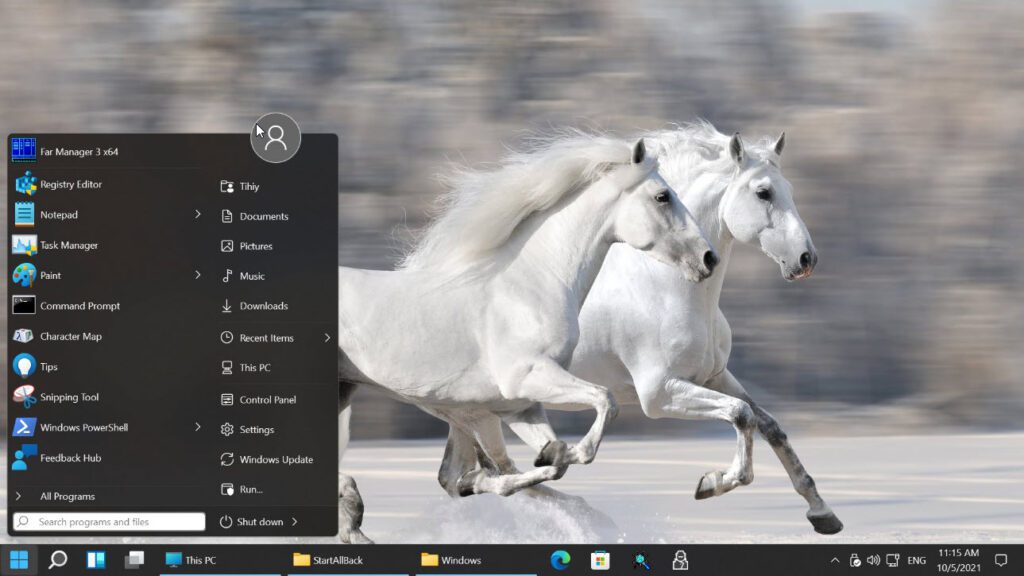
You can buy a Personal Edition license for $4.99 per PC or two PCs for $8.99. There is a 30-day trial for StartAllBack. Multiple PC licensing options are available with the Business Edition.
Start Menu X is a Windows 11 Start menu alternative that does not customize the taskbar. However, it provides a flexible Virtual Groups feature that enables you to easily group your Start menu items together as well as collapse and expand the groups. The Start Menu X Start menu supports tab groupings, it can be moved anywhere on your desktop, and it can also be resized to fill your entire desktop.
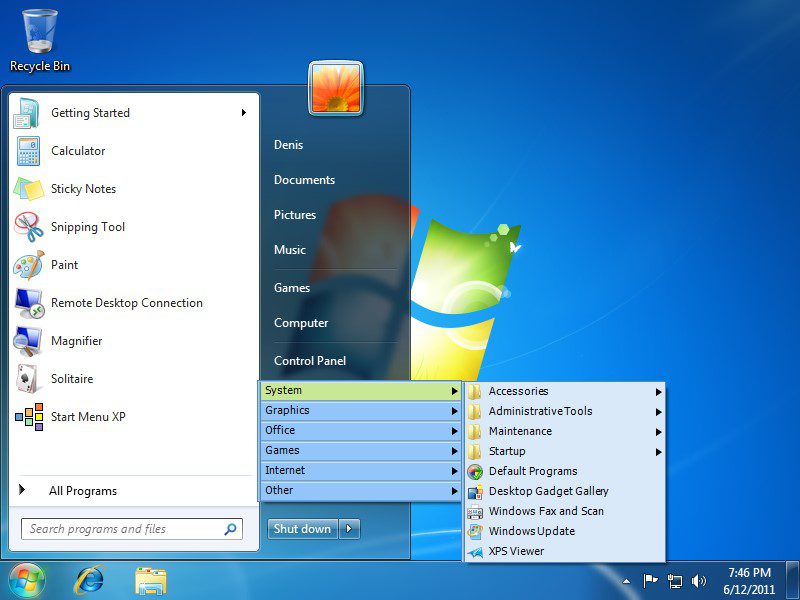
There is a Freeware version of Start Menu X as well as a Pro version. The Freeware version is limited to five Virtual Groups and does not support one-click launch or tabs. The Pro version sells for $9.99 for a single PC or $7.99 for two or more.
Conclusion
Even though the Windows 11 Start Menu and taskbar seem to offer fewer customization options compared to previous versions of Windows, it’s still quite easy to align the taskbar to the left and pin your favorite apps to it. The Windows 11 Start Menu, however, is quite a departure from the Windows 10 Start Menu and its live tiles, but again, it’s still quite easy to pin your favorite apps up there.
For Windows 11 users who really need more flexibility, there are already various third-party apps that can provide that today. Windows 11 also remains a work in progress and maybe we’ll see Microsoft improve its Start Menu and Taskbar in the coming months and years.
Table of contents
- How to customize the Windows 11 Taskbar
- How to move the taskbar and Start Menu to the left
- How to automatically hide the taskbar
- How to customize which items show on the Taskbar
- How to show the taskbar on multiple displays
- How to show your accent color on your Start menu and taskbar
- How to resize the Windows 11 taskbar
- Creating a custom taskbar
- How the customize the Windows 11 Start Menu
- Conclusion


