How to Migrate a DNS Server to a New Windows Server (Step-by-Step)
A practical walkthrough for migrating Microsoft DNS to new Windows Server infrastructure.

In this guide, you’ll learn how to migrate a DNS server in a Windows Server environment, covering both Active Directory–integrated and standard zones. We’ll look at prep, validation, and troubleshooting steps to keep name resolution (and Active Directory) stable throughout the cutover.
🎬 Watch This Week in IT.
Migrating a DNS server in a Windows environment can be tricky, especially for newer IT pros. But with the right plan it can be done with minimal disruption. This post walks through a Windows Server DNS migration (2016, 2019, 2022, and 2025) within the same domain/subnet: why you might migrate, how to prepare, how to execute (for both Active Directory–integrated and standard DNS zones), and how to validate and troubleshoot after cutover.
Core tip upfront: if you can run your new DNS server in parallel with the old one, do it. This keeps name resolution available while you transition.
| At a glance Best case (AD-integrated DNS): Add a new DC + DNS → let AD replication populate zones → copy server-level DNS settings (forwarders, scavenging, etc.) → shift clients via DHCP/static settings. Standard primary zones: Make the new server a secondary → allow/verify zone transfers → promote it to primary (optionally convert to AD-integrated later) → shift clients. Don’t forget: forwarders/conditional forwarders, DNS scavenging settings, firewall rules (TCP 53 for transfers), and updating other secondary DNS servers that used the old master. Rollback plan: Keep the old DNS online until validation is complete—then rollback is usually as simple as pointing clients back to the old server. |
Why migrate a DNS server?
Migrating your DNS server often isn’t just a technical housekeeping task, concrete needs drive it. Common reasons include:
- End-of-Life or Outdated Servers: Older Windows Server versions (e.g., 2008 R2 or 2012 R2) may be out of support or missing features and security updates. Upgrading to Windows Server 2022 or 2025 ensures you benefit from the latest security enhancements and capabilities. The newer DNS service offers improved performance and bug fixes that can make your network faster and safer.
- Hardware Refresh or Performance: You might have a DNS server on aging hardware or a legacy VM that’s struggling. Moving DNS to a new server (perhaps with better specs or on modern virtualization) can improve reliability and give you a few additional years of service for your users.
- Consolidation & Best Practices: Many organizations consolidate roles when they grow. For example, you might migrate DNS onto a new domain controller (DC) to streamline infrastructure. Microsoft recommends having at least two DNS servers/DCs for redundancy; migration can be part of achieving that.
- Reorganization or Cloud Integration: Even within one domain, you might relocate DNS service (say, from a branch server to a central server) to simplify management. Or you plan future cloud integration (e.g., Azure AD) and want your on-prem DNS on a supported OS.
Migrating DNS is critical because DNS is the “phonebook” of your network – if it falters, logons, email, and application connectivity can all fail. Knowing why you’re migrating sets the tone for careful execution.
Common DNS migration scenarios
To further clarify the motivations, let’s highlight a few typical DNS migration scenarios IT pros encounter:
DNS migration scenarios
- OS upgrade / end of support: Move DNS from an older Windows Server version (for example 2012 R2) to a supported release while keeping the same zones and client experience.
- Hardware refresh / virtualization changes: Move DNS off aging hardware or an old VM host to new hardware, a new cluster, or a new virtualization platform.
- Add redundancy (recommended): Introduce an additional DNS server (often by adding a new domain controller with DNS) so clients have at least two resolvers and you avoid a single point of failure.
- Consolidation / role changes: Relocate DNS onto (or off of) domain controllers to simplify management, align with policy, or standardize builds.
- Datacenter/site move: Shift DNS to a new site/subnet and update DHCP scopes, static devices, and firewall rules so clients can still reach DNS reliably.
Whether it’s an upgrade or adding redundancy, the goal is a seamless transition: users and devices should continue resolving names without error. Before touching any servers, let’s cover what you need to know and prepare.
DNS and Active Directory fundamentals (before you migrate)
Understanding your current DNS environment is essential before migration. Here are the key concepts and facts to know up front:
- DNS Zone Types – AD-Integrated vs. Standard: Determine if your DNS zones are Active Directory–Integrated or Standard (file-based) primary zones. Why does this matter? Because it dictates your migration method:
- AD-Integrated Zones: These are stored in Active Directory. All domain controllers (DCs) running the DNS role automatically replicate these zones via AD (no manual zone transfers needed). This multi-master replication means any DNS update on one DC gets replicated to others.
- Standard Zones: These are stored as files (or in the registry) on a single DNS server (the primary). Replication isn’t automatic; if you have secondary DNS servers, they get updates via zone transfers. If you’re moving a standard primary zone, you’ll need to manually transfer zone data (via a zone transfer or export/import process) to the new server, because there’s no AD to do it for you.
- Domain Controller Considerations: If your DNS is AD-integrated, it’s usually running on a domain controller. Migrating DNS often goes hand-in-hand with adding a new DC. The new server should be a domain member (or promoted to DC) before you migrate DNS. This allows it to receive AD-integrated DNS data. (You can host DNS on a non-DC, but AD-integrated zones only replicate to DCs; a non-DC server can only host those zones if you convert them to standard zones.)
Prerequisites: roles, permissions, and tools
Once you’ve confirmed your zone types, make sure the new server is eligible to host them and that you have the access and tooling needed to complete the move cleanly.
- Permissions: You’ll need Domain Admin or Enterprise Admin rights for most DNS migrations—especially if installing a new DC or altering DNS zone settings. Ensure you have the right admin credentials.
Cutover planning: IPs, naming, overlap, and downtime
Most migration pain comes from client configuration and timing—not copying zones. Plan how clients will find the new DNS server and how long you’ll run both servers in parallel.
- Networking & IP planning:
- Do: Pick your approach (new IP now, or reuse the old IP later) and document exactly where DNS server IPs are configured (DHCP scopes/options, reservations, static servers, printers, network devices).
- Check: Whether anything is hardcoded to the old DNS IP (including apps, appliances, and secondary DNS servers pulling zones from the old master).
- Decide: If you’ll keep the new IP permanently (simpler), or do an IP takeover at the end to catch stragglers (more complex, but reduces missed hardcoded references).
- No Two Servers with Same Name/IP: Do not attempt to bring up a new server with the same hostname or IP simultaneously with the old server. Always use a unique name/IP for the new machine during migration. If reusing the old identity, you’ll do it after the old server is offline (as an optional final step). Trying it too early will cause conflicts in AD and DNS.
- Native Tools at Your Disposal:
- DNS Manager (GUI): Good for visual verification, and it has wizards for zone transfers and zone creation.
- PowerShell: Cmdlets like Export-DnsServerZone and Add-DnsServerPrimaryZone help script out the export/import of zones.
- Dnscmd.exe: A legacy command-line tool that can be used for exporting/importing zone files (useful if you prefer it or for certain advanced tasks).
- AD DS tools: If you’re adding a new DC, the AD DS Installation Wizard or Install-ADDSDomainController PowerShell cmdlet will help set up the new DC (with DNS role optionally).
- Impact on Services: Recognize that DNS is critical for AD (DCs register in DNS, clients find DCs via DNS). Plan a maintenance window if possible. In case something goes unexpectedly, you want the freedom to troubleshoot without users being immediately impacted. In a well-planned migration, actual service interruption should be near zero (clients can use either old or new DNS during transition).
- Prepare to Run Both DNS Servers Temporarily: It’s normal (even recommended) to have the old and new DNS servers running together during the migration phase. This overlap means you can verify the new server is handling queries before you retire the old one. AD-integrated DNS is especially designed for multi-server redundancy, and even standard DNS can have a primary and secondary in operation. So don’t think of it as an instantaneous “flip the switch” – think of it as a transition period where both servers may serve DNS queries.
The preparation phase: your foundation for success
Up-front preparation separates a smooth DNS migration from a chaotic one. In this phase, you’ll plan and ready all components so that execution is mostly a straightforward follow-through.
In short, preparation is about eliminating surprises. If you follow a pre-migration checklist (next), you’ll cover all bases and be set for success.
Audit your current DNS configuration
Before migrating, perform a thorough audit of your existing DNS setup. This ensures you won’t forget to migrate any piece of configuration. Use the following checklist to guide your audit:
- List all DNS Zones: Document every zone hosted on the old server. Include forward lookup zones (internal domains like reinders.local, _msdcs.reinders.local, etc.) and reverse lookup zones (e.g., 10.0.0.x Subnet). Note for each zone: is it AD-integrated or Standard? Primary or secondary? This inventory is crucial.
- Record Types and Counts: While you don’t need every single record noted, be aware of special records. For example, do you have any non-default CNAMEs, MX records for email, TXT records (perhaps for SPF/DMARC), etc.? These all transfer with the zone, but knowing what’s critical helps post-migration testing. Also, identify if any record has an unusually long TTL that might linger in caches.
- DNS forwarders:
- Do: Record the current forwarder IPs on the old server (DNS Manager > server properties > Forwarders) and plan to configure the same set on the new server.
- Check: That recursion/external lookups work the same way after the cutover (a quick test is resolving a well-known public name using the new server).
- Decide: Whether to keep the same upstream resolvers, or switch to different ones (e.g., internal resolver pair, ISP resolvers, or a security-filtering resolver) as part of the migration.
- Conditional Forwarders: If the old DNS has any Conditional Forwarders (DNS Manager -> Conditional Forwarders node) for specific domains (e.g., forwarding partner.local to a partner’s DNS), export or note them. In Windows AD-integrated conditional forwarders can be AD-replicated if configured as such, but if not, you’ll need to recreate them on the new server.
- Dynamic Update Settings: Verify if each zone allows dynamic updates (Secure or Nonsecure). Usually, AD-integrated zones allow Secure Dynamic Updates (only AD-joined machines can update their DNS records), which is standard for AD environments. Just ensure you carry over these settings (the defaults usually stick with the zone but double-check).
- Secondary Zones: If your old server hosts any secondary zones (zones for which another server is primary), note them. You will either reconfigure the new server to be the new secondary or possibly make it primary if appropriate. Also, if the old server is providing zone data to other secondary servers, plan to update those secondaries to pull from the new server after migration.
Here are a few sample PowerShell and command-line commands you can use to export your DNS Zones.
Export-DnsServerZone -Name "reinders.local" -FileName "reinders.local.dns"

dnscmd WS16-DC1.reinders.local /zoneexport reinders.local reinders.local.dns
Choose your migration strategy
With your environment audited and the new server prepped, decide how to technically perform the migration. The strategy largely depends on your zone types:
Active Directory–Integrated Zones: These offer the easiest migration path. Since AD-integrated DNS zones replicate via the domain, your strategy is to introduce the new server into that replication scope and let AD copy all DNS data for you. In practice, this means promoting the new server to a domain controller (if not one already) and installing DNS. Once it’s a DNS server in the domain, it automatically becomes an authoritative server for the AD-integrated zones after replication. We still have to migrate any per-server settings (forwarders, etc.), but the zones and records come over with minimal effort.
Standard Primary Zones: These require a manual data transfer.
- Side-by-Side Transfer with Secondary Zones (Minimal Downtime). You temporarily make the new DNS server a secondary for each zone, get a full zone transfer, then promote it to primary and retire the old. This allows the new server to have up-to-date data before cutover, avoiding any data freeze or loss. It’s great for large or frequently updated zones.
Mixed Environments: If you have a mix (some zones AD-integrated, some not), you can use a combination of the above. For instance, maybe your internal AD domain zone is integrated (easy), but you also host a standard primary zone for, say, a legacy application. You could let AD replication handle the domain zone and do an export/import for the standalone zone.
Pre-migration checklist
Here’s a simple checklist of tasks and tools to complete before you execute the migration. Ensure each item is done or verified.
- Environment Backups Ready: Confirm you have recent backups.
- New Server Prepared:
- Windows Server is installed, updated, and joined to the domain.
- Static IP configured on new server (and note it down, e.g. 192.168.100.20 for new DNS).
- Appropriate server name given (don’t duplicate the old server’s name).
- DNS role installed (and server is promoted to DC if doing AD-integrated migration).
- The new server’s own DNS settings (in its NIC) should ideally point to the old DNS as primary until it goes live, and to itself or another as secondary to avoid lookup issues during promotion.
- Access and Permissions: You have Domain Admin rights on the old and new servers. Also, check that you can log into the new server with a domain account (post-join) and that it can communicate with the old server.
- AD Health Check: Run basic health checks (e.g., dcdiag) on the old DC/DNS to ensure no underlying issues. Fix any replication or AD errors now.
Stop here if: dcdiag/repadmin shows replication errors, SYSVOL/Netlogon issues, or DNS-related AD errors. Fix AD health first—migrating DNS on top of a broken replication state will amplify problems and make validation misleading.
- Zone Transfer Settings (if needed): If you plan to use the secondary zone method for any standard zones:
- On the old DNS, enable zone transfers for those zones. In DNS Manager, right-click the zone -> Properties -> Zone Transfers tab. Allow transfers to servers you specify, and add the new server’s IP or select “to any server” (temporarily).
- Ensure the old DNS’s firewall will allow the new server to query it on TCP port 53 (zone transfers use TCP).
- Pre-create Secondary Zones (optional prep): You might wait to do this during execution, but you could create the secondary zones on the new server now (if the new server is already up and can reach the old). They’ll remain empty until the new server can communicate with the old. Many prefer doing this live during the migration window, but having the DNS console open and ready with these operations scripted can save time.
- Notify/Coordinate: Let colleagues know that “On Saturday at 5 PM, I will migrate DNS to a new server.” This way, no one will be making simultaneous DNS changes or be surprised if something reconfigures.
- DHCP Changes Staged: If your clients get DNS server info from DHCP, prepare an update to those scopes:
- Add the new DNS server IP as a secondary DNS (while keeping the old as primary for now) in the DHCP scope options. This way, clients start learning about the new DNS as well, even before cutover.
- Or be ready post-cutover to swap the order, making the new primary and old secondary, then eventually removing the old.
- For any DHCP reservations or static IP devices (printers, etc.), list out which need manual updating and how you’ll do it.
- Plan for Verification: Decide on a few test cases to verify after migration (e.g., “Can resolve internal names like ws19-dc2.reinders.local; can resolve external names like www.bing.com; AD replication still works; can join a PC to the domain; etc.”). Having this list prepared ensures you systematically confirm functionality.
- Rollback Consideration: If something fails, what’s the fallback? Typically, it’s “point clients back to old DNS” or restore any changed settings. Keep the old server running and unchanged as that safety net until you’re satisfied.

Everything on this checklist should ideally be completed before you begin the actual migration steps. When all boxes are checked, you can proceed confidently to execute the migration.
Execute the migration: step-by-step
With preparation done, it’s showtime. We’ll outline the general step-by-step migration, then dive into specifics for AD-integrated and standard zones in the next sections. The key principle during execution is to keep DNS resolution available at all times (either via the old or new server).
Here’s the high-level game plan for the migration event:
Execution plan for DNS migration
- Prepare and baseline: Inventory zones and records, capture server-level DNS settings (forwarders, conditional forwarders, scavenging, root hints), confirm AD health (if applicable), and define rollback.
- Bring up the new DNS server in parallel: Build/join the server and install DNS (and promote to DC if you’re using AD-integrated zones). Keep old DNS online.
- Migrate zone data:
- AD-integrated zones: allow replication to populate zones on the new server.
- Standard zones: transfer/export-import, verify SOA/serials, then promote the new server to primary.
- Replicate non-zone DNS settings: Ensure forwarders/conditional forwarders (and any custom settings like scavenging) match the old server.
- Shift clients and dependencies: Update DHCP scope options and static devices/servers to prefer the new DNS server (keep the old as secondary during transition when possible).
- Validate and monitor: Run authoritative/internal/external resolution tests, check SRV records (AD), confirm dynamic updates (if used), and monitor DNS logs/counters.
- Decommission (or retain) the old DNS: Once stable, remove the old server from client configs; keep it as a secondary for redundancy or retire it. Document changes.
Each of these steps should be done methodically. In practice, for AD-integrated zones, Steps 1 and 2 are essentially achieved simply by adding the new DC with DNS—so the focus becomes heavily on Step 3 (point clients to new DNS) and Step 4 (verification). For standard zones, you’ll spend a bit more time in Step 2 (importing data or promoting secondaries).
Now, let’s break out the two major scenarios (AD-integrated vs. standard) into detailed instructions.
Migrating Active Directory–integrated zones
If your DNS zones are AD-integrated, the migration is usually straightforward because Active Directory replication does most of the work.
Step-by-step: AD-integrated DNS
- Add New Domain Controller (if not already done): Promote your new Windows Server to be a domain controller in the existing domain. During promotion, opt to install the DNS Server service (the wizard has a checkbox for DNS). After reboot, the new server (let’s call it NewDC) is a fully functional DC. By virtue of being a DC, it’s now part of the AD replication ring that includes DNS data.
- Verify DNS Role on NewDC: Open DNS Manager on NewDC. You should see the DNS service running and, within a few minutes, see your AD-integrated zones appear. Typically, you’ll see zones like “reinders.local” and the AD-specific “_msdcs.reinders.local” if that’s your domain. Because they are AD-integrated, they replicate automatically via AD DS. If the zones don’t show up immediately, use the checks below:
- Ensure replication happened. You can trigger it: on NewDC, open Active Directory Sites and Services and force replication from a partner DC, or use repadmin /syncall.
- Check if the zone’s replication scope is unusual. Most zones replicate to either “All DNS servers in the domain” or “All DNS servers in the forest”. NewDC, being a DNS server in that domain/forest, will get them. If someone had set a custom replication scope (like only to certain DCs), you might need to adjust the zone’s replication scope to include NewDC.
- If zones still don’t appear, look at Event Viewer (DNS events or Directory Service events) for errors.
Stop here if: AD replication is not converging (persistent errors), the zone replication scope excludes the new DNS server, or the DNS Server/Directory Service event logs show repeated failures. Don’t proceed to client cutover until the new server is consistently hosting the same zones/records as the old server.
- Compare Records: Once the zones are visible on NewDC, compare a sample of records with the old server (OldDC). They should be identical. For instance, if you had a static entry ServerX with an IP 10.0.0.5, verify it’s present on NewDC’s zone data. Since AD replication is multi-master, any changes to either server’s DNS zone should sync to the other. At this point, NewDC is essentially a peer DNS server to OldDC.
- Replicate DNS settings (non-zone settings):
- Do: Copy per-server settings from OldDC to NewDC (forwarders, conditional forwarders, any root-hints customizations, and scavenging configuration).
- Check: That NewDC can resolve both internal names (authoritative zones) and external names (recursion/forwarders) with the same results as OldDC.
- Decide: What should be identical vs. intentionally different (for example, whether scavenging should remain enabled, and whether conditional forwarders should be AD-replicated or kept local).
- Forwarders: On OldDC DNS Manager, note the Forwarders (e.g., forwarding to 8.8.8.8 or your ISP). On NewDC, open DNS Manager, right-click the server name, Properties -> Forwarders, and add those entries. This ensures NewDC can resolve external names the same way OldDC does.
- Conditional Forwarders: Recreate any conditional forwarders on NewDC (unless they were AD-integrated, which would replicate them automatically if configured so).
- Root Hints customizations: If any, replicate those.
- DNS Scavenging: If OldDC had scavenging enabled at the server level (check OldDC DNS Properties -> Advanced, and zone settings), set the same on NewDC. Note: Scavenging isn’t enabled by default; if you didn’t explicitly set it on OldDC, you can skip.
- Start Using NewDC for DNS Queries: At this stage, both OldDC and NewDC have the same DNS data. NewDC is ready to answer queries. Gradually direct clients to use NewDC:
- If using DHCP, add NewDC’s IP as a DNS server option (so clients get two DNS servers). Or swap it to be the primary. Either way, clients will begin querying NewDC (especially if it’s listed first). There is no issue having both DNS servers active; this is the normal state in AD (multiple DNS servers for redundancy).
- For any servers with static DNS settings, point them to NewDC (and perhaps list OldDC as secondary for safety during transition).
- Because the zones are still in sync, it doesn’t matter which DNS server a client hits – the answer will be the same.
- Validation on NewDC: Do thorough testing using NewDC only:
- Run nslookup. By default, it will query the primary DNS in your IP config (ensure that’s NewDC’s IP). Test a domain controller lookup: nslookup -q=SRV _ldap._tcp.dc._msdcs.reinders.local. It should return SRV records pointing to your DCs (including NewDC). This confirms that AD critical records are present.
- Test name resolution for various internal hosts (servers, websites, etc.) using NewDC. Also test an external lookup (e.g., nslookup www.bing.com NewDC_ip). External should work if the forwarders were set correctly.
- Check that dynamic updates work: perhaps create a dummy A record on NewDC DNS and see it replicate to OldDC (and vice versa) to confirm updates flow. Monitor the Event Viewer on NewDC for DNS errors or warnings.
- Deprecate OldDC’s DNS: Once you’re satisfied NewDC is handling DNS well:
- Remove OldDC’s IP from DHCP DNS lists (or swap order to make it secondary).
- Clients will gradually stop using OldDC for DNS (especially if they renew DHCP leases).
- If OldDC is going to remain online as a DC, it’s fine to keep DNS running on it as a secondary server for redundancy. (In AD, more DNS servers = better resilience.)
- If you plan to decommission OldDC entirely (common in migration), ensure no clients or settings rely solely on it. Then demote the DC (if that’s in scope) following AD best practices. The demotion process can also remove its DNS info from AD.
- Clean up DNS: after demotion, check DNS zones’ Name Servers (NS) records. If OldDC is listed and NewDC isn’t, adjust that (though promotion typically adds the new DC to NS records automatically).
- (Optional) IP Reassignment: If you had static devices that you couldn’t reconfigure easily, and you want NewDC to take OldDC’s IP, you can now do that since OldDC is shut down or demoted. As described in CheckYourLogs: assign OldDC’s IP to NewDC’s NIC, update DNS records for NewDC’s hostname to that IP, and double-check everything still resolves. This way, even straggler machines that still had OldDC’s IP will be talking to NewDC now (thinking it’s the old address).
- Finalize & Document: Document that the DNS for the domain is now on NewDC (and any additional new DNS servers). Update network diagrams or run-books. Also, consider keeping at least two DNS servers for the domain for fault tolerance (if you demoted OldDC and have only one NewDC, plan to introduce another DNS server/DC to avoid single points of failure).


Because AD is replicating the zone data, the remaining work is mainly client cutover, validation, and then decommissioning (or repurposing) the old server.
Migrating standard primary zones
Zone transfer method: Run the new server in parallel as a secondary, verify it has a complete copy of the zone, then promote it to primary and update clients.
Steps:
- Enable Zone Transfer on Old Server: On the old DNS server, enable transfers for the zone. Allow the new server by IP. This ensures the old server will answer zone transfer requests from the new server.
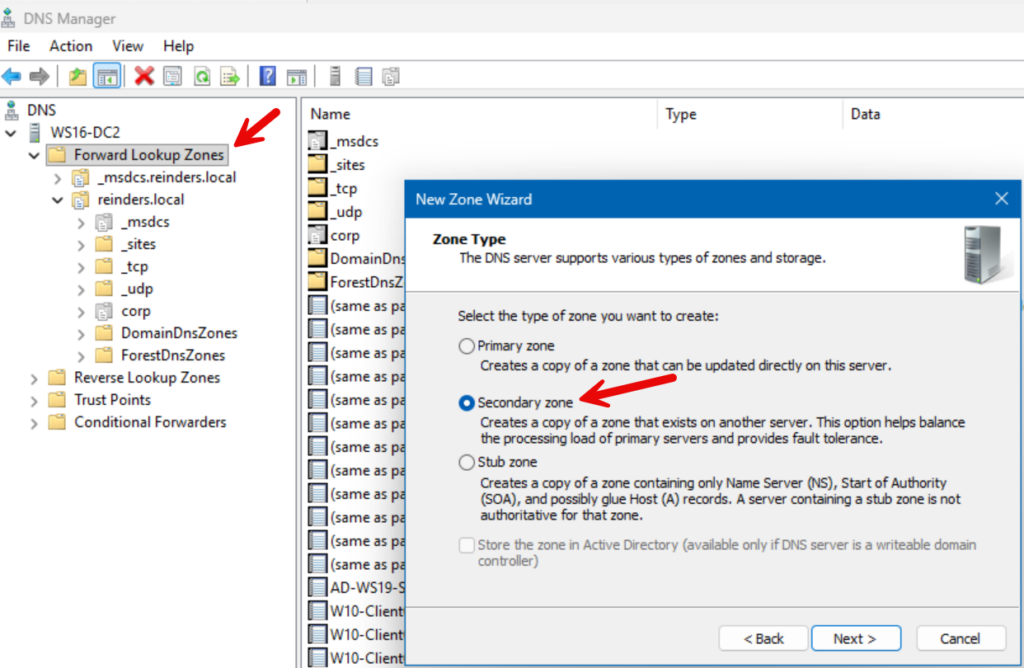
- Create Secondary zone on New Server: On the new DNS server, open DNS Manager. Right-click “Forward Lookup Zones” > “New Zone…” > choose Secondary Zone. When prompted, enter the zone name exactly (e.g., reinders.local). For the Master DNS Server, enter the IP of the old DNS server. Complete the wizard. The new server will now attempt to fetch the zone data from the old server.
- Verify Zone Transfer Completion: In DNS Manager on the new server, you should see the new zone with type “Secondary”. It should list all the DNS records (refresh the view if needed). If it shows an error or is empty:
- Check that the old server’s firewall allows it, and that you spelled the zone correctly.
- Check the Event Logs on either server for zone transfer issues.
- You can trigger a manual transfer by right-clicking the secondary zone and choosing Transfer from Master.
- Once it loads and the serial number matches the old server’s zone serial, you have an up-to-date copy.
Stop here if: the secondary zone stays empty, shows transfer errors, or the SOA serial number on the new server doesn’t match the old server. Confirm TCP 53 connectivity, zone transfer permissions (allow the new server), and that no firewall/NAT device is interfering before you promote the zone to primary.
- Freeze Changes (short window): To avoid divergence, pause non-essential DNS changes while you promote the new server to primary and update dependencies. If your environment relies heavily on dynamic updates (for example via DHCP), schedule this step during a quiet period.
- Promote New to Primary: Now, flip the new server to primary for the zone. There are two ways:
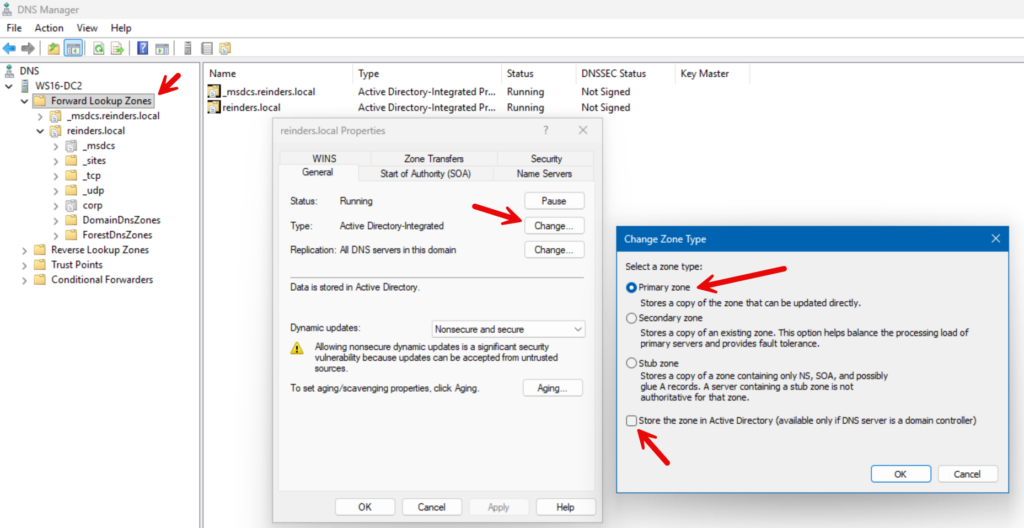
- Method 1: On the new server’s DNS Manager, right-click the secondary zone > Properties > Change Zone Type > select Primary and uncheck “Store in Active Directory” (since we want it file-based). Confirm the change. The zone on the new server is now Primary (and writeable) – it has all records.
- Method 2: Alternatively, on the old server, change its zone to secondary (or remove it entirely). If you uninstall DNS from the old server or delete the zone there, the new server (still configured as secondary) will detect that it can’t reach the master. You can then change the zone type to primary on the new server. But Method 1 is simpler and immediate.
- After promotion, ensure the zone on the new server is listed as Primary. All records should remain intact.
- [Optional] Convert to AD-Integrated: If the new server is a DC and you prefer the zone to be AD-integrated now (gaining the benefits of AD replication and secure dynamic updates), you can do so: Right-click zone > Properties > Change Zone Type > check “Store in Active Directory”. Choose replication scope (e.g., to all DNS servers in the domain). This will convert the zone into AD-integrated on the new server, and it will replicate to other DCs. This step is optional but recommended if you want to eliminate manual transfers in the future. Important: Only do this after the new server is primary and the old server’s version is deprecated, to avoid having two separate copies.
- Update DNS Clients/Settings: Now that the new server is the primary source for this zone, make sure all references are updated:
- If other DNS servers in your org were secondary to the old server, repoint them to the new server as their master.
- Update any NS records if this zone is delegated somewhere (if this is an internal-only zone, likely not an issue).
- As usual, adjust DHCP or client settings to prefer the new DNS server IP for queries.
- Test Resolution: Query the new DNS for records in the zone. Make sure it responds authoritatively (no “SERVFAIL” or timeouts). Try adding a test record on the new server (since it’s primary now) and see that it works.
- Decommission Old: The old DNS server’s role for this zone is finished. You can remove that zone from the old server to avoid confusion (especially if the new one is now primary). If the old server isn’t serving anything else, you might turn it off. If it still hosts other zones or roles, keep it up, but it will no longer interfere with this zone.
- Monitor: Keep an eye on the new server logs to ensure no issues. If the new primary zone was converted to AD-integrated, check that replication of it to other DCs occurs.
Step 2 above:
Step 5 above:
The advantage of this approach is that you never actually have a moment where the zone wasn’t available on at least one server.
Post-migration validation
After migrating DNS to the new server, it’s crucial to validate that everything is functioning properly. This gives you confidence to decommission the old server and assures you didn’t miss anything.
Test DNS resolution (the moment of truth)
Run these checks using only the new DNS server (set your client to query NewDNS, or specify the server IP in each command). The goal is to confirm the new server is authoritative for your internal zones and can also resolve external names (via forwarders/root hints).
| Test (what you’re proving) | Expected result (and what to check if it fails) |
| 1) Basic host lookup (A/AAAA) Query a known internal host directly against NewDNS. nslookup <hostname> <NewDNS_IP> | Expected: Correct IP returned, no timeouts. If it fails: confirm the record exists on NewDNS, check you’re querying the right zone, and verify replication/zone transfer completed. |
| 2) SOA + NS records Confirm the zone’s authority information is sane and the right name servers are listed. nslookup > server <NewDNS_IP> > set type=SOA > <zone-name> | Expected: SOA returns; NS list includes the servers you intend to be authoritative. If it fails: check the zone exists/loaded, verify zone type (AD-integrated vs standard), and review DNS Server event log. |
| 3) AD SRV records (AD-integrated environments) Validate the records clients use to find domain controllers. nslookup -q=SRV _ldap._tcp.dc._msdcs.<your-domain> <NewDNS_IP> | Expected: SRV records return for your DCs (including the new one, if applicable). If it fails: verify _msdcs zone replication, DC registration, and check Directory Service/DNS logs. |
| 4) External resolution (recursion/forwarders) Confirm NewDNS can resolve internet names the same way the old server did. nslookup www.bing.com <NewDNS_IP> | Expected: A valid public IP is returned quickly. If it fails: check forwarders, firewall/egress rules, recursion settings, and root hints (if you rely on them). |
| 5) Dynamic updates (if used) Make sure clients (or DHCP) can register/update records. | Expected: New records register successfully; updates replicate (AD-integrated) or persist (standard primary). If it fails: check zone dynamic update settings, secure update permissions, and time sync/Kerberos health. |
| 6) Mail records (optional) Only if you host mail-related records in the zone. nslookup -q=MX <zone-name> <NewDNS_IP> | Expected: Same MX answers as before (or your planned new values). If it fails: verify the MX/TXT records in the zone and confirm you’re querying the right DNS server. |
Monitor performance and health
DNS isn’t a “set and forget” service, especially right after a migration. Ongoing monitoring ensures that the new server continues to operate well and that any issues are caught early. Here’s how to keep an eye on DNS post-migration:
- Event Logs: The DNS Server event log is your first indicator of any trouble. Check it daily for the first week or so. Common things to watch:
- Errors about zone loading or zone transfer failures (if you still have secondaries).
- Warnings about recursive query failures or timeouts (could indicate forwarder issues or internet connectivity problems).
- Any strange security events (e.g., if someone is trying a spoofing attack or if DNSSEC was misconfigured).
- Given a smooth migration, you ideally see no errors beyond maybe an info that the zone loaded successfully.
- DNS Analytical Logs (Advanced): If you want deeper insight, the Windows DNS server has analytical logs (in Event Viewer, under Applications and Services Logs > Microsoft > Windows > DNS-Server). You can enable query logging or audit settings. This can show top queries, etc., but is usually overkill unless troubleshooting.
- Performance Counters: Use Performance Monitor (perfmon.exe) on the new server and add counters from the “DNS” category:
- Recursive Queries/sec, Total Queries/sec – to see query load.
- Recursive Query Failures – should be near zero; spikes might indicate external resolution issues.
- AXFR Requests Received/Sent – if you have zone transfers, monitor those.
Track these counters to establish a baseline. If you notice a sudden drop or spike beyond the baseline, investigate.

Common migration headaches (and how to fix them)
Even with good planning, DNS migrations can encounter a few gotchas. Let’s outline some common headaches and how to resolve them quickly:
Common migration headaches
- Clients still use the old DNS server: DHCP lease time, multiple scopes, VPN configs, and static devices can keep pointing at the old IP.
Fix: update DHCP scope options/reservations, update static configs, and force renewals where appropriate. - Hardcoded DNS IPs in apps/appliances: Printers, firewalls, NAS devices, hypervisors, and line-of-business apps sometimes have DNS set manually.
Fix: inventory and update them, or (as a last step) consider an IP takeover once the old server is offline. - Forwarders/recursion mis-match (internal works, internet fails): NewDNS can be authoritative for internal zones but unable to resolve external names.
Fix: copy forwarders/conditional forwarders, verify recursion settings, and confirm outbound connectivity (DNS/HTTPS as required by your upstream resolvers). - Zone data isn’t identical: Missing records, wrong zone type, or replication/transfer issues can cause inconsistent answers.
Fix: verify AD replication scope (AD-integrated) or SOA serial/zone transfer health (standard zones) before cutover. - Dynamic updates fail: Clients/DHCP can’t register or update records after cutover.
Fix: check zone dynamic update settings (secure vs nonsecure), permissions, time sync/Kerberos health, and whether DHCP is configured for secure updates. - Reverse DNS/PTR gaps: Reverse zones are often forgotten, which breaks some management tools and logging workflows.
Fix: migrate reverse lookup zones too and test PTR lookups for key subnets. - Name server (NS) / delegation mismatches: Parent zones or delegations may still reference old name servers.
Fix: update NS records and delegations so the intended servers are authoritative.
By anticipating these issues, you can often preempt them or solve them quickly:
- Hardcoded IPs -> Use IP reassignment or update configs (and remember to communicate IP changes to all relevant parties).
- Forgotten settings -> Keep that audit list handy to double-check after migration.
- Unplanned downtime -> Always keep the old server running until 100% sure; that way, it’s easy to roll back by just pointing back to it.
- Communication -> Many headaches are resolved by simply informing everyone involved (“Hey, we changed DNS servers; if your system had an IP hardcoded, update it or let us know”).
Finally, document the resolution of any issues you encountered. That becomes part of your knowledge base for future migrations or for colleagues. With the migration complete and any headaches resolved, you should have a robust, modern DNS setup serving your network reliably.
Conclusion
A Windows Server DNS migration is safest when you run the new server in parallel, verify AD/DNS health, and only then shift clients via DHCP/static settings. Once queries and dynamic updates look solid (and forwarders/conditional forwarders match), you can retire the old server with confidence and keep at least two DNS servers for resilience.

Michael has been an IT Pro since 1998. He has worked predominantly in the Windows world including client and server operating systems, on-prem systems engineering (AD, DNS, etc.), and over the last ten years or so has embraced and immersed himself in...