Deploying VHD Sets on Windows Server 2016 Hyper-V
In this post, I will show you how to deploy VHD Sets on Windows Server 2016 (WS2016) Hyper-V.
Creating a VHD Set
A requirement of any cluster disk is that all nodes in the cluster can access it. Therefore, the cluster disk should reside on storage that the guest cluster nodes can access. This is the case regardless of where they go:
- SMB 3.0 storage
- Cluster shared volume (CSV)
I can create a VHD Set using New-VHD. This is the same New-VHD as always but now it understands that a virtual hard disk with a .VHDS extension is a VHD Set. The following example will:
- Create a new VHD set called DBCluster-Witness.VHDS on a host called Host1.
- Store the VHD Set in folder called VHDSets in a CSV called CSV1.
- Make the data disk of the VHD set a dynamic 1GB disk.
New-VHD -ComputerName "Host1" -Path C:\ClusterStorage\CSV1\VHDSets\DBCluster-Witness.vhds -SizeBytes 1GB -Dynamic
The above example is perfect for a witness disk. I can create a data disk too:
New-VHD -ComputerName "Host1" -Path C:\ClusterStorage\CSV1\VHDSets\DBCluster-Data1.vhds -SizeBytes 500GB -Dynamic
At this point, there are 4 files in the VHDSets folder:
- DBCluster-Witness.vhds
- DBCluster-Witness.avhdx
- DBCluster-Data1.vhds
- DBCluster-Data1.avhdx
Attaching the Disks
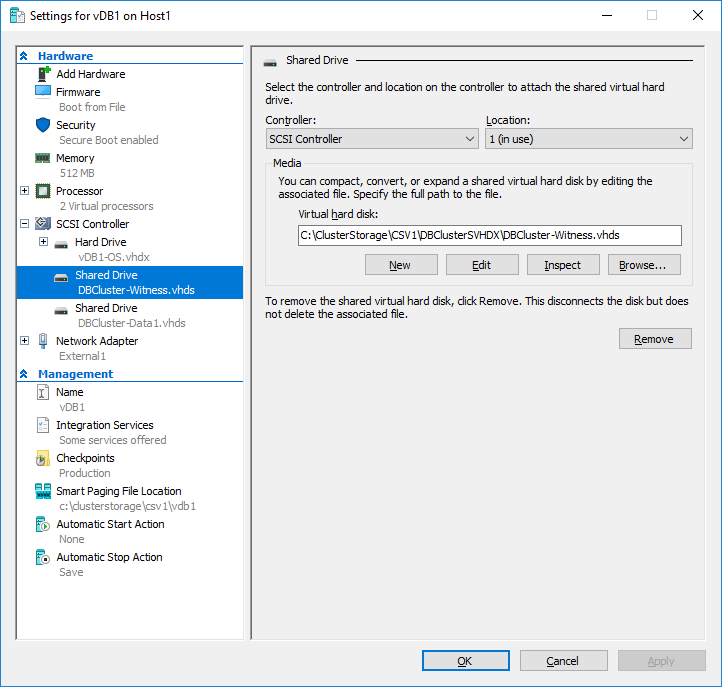
Now, we need to connect the VHD Set disks to the virtual machines of the cluster. I will connect the two VHD sets to virtual machines called vDB1 and vDB2. First, I will attach the witness disk. Note, we are using Add-VMHardDiskDrive and the -SharedVirtualDisk flag will instruct the virtual machine that the disk is a VHD Set.
Add-VMHardDiskDrive -ComputerName "Host1" -VMName "vDB1" -ControllerNumber 0 -ControllerLocation 1 -Path C:\ClusterStorage\CSV1\VHDSets\DBCluster-Witness.vhds -ShareVirtualDisk
Add-VMHardDiskDrive -ComputerName "Host4" -VMName "vDB2" -ControllerNumber 0 -ControllerLocation 1 -Path C:\ClusterStorage\CSV1\VHDSets\DBCluster-Witness.vhds -ShareVirtualDisk
Next, I can attach the data disks. We will use the same command as before but we will change the names of the .VHDS file:
Add-VMHardDiskDrive -ComputerName "Host1" -VMName "vDB1" -ControllerNumber 0 -ControllerLocation 1 -Path C:\ClusterStorage\CSV1\VHDSets\DBCluster-Data1.vhds -ShareVirtualDisk
Add-VMHardDiskDrive -ComputerName "Host4" -VMName "vDB2" -ControllerNumber 0 -ControllerLocation 1 -Path C:\ClusterStorage\CSV1\VHDSets\DBCluster-Data1.vhds -ShareVirtualDisk
Viewing VHD Sets
After you have created your VHD Set, you can view it in Hyper-V Manager or Failover Cluster Manager. Note, many of the options that are there for regular VHDX files are gone and some of the sharing checkboxes of WS2012 R2 are gone too. VHD Sets on WS2016 are only shared disks, so those options to manage sharing are no longer required. If you want to manage performance, instead of implementing QoS on the virtual hard disk, you should do it on the CSV or Scale-Out File Server. This is new in WS2016.
Operations
Operations that were previously unavailable, are possible now. Some of these, such as replicating a virtual cluster with VHD Sets, must use virtual machine groups. Create a virtual machine group including all of the virtual machines in the guest cluster and enable Hyper-V Replica using the members of the group.
You might be asked to increase the size of a VHD Set data disk. Shared VHDX in WS2012 R2 required that the cluster was powered down, which makes a mockery of the concept of high availability. In WS2016, you just resize the disk:
Resize-VHD -ComputerName "Host1" -Path C:\ClusterStorage\CSV1\VHDSets\DBCluster-Data1.vhds -SizeBytes 1024GB
Finally, you will need to extend the volume in the guest OS of one of the virtual cluster nodes.


