The Complete Guide to Windows Backup
Learn about the different options you have for back up in Windows

While virtually every organization makes sure their servers are backed up, that’s not always the case for endpoints. While some larger organizations have backup products that are capable of protecting desktop PCs and mobile devices like laptops, many smaller and medium sized business do not.
I think it’s fair to say that a good percentage of PCs are not backed up at all. At the very minimum, losing a desktop or laptop to system failure, malware, or some other type of incident can have a huge impact on your productivity.
Windows backup options
Regularly backing up your Windows 10 or Windows 11 PCs is the best way to be sure that you have the data and application protection you need to quickly get up and running again in the event that something happens to your device. Fortunately, or perhaps confusingly, both Windows 10 and 11 provide a number of different backup options.
You can find the different Windows 10 backup options by opening:
- Settings > Update & Security > Files backup, which will display the following screen:

This screen shows the three main backup options provided by Windows 10.
- Back up files to OneDrive – Back up important settings and files to your OneDrive
- Back up using File History – Back up copies of your changed files to an external storage location
- Looking for and older backup, Go to Backup and Restore (Windows 7) – Can backup selected files or an entire system image to a selected storage location.
Windows 11 makes it a bit tougher to find these options. The Backup to OneDrive option is still in Settings but links have been moved to the Account and System pages like you can see below.

The Backup using File History and Backup and Restore (Windows 7) links have been moved to the Windows 11 System and Security Control Panel like you can see in the figure below.

These options are all built-in to Windows and there is no need to use the Microsoft Store or to download anything. Now that you know where to find the different backup options in Windows 10 and 11, let’s take a look at each of them and the best uses for each.
Back up files to OneDrive
OneDrive is Microsoft’s cloud storage service that syncs with your local PC. To use it, you’ll need a Microsoft Account. While synchronization isn’t quite the same thing as backup, OneDrive stores deleted versions of files in a Recycle Bin for up to 30 days if you have a personal OneDrive account. If the Recycle Bin exceeds 10% of your total storage, older items may be deleted after just 3 days to make room for new ones. If you have a business OneDrive account, retention and archiving is configurable by your system administrator.
OneDrive keeps file versions indefinitely, but only for files stored in Office formats (Word, Excel, PowerPoint etc.). But OneDrive can limit the number of versions stored if you are low on storage. Again, for business accounts, your system administrator configures limits and default behaviors.
So, though it does perform a type of backup, you shouldn’t confuse synchronizing your files to OneDrive with a full system backup. Once initiated, it automatically syncs files and folders to the cloud, providing a form of backup. This also allows access to backup from multiple devices, making it a useful tool for switching between systems.
The backup files are stored in a OneDrive folder and they are automatically synced to the cloud. They are available offline on the local device. Like you might expect, you need to have adequate OneDrive storage available. The Backup app warns you on the first screen if there isn’t enough OneDrive capacity. You can access and restore previous versions of files through the OneDrive web interface.
Unlike traditional backup solutions, the Windows Backup app is not meant to perform a complete system restoration. The app doesn’t even have an interface to restore a specific file, setting, app, or credential. Instead, you access your files directly from OneDrive. For settings, you have the option to restore them during the initial Windows setup process.
Launching Windows Backup
To launch the Windows Backup app in Windows 10:
- type Windows Backup into the Windows Seach box by the Start menu
- Then select Windows Backup from the results.
Alternatively, on Windows 11, you can back up files using Microsoft OneDrive:
- select Start, All apps, Windows Backup.
This will launch the Microsoft OneDrive app that you can see in the following figure.

- Select the items you want to sync to OneDrive using the toggle switches you can see on the right side of the window.
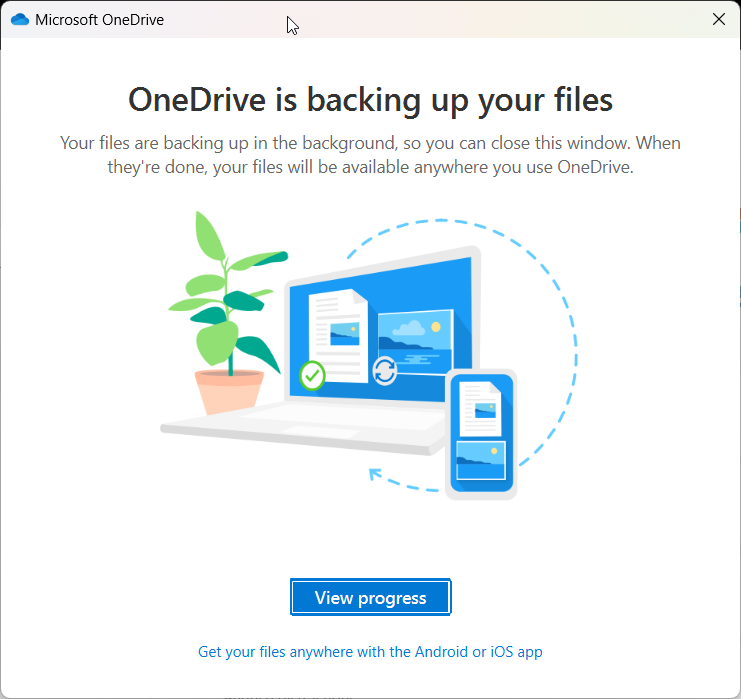
- Clicking the Start backup button causes the sync process to begin and you will see a screen like the following.
Disable OneDrive synchronization in Windows 11
If you want to stop backing up some or all of your folders, you need to turn off OneDrive folder syncing for the selected drives. To change OneDrive:
- right-click the OneDrive icon in your system tray
- Then select Settings, Sync and backup, then Manage backup and turn off any folders you no longer want sync.
Change OneDrive synchronization settings in Windows 11
To alter the backup for apps and settings:
- go to Start, Settings, Accounts, Sync your settings and the Windows Backup
- then turn off the settings and apps you wish to stop backing up.
Back up using File History
File History provides data or file protection by allowing you to regularly back up your changed files to an external drive or network location. It automatically saves multiple versions of your files so you can easily retrieve previous versions and recover from data loss by restoring previous versions of files.
File History automatically backs up files in your Libraries, Desktop, Contacts, and Favorites folders, as well as OneDrive files that are available offline. You can specify the frequency of backups and the duration for which versions of files are kept.
How to configure File History
To launch File History on Windows 10 go to:
- Settings > Update & Security > Files backup and select Backup using File History.
On Windows 11:
- open the Control Panel go to System and Security, and select File History.
Before starting File History, you’re prompted to select a drive where the copied files will be stored. You can see the drive selection dialog in the figure below.

Next, you can set the different file backup options. You can see File History’s main backup options in the following figure.
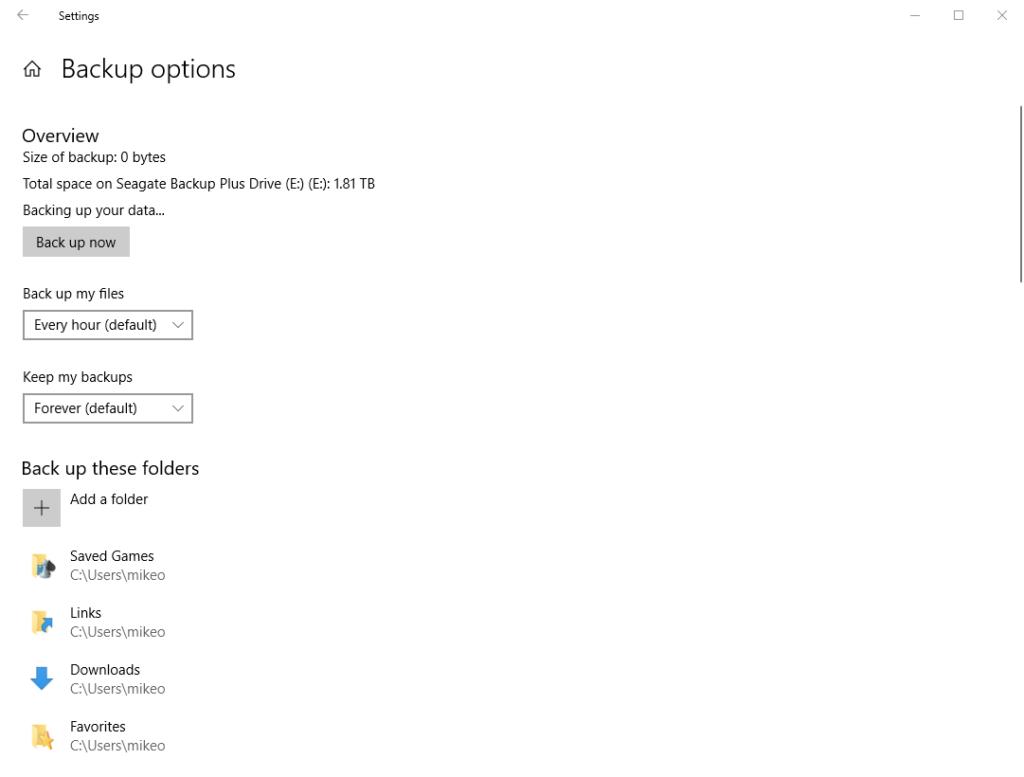
The dialog enables you to setup the frequency, retention time and the specific folders that will be protected. The frequency can be any of the following:
- Every 10 minutes
- Every 15 minutes
- Every 20 minutes
- Every 30 minutes Every hour (default) Every 3 hours
- Every 6 hours
- Every 12 hours Daily
The retention time can be set for the following:
- Until space is needed
- 1 month
- 3 months
- 6 months
- 9 months
- 1 year
- 2 years Forever (default)
All of the different folders are listed below these settings. Scrolling to the bottom of the dialog reveals the final File History backup settings that you can see in the next figure.

Here you can choose to exclude certain folders or to stop using the current backup drive allowing you to change to a different backup drive.
Finally, you have the option to restore files from a current backup. The See advanced settings link essentially sends you to the Control Panel.
Looking for an older backup – Backup and Restore (Windows 7)
While deprecated, this backup option still exists in both Windows 10 and Windows 11. It allows you to create a complete image of your system, including:
- the operating system
- installed programs
- and user files
Having a complete backup can be important if you have a hardware failure and need to restore your entire system. You can create full system backups automatically at regular intervals. You can also choose to back up selected files and folders.
For Windows 10 you can access Backup and Restore (Windows 7) by:
- navigating to Control Panel
- then selecting Backup and Restore (Windows 7).
For Windows 11 you go to:
- Control Panel, System and Security
- then select selecting Backup and Restore (Windows 7). This will display the following Control Panel dialog.
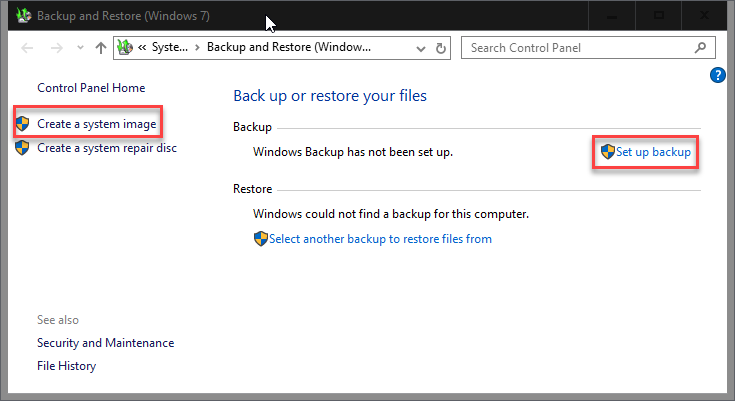
Backup and Restore (Windows 7) – Create a system image
From here you can either choose to: Create a system image or to Set up backup.
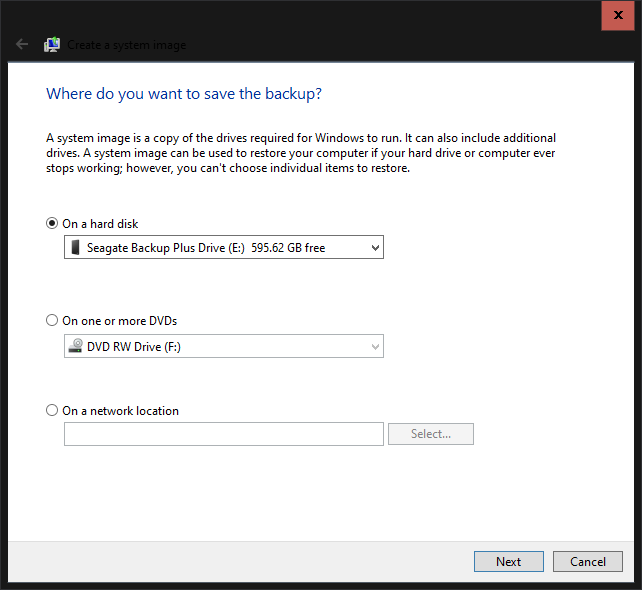
Create a system image creates a system-level backup immediately at the end of the backup wizard dialogs. It is intended to be able to restore your system in the event of a failure.
- The first dialog that this option displays asks Where do you want to save the backup? You can choose a hard drive, a writeable DVD or a networked drive. In the figure below you can see that an external hard drive was selected.
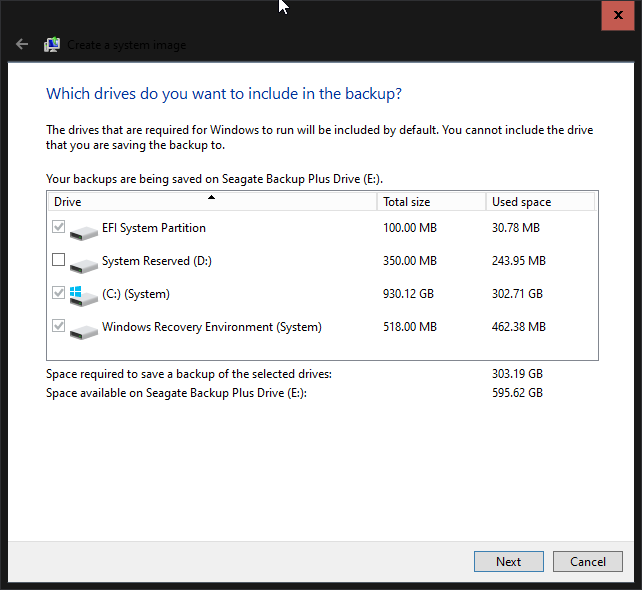
- Clicking Next displays the dialog that you can see below. By default, all of the drives that are required to restore your system are automatically checked and selected. The dialog also displays the free space on the backup target drive.
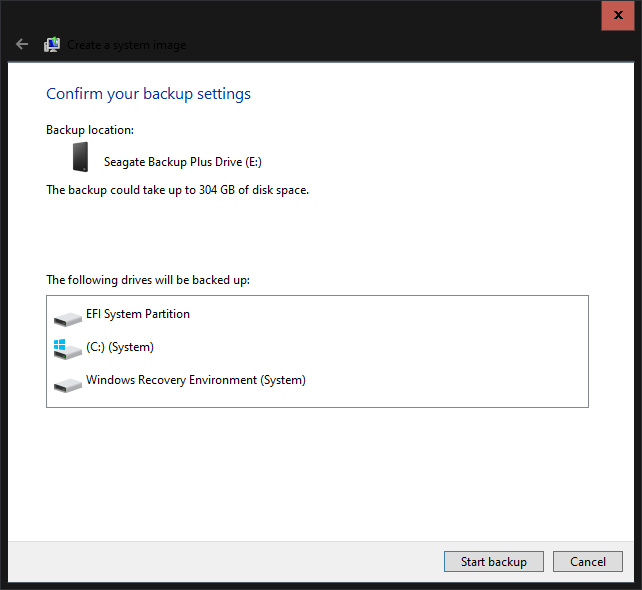
- Clicking Next displays the final Confirm your backup settings dialog that you can see in the following figure. It shows that various system components that will be backed up.
- Clicking the Start backup button runs the system image backup.
Windows 7 Backup and Restore – Set up backup
In addition to running a system backup, you can also select Set up backup from the Control Panel. This options can backup both the system drives as well as various additional drives and data.
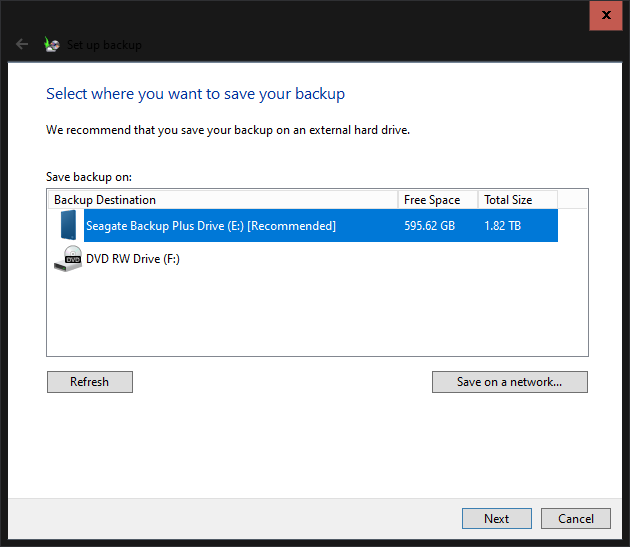
- Clicking Set up backup from the Control Panel displays the dialog that you can see in the figure below.
The Select where you want to save your backup dialog analyzes available backup locations and enables you to select the location you want to use. It also displays the free space available on the target drives. In the figure below you can see that an external Seagate drive has been selected as the backup location.
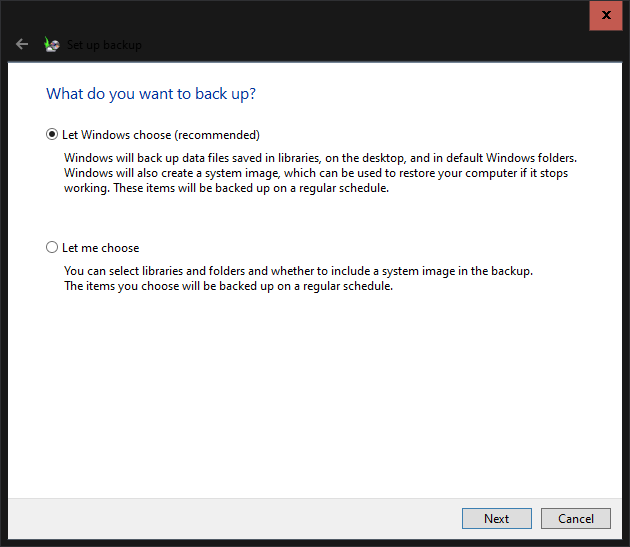
- Clicking Next displays the following What do you want to back up? screen shown below.
- Here you can either allow Windows Backup to select what it wants to backup or you can expressly choose the drives and folders that you want to protect.
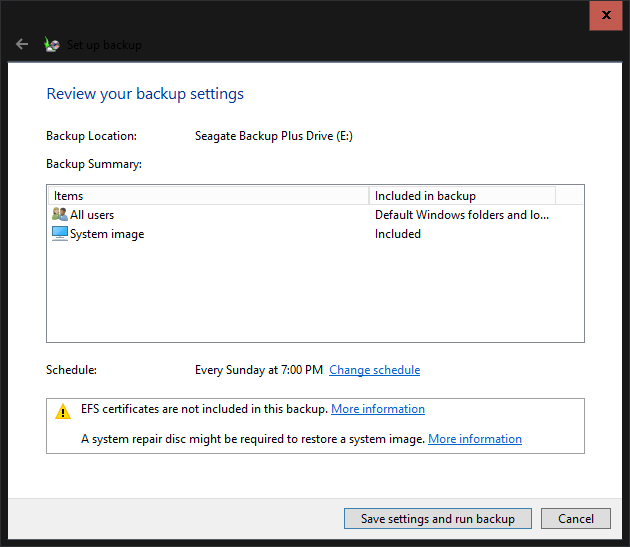
- If you select the option Let Windows choose (recommended) and then click Next you’ll see a dialog like the one you see in the following figure. This will backup all user folders as well as a system image. By default, this backup will be scheduled to happen every Sunday at 7:00 pm.
- Clicking the Save settings and run backup button will begin the backup and it will run next according to the schedule you selected.
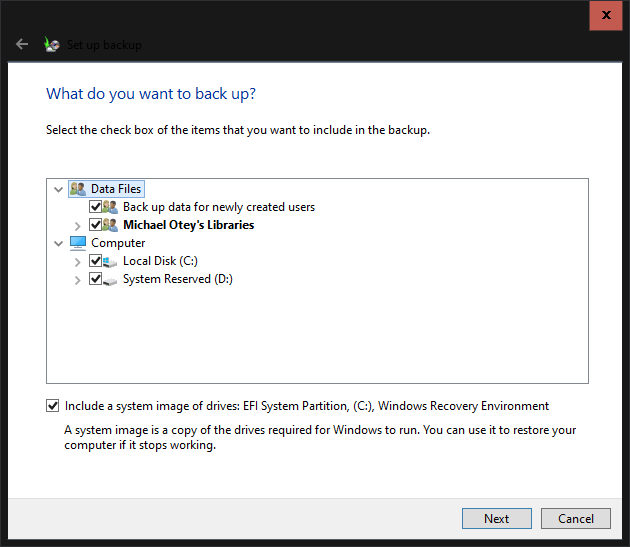
- Alternatively, if you selected the Let me choose option then you will be presented with the backup dialog that you can see in the following figure. By default, the Local Disk and System Reserved drives will be selected. However, you can also choose to backup files for newly created users as well as your own data folders.
- By checking the box at the bottom you can also perform a system image backup that includes the EFI partition, the C drive, and the Windows Recovery Environment.
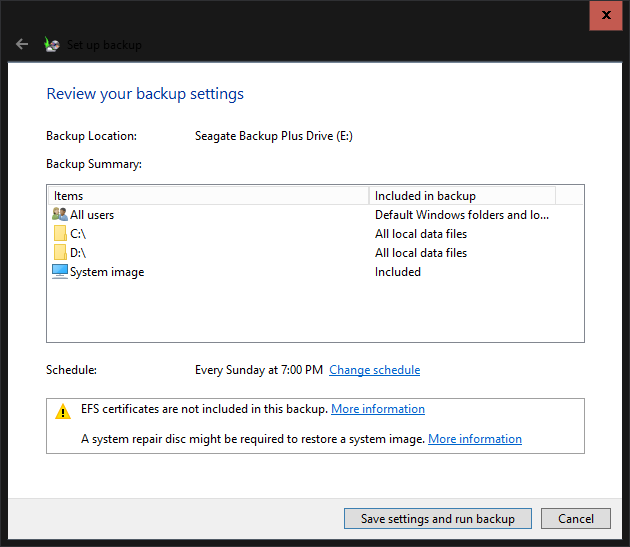
- Clicking Next will display the Review your backup settings dialog that you can see below. This dialog allows you to confirm the choices you made using the backup wizard as well as either accepting or customizing the backup schedule. By default, the backup will run every Sunday at 7 pm.
- Clicking the Save settings and run backup button will execute the backup process.
Restoring your backups in Windows
Let’s look at how to restore backups in Windows.
To restore files from a backup:
- go back to the Control Panel where you can see the Backup and Restore (Windows 7) window.
- then select Restore files from backup.
It’s worth noting that the Backup and Restore (Windows 7) option is a deprecated feature and Microsoft might decide to remove this tool in a future release.
Windows Backup alternatives
There are various third-party backup solutions available that offer more advanced features and customization options than the standard Windows 10 and 11 backup tools. Some popular backup software alternatives include: Acronis True Image, EaseUS Todo Backup, Macrium Reflect, and Paragon Backup & Recovery.
Each of these alternatives offers various features such as full system backups, incremental backups, scheduling options, and more.
Windows Backup for Organizations
Windows Backup for Organizations (WBfO) is designed to do a specific job, i.e. back up user settings on Windows 10 and migrate them to Windows 11. Both the source and target devices need to be Microsoft Entra joined.
WBfO moves user settings to the cloud and when the new device, or existing device is upgraded to Windows 11, is ready to use, users sign in with their Microsoft Entra ID account and their Windows settings are automatically applied back to the device.
Windows 365 Reserve
Microsoft has announced Windows 365 Reserve, now in public preview for commercial customers. This new offering gives employees immediate access to a temporary Cloud PC when their primary device is lost, stolen, delayed, or down. Windows 365 Reserve provides a secure, cloud-hosted Windows desktop that looks and feels like a physical PC, and is accessible from any device, anywhere, so employees can continue being productive. It allows users to access their files that are synchronized to the cloud.
Summary
Windows 10 and 11 both come with three different built-in backup options that you can use to protect your desktop and laptop systems. The backup and recovery options for each backup method are quite different.
The Windows Backup app uses OneDrive and it’s best for backing up your settings and personal files making it easier to move to another Windows system. However, it will not backup or restore your current Windows system.
The File History backup option is focused on data protection and it makes automatic backups of your changed files. It also cannot be used to restore your Windows system.
The Backup and Restore (Windows 7) option does allow you to make and perform full Windows system image recovery as well as data files, making it suitable for full system disaster recovery. However, this option has not been updated since Windows 7 and may be discontinued in the future.
The built-in Windows backup solutions are sufficient for most user’s backup requirements. However, many businesses choose third-party solutions for their flexibility, additional features, and performance. Ultimately, your choice of desktop and laptop backup depends on your own specific requirements and preferences.
Frequently asked questions
1. How do I backup my entire Windows?
To back up your entire Windows system (often called a system image backup), you can use built-in tools or third-party software.
Built-in method:
- Open the Control Panel → Backup and Restore (Windows 7) (yes, it still exists in Windows 10/11).
- Click Create a system image and choose where to save it (external drive, DVDs, or network location).
- Follow the prompts to include all system drives.
This creates a full copy of your Windows installation, settings, apps, and files—allowing a complete restore if your system fails.
2. What is Windows Backup?
Windows Backup is Microsoft’s built-in utility that lets you create backups of files, folders, and sometimes entire system images. Depending on your version of Windows, it may include:
- File History – Regularly saves copies of personal files so you can restore earlier versions.
- Backup and Restore (Windows 7) – Allows scheduled file backups and full system images.
Its purpose is to protect your data and system from hardware failure, accidental deletion, or corruption.
3. Is Windows Backup free?
Yes. Windows Backup and its related features (File History, Backup and Restore) are included at no additional cost in Windows 7, 8, 10, and 11.
However:
- You’ll need to provide your own storage device or cloud subscription.
- Advanced backup options (e.g., incremental, differential, or multi-cloud backups) may require paid third-party software.
4. Does Windows 10 have built-in backup?
Yes. Windows 10 includes multiple built-in backup tools:
- File History – For personal file versioning.
- Backup and Restore (Windows 7) – For file and system image backups.
- OneDrive Integration – Syncs files to the cloud for easy recovery.
These tools can be used separately or together for a more complete backup strategy.

Michael Otey is president of TECA, a technical content production, consulting and software development company in Portland, Ore. Michael is a former SQL Server MVP and was Senior Technical Director for Windows IT Pro and SQL Server Pro. He covers the...