Manage-Bde – BitLocker Drive Encryption from the Command Line
Encrypt Windows drives from the command line using Manage-Bde.

Learn about key Manage-Bde commands, scripting possibilities, and troubleshooting tips to secure drives efficiently in enterprise or standalone environments—your ultimate goal – to have all of your devices BitLocker-protected.
How to use Manage-Bde
First, we’ll start with preparing to use the tool.
Prerequisites
First, you’ll only find the tool running on Pro, Enterprise, and Education SKUs of supported versions of Windows. A few OEM Windows 11 Home devices with modern hardware are also supported. All supported versions of Windows Server support BitLocker (you need to verify the ‘BitLocker Drive Encryption’ feature is enabled in Server Manager.)
You need to use shells (Command Prompt, Windows Terminal, PowerShell, etc.) with administrative permissions.
The hardware requirements for BitLocker are as follows:
- TPM 1.2 or 2.0 (The Trusted Platform Module must be enabled in the UEFI/BIOS of the device)
- Secure Boot – this is required for TPM+PIN protection on UEFI systems.
- Hardware Compatibility – some older BIOS systems may need to have their ‘Legacy Mode (CSM)‘ enabled.
Want to use PowerShell instead? Check out our guide on Command Prompt vs PowerShell on Petri.com.
Key Manage-Bde commands and syntax
Let’s first do some quick sanity checks and make sure our system is compatible and ready.
Use this to check the status of TPM on your device.
Get-TPM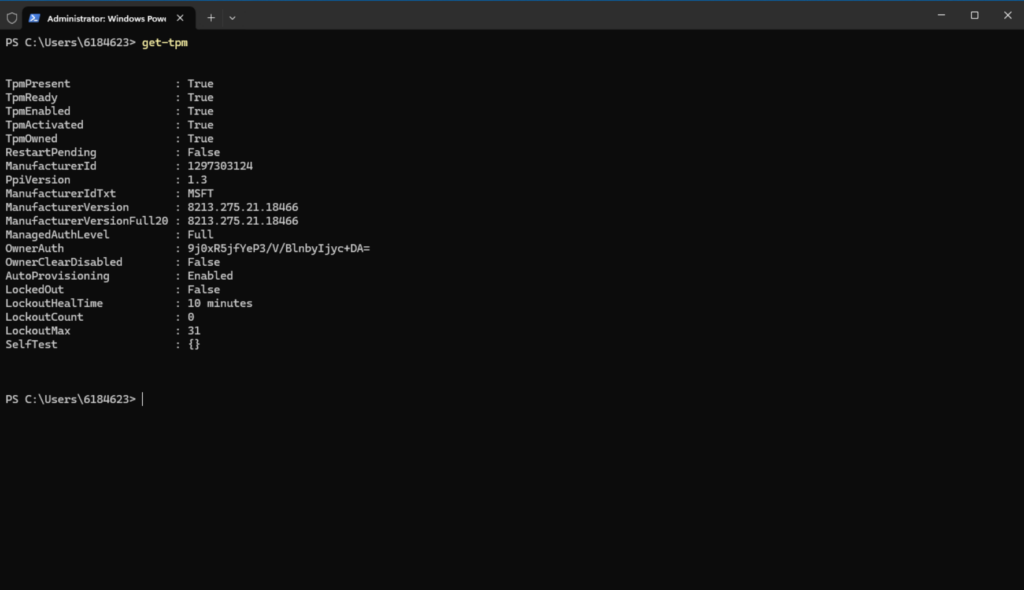
As long as most or all of the first few fields are ‘True’, you’re good to go. Next, we’ll check the current status of BitLocker on my Hyper-V virtual machine running Windows 11.
manage-bde -status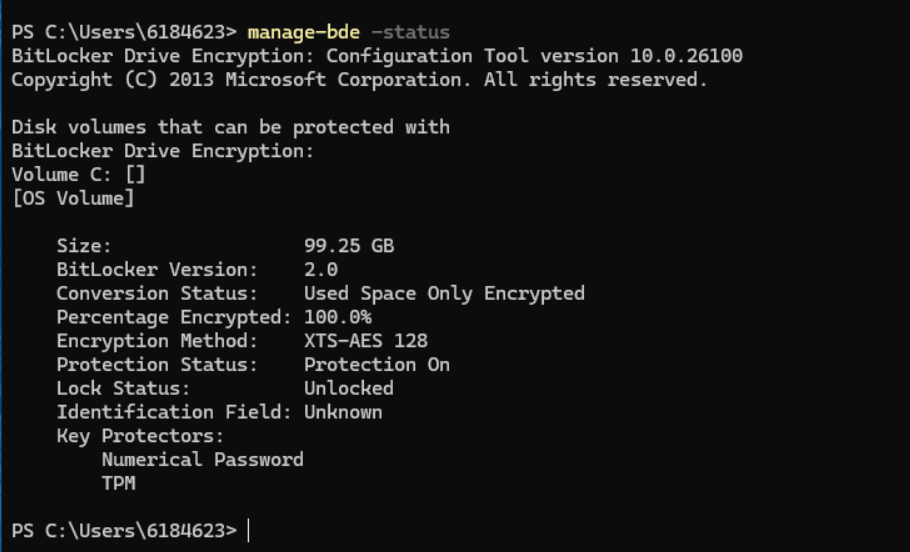
You can see that the only drive, the OS drive (C:), is enabled – ‘Protection On.’ The default action during Windows Setup (unless you’re using an unattended script or OS automation deployment tools), is to use ‘Used Space Only Encrypted’, meaning only the space used by files is encrypted. This is much faster but not entirely secure. However, it will do in most cases.
manage-bde -on cYou would use this on devices where the protection status is essentially not enabled. This command will encrypt the drive (with default parameters) and turn on BitLocker.
I added a second data drive to my virtual machine (VM), fired it up, and assigned it a drive letter. I ran manage-bde: -status again and took a look.
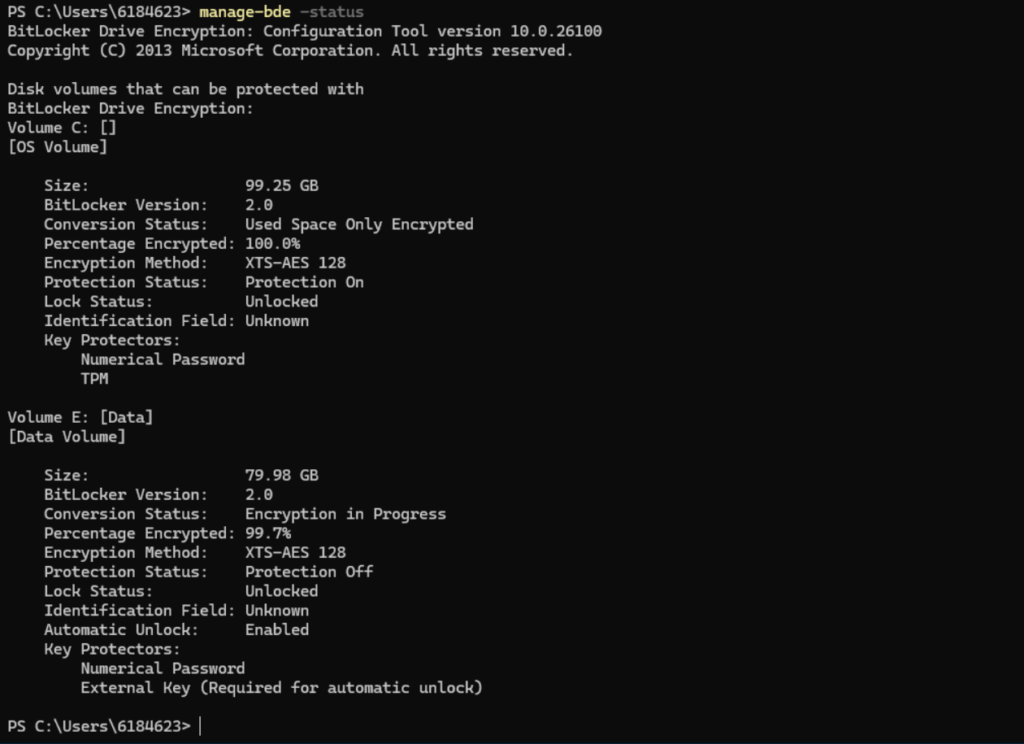
Windows automatically started to encrypt the data drive as soon as it was formatted. What if I want to disable BitLocker on my Data (E:) drive? I’ll use this command.
manage-bde -off E:
And, because it was a brand-new drive, we can check status again…
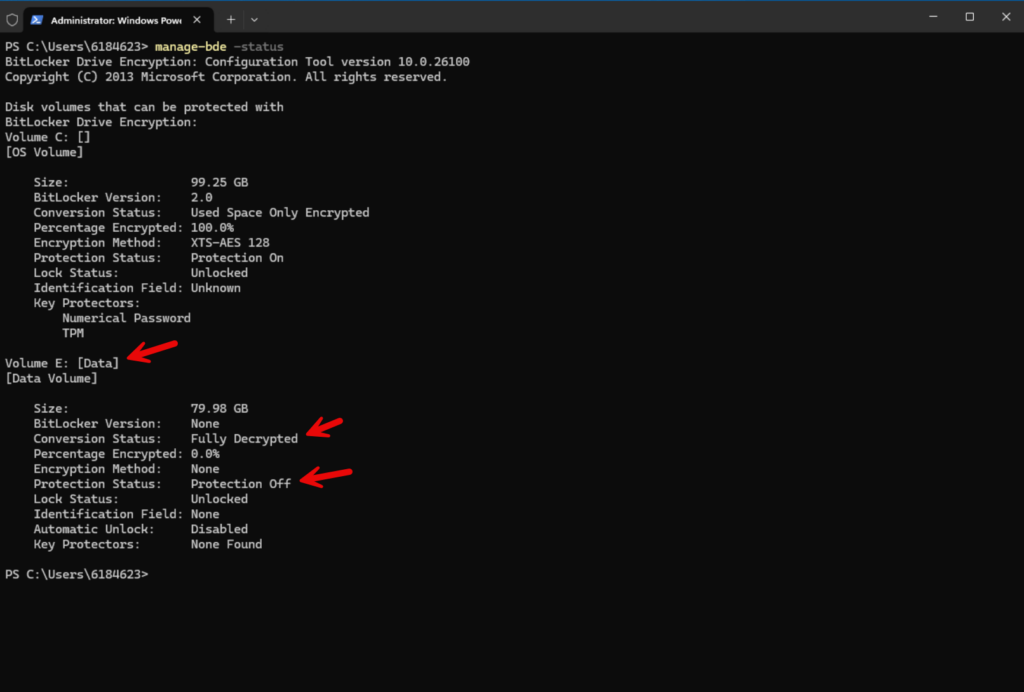
Sure enough, my E: drive is again decrypted and unprotected.
Let me close with a very useful switch to get the current Recovery key for a protected volume.
manage-bde -protectors -get C: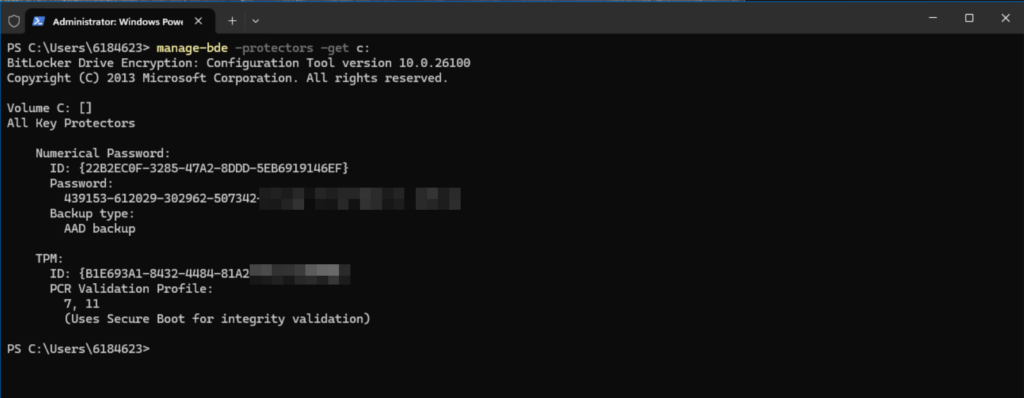
Now, you need to be careful with this. My image is masked for security reasons. This key would allow a hacker or ‘unethical’ individual to unlock the Windows volume.
Let’s finish this section with some additional switches.
- -pause – This will pause a decrypting volume
- -resume – This will resume a previously paused encrypting volume
- -protectors – manages protection methods and recovery keys, and your encryption key
- -wipefreespace – Wipes the free space on a drive
More Manage-Bde use cases
Here are some more use cases for utilizing different switches and parameters when using the Manage-Bde command-line tool. Let’s go through some more common ones.
| Use case | Manage-Bde command | Description |
| Backing up the Recovery Key | manage-bde -protectors -add C: -Recoverykey G:\ | This saves the recovery key to a file in the root of the G: drive. This needs to be a removable drive type. |
| Adding a password protector | manage-bde -protectors -add C: -password | This will prompt you to set a new password for unlocking the protected C: drive. The stronger, the better. |
| Lock or unlock a protected drive | manage-bde lock C: OR manage-bde -unlock E: -password | The first command will lock the C: drive. The second command will prompt you for the password to unlock the E: drive. |
Advanced topics
There are some more advanced (and less common) scenarios you’ll inevitably run into when managing BitLocker with Manage-Bde. Here are some good examples to keep in the back of your mind.
You can use the -forcerecovery switch to tell Windows to reboot the computer and require the BitLocker Recovery screen to come up and prompt for the Recovery key.
Pre-provision BitLocker for OS deployment
Why should you look into incorporating BitLocker Drive Encryption into your automated OS deployment routines? Manage-Bde can offer you faster deployment, security compliance, zero-touch for your devices, among other features.
As an example, if you use the Microsoft Deployment Toolkit (MDT) or Configuration Manager (SCCM), you can include this line during the Windows PE part of your deployment task:
manage-bde -on C: -usedspaceonly -skiphardwaretestIf you’re using more modern tools like Windows Autopilot and/or Microsoft Intune, you can perform these steps:
- Configure BitLocker policies in Intune:
- Enable “Pre-provision BitLocker” in Endpoint Security > Disk Encryption.
- Set TPM + PIN or TPM-only mode.
- At deployment:
- BitLocker starts encrypting before the user setup.
Troubleshooting and conclusion
BitLocker Fails to Enable (manage-bde -on Errors)
Symptoms:
- Errors like:
- “BitLocker could not be enabled.”
- “A compatible TPM was not foun.d”
- “The system volume is already encrypte.d”
Causes and fixes:
| Cause | Solution |
|---|---|
| Missing TPM (or disabled in BIOS) | Use -skiphardwaretest and a USB startup key:manage-bde -on C: -SkipHardwareTest -RecoveryPassword |
| Incorrect disk partitioning (No system partition) | Re-partition disk (GPT with 500MB EFI + MSR) |
| BitLocker already enabled | Check status first: manage-bde -status C: |
| Insufficient disk space | Free up space (6GB+ required) |
Another troubleshooting technique you can use is to input your BitLocker Recovery Key to unlock a data drive.
manage-bde -unlock E: -recoverypassword 111111-999999-222222-888888-333333-777777-444444-666666What is BitLocker?
BitLocker Drive Encryption, a software-based drive encryption software feature, rolled out with Windows Vista Enterprise and Ultimate editions way back in 2006. At that time, only the entire OS drive was supported. It required a TPM 1.2 chip or a USB startup key.
Encrypting additional data volumes/drives was introduced with Windows 7 in 2009. Windows 8/8.1 added ‘Used-space-only encryption, providing a faster initial setup. Along the way, with Windows 10 and Windows 11, additional features, including enhanced encryption and Entra ID (Azure AD) integrations, have made it a truly helpful and required feature for many enterprises across the globe.
Reasons to use Manage-Bde to manage BitLocker Drive Encryption
Windows comes with a BitLocker Control Panel applet to manage and verify BitLocker encryption status. However, for IT Pros and system administrators who prefer the command-line world and want to engage in scripting and automation tasks, ‘Manage-Bde’ is the tool to use.
Besides automation, there are other reasons to use Manage-Bde:
- Quick wipe: Securely erase keys,
-WipeFreeSpacebefore decommissioning drives. - Granular Control
- Flexible encryption options: Choose algorithms (AES-CBC, XTS-AES) and key strengths (128-bit, 256-bit).
- Partial vs. full encryption: Encrypt only used disk space (
-UsedSpaceOnly) or the entire drive. - Pre-provisioning: Prepare drives for encryption before OS deployment (e.g., in Windows PE).
- Advanced Recovery & Management
- Recovery key backup: Force backup keys to Active Directory (-ComputerName, -BackupToAd).
- Protector management: Add/remove TPM, PIN, USB, or recovery passwords dynamically.
- Emergency recovery: Unlock a drive manually if the TPM fails (-RecoveryPassword).
Security and compliance
- Enforce policies: Align with organizational security standards (e.g., mandatory PINs for boot).
- Hardware-bound encryption: Ensure TPM-only unlocks for high-security environments.
Frequently asked questions (FAQ)
What is manage-bde?
manage-bde is a command-line tool provided by Microsoft to manage BitLocker Drive Encryption on Windows systems. It allows IT administrators and advanced users to perform a wide range of BitLocker-related tasks—such as enabling or disabling encryption, viewing status, unlocking drives, backing up recovery keys, and more—directly from the Command Prompt (CMD) or Windows PowerShell.
How to check manage-bde status in CMD?
To check the BitLocker status of your drives using manage-bde, follow these steps:
- Open Command Prompt as Administrator.
- Type the following command and press Enter:
manage-bde -status - The output will display the encryption status of each volume, including whether it is protected, the encryption method used, percentage completed, and more.
This is especially useful for verifying if BitLocker is enabled or paused on a particular drive.
What does BitLocker do?
BitLocker is a full-disk encryption feature built into Windows that protects data by encrypting entire volumes. It prevents unauthorized access to data on lost or stolen devices, especially if the hard drive is removed and accessed on another system. BitLocker uses the Trusted Platform Module (TPM) or a password/PIN for authentication, and it integrates with Active Directory for key recovery in enterprise environments.
How do I get the BitLocker recovery key using manage-bde?
To retrieve the recovery key using manage-bde, use the following command:
manage-bde -protectors -get C:
Replace C: with the drive letter of the volume you’re checking. This command displays all protectors for the specified drive, including the recovery password (also known as the recovery key). Make sure to run the command as an administrator. The recovery key is typically a 48-digit numeric string, which can be saved or backed up manually or through Active Directory or Entra ID (Azure AD) in managed environments.

Michael has been an IT Pro since 1998. He has worked predominantly in the Windows world including client and server operating systems, on-prem systems engineering (AD, DNS, etc.), and over the last ten years or so has embraced and immersed himself in...