Getting Started with PowerCLI: Creating a Virtual Machine
- Blog
- PowerShell
- Post
At this point in learning how to leverage PowerShell and PowerCLI to manage your VMware Infrastructure, let’s turn our attention to PowerCLI and creating a new virtual machine from the command line. If you missed any of the previous articles in this series, I recommend you get caught up first.
In part one, we took a look at downloading and installing PowerCLI. In part two, we went through the steps of setting up and configuring PowerCLI. And in part three, I showed you how to use PowerCLI to start and shutdown VMs. In part four, we went over PowerCLI and PSDrives. Next, in part six I’ll show you how to use PowerCLI to manage your ISO files.)
Creating a New Virtual Machine
I’ve already loaded the PowerCLI snapin and connected to my VMware host server. Not surprisingly, the cmdlet we will use is called New-VM. Even more amazingly is that it requires hardly any effort to use!
PS C:\> new-vm cmdlet New-VM at command pipeline position 1 Supply values for the following parameters: Name:
I didn’t bother to specify any parameters. All the cmdlet required is the name of the new virtual machine so it prompted me. I entered Petri-1 and hit Enter. That’s it.
PS C:\> get-vm petri-1 Name PowerState Num CPUs MemoryGB ---- ---------- -------- -------- Petri-1 PoweredOff 1 0.250
Of course, there is more to the new VM than what you see here.
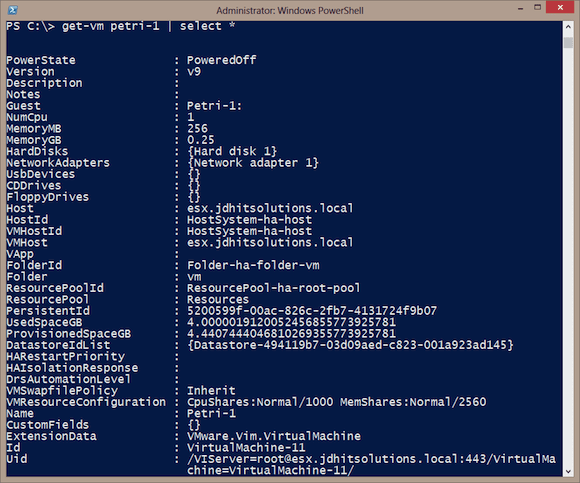
PS C:\> get-vm petri-1 | select *
Figure 1 shows the default settings for my server.
If you create a new virtual machine and try a command like this you might see some warnings about a number of deprecated properties. That’s fine. Based on what I see here I can see that PowerCLI created a virtual machine with 256MB of RAM and a single processor. From the ProvisionedSpaceGB property it appears I also have a 4GB hard drive. I can drill down and get more detail.
PS C:\> get-vm petri-1 | select -expand hardDisks
Based on Figure 2, the new drive is in Datastore 3.
I also can see that the virtual machine was placed on the default virtual network.
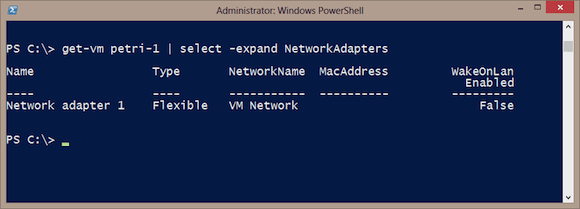
PS C:\> get-vm petri-1 | select -expand NetworkAdapters
In the image above, we see a single adapter. Now, in figure 4 below, you can see that I only have one network defined so this is not a problem.
But I expect that a 256MB virtual machine with a 4GB drive isn’t what you had in mind.
Creating a Customized Virtual Machine
You will need to use a few more parameters with New-VM. I’m not going to cover every possible parameter permutation. As with any new tool you should take the time to read full cmdlet help and examples. I’ll focus on more typical usages. I think you will most likely want to configure these settings:
- Virtual machine name
- Virtual machine location
- Virtual machine guest type
- Number of processors
- RAM
- Disk size, type and location
- Add a CD/DVD drive
For the sake of simplicity, I’m going to assume a single network, like I have. If you have multiple networks, in PowerCLI they are referred to as port groups, there is a parameter to specify one. I’m also going to assume you are happy creating a virtual machine with the most current hardware version and other default settings like the virtual machine swap file policy.
The name for the new virtual machine is pretty self explanatory. The location, maybe not so much. Depending on your server configuration you may have several storage locations. I have three possible datastores I could use:
PS C:\> get-datastore
As you can see below in Figure 5 since Datastore1 has the most free space, I’ll use that.
The number of processors is specified with the –NumCPU parameter. Using –CD will add a CD/DVD to the virtual machine. That’s easy. Specifying the disk size can be done using a value in GB (-DiskGB). There is a –DiskMB parameter which will work, but is obsolete. Memory is handled the same way. Again use -MemoryGB.
However, you might also need to consider how the disk will be formatted. The –DiskStorageFormat parameter accepts Thin, Thick, and EagerZeroedThick values. Thin is the dynamically expanding disk you are probably familiar with. Thick create a complete disk file using the specified size. According to the VMware documentation, “An eager zeroed thick disk has all space allocated and wiped clean of any previous contents on the physical media at creation time. Such disks may take longer time during creation compared to other disk formats.” The differences between the thick options are minor. There are some special use cases, such as clustering, where you’ll need to use EagerZeroedThick. If you don’t specify a value, the default is Thick. Personally, I prefer Thin as space on my server is always tight.
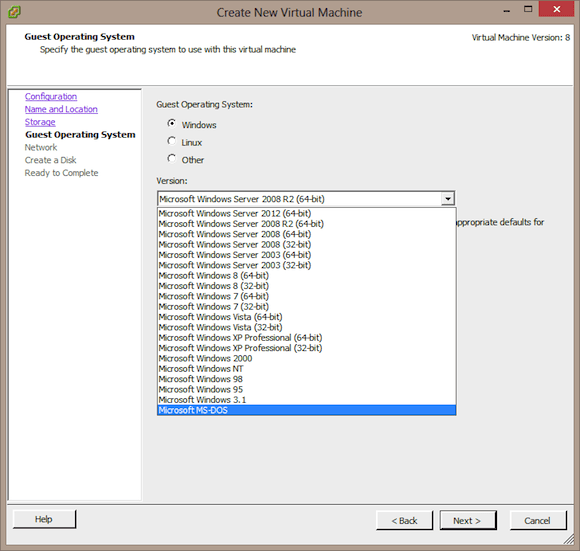
The last setting I recommend is defining the Guest OS identifier. This is what you see in the vSphere client when manually creating a new virtual machine.
Unfortunately you can’t simply use one of these values. You need to find the corresponding identifier. I have yet to find an easy method using PowerShell to enumerate these values Instead use these values.
With all of this information, I can now create a new virtual machine that is better suited to my needs.
PS C:\> New-VM -Name Petri-2 -Datastore Datastore1 -DiskGB 20 -DiskStorageFormat Thin -MemoryGB 4 -CD -GuestId windows7Server64Guest -NumCpu 2 Name PowerState Num CPUs MemoryGB ---- ---------- -------- -------- Petri-2 PoweredOff 2 4.000
I now have a virtual machine ready to run Windows Server 2008 R2 (64bit) with two processors, 4GB of RAM, and a 20GB disk. The machine was created on the server I had previously connected to.
The New-VM cmdlet also supports –WhatIf so you can verify your settings are correct. You might also choose to run the command with the RunAsync parameter, especially if using Thick disks which might take some time to create. Using –RunAsync will launch a backgroup VMware task and give you your PowerShell prompt back.
Of course, my virtual machine is lacking an operating system. We’ll look at that little problem in the next article!


