How to Install and Configure Microsoft LAPS

Microsoft’s Local Administrator Password Solution (LAPS) tool was released May 1st 2015, and it consists of a Group Policy client-side extension (CSE) that enables organizations to manage local administrator account passwords on domain servers and workstations by automating regular password changes and storing them in Active Directory. In this article, I’ll explain why you should use Microsoft LAPS, how it works, and show you how to set it up.
The problem with local administrator accounts
It’s not uncommon for local administrator accounts to be configured with the same password across all devices in corporate environments, leading to the possibility that if an attacker were to discover the password, every device could be compromised.
🎬 Watch This Week in IT.
Some organizations manage this risk by manually renaming the built-in administrator account, setting a random password, and recording that information in a spreadsheet. But that doesn’t address the issue of changing the passwords periodically. Others go a step further, and disable the built-in administrator, creating a new administrative account on each device.
While there are third-party solutions that can help mitigate the threats posed by unmanaged local administrator accounts, the Microsoft LAPS tool, which can be downloaded free here, presents a solution that randomizes passwords every 30 days, or a period of your choice, and stores them securely in Active Directory for each computer account.
Download and install Microsoft LAPS
Follow the instructions below to install LAPS on a management computer. Log on to the computer as a local administrator. In this lab, I have one member server (contososrv1) located in the Member servers Organizational Unit (OU).
Microsoft LAPS consists of three parts:
- The user interface (UI)
- An extension to the AD schema
- A client-side component that manages password resets and updates to AD
- Run the downloaded LAPS.x64.msi or LAPS.x32.msi package, appropriate for your device’s architecture.
- Click Next on the welcome screen.
- Accept the terms and conditions on the End-User License Agreement screen, and then click Next.
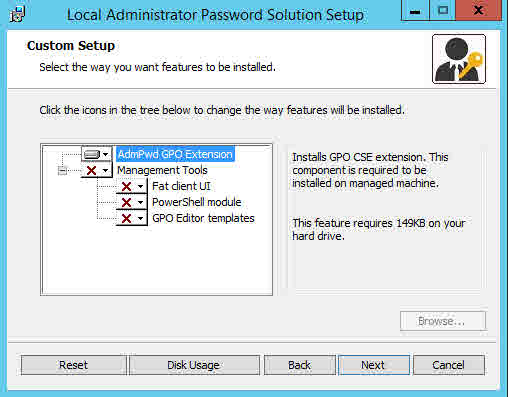
- If this a device from which you intend to manage Microsoft LAPS, make sure that the Management Tools, including Fat client UI, PowerShell module, and GPO Editor templates, are also checked for install before clicking Next on the Custom Setup screen.
- Click Install to complete the process, and then Finish.
Install Microsoft LAPS on a managed computer
To install LAPS on a managed computer, repeat the above procedure without adding the management tools on the Custom Setup screen. Alternatively, you can run a silent install from the command line if you want to automate installation, replacing c: with the folder path where LAPS.x64.msi is located.
Extend the AD schema
Before the tool can be used to manage passwords, the Active Directory (AD) schema must be extended. Two new attributes are required, ms-MCS-AdmPwd and ms-MCS-AdmPwdExpirationTime, which store a device’s local administrator account password, and the time when it should be reset.
Both are added to the computer class may-contain attribute set. Note that once you’ve updated the schema, you cannot undo the changes.
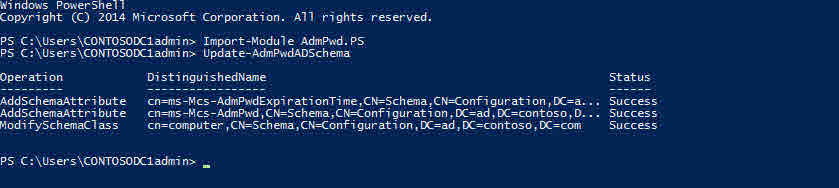
Microsoft LAPS contains a PowerShell module to update the AD schema automatically. Remember that you must be logged in as a Schema Administrator to update the AD schema. To import the module and update the schema, open a PowerShell prompt and run the following two cmdlets:
Import-Module AdmPwd.PS

Update-AdmPwdADSSchema
If you have any read-only domain controllers (RODC) in your domain, and you want to replicate the two new attributes to those DCs, you’ll need to add them to the attribute set that gets replicated to RODCs.
Set permissions for the new AD attributes
There are several different access requirements for the new AD attributes that you need to consider.
Machine rights
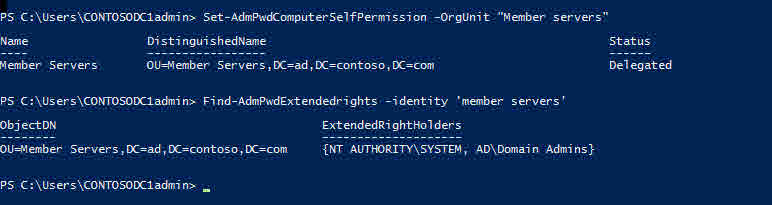
The first is giving devices permission to write to the new attributes. This is done using the Set-AdmPwdComputerSelfPermission PowerShell cmdlet that’s part of the AdmPwd module imported above.
The –OrgUnit parameter should be followed by an OU name. If the specified OU contains other nested OUs, you don’t need to specify them individually as the command sets permissions recursively, as is the case with all the cmdlets included in the AdmPwd module.
Set-AdmPwdComputerSelfPermission -OrgUnit "Member Servers"
All Extended Rights
Next let’s determine which users and groups have the All extended rights permission on the OU. Users with this permission have the right to read confidential attributes. Again, we can use a cmdlet that’s part of the AdmPwd module to achieve this:
Find-AdmPwdExtendedRights -Identity 'member servers'
In my domain, only Domain Admins and SYSTEM have this permission, so I don’t need to make any changes. If you do need to remove the All extended rights permission for specific users or groups from the OU, ADSI Edit is the right tool for the job and can be found on the Tools menu in Server Manager.
User Rights
Finally, decide which users and groups need to be able to read the contents of the new attributes. For example, helpdesk users might need access to the local administrator password. Again, the AdmPwd module contains a command to set rights on a given OU.
In the cmdlet below, you can see that I’ve specified the domain group helpdesk.
Set-AdmPwdReadPasswordPermission -Identity "Member Serveres" -AllowedPrincipals "helpdesk"
Create a Group Policy Object
Now that all the prerequisites are in place, all I need to do is configure the Microsoft LAPS settings in a Group Policy Object (GPO), and apply it to my Member Servers OU. For more information on creating and linking GPOs, see How to Create and Link a Group Policy Object in Active Directory on Petri.
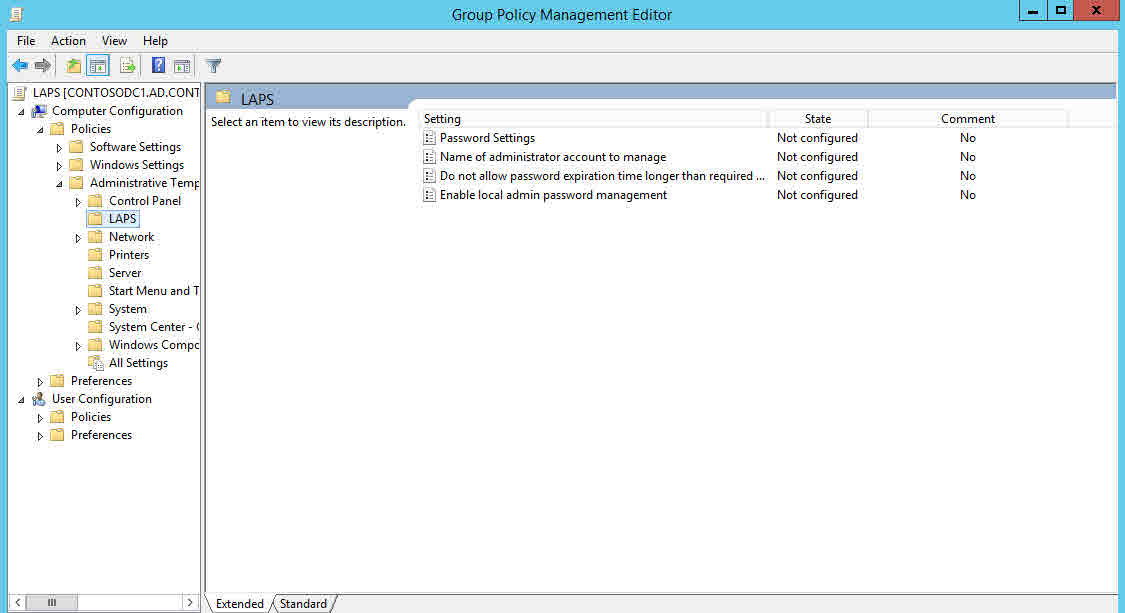
The LAPS Group Policy settings are located under Computer Settings, Policies, Administrative Templates in the Group Policy Object Editor. There are four settings:
- Password Settings
- Name of administrator account to manage
- Do not allow password expiration time longer than required by policy
- Enable local admin password management
The Enable local admin password management setting must be set to activate LAPS on the managed computer. Password Settings allows you to configure password complexity, length and age. By default, LAPS uses maximum password complexity, a 14-character password length, and a password change every 30 days. You only need to enable the Password Settings policy if you want to change these defaults.

If you intend to use LAPS to manage the password of an account other than that identified by the well-known SID of the built-in administrator account, then you need to specify the account name in this policy. If you have renamed the built-in administrator account, there’s no need to enable this policy.
Enabling the Do not allow password expiration time longer than required by policy setting strictly enforces the age of the local administrator account’s password. I.e. it is not allowed to drift beyond the specified age limit and is changed immediately should that occur.
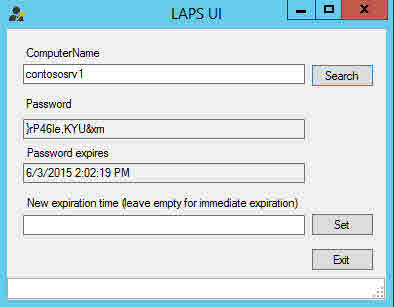
View the passwords stored in Active Directory
Once you have a LAPS policy applied to an OU, and Group Policy has refreshed on computers in scope, users that have permission can view the passwords stored in Active Directory. The easiest way is to use the Get-AdmPwdPassword cmdlet included in the AdmPwd PowerShell module installed as part of the LAPS management components.
Get-AdmPwdPassword -ComputerName <computername>
Alternatively, there’s a GUI tool (AdmPwd.UI.exe) included in the install package, located in
C:Program FilesAdmPwd
You can also audit access to the stored Microsoft LAPS passwords in Active Directory.
Troubleshooting LAPS
If you run into any problems with the LAPS CSE, events are logged to the local computer’s Application log, and the level of information can be tuned on the local device by configuring the ExtensionDebugLevel registry value under:
HKEY_LOCAL_MACHINESOFTWAREMicrosoftWindows NTCurrentVersionWinlogonGPExtensions{D76B9641-3288-4f75-942D-087DE603E3EA}}.
0 is the default value and logs errors only. 1 logs errors and warnings, and 2 is verbose mode and logs everything.
If you set ExtensionDebugLevel to anything other than zero, don’t forget to set the value back to zero once you’ve finished debugging. The registry can be modified using the Registry Editor (regedit) tool in Windows 8 and Windows Server 2012, but remember that accidental changes to the registry can render a system unusable, so always have a backup before using this tool.
Related Article:
Russell Smith, the Editorial Director at Petri IT Knowledgebase, has over two decades of hands-on experience in IT, in both small business settings and government IT infrastructure projects. Russell started writing for Windows IT Pro Magazine in t...


