- Blog
- PowerShell
- Post
How to Use the PowerShell Get-MessageTrace Command in Office 365

The PowerShell Get-MessageTrace command can help Office 365 admins track down the delivery and processing of email messages that may not be getting into their users’ mailboxes. In this article, I’ll show you how to use the Get-MessageTrace command to manage and analyze email message traces in Office 365.
Using PowerShell Get-MessageTrace with Exchange Online
The Get-MessageTrace cmdlet is the default method for administrators to analyze and manage email traffic within Exchange Online. However, this PowerShell command is only available in Exchange Online (part of Office 365) environments.
In an Exchange on-premises environment, the Get-MessageTrace PowerShell command is not available, and your alternative is the Get-MessageTrackingLog cmdlet. The Get-MessageTrace PowerShell command provides similar functionality to its on-premises counterpart, but again, this cmdlet is specifically designed for cloud-based Office 365 environments.
Exchange on-premises vs. Exchange Online message tracing: Key differences
- Environment: Exchange on-premises deals with an organization’s own servers, while Exchange Online is a cloud-based service provided by Microsoft.
- Integration: In Exchange Online, the Get-MessageTrace command seamlessly integrates with Office 365’s security and compliance features, while in on-premises environments, the Get-MessageTrackingLog cmdlet must be used.
- Authentication: The authentication methods and PowerShell sessions are managed differently due to the cloud-based nature of Exchange Online.
- Scalability: Exchange Online’s scalability is designed to handle large email workloads without the need for on-premises hardware upgrades.
Connecting to Exchange Online
Here’s a quick refresher: to use any Exchange Online cmdlets, you need to establish a remote PowerShell session with your Office 365 environment. Open Windows PowerShell and run the following command.
Connect-ExchangeOnline
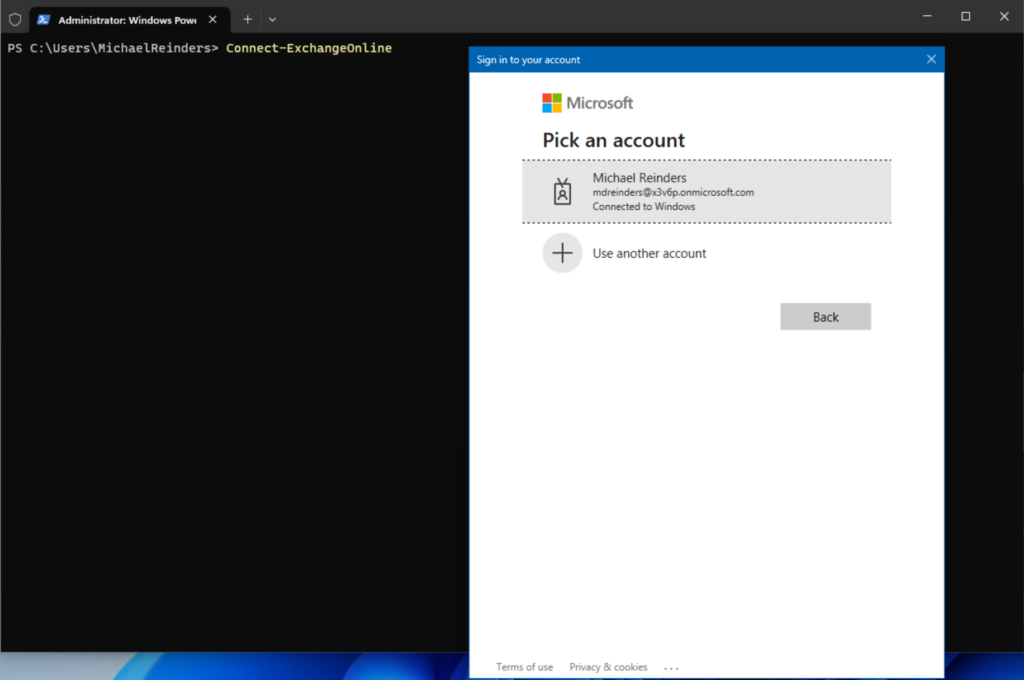
There, you’re used to it, right? If you need a little more help with the prerequisites required to be able to connect, please read my previous post on how to connect to Exchange Online.
Using Get-MessageTrace with a specific date range
Analyzing email traffic within a specific date range is a common administrative task. The Get-MessageTrace cmdlet enables you to filter and review email messages based on their creation or delivery date. Please be advised that there is a maximum of 10 days’ worth of history that this PowerShell command can access. If you need to investigate email flow earlier than 10 days ago, you will need to use the Exchange Admin Center website and run a message trace for a longer time period.
Here’s a step-by-step guide on how to use the Get-MessageTrace cmdlet to search for messages within a specific date range.
Last x minutes
The ‘StartDate’ parameter is what’s used to specify what timeframe you want to search for. You can enter dates (up to a maximum of 10 days). However, you can also include times. Be sure to enclose your data/time ranges in quotation marks (“”).
Let’s try using the Get-MessageTrace cmdlet to search for emails within the last 90 minutes:
Get-MessageTrace -StartDate "08/15/2023 10:45 AM" -EndDate "08/15/2023 12:15 PM"
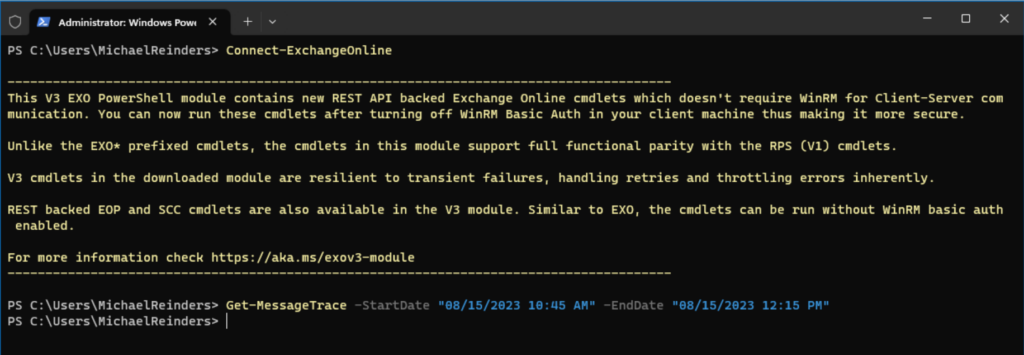
I’ll remind you that I am using my Microsoft 365 Developer tenant, so there’s not a lot of email activity occurring. If you get no output, it simply means that no email traffic records were returned. This can be completely normal.
You could also use a more fancy PowerShell command to go back 45 minutes thusly:
Get-MessageTrace -StartDate (Get-Date).AddMinutes(-45) -EndDate (Get-Date)
Let me send a few emails so you can see how the output will work in your environment.
Last x hours
Now, this is important – Exchange Online will almost certainly be recording email delivery times in UTC! So, I need to adjust my end date times, and I’ll show you how to do that.
Let’s search back to the last 8 or 9 hours:
Get-MessageTrace -StartDate "08/15/2023 10:45 AM" -EndDate "08/15/2023 7:00 PM"
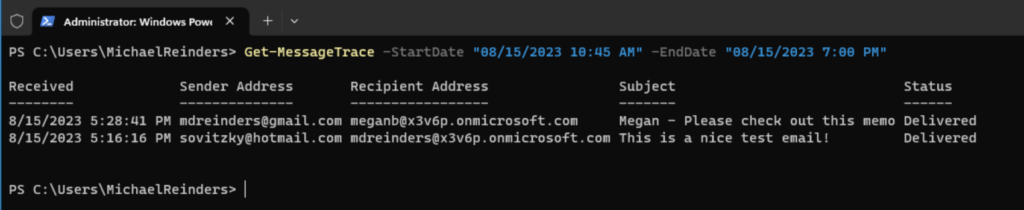
There we go! This shows an email from another account to my main Global Administrator account. As I type this, I sent the email around 12:15 PM (CDT). However, UTC is 5 hours ahead. This is why the email row reports delivery at 5:16 PM (UTC). Please keep that time difference in mind!
Last x days
Although I do not have any email delivery history, I can still show you the command. If you want to show ALL emails processed through Exchange Online, you can simply include the dates.
Get-MessageTrace -StartDate 08/05/2023 -EndDate 08/15/2023

There we go. Because I have Azure AD Connect Cloud Sync configured in this tenant, I receive a weekly email with status updates. The email was sent on 8/8/2023.
Again, remember, you can only search back a maximum of 10 days. If you need to explore further back in time, you will need to use the Message Trace feature on the Exchange Admin Center website. There, you can create a request to go back as much as 90 days.
Using Get-MessageTrace to search by sender email address
Identifying messages sent by a specific sender can be crucial for various purposes, such as investigating communication patterns or addressing security concerns. The Get-MessageTrace cmdlet allows you to search for message traces from a particular email address.
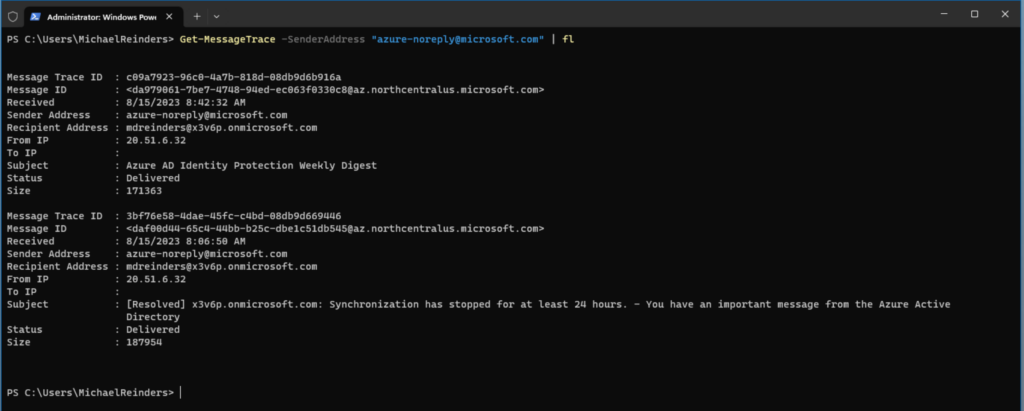
Here’s how to use the ‘-SenderAddress’ parameter to search for message traces from a specific sender:
Get-MessageTrace -SenderAddress "[email protected]"

Cool, there’s another one. Nice and intuitive. And, an excellent tip – if you pipe the results into the Format-List cmdlet, you will get an excellent summary of results including the delivery status, the message-id, the message trace id, the sender address, the recipient address, and much more.
Using Get-MessageTrace to search by recipient email address
Tracking emails sent to a particular recipient is another essential task for administrators. Whether you’re managing email delivery or ensuring sensitive information reaches the right people, the ability to search by recipient email address is invaluable.
Let’s use an example, here we will search for all emails delivered to… me:
Get-MessageTrace -RecipientAddress "[email protected]"

This shows 3 email messages sent to my email address in the tenant. And, by the way, if you do NOT include any time-related parameters, it will report the last 48 hours.
Can you use Get-MessageTrace to search by email subject?
Unfortunately, you can’t use the Get-MessageTrace command to search by subject. For this need, you will want to utilize Microsoft Purview and create an eDiscovery (content) search. You can find more information about that in our previous article about eDiscovery.
Using Get-MessageTrace to search by source and destination IP address
You can also use the Get-MessageTrace command to search by source and destination IP addresses. This allows you to track email messages based on the IP addresses of the sending and receiving servers. This can be particularly useful for diagnosing delivery issues, identifying suspicious activity, and understanding the path that messages take through your email infrastructure.
Here, we can also use the ‘-ToIP’ and ‘-FromIP’ parameters. For example, if we wanted to search for all emails coming from the 44.42.2.55 source IP and our edge firewall’s public IP to receive email, 101.3.2.88, we could use the following command as an example.
Get-MessageTrace -ToIP "4.42.2.55" -FromIP "101.3.2.88"

Again, I don’t have really cool content here to show you, but it works. Really, it does.
How to use wildcards and partial matches
You can also use wildcard characters to efficiently narrow down results. For instance, for security or compliance reasons, let’s say your compliance officer wants to see a record of all emails that have been processed from Gmail in the last 48 hours. Piece of cake!
Get-MessageTrace -SenderAddress *@gmail.com
See, that’s quite easy to do. And you can do the same for recipients. If you want to see all emails delivered to everyone with an email address starting with the letter “m”, try the following command:
Get-MessageTrace -RecipientAddress m*@x3v6p.onmicrosoft.com
Again, that’s very straightforward.
How to get more detailed results with Get-MessageTraceDetail
If you’re looking to expand on the output from the Get-MessageTrace command, you will be delighted to learn that the Get-MessageTraceDetail cmdlet expands on that and shows you the individual processing and delivery events for an email transaction. Let me show you.
First, I will run the Get-MessageTrace cmdlet and pipe it to the ‘Format-List’ (fl) command to get some details.
Get-MessageTrace | fl
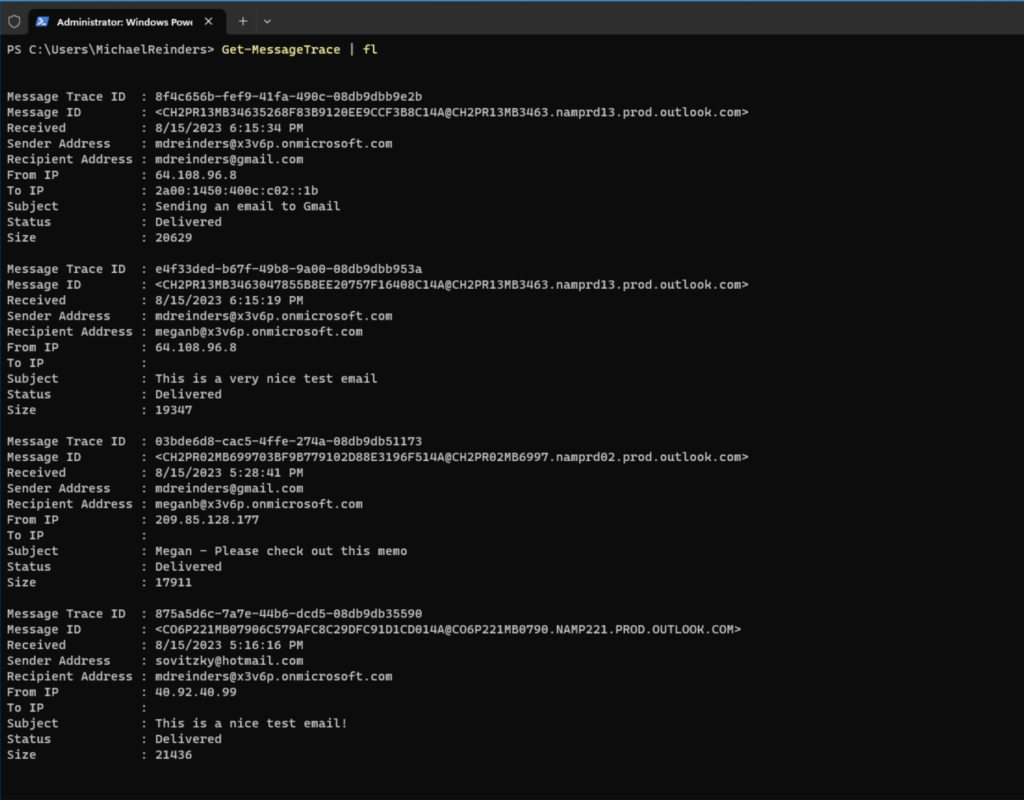
Here, we can see some more details on 4 email messages in the last 48 hours. So, what we can do is grab the Message Trace ID and Recipient Address from the second email and use the following command:
Get-MessageTraceDetail -MessageTraceID e4f33ded-b67f-49b8-9a00-08db9dbb953a -RecipientAddress [email protected]

Here, we can see the 3 events that make up the reception and delivery of the email message from the Internet into Megan’s actual Exchange mailbox. Very nice amount of detail here. This can conceivably show if a message was delivered straight into a user’s Junk Email folder, or if it was auto-forwarded to another internal (or external) mailbox. Overall, that’s very helpful information for IT Pros and Exchange administrators.
How to export results to a CSV file
More often than not, you will be running searches that will report MANY records. You will certainly want to use Excel to analyze and filter the results. To do this, simply pipe your results via the Export-CSV command, like this:
Get-MessageTrace | Export-CSV AllEmailsInLast48Hours.csv

This only took a couple of seconds. Very nice!
How to perform advanced searches with Group-Object
You can use the Group-Object cmdlet to get a more high-level view of our email delivery.
Most active email senders
You can use the following command to find users that have sent the most emails in the last 7 days. Let me show you the command, then I will explain it.
Get-MessageTrace -StartDate (Get-Date).AddDays(-10) -EndDate (Get-Date) | Group-Object -Property SenderAddress | Select Name,Count | Sort Count -Descending

Here, we first gather the complete list of emails processed in the last 10 days. Then, we take that output and use Group-Object command, use the property ‘SenderAddress’, get the count (number of emails), and sort it by the highest amount first.
Recipients that receive the most email
In a similar vein, we can very quickly gather the users that received the most emails in the last 10 days by running the same command and replacing the ‘SenderAddress’ property with ‘RecipientAddress’. Let’s see what happens:
Get-MessageTrace -StartDate (Get-Date).AddDays(-10) -EndDate (Get-Date) | Group-Object -Property RecipientAddress | Select Name,Count | Sort Count -Descending

I do love how powerful and simple PowerShell can be. Now, we have the information. Again, the data in this tenant is VERY low. You will undoubtedly see more robust results when you run these commands in your tenant.
The Get-MessageTrace cmdlet offers flexibility and control
Whether you need to search within a specific date range, identify message traces from a particular sender, or track message traces sent to a specific recipient, the Get-MessageTrace cmdlet provides the flexibility and control you need. Additionally, the ability to export results to a CSV file enhances your ability to analyze and document email communication patterns. By mastering the use of the Get-MessageTrace cmdlet, you can effectively manage email traffic and gain valuable insights into your organization’s communication activities.

Michael has been an IT Pro since 1998. He has worked predominantly in the Windows world including client and server operating systems, on-prem systems engineering (AD, DNS, etc.), and over the last ten years or so has embraced and immersed himself in...


