NTFS Permissions: A Comprehensive Guide

Windows allows users to assign permissions to files and folders, for added security and to control which users can perform specific actions on files and folders. Learn all you need to know about basic permissions, folder permissions, user permissions, explicit permissions, and much more.
What are NTFS permissions?
NTFS permissions, first introduced with Microsoft Windows NT, are one of two types of access controls built-in to Windows systems formatted with the NTFS file system (New Technology File System). The other type is ‘Share’ permissions.
These permissions can be used to restrict who can access files and folders on Windows computers using allow or deny permissions. NTFS permissions are inherited from a root folder (parent folder) to files beneath it. However, this inheritance can be disabled. There is a lot of granularity available, but it can quickly become an administrative nightmare.
How do NTFS permissions differ from Share permissions?
NTFS permissions are set on NTFS volumes, which are logical areas of a physical disk. NTFS permissions control access to files and folders. Share permissions are set on shared folders and help you control access at the share level. Share permissions are evaluated before NTFS permissions.
You will discover more granularity with NTFS permissions, allowing you to grant finer control to your users. On the other hand, share permissions are simpler to manage, but offer less granularity. You essentially have three Share permissions:
- Full Control
- Change
- Read
You’ll find MANY more levels with NTFS permissions later in this article.
How to Set Up NTFS permissions
At the simplest level, IT Pros can use File Explorer (or Windows Explorer) in Windows to set and apply NTFS permissions using access control lists. To open File Explorer, press WIN+E. There are other tools and third-party solutions that can be utilized to offer the same steps, but at a fundamental level, File Explorer is your ticket.
Let me open up my Hyper-V lab with my Windows Server 2022-based Active Directory environment. I have logged into one of my Windows 11 workstation virtual machines (VM) to show you the ropes.
In the figure below, you can see a share on one of my file servers. There are two folders here. Let me right-click on ‘Folder_01’ and click Properties.
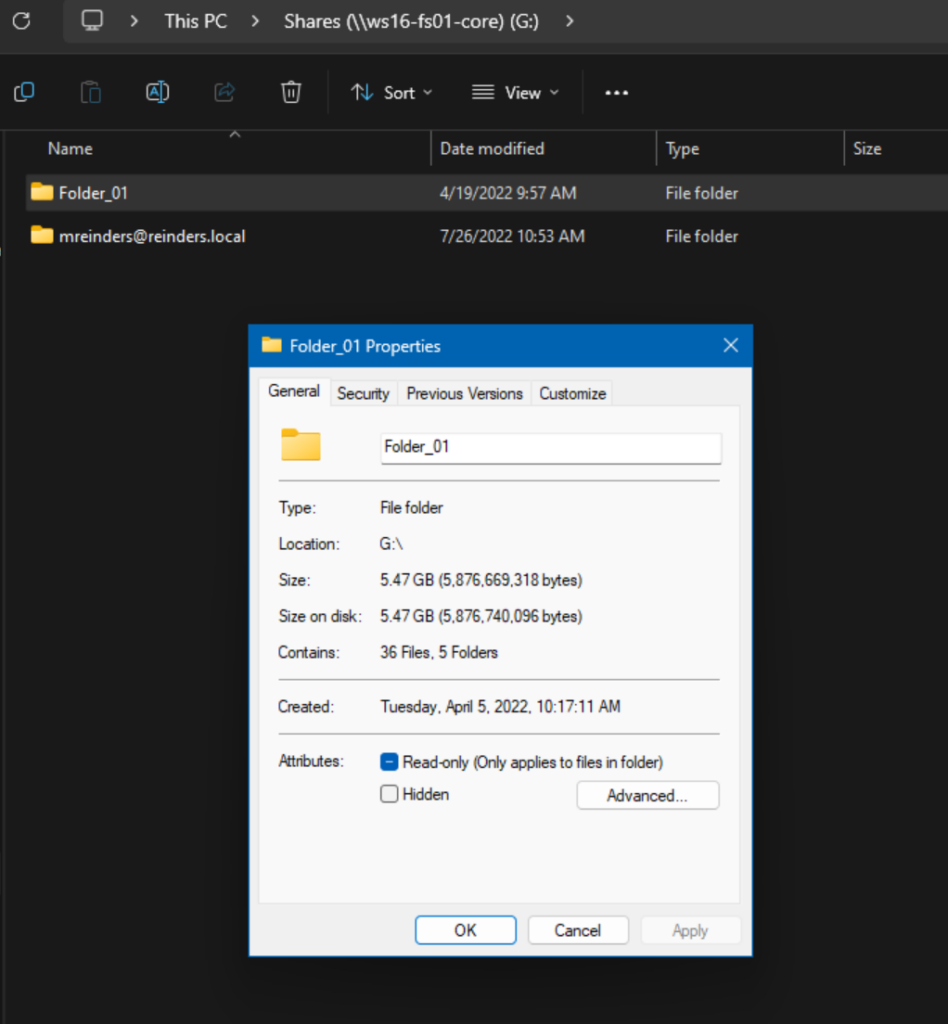
From here we will click the Security tab on the top and then click the ‘Edit…‘ button to make some changes.

We can select each user or group in the first section to view what NTFS permissions said user or group has.
A quick note – if the checkmark is ‘clean’ or not faded, that means the permissions are explicit. If the checkmark is greyed or faded, that means the permission level is inherited from the parent folder above. I will explain this more later.
Let me click the ‘Add…‘ button.
Next, I will type in a user’s name and then click Check Names to confirm the choice. Here I’ve chosen Billy Reinders. I will click OK.

By default, Windows chooses the basic ‘Read’ permissions – ‘Read & execute’, ‘List folder contents’, and ‘Read’. This is what I happen to be looking for – I want Billy to be able to read these files and copy them elsewhere, but I don’t want him to be able to make any changes.
Alright, let’s get into some more details about these permissions and options.
What are the different types of NTFS permissions?
At a fundamental level, there are Basic and Advanced permission types. Basic include: Read, Read and Execute, Write, Modify, List Folder Contents, and Full Control.
- Read: Allows users to view the contents of a file or folder.
- Read and Execute: Allows users to view the contents of a file or folder and execute files.
- Write: Allows users to create new files and folders and modify existing files and folders.
- Modify: Allows users to create new files and folders, modify existing files and folders, and delete files and folders.
- List Folder Contents: Allows users to view the contents of a folder.
- Full Control: Allows users to perform any action on a file or folder, including modifying permissions.
What are special permissions?
Special permissions, or advanced permissions as they are more commonly known, are impressive and daunting at the same time. This list comes straight from ntfs.com and is rather educational.
- Traverse Folder/Execute File: This attribute allows you to move through a restricted folder to reach files and folders beneath the restricted folder. Traverse folder only takes effect when the group or user is not granted the “Bypass traverse checking user” right in the Group Policy snap-in. Remember that this permission does not allow running program files automatically. Execute File: Allows or denies running program (executable) files.
- List Folder/Read Data: This will allow or deny the ability to view file names and subfolder names within said folder. List Folder only affects the contents of the specified folder and does not affect whether the folder you are setting the permission on will be shown. Read Data: Allows or denies viewing data in files.
- Read Attributes: This attribute is very common. This allows the user or group to view the attributes of a file or folder, for example, “read-only” and “hidden”.
- Read Extended Attributes: This is a tad more obscure, but it allows a user to view the extended attributes of a file or folder. Programs define extended attributes and may vary by program.
- Create Files/Write Data: Create Files: This will allow or deny the ability to create files within the folder. Write Data: this allows or denies a user from making changes to a file and overwriting existing content.
- Create Folders/Append Data: Create Folders: This one will allow the user to create subfolders within the folder. Append Data: This one means that you will be able to explicitly open a file and add to it. This does NOT include deleting or changing a file (Save).
- Write Attributes: This is a powerful attribute – it allows or denies changing the attributes of a file or folder. The Write Attributes permission does not necessarily include creating or deleting files or folders, it only allows the user to make changes to the attributes of an existing file or folder.
- Write Extended Attributes: This attribute lets the user change the extended attributes of a file or folder. Programs define extended attributes and may vary by program. The Write Extended Attributes permission does not imply creating or deleting files or folders. It will only include the permission to change extended attributes of files or folders in an existing folder.
- Delete Subfolders and Files: A very powerful attribute – use with caution – this allows the user to delete subfolders and files, even if the Delete permission has not been granted on the subfolder or file.
- Delete: Another powerful tool in a user’s arsenal – this will let you delete files in a folder, including the folder. However, and this is often overlooked – if you don’t have Delete permission on a file or folder, you can still delete it if you have been granted Delete Subfolders and Files on the parent folder.
- Read Permissions: This attribute will let you read the permissions of files and folders in a specific folder.
Everyone vs. Authenticated Users
When laying out your plans for assigning NTFS permissions to your files and folders, you will inevitably choose a group for the ‘root’ folder or ‘top-level’ folder for your various volumes. You will need to choose carefully so that you restrict the possibility of security breaches in your network. The two most-used groups are ‘Everyone’ and ‘Authenticated Users.’
‘Everyone’ includes all users from the entire AD forest, including built-in, no-password-protected accounts like Guest and NETWORK_SERVICE. If you grant the ‘Everyone’ group to a folder, literally EVERYONE, even users without a user account on your network, will have access. A HUGE security risk, yes.
On the flip side, ‘Authenticated Users’ only includes authenticated users. Said users need an authorized username and password to access the folder or file.
How does inheritance work with NTFS permissions?
Inherited permissions offer IT Pros easier administration of files and folder permissions. When inheritance is enabled on a group of files and folders, any ‘child’ objects will inherit the permissions set by their ‘parent’ folder. If you were to apply ‘Read’ permissions at the top (root) folder of a specific volume and set all child objects to inherit the permissions, ALL of your files and folders on the volume will have ‘Read’ permissions set. Yes, rather efficient.
Let me show you… On the same folder ‘Folder_01’, on the Security tab, I clicked the Advanced button.
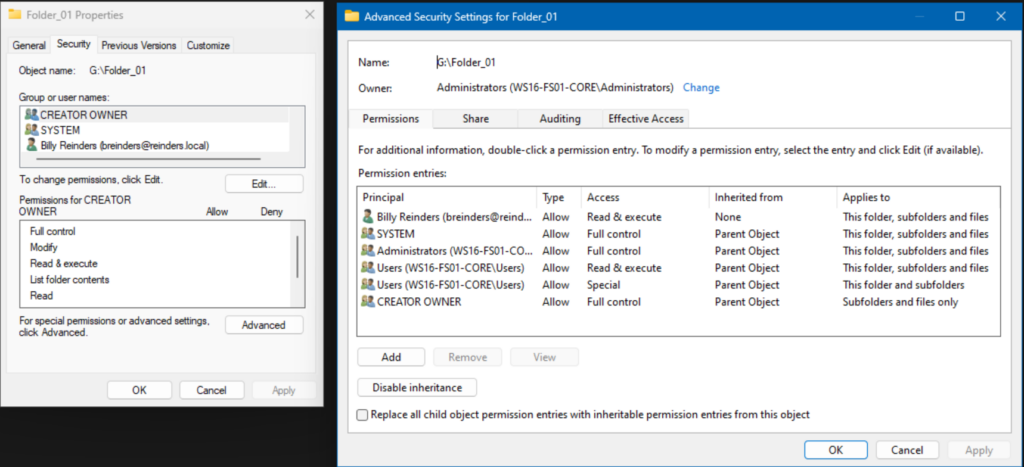
Here we can see that Billy has the explicit ‘Read’ permission we previously set, and that the remaining entries show inherited from ‘Parent Object.’ We could ‘Disable inheritance’ by pressing that button. Those permissions would then be marked as explicit. And yes, you’re starting to see the potential nightmare of administering this. But, no fear, the next topic touches on this.
What are effective NTFS permissions?
This concept illustrates what permissions a user or group has on a specific file or folder. It takes into account Share and NTFS permissions and offers some concrete info for IT Pros.
In the Security tab again, I clicked Advanced. I then clicked the ‘Effective Access‘ tab on top. Next, I chose Billy Reinders’s user account and clicked ‘View effective access.’
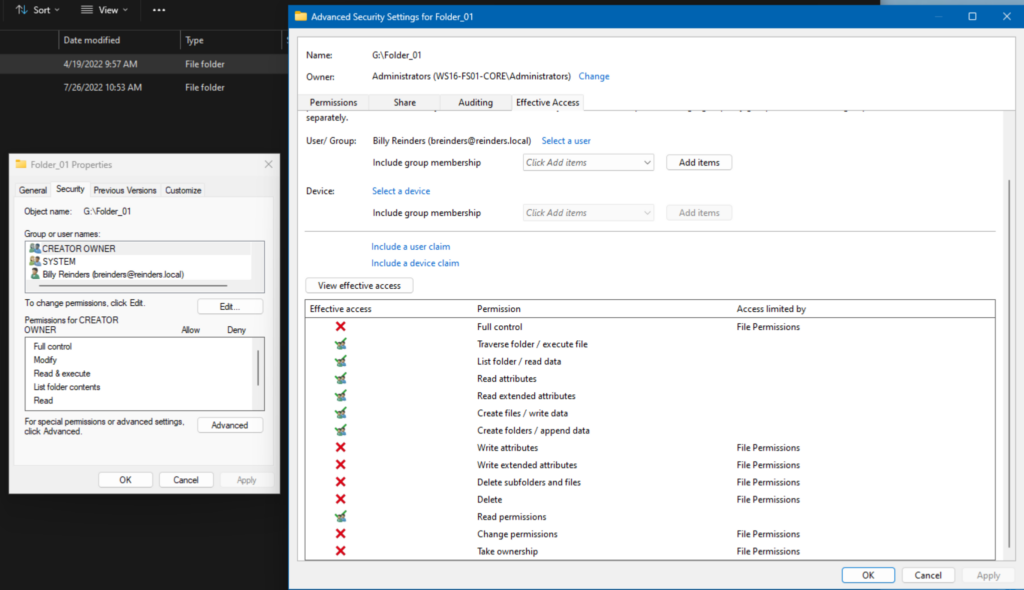
We can see that Billy has only ‘Read’ type permissions levels as those are explicitly entered in this folder. A nice quick way to verify what permissions a user or group has on a specific file or folder.
What are some best practices when setting up NTFS permissions?
There are some ‘industry-standard’ best practices when planning and strategizing an overall security approach to files and folders in your environment. Here are a few.
1. Review and audit your NTFS permissions regularly to ensure the correct permissions are set for your file servers.
2. Use a third-party tool or software solution to perform this analysis for you. These will often also offer alerting to changes to NTFS permissions on your servers.
3. Use inheritance as often as possible to ease ongoing administration and auditing of your fileservers.
4. Groups, groups, groups – do yourself a favor and utilize security groups as much as possible to ease administration. Instead of having to add another user and their permissions on seven file servers, you can add them to a security group, and you’re done.
How to back up and restore NTFS permissions using Icacls
What IT Pro wouldn’t want an easy and quick way to back up NTFS permissions? – that’s where the Icacls command comes in. Yes, you should certainly have an enterprise backup solution in place, but again this is a nice impromptu option. Back in my lab…
I can issue this command to capture the current permissions on our ‘Folder_01’ folder.
icacls g:folder_01 /save ntfsperm.txt /t /c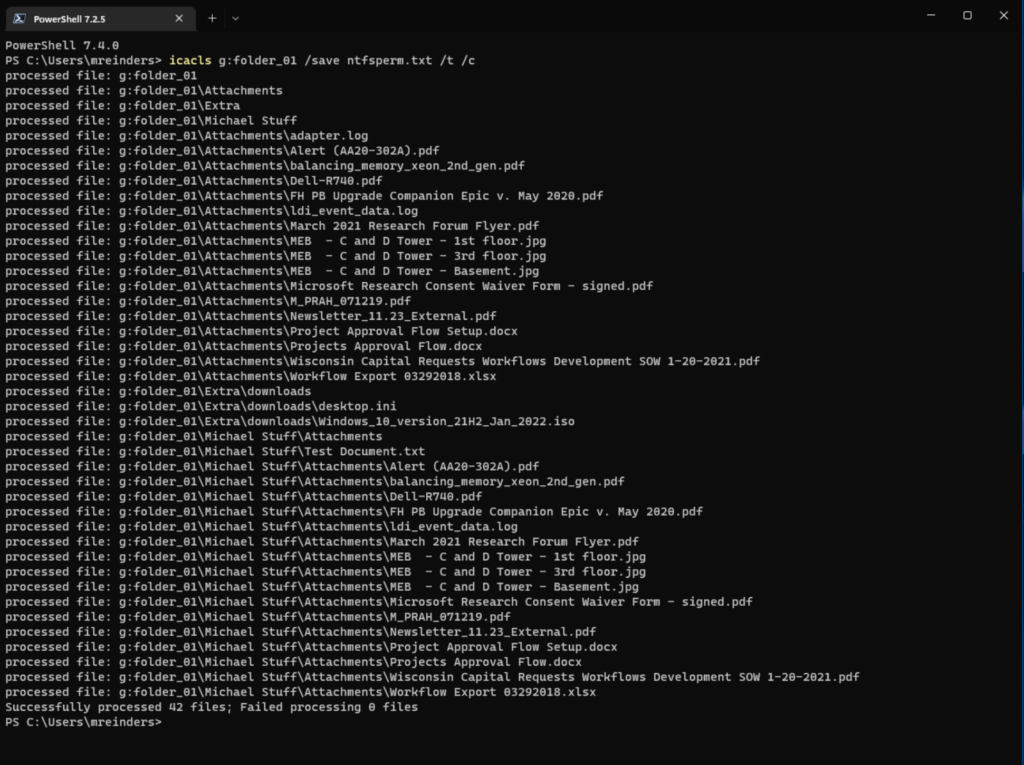
The ‘/t’ switch tells the command to check child folders and files, too. The ‘/c’ switch says to continue on any errors.
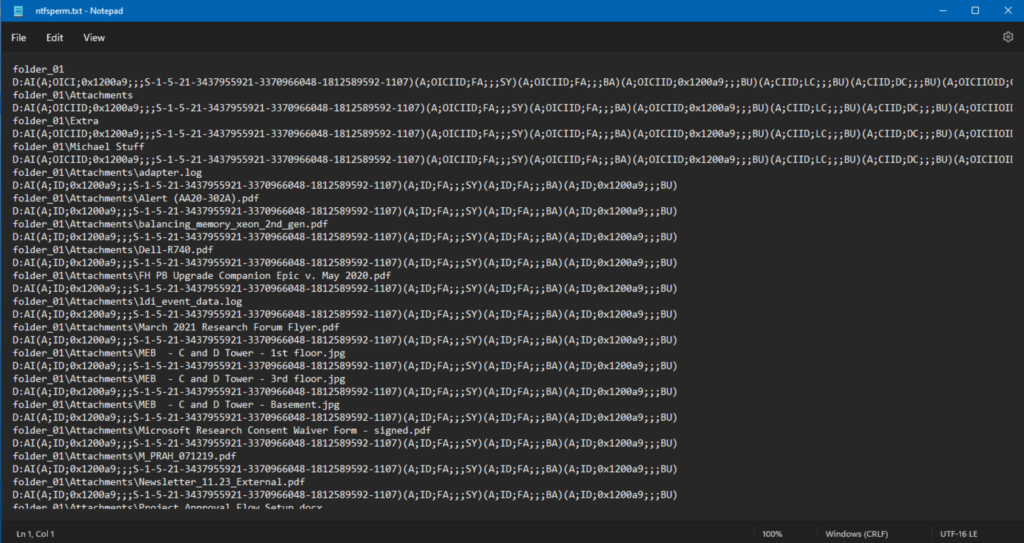
And yes, this looks wonderfully complicated, huh? Don’t worry. You can simply know enough to restore them if necessary.
icacls g:folder_01 /restore ntfsperm.txtAuditing NTFS permission changes in Windows
To set up auditing of changes to NTFS permissions in Windows, you will want to use Group Policy. Here is a ‘high-level’ walkthrough:
- Open Group Policy Editor from Administrative Tools.
- Browse to Computer Configuration -> Windows Settings -> Security Settings -> Local Policies -> Audit Policy.
- For ‘Audit object access’, enable both Success and Failure.
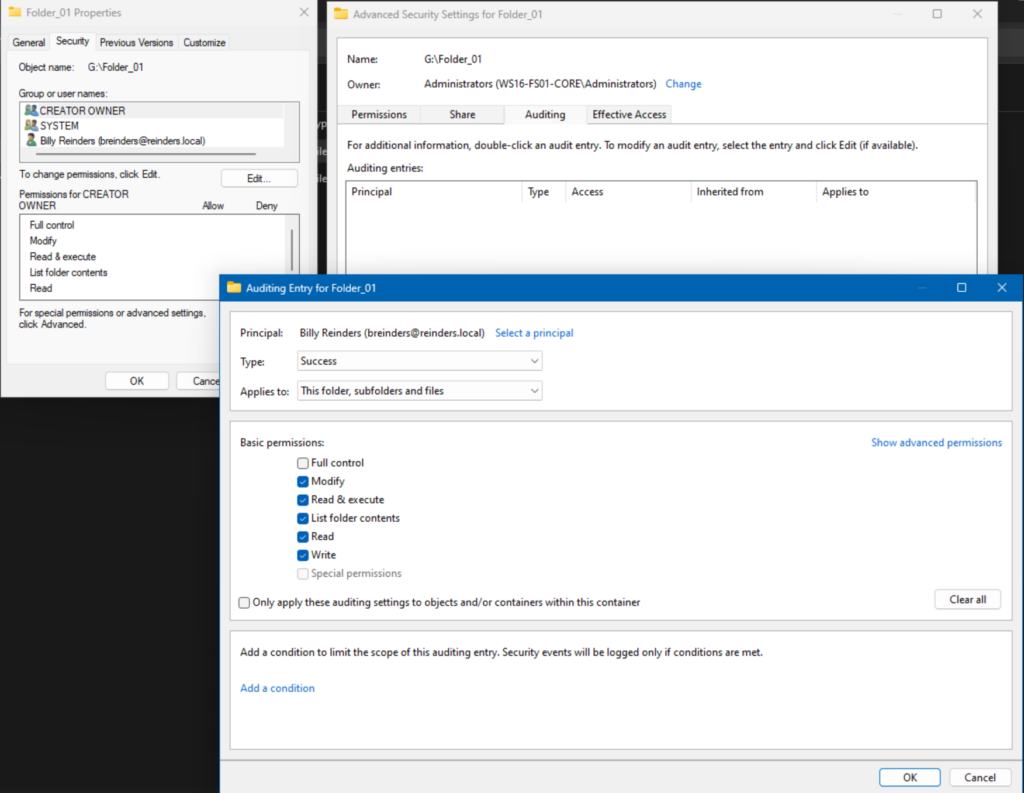
- You can then configure an audit entry on the specific folders you want to audit. On the Advanced security dialog box click the Auditing tab, -> Continue -> and click Add and add a group you want to track.
- Select ‘Type = Success’ and enable CHange Permissions and Take Ownership in Advanced Permissions.
That is it.
Conclusion
This post truly brushes the surface of NTFS permissions in Windows. There are many options involved and a lot of granularity with the design and administration of these permissions.
Please leave a comment or question below and thank you for reading.

Michael has been an IT Pro since 1998. He has worked predominantly in the Windows world including client and server operating systems, on-prem systems engineering (AD, DNS, etc.), and over the last ten years or so has embraced and immersed himself in...