Manage Local Active Directory Groups using Group Policy Restricted Groups
The IT in a medium or large organization can mean managing hundreds, thousands or even tens of thousands of client computers, and servers. Some management tasks on these machines are related to the need to control local group members on those workstations and servers, which in such numbers, means an almost impossible task if you have to do it manually. Using GPO Restricted Groups, this process becomes much more manageable.
Managing Local Active Directory Groups Article Series
🎬 Watch This Week in IT.
- Part 1: Manage Local Active Directory Groups using Group Policy Restricted Groups
- Part 2: Using “This group is a member of” controls to manage local AD groups
- Part 3: Manage Local Active Directory Groups using Group Policy Preferences
- Part 4: Using Startup Scripts to Manage Local Active Directory Groups
Why bother with local groups when you already have Active Directory (AD) to manage the authentication and authorization of users in your organization? Although AD centralizes the management of user and computer identities and allows central management, you still need to use local groups to grant permissions and rights to these identities.
For example, you many need to add a specific user account to the Local Administrator group of every computer on the network for the purpose of remote management or the use of specific applications. Another example may be when some cheeky user that has local admin rights on a workstation decides to remove the Domain Admins group from the local Administrators group on their computer, which obviously makes your management task much harder. All this and more means that someone needs to manage these local groups using GPO Restricted Groups..
About Group Policy Restricted Groups
How do you control the membership of local groups on so many computers from a central location?
Luckily we have several options, such as built-in features of Group Policy Objects (GPOs) or startup scripts. We’ll first talk about a feature of Group Policy called Restricted Groups. Using this mechanism, GPOs lets you control the membership of domain and local groups on any computer that’s joined to the Active Directory domain.
Alternative options will be discussed in future articles, so make sure you come back to read them.
Important: Restricted Groups affect only the computer account, not the user accounts. That means that you will need to use the GPOs that are linked to the organizational units (OUs) that contain the computer accounts. If you edit the default domain GPO, it will affect all the computers in the domain. If you edit the default domain controller GPO, it will affect all the domain controllers in the domain. Use GPO Restricted Groups with caution.
It’s worth mentioning that Restricted Groups are not configured by default in any pre-defined GPO, and by default, no new GPO has Restricted Groups configured initially. This means that if you want to use this feature, you must manually configure it, which is a good thing, as you’ll see in my next super important note.
Warning: Before touching any existing Restricted Groups setting or before adding new Restricted Groups settings, you must fully read and understand the possible consequences of using this feature. If you fail to do so, you may find yourself in deep trouble.
Tips for using Group Policy Restricted Groups to control group membership
How do we use Restricted Groups? You can use these groups in several different ways. For example, you can add users to groups, and you can also use Restricted Groups to remove any user or group that is not on the list of allowed users or groups from groups. Finally, you can also use Restricted Groups to maintain the membership of the Domain Admins group in all the Local Administrators group.
With Restricted Groups, you can control the membership of critical groups, such as the Domain Admins, Enterprise Admins, and Schema Admins groups, for better security that ensures incorrect accounts are not added to these groups. Restricted Groups also lets you manage membership of local groups on file servers, adding global groups from the Active Directory domain to keep group membership consistent and persistent using GPO Restricted Groups.
One nice feature of Restricted Groups is that you can manage groups that are non-existant at the time of configuration, where you can control those members. For example, you can configure a group called “Future Local Group” by typing in the name and adding a user called “Future User.” Because the group and user don’t exist at this point in time, it will have no effect.
Once such a group is created on one of the computers that fall under the scope of that GPO, it will automatically be configured to only include “Future User” in it. If that user exists, it will be added. If not, the group will remain empty until such a user is created. Any attempt to add other members to that group will fail.
Creating a Restricted Group using Group Policy
To create a Restricted Group, you need to create or edit a GPO that is linked to the OU that contains the computer objects you want to be affected by the GPO.
1. In the GPO, browse and expand “Computer Configuration” > “Policies” > “Windows Settings” > “Security Settings”. Click on “Restricted Groups.” Right-click on “Restricted Groups” and select “Add Group”.
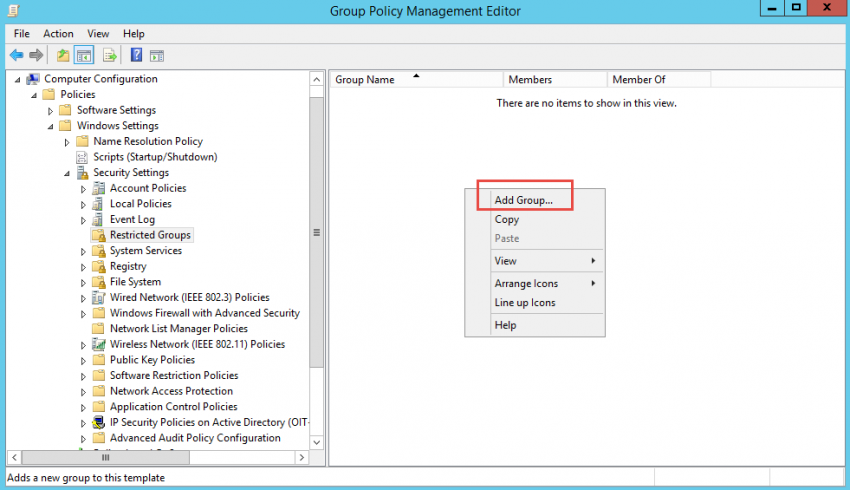
2. Manually enter the group name. The name can be an existing group or a non-existing group that will be created in the future. If you want to control an existing Active Directory group, then you can browse for it, but this will only work for AD-based groups. Once you create the group, it will show up in the right-hand pane. In this example, we’re using a group called “Test Local Group” located on a member server.

3. Once the group is added to the Restricted Groups list, double-click the newly-added group to reveal the “Members of this group” option. This option lets you control the membership of the group that you’ve specified in the policy.
Important: When you configure the members of a group, the group’s existing membership is overwritten and replaced with the members that are specified in the GPO at the time of the GPO refresh. Any existing members in that group are immediately removed. Because of this, it is critical that you test these steps before applying these steps to a production environment.
Important: If you configure this setting and leave the “Members of this group” list blank, the group will be emptied and will not have any members after the GPO refresh.
4. To configure this option, double-click the group name that you created under Restricted Group node, then, click on the “Add” button for the “This group is a member of” on the upper part of the window. In this example we’re adding a user called “testuser1” located in AD.


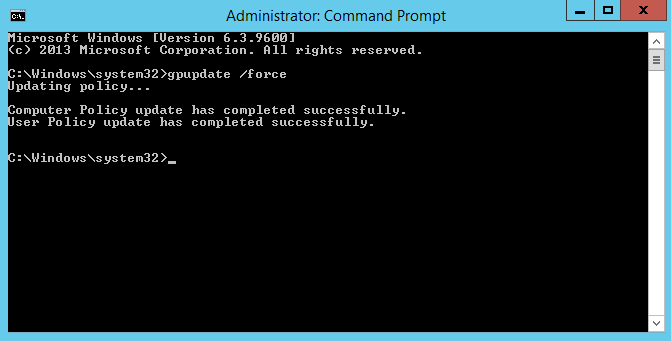
5. If you look at the specific group on the target workstation or server, you will see that the group is empty. However, after you perform a GPO refresh by typing gpupdate /force in a command prompt window, you will see that the group now has a new member due to the GPO Restricted Groups policy.
6. After you’ve refreshed the GPO, you will see that the member was re-added if you try to remove the member from the local group on the member server.


7. If you edit the GPO and add a second user to the list, you will see that the new member was added to the group after you’ve performed a refresh. However, group memberships for the current user take effect during the next user logon.


8. If you remove the previous two users from the group and instead insert a third user, you will see that the third user was added to the group, but also that the previous two users were removed.
Again, keep in mind that group memberships for the current user take effect during the next user logon and follow the guidelines of GPO restricted groups.


9. Finally, if you empty the “Members of this group” list, you will see that group is now empty after a refresh.


10. Note that all manually added users to the specific group will be re-added once the GPO is deleted or edited to remove the Restricted Group from the list. In this case, it’s “testuser1” that was originally manually added to the group.

FAQs
How do I troubleshoot when Restricted Groups are not applying correctly in GPO?
When GPO Restricted Groups aren’t working:
- First check the GPO link order,
- Ensure WMI filters aren’t blocking application,
- Verify GPMC replication status,
- Check Group Policy logging, and
- Run GPResult /h to generate a detailed HTML report of applied policies.
Can GPO Restricted Groups be used to manage service accounts across multiple domains?
Yes, GPO Restricted Groups can manage service accounts across trusted domains by using fully qualified domain names (FQDN) in the group membership settings and ensuring proper trust relationships are established between domains.
How do GPO Restricted Groups interact with nested group memberships?
GPO Restricted Groups respect nested group memberships but will override any local nesting configurations. When implementing nested groups with GPO Restricted Groups, plan the hierarchy carefully to avoid circular references.
What’s the impact of using GPO Restricted Groups in a mixed Windows Server environment?
GPO Restricted Groups function consistently across different Windows Server versions, but you should test implementation in a lab environment first, as older operating systems might have specific limitations or behavior differences in group policy processing.
How frequently do GPO Restricted Groups refresh compared to regular group policy updates?
GPO Restricted Groups follow the standard Group Policy refresh interval (default 90 minutes with a random offset of 0-30 minutes), but you can modify this using the Group Policy refresh interval policy or force immediate updates using gpupdate /force.
Related Article:

Renowned as the creator of the acclaimed Petri IT Knowledgebase back in 1999 Daniel Petri has become a distinguished figure in the IT realm, recognized for delivering reliable, expertise-driven content. This website - www.petri.com - not only embodie...