Using GPUpdate to Manage Group Policy

With GPUpdate, administrators can update Group Policy settings from a central location and set configuration settings for computers in an Active Directory domain. In this guide, I’ll show you how to use GPUpdate to refresh local and Active Directory–based Group Policy settings.
I can’t tell you (accurately) how many times I have typed ‘gpupdate /force‘ at an administrative Command Prompt. It must be between 750 and 1000 times. No, really!
But, why is this command so popular, you may be wondering? And why is it absolutely essential for IT pros to understand what it is and how it can save you a LOT of time, not waiting around for regular group policy update intervals?
Read on to get all your questions answered.
How to reapply all Group Policy settings using GPUpdate /force
To force Windows to reapply all user and computer Group Policy settings, regardless of whether they have changed, use GPUpdate as shown here:
gpupdate /force
For more details on how to use GPUpdate, keep reading!
What is GPUpdate?
‘GPUpdate’ is short for Group Policy update. It is a command-line tool used to update the group policy on a local or remote computer in an Active Directory domain environment.
After you make changes in the Group Policy Management Console, GPUpdate a nice and quick tool to run on a client or server machine to verify if the settings are being applied correctly in the domain and on the computer itself.

How to force a Group Policy refresh with GPUpdate
It’s important to remember that Group Policy Objects (GPOs), which are a virtual collection of policy settings, almost exclusively just update the registry on a computer.
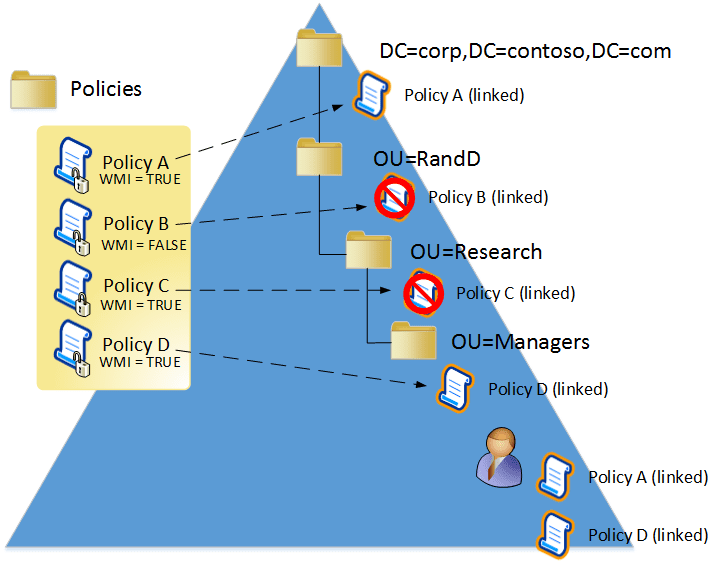
So, after you’ve added a new GPO or modified one or two, even updated the Windows Management Instrumentation (WMI) filter on a GPO to target specific Windows 10 versions, you’re ready to see if your client machines received the updated configuration. That’s where using GPUpdate can be your silver bullet.
Prerequisites
The prerequisites for using GPUpdate are rather straightforward, but let’s go through them for completeness:
- You need to be running an Active Directory domain environment and be accessing a domain-joined computer or server, local or remote.
- To be effective, there needs to be at least one GPO enabled (and optionally enforced) on the domain/user/computer/OU, etc. of the user and/or computer you’re running the command on.
What’s the difference between GPUpdate and GPUpdate /force?
So, like me and I’m sure many other IT Pros, you’ve probably been using ‘gpupdate /force’ more often than just ‘gpupdate’. What’s the difference? Well, let me explain.
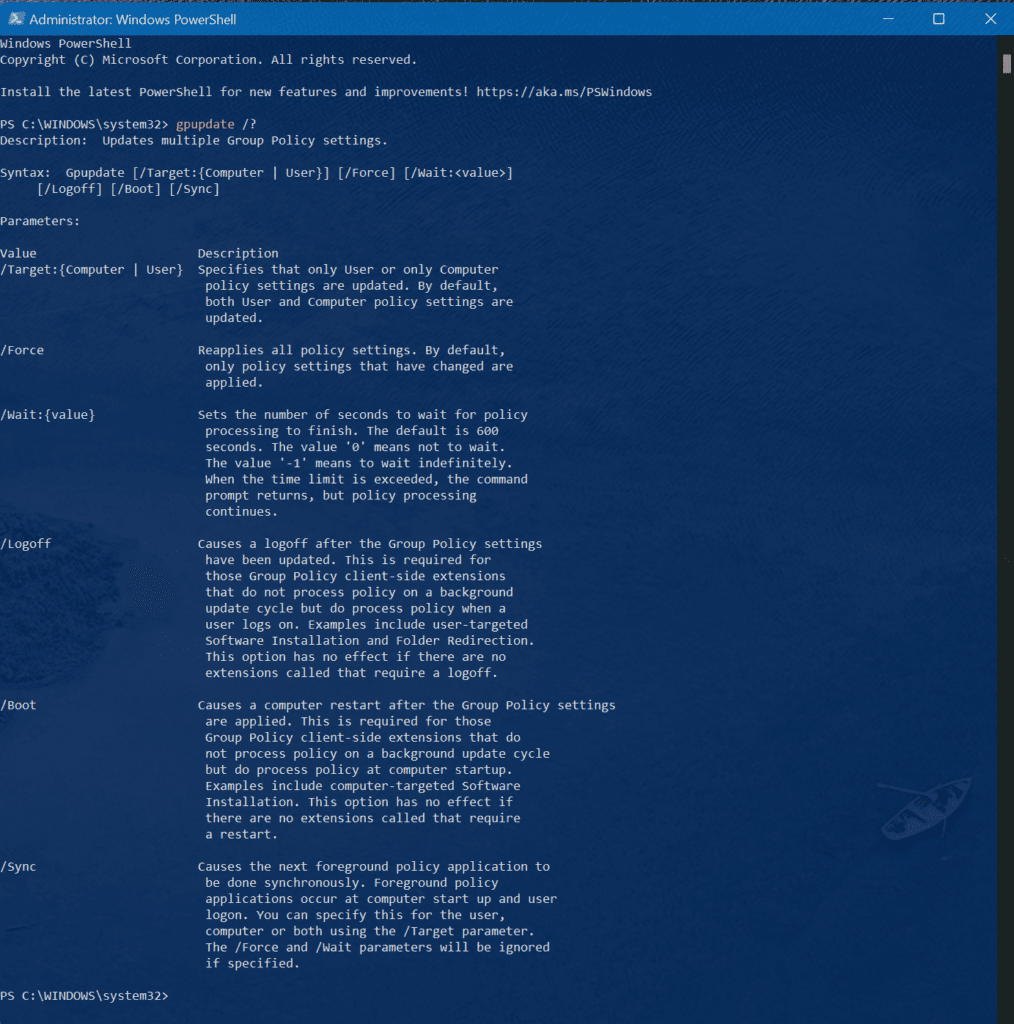
Running ‘gpupdate’ will update only GPOs that are new or have changed since Group Policy was last checked on the computer or server.
When you add the /force switch, it forces the Group Policy client to contact the closest domain controller, read ALL applicable GPOs for the user/computer, and process them all, regardless of if the machine ‘needs to’ or not. This is why this switch is so useful in troubleshooting, especially on more tricky or finicky GPO settings.
How to only update the user or computer settings with the /target switch
In larger environments, processing Group Policy can take a long time. There are many variables that are taken into account when running GPUpdate.
If your environment is small, it could take only seconds to process all GPOs on a computer. However, in larger organizations, I’m sure there are hundreds (if not thousands) of GPOs that could potentially apply to a user or computer.
Granted, there would probably be a single configuration item in each GPO, but still. Running through a thousand GPOs, you may want to save some time.
So, if you are working on a user-specific setting or a computer-specific setting, you can use the /target switch to tell GPUpdate to only process the respective section of the GPO, user, or computer.
To target only the ‘user’ settings with GPUpdate, use the following command:
gpupdate /target:user
To target only the ‘computer’ settings and use the /force switch to make sure all settings are checked, use the following command:
gpupdate /target:computer /force
How to automatically reboot or logoff after using GPUpdate
When working with certain GPO settings, especially client-side settings that can’t be run while a user is logged in, you can use the /logoff switch to automatically have GPUpdate process the GPOs and then log off the user after processing is complete.
Here’s the command you need to use:
gpupdate /target:user /logoff
In a similar fashion, some computer settings need a reboot to take effect; use the /boot switch as so:
gpupdate /target:computer /boot
How to force synchronous policy processing

If you want to force the policy processing to run synchronously, use the /sync switch. Here are the details from Microsoft documentation.
The /sync flag causes the next foreground policy application to be done synchronously. Foreground policy is applied at computer boot and user logon. You can specify this for the user, computer, or both, by using the /target parameter. The /force and /wait parameters are ignored if you specify them.
How to run GPUpdate on a remote PC
Checking updates to Group Policy on a local computer or server is one thing, but what if you have a few hundred computers you want to quickly update Group Policy on in an efficient manner?
Well, that’s where PowerShell and the Invoke-GPUpdate cmdlet come in. This allows you to run a remote group policy update, en masse.
To update a single computer remotely and check only the ‘User’ settings, run the following command:
Invoke-GPUpdate -Computer "TestComputer01" -Target "User"
If you have a new GPO targeting a single OU, you probably want to blanket all the computers/servers in that OU. In that case, use the following command:
Get-ADComputer -filter * -Searchbase "OU=TestOfficeUsers,DC=reinders,DC=local" | foreach{ Invoke-GPUpdate -computer $_.name -force}
Pretty slick, huh? There are quite a few moving pieces here, so let me go through what’s happening:
- First, the Get-ADComputer cmdlet is temporarily storing all the computer objects in the ‘TestOfficeUsers’ OU in Active Directory in a hidden ‘array’.
- Next, the foreach command initiates a mini loop.
- For each computer in that temporary array we created, we run the Invoke-GPUpdate command, which will update the Group Policy. So, it goes to the first computer object, runs the command, goes back to the list, gets the second computer, runs the command, and keeps going until the list is done.
Well, now we get to another pretty cool command, a boon for when you need to carefully test or roll out changes to your servers. Here it is:
Get-ADComputer -Filter {enabled -eq "true" -and OperatingSystem -Like '*Windows Server*' } | foreach{ Invoke-GPUpdate -computer $_.name -RandomDelayInMinutes 10 -force}
- This command will again grab all the computer objects in AD that are enabled and are running any flavor of Windows Server as their operating system.
- Next, the command will use the same foreach command (to start a mini loop as above) to run the GPUpdate /force command on those computers. And, in case there are a thousand servers (or more!) in your domain, it will randomize when it runs the command.
- This command also specifies a 10-minute randomized delay, so a thousand servers don’t all start bombarding the DCs at the same time. You can adjust this interval, of course. If I had a thousand servers, I would probably use ’60’.
Awesome!
How to change the Group Policy refresh interval
To finish off this guide, let me give you a refresher on how often Group Policy is applied and how you can change the various intervals throughout your domain.
First, a Group Policy Update occurs when a computer boots, after a user logs in, then it will be refreshed in the background every 90 minutes plus a random offset between 0-30 minutes. So, as long as a client machine is on the network and has access to your DCs, it will never be two hours ‘out of date’ (Domain controllers update Group Policy changes every 5 minutes).
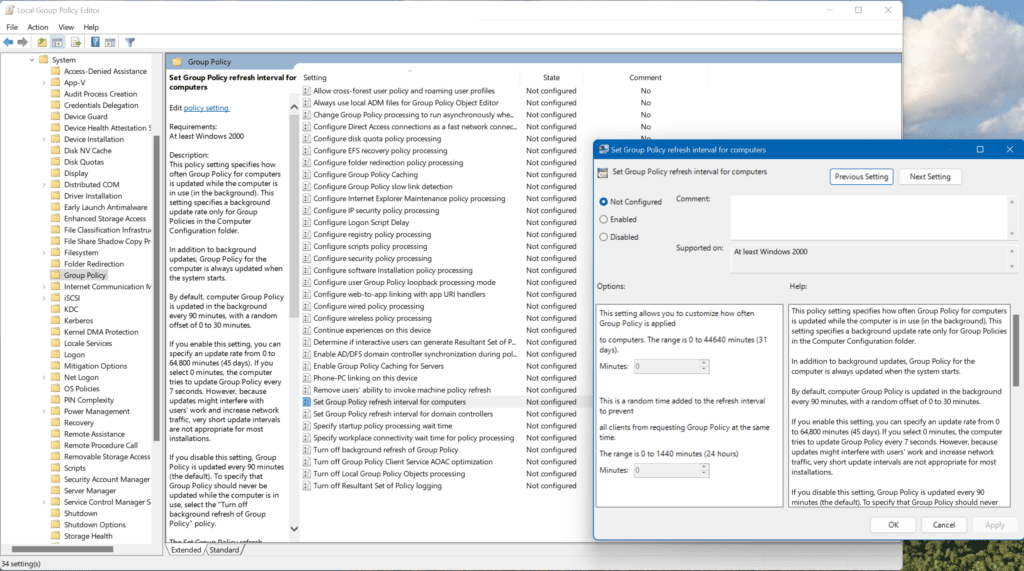
Set the Group Policy refresh interval for computers
If you want to change the refresh interval for computers, go ahead and open the local Group Policy Editor (gpedit.msc) and navigate to Computer Configuration -> Administrative Templates -> System -> Group Policy. Access the following setting: Set Group Policy refresh interval for computers
This setting establishes the update rate for computer Group Policy. Enable the policy and set the time for the following options.

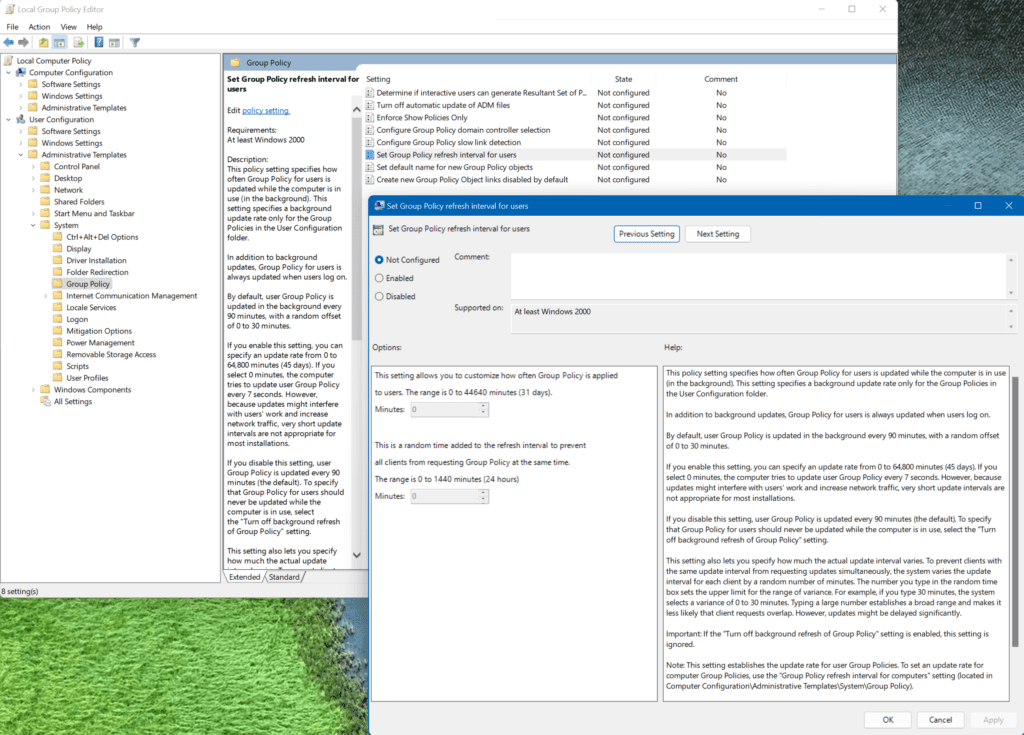
Set the Group Policy refresh interval for users
To set an update rate for user policies, navigate to User Configuration -> Administrative Templates -> System -> Group Policy. Access this setting:
Set Group Policy refresh interval for users
You can then change the range between refresh intervals from 0 minutes to 44640 minutes (Yep…31 days…).
Next, you can alter the random interval, too, from between 0 minutes and 1440 minutes (24 hours). I recommend staying away from the extremes.

Conclusion
It’s fascinating to me when I dig into the documentation for some of these everyday commands to discover all the new switches, flags, etc. that I never knew existed. Honestly, I wasn’t aware that you could issue the GPUpdate command to a thousand servers from a single command/script using PowerShell. That would have helped me in my prior IT pro lives, let me tell you.
Please feel free to leave a comment or question below. Thank you!
Related Article:


