How to Install the New Microsoft Defender for Endpoint Agent on Windows Server 2012 R2 and 2016
New protection capabilities for Microsoft Defender for Endpoint (MDE) customers landed in public preview, Oct 7th 2021, for Windows Server 2012 R2 and Windows Server 2016. With the public preview, Windows Server 2012 R2 and 2016 gain ‘functional equivalence‘ to Windows Server 2019, thanks to a new agent that is being described as the ‘unified solution’.
Historically, a significant gap
Previously, as detailed in Understanding Microsoft Defender for Endpoint and How It Protects Your Data on Petri and here on my own blog, there was a large feature gap between Windows Server 2019 and these “down-level” OSs.
The onboarding process was also different. To get devices into MDE, you had to deploy the Microsoft Monitoring Agent (MMA). This was required as the EDR sensor wasn’t built-in, unlike with Server 2019.
While Server 2016 shipped with Microsoft Defender Antivirus (MDAV) installed already, to get any kind of scanning and endpoint protection capability in Server 2012 R2, you had to install System Centre Endpoint Protection (SCEP).
Even after onboarding and having either MDAV or SCEP, you still didn’t get the full capabilities of MDE that you did with Windows Server 2019. Key among the features missing were attack surface reduction (ASR) rules and automated investigation and response (AIR).
On the portal, you also couldn’t perform actions such as live response or file responses. As of today, in public preview, you can.
Improvements now in public preview
With the improved feature parity, Microsoft remove a blocker for many organizations adopting MDE on servers, close the gap with competitors with enhanced protection, and make IT/security pros lives a little easier with consistent onboarding and tools. This does, however, for now, still leave Windows Server 2008 R2 in the same old place.
The features previously unavailable that you can now leverage include, but aren’t limited to, ASR rules, network protection, Controlled Folder Access (CFA), AIR, tamper protection, and device actions in the Microsoft 365 Defender portal, such as device isolation, but not app execution restriction.
The new features include the PowerShell cmdlets to manage them, such as Set-MpPreference -AttackSurfaceReductionRules_Ids.
AIR is of particular note, as it’s what many customers perceive to be the R in EDR. Note that ASR rules won’t function in warn mode and not all are available: block JavaScript and VBScript from launching downloadable executable content didn’t make it to Server 2012 R2, and neither server gets the rules to block Win32 API calls from Office macros or block persistence through WMI event subscription. This is more down to intrinsic differences in the operating system, though.
How to install the new unified Defender for Endpoint agent
To install the new Microsoft Defender for Endpoint agent on Windows Server 2012 R2 or Windows Server 2016, you need to:
- Download the Group Policy installation and onboarding packages
- Save the files in an accessible location
- And then run the downloaded PowerShell script with some additional parameters.
Both the most thorough and simple way to deploy the new agent I’ve found, for most environments, is through the upgrade helper script that Microsoft has published to GitHub. This automates a few steps that otherwise would be done separately.
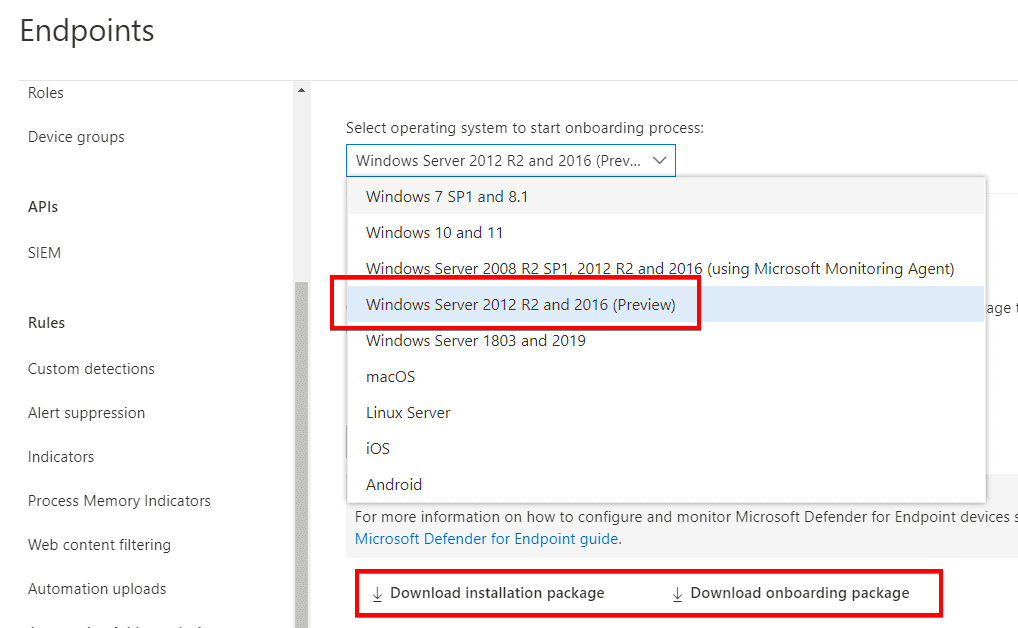
1. First, in the Microsoft 365 Defender portal, you’ll find an onboarding option for Windows Server 2012 R2 and 2016 (Preview). From here, choose to download the Group Policy installation and onboarding packages.
2. Store the script, MSI, and onboarding package in a place accessible by the server(s) you’ll be upgrading or deploying to. I have found that network paths are not supported so you may want to consider ways to execute with local paths.
3. Now, you’ll run the script with some parameters. How you run it depends on your own environment: for example, you may scale it using a centralised management tool or manually on a server.
The RemoveMMA parameter is required if upgrading from the MMA agent (i.e. not a new install), where you’d replace ABCDE with the workspace ID (you can find this in Control Panel > Microsoft Monitoring Agent > Azure Log Analytics). This command assumes the MSI and onboarding script are in the same directory as the PowerShell script.
.Install.ps1 -RemoveMMA ABCDE -OnboardingScript ".WindowsDefenderATPOnboardingScript.CMD"
As the script runs, it gets rid of that workspace it no longer needs, checks for SCEP and uninstalls if present, applies some prerequisite patches (which may not be needed on fully updated servers), installs the agent, then connects it to the MDE instance identified in the onboarding package.
The script’s output will confirm success or failure (if, for example, it can’t find the MMA workspace).

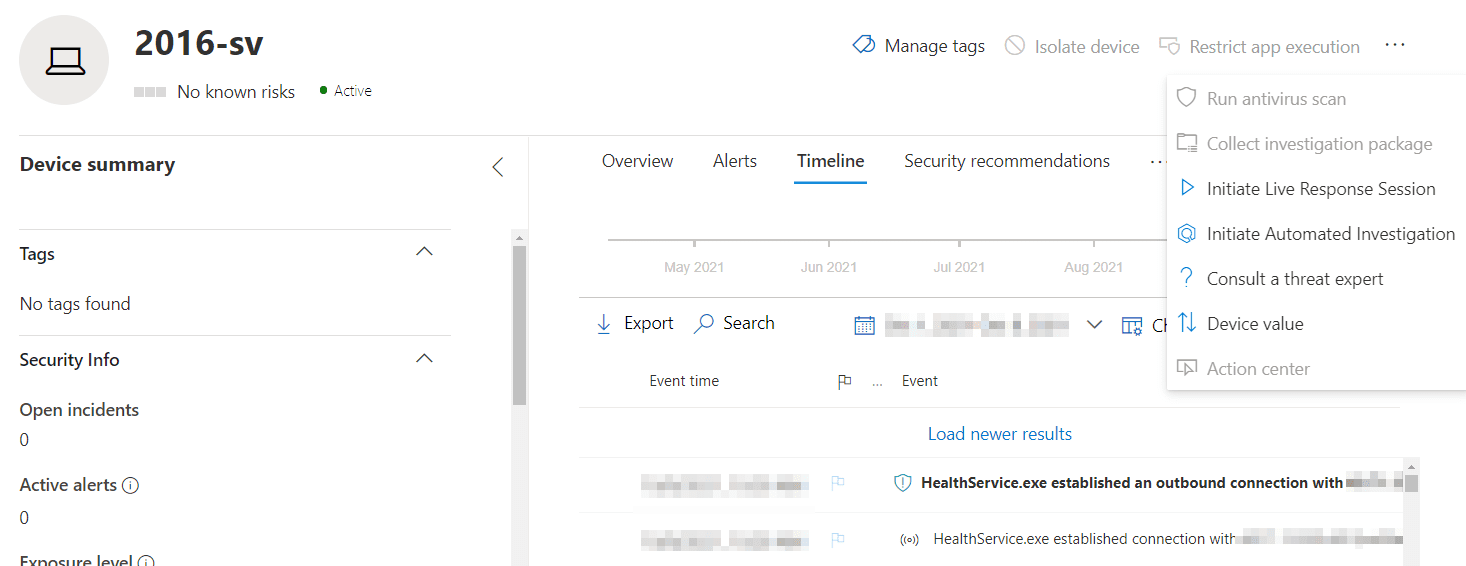
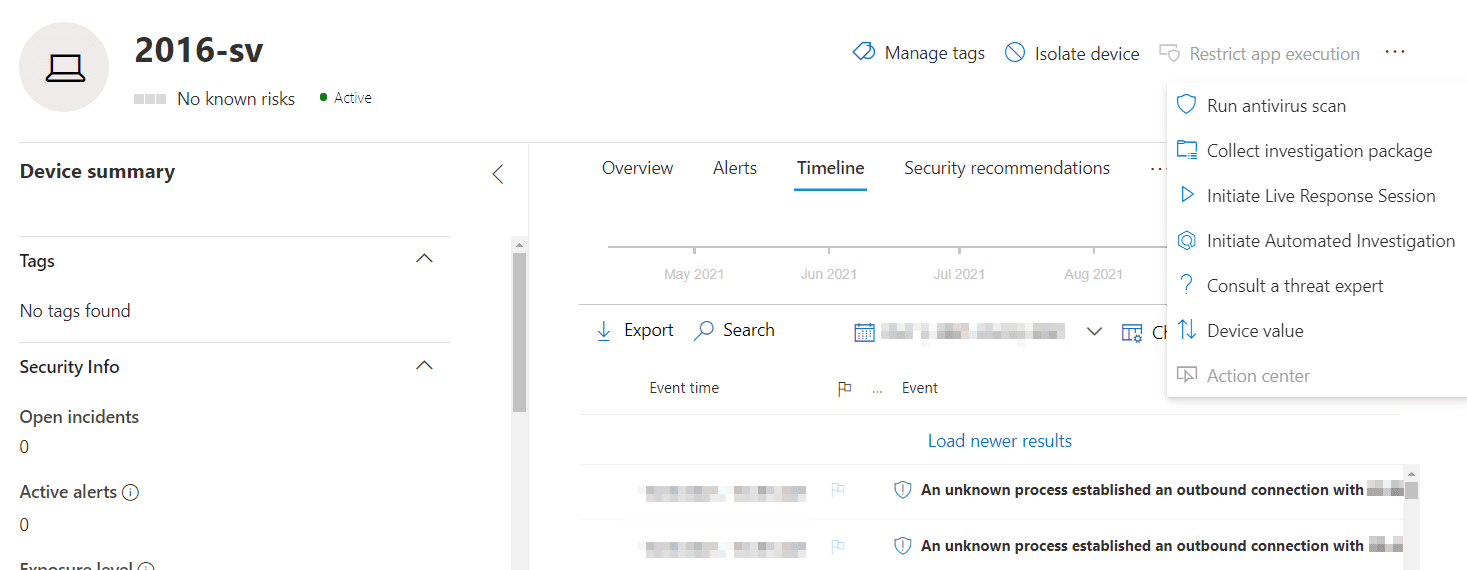
Reviewing a server before and after the upgrade, we can see new features light-up within minutes in Microsoft 365 Defender. The device itself is preserved, as are alerts, incidents, and the timeline. Features previously unavailable, such as ASR rules, now are.
Before, with only MMA

After, with unified solution agent
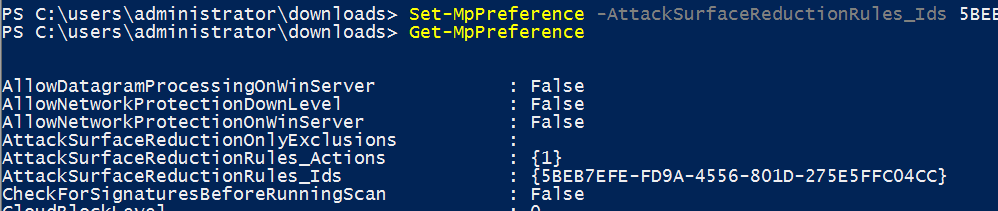
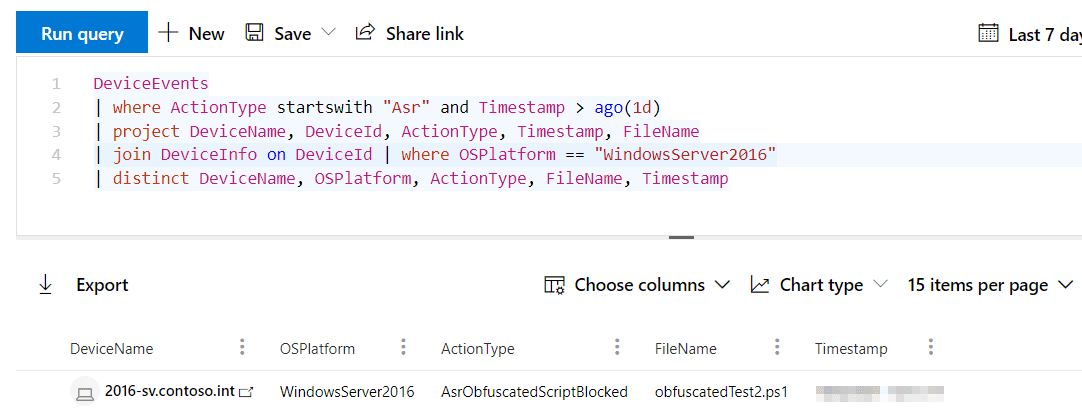
We can confirm that Windows Server 2016 is processing our ASR rules with Microsoft 365 Defender’s advanced hunting.
Important points to note
If you’re in a position to deploy or upgrade MDE on servers using the public preview agent, check out these key points of interest so that you know what to expect and have your prerequisites in order.
Both 2012 R2 and 2016
- You no longer onboard with MMA. Instead, you install an MSI agent that provides those missing capabilities.
- Network requirements are the same as Windows Server 2019, rather than what they previously may have been for MMA. This is most significant if your servers connect via a proxy or used OMS Gateway.
- Network protection, a feature now available, must be enabled manually using Set-MpPreference; it is not on by default.
- You should make sure all Windows updates are applied. For example, KB5005292 is needed to get the updated MsSense.exe sensor.
- Should you do an in-place upgrade of the OS (e.g. from 2012 R2 to 2016, or 2016 to 2019) you will need to first offboard then onboard again.
2016
- Defender Antivirus, which is built-in, must be up to date before you deploy.
2012 R2
- You no longer need SCEP. The agent includes Microsoft Defender Antivirus.
- If you have SCEP installed, installing the new agent will automatically replace it if you use the script described in this article.
- After installation, unlike with SCEP, there is no UI on the server.
- As already mentioned, it’s best practice to get the server fully updated before deploying, but in particular for 2012 R2, if you don’t, network events may not populate in the device’s timeline in Microsoft 365 Defender.
FAQs
Can I download Windows Defender Server 2012 R2 directly from Microsoft’s website?
Yes, Windows Defender Server 2012 R2 download is available through the Microsoft Volume Licensing Service Center (VLSC) or the Microsoft Evaluation Center. You’ll need valid credentials or a subscription to access these resources.
What are the system requirements for Windows Defender Server 2012 R2 download and installation?
To successfully complete a Windows Defender Server 2012 R2 download and installation, your system needs minimum 4GB RAM, 60GB available disk space, and a 1.4GHz 64-bit processor. Internet connectivity is required for updates and real-time protection features.
Does Windows Defender Server 2012 R2 download include automatic updates?
After completing your Windows Defender Server 2012 R2 download, the system automatically configures updates through Windows Update. However, administrators can customize update settings through Group Policy or the Windows Server Update Services (WSUS).
Are there any licensing requirements for Windows Defender Server 2012 R2 download?
Yes, to legally download and use Windows Defender Server 2012 R2, you need valid server licensing. This can be obtained through Microsoft’s volume licensing programs or as part of your Windows Server 2012 R2 license.
Can I perform an offline Windows Defender Server 2012 R2 download for multiple servers?
Yes, after your initial Windows Defender Server 2012 R2 download, you can create installation media for offline deployment across multiple servers using the Microsoft Deployment Toolkit (MDT) or System Center Configuration Manager (SCCM).

Ru (Ruairidh) Campbell is a Microsoft MVP and Microsoft security solutions architect, helping customers with security, compliance, identity, and modern device management. Specializing in Azure AD, Enterprise Mobility + Security, and Microsoft Defende...


