Deploying a Desired State Configuration Web Host Using PowerShell
- Blog
- PowerShell
- Post
One of the coolest features introduced in Windows Server 2012 R2 is packaged as part of the Windows Management Framework and PowerShell 4.0, a feature which is commonly referred to as Desired State Configuration (DSC).
This feature takes all the benefits of using PowerShell to the next level, and finally enables us to manage our Windows hosts just like their Linux counterparts with configuration-based management. The approach is extremely flexible and unleashes an awesome amount of power to keep our servers standardized. Best of all, the feature has been backported to earlier versions of Windows, which implies that we can influence the old and the new!
In this post, I am going to share a script which permits us to take a Windows 2012 R2 server and configure it so that it is ready to deliver our configurations to our clients through HTTP. This configuration is better know as a DSC web-based pull server.
Web-Based Configuration Server
To successfully complete the configuration you will need to use an Administrative PowerShell session, and also modify the host header (Section 3), to match the name of the website from which you wish to publish the service (in my example this is PSDSCPullServer.diginerve.net). Additionally, for the host header to function, we need to add this name to our DNS service as a A record or CNAME, resolving to the IP of the chosen server.
# Begin by enabling the DSC Service
Add-WindowsFeature DSC-Service
# Section 2
# Next Create a root folder for the web service, and import the necessary application files
$WebRoot = "c:\inetpub\wwwroot\PSDSCPullServer"
mkdir $WebRoot
copy $pshome/Modules/PSDesiredStateConfiguration/PullServer/Global.asax $WebRoot
copy $pshome/Modules/PSDesiredStateConfiguration/PullServer/PSDSCPullServer.mof $WebRoot
copy $pshome/Modules/PSDesiredStateConfiguration/PullServer/PSDSCPullServer.svc $WebRoot
copy $pshome/Modules/PSDesiredStateConfiguration/PullServer/PSDSCPullServer.xml $WebRoot
copy $pshome/Modules/PSDesiredStateConfiguration/PullServer/PSDSCPullServer.config $WebRoot\web.config
mkdir $WebRoot\Bin
copy $pshome/Modules/PSDesiredStateConfiguration/PullServer/Microsoft.Powershell.DesiredStateConfiguration.Service.dll $WebRoot\Bin
copy $pshome/Modules/PSDesiredStateConfiguration/PullServer/Devices.mdb $env:programfiles\WindowsPowerShell\DscService
# Section 3
# With the Folders ready we will use the IIS Modules to create a new Application Pool
Import-Module WebAdministration
Add-WindowsFeature Web-Mgmt-Console
$appPool = New-WebAppPool -Name "PSDSCPullServer"
$appPool.processModel.identityType = 0
$appPool | Set-Item
Start-WebAppPool $appPool.name
# Section 4
# Next, we can create our new Web Site, with its host header, using both the root web folder and the new application pool
$Website = New-Website -Name "PSDSCPullServer" -HostHeader "PSDSCPullServer.diginerve.net" -Port 80 -PhysicalPath $WebRoot -ApplicationPool $AppPool.Name
# Section 5
# We are almost complete, the Web.Config file we have hosted in our new site needs to be enabled to override some security settings
Set-WebConfiguration //system.WebServer/security/access machine/webroot/apphost -Metadata overrideMode -Value Allow
Set-WebConfiguration //system.WebServer/security/authentication/AnonymousAuthentication machine/webroot/apphost -Metadata overrideMode -Value Allow
Set-WebConfiguration //system.WebServer/security/authentication/basicAuthentication machine/webroot/apphost -Metadata overrideMode -Value Allow
Set-WebConfiguration //system.WebServer/security/authentication/windowsAuthentication -Metadata overrideMode -Value Allow
# Section 6
# And finally, we will update the Web.Config file, with some Application Settings, to complete the web service configuration
$webConfigFile = $WebSite.physicalPath + "\Web.Config"
$webConfig = [XML] (Get-Content $WebConfigFile)
$dbProvider = $webConfig.CreateNode('element',"add","")
$dbProvider.SetAttribute("key", "dbprovider")
$dbProvider.SetAttribute("value", "System.Data.OleDb" )
$dbConnectionStr = $webConfig.CreateNode('element',"add","")
$dbConnectionStr.SetAttribute("key", "dbconnectionstr")
$dbConnectionStr.SetAttribute("value", "Provider=Microsoft.Jet.OLEDB.4.0;Data Source=C:\Program Files\WindowsPowerShell\DscService\Devices.mdb;" )
$configurationPath = $webConfig.CreateNode('element',"add","")
$configurationPath.SetAttribute("key", "ConfigurationPath")
$configurationPath.SetAttribute("value", "C:\Program Files\WindowsPowerShell\DscService\Configuration" )
$modulePath = $webConfig.CreateNode('element',"add","")
$modulePath.SetAttribute("key", "ModulePath")
$modulePath.SetAttribute("value", "C:\Program Files\WindowsPowerShell\DscService\Modules" )
$appSettingsNode = $webConfig.SelectSingleNode("//configuration/appSettings").AppendChild($dbProvider)
$appSettingsNode = $webConfig.SelectSingleNode("//configuration/appSettings").AppendChild($dbConnectionStr)
$appSettingsNode = $webConfig.SelectSingleNode("//configuration/appSettings").AppendChild($configurationPath)
$appSettingsNode = $webConfig.SelectSingleNode("//configuration/appSettings").AppendChild($modulePath)
$webConfig.Save($WebConfigFile)
Let’s take a closer look at how this script is structured and what it is doing.
- Section 1: This starts off the process by adding the Windows Feature for DSC, along with all its dependencies, which will include adding IIS and Management ODATA to the server.
- Section 2: We create a new folder in c:\inetpub\wwwroot, which will be used to host the content for the pull server website. We then copy over the supporting files necessary to create the web service from the default PowerShell folder on the server to this folder.
- Section 3: We load up the IIS modules and create a new application pool with local system authentication for the website.
- Section 4: We then define our new website, including the host header, the path to the folder we created and populated in Section 2, and reference the name of the application pool we created in Section 3.
- Section 5: We update the IIS configuration to allow the security settings in our Web.Config file take effect.
- Section 6: We finally update the application settings in our Web.Config, adding four new parameters that configure the web service we just created.
After a successful execution of the script, your new web-based DSC pull server should be online and ready for service.
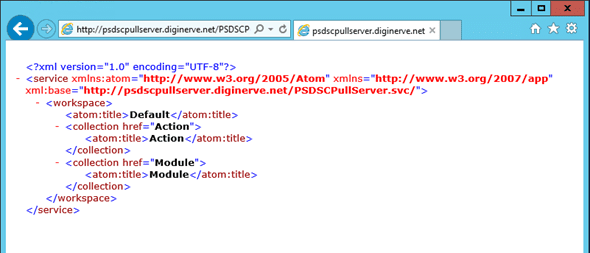
You can validate your work by pointing your web browser to the new web service. Assuming the procedure has worked, you should be presented with some XML similar to the screen shot.
Congratulations! You are now ready to begin the real fun part, configuring the Desired State Configurations. We’ll cover that in the next post.


