- Blog
- PowerShell
- Post
How to Delete Files Using PowerShell
Learn how to delete files and folders using PowerShell.
This blog post walks you through how to use PowerShell to delete files using the Remove-Item cmdlet.
How to delete a file and/or a folder using PowerShell
To delete a single file, you can use this example, where you replace ‘c:\stuff\Mailboxes.csv’ with the path of the file you want to delete.
Remove-Item c:\stuff\Mailboxes.csv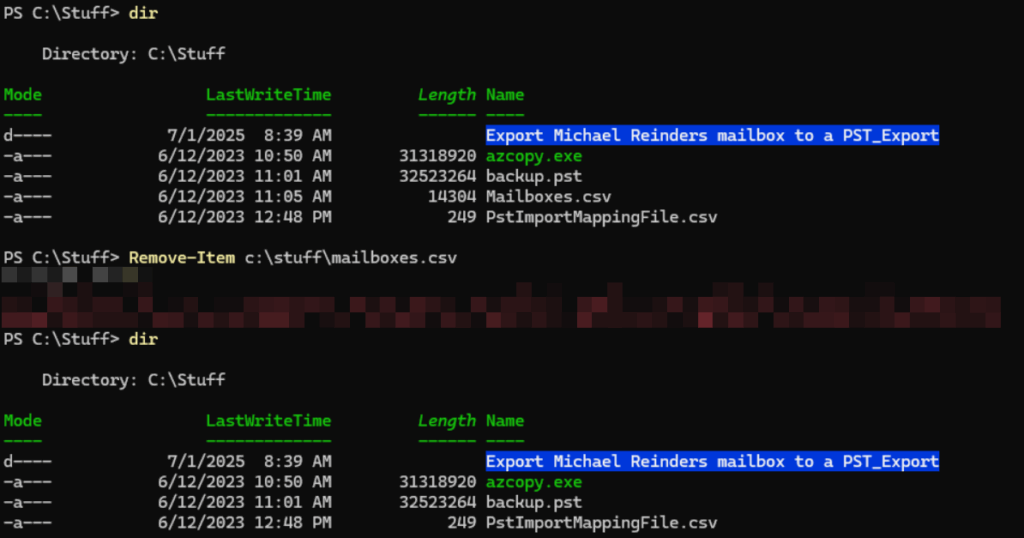
Unless you specify verbosity, you will receive minimal output.
To delete a single folder, use the command below, replacing ‘c:\stuff\empty’ with the path of the folder you want to delete:
Remove-Item c:\stuff\empty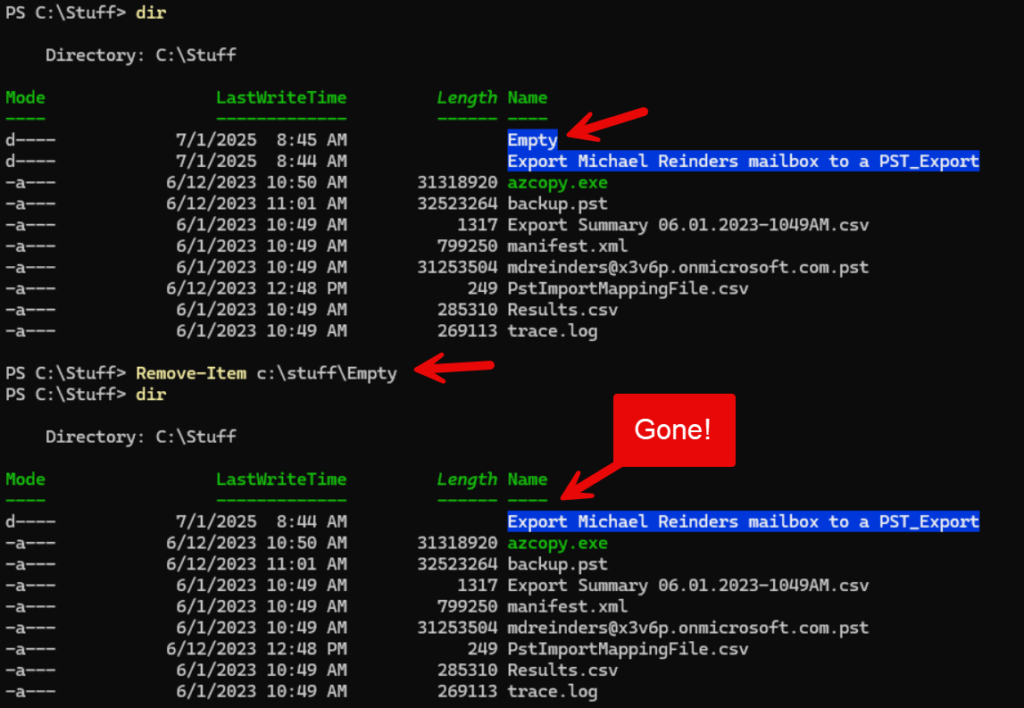
Examples of deleting multiple files using PowerShell
To delete multiple files with a certain extension, use the command below. Again replacing ‘c:\stuff*.pst’ with the path of the folder where the files are located:
Remove-Item -Path c:\stuff\*.pst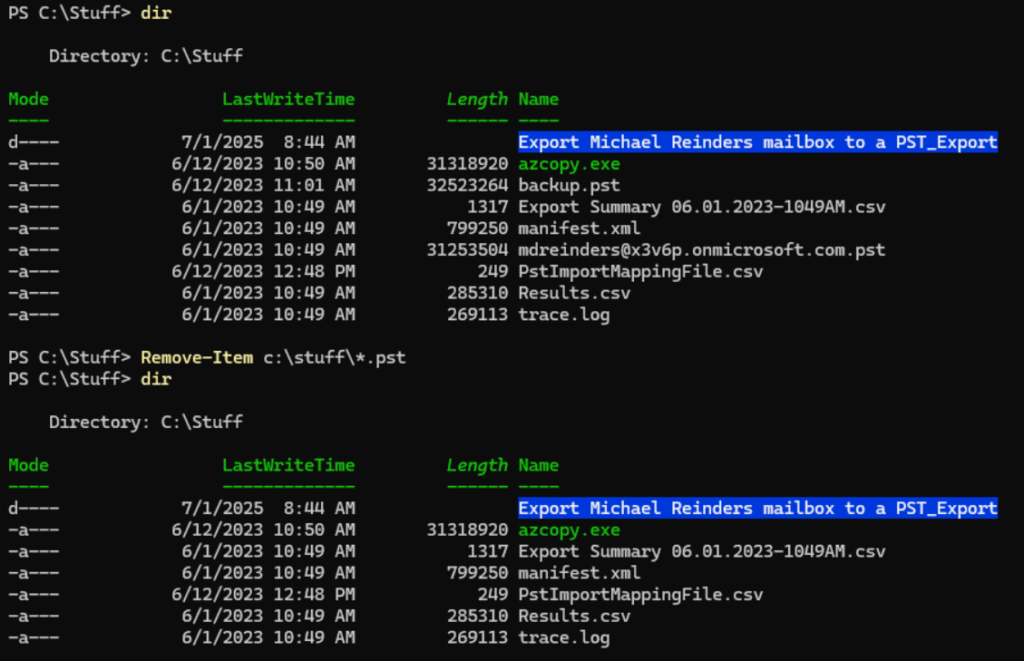
As you can see, only the files with a PST extension were removed.
Now, let’s use the -Include and -Exclude parameters. These let you filter to include or exclude specific file types or file extensions (among other criteria). I’ll show you how to include only CSV files, but to exclude any files with ‘PST’ in the filename.
Remove-Item c:\stuff\* -Include *.csv -Exclude *pst*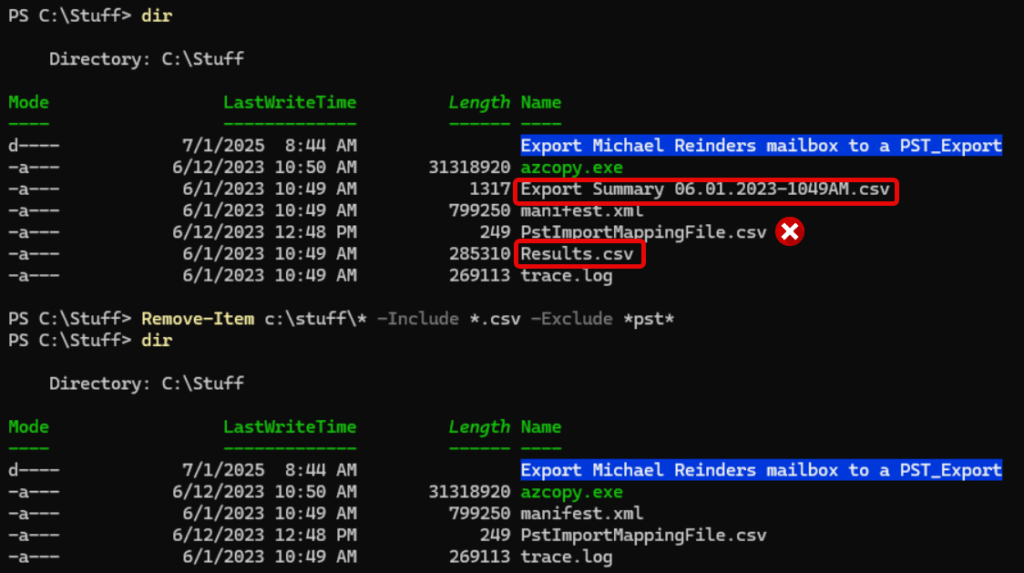
Notice that the two files highlighted were deleted. But the file with the ‘X’ next to it was excluded from the command because its filename starts with ‘pst’. One of the nice aspects of PowerShell is you quickly notice how powerful the commands are.
PowerShell delete – more complex scenarios
Let’s look at some more complex scenarios. There are thousands of examples and ideas here – I’m just scratching the surface.
Deleting files of multiple extensions
If you want to delete files of multiple extensions, simply use the -Include parameter with multiple extensions like so, separated by commas.
Remove-Item * -Include *.csv, *.xml
Using -WhatIf and -Confirm as a safety net
You do have options before running a command that may inadvertently delete 1,000 files due to a syntax mistake. Have no fear – you can use the -WhatIf and -Confirm parameters to test things out first.
Let me show you some examples. We can use -WhatIf to get an idea of what would happen if we tried this rather ‘inclusive’ command.
Remove-Item c:\stuff\* -WhatIf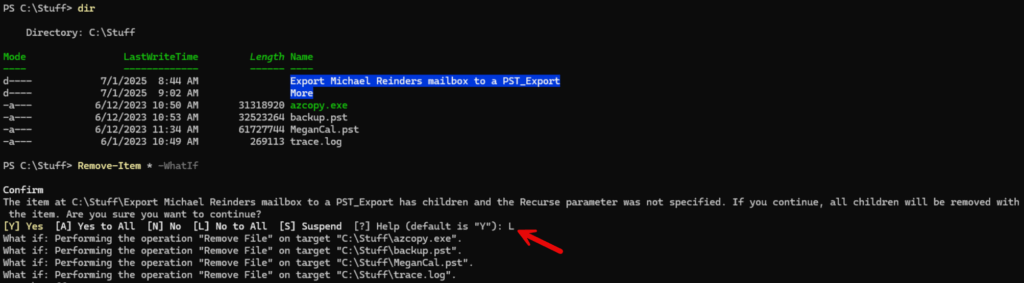
I typed ‘L’ to tell it No to all other questions of the same type. It shows it would have deleted all 4 files in the folder, the ‘Export’ folder and all its child files. I’m glad I used -WhatIf.
The -Confirm command is similarly helpful.
Remove-Item * -Confirm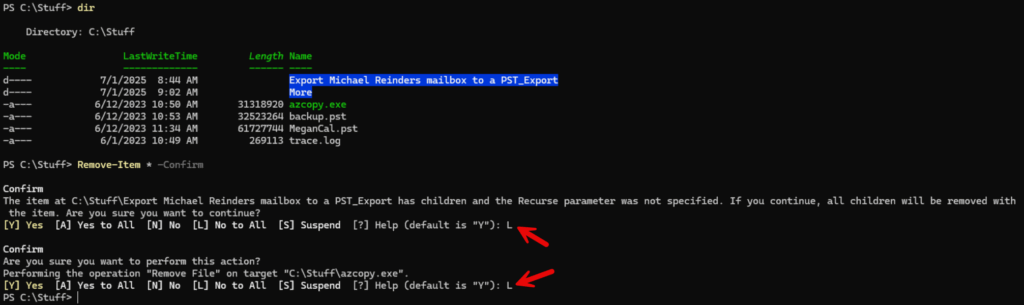
It prompted me to confirm that I want to delete the ‘Export…’ folder and all its files. It also prompted me to confirm deleting the first file.
Using -Exclude to filter out specific files or types
I gave you one example above using -Exclude, but let me ‘include’ (sorry) some more examples here.
Remove-Item c:\stuff\* -Exclude *.exe, *trace*, *.pstHere we are again deleting ‘all’ files in the folder, but we’re excluding all files with an EXE or PST extension AND excluding all files with ‘trace’ anywhere in their filename. If we wanted to exclude files starting with trace, we would do -Exclude trace* – If we wanted to exclude files ending in trace, we would do -Exclude *trace.
Deleting hidden or read-only files
Normally, Remove-Item will not delete hidden or read-only files. However, we can use the -Force parameter to ‘force’ PowerShell to include these files. First, I’ll use ‘dir -Force’ to display hidden files. Then, we use the command below.
Remove-Item backup.pst -Force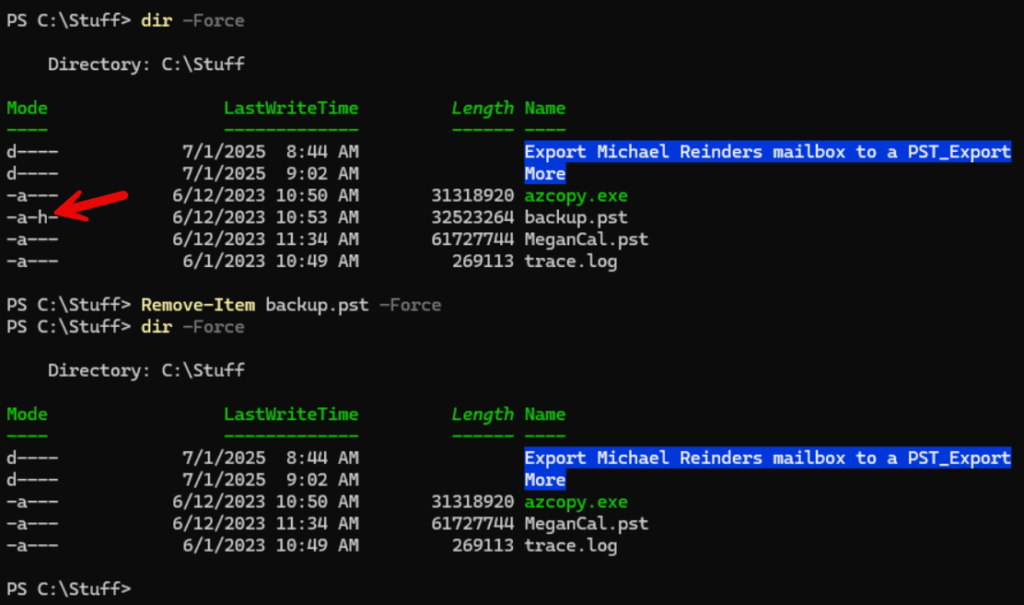
And voila, the hidden file, backup.pst, is gone. This also works with read-only files.
Remove-Item trace.log -Force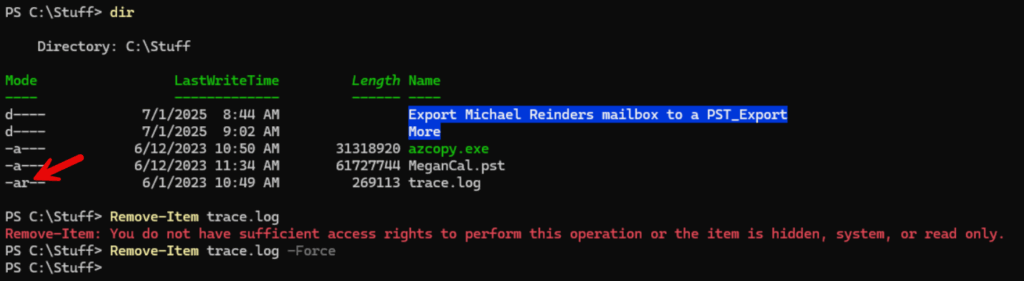
Without the -Force parameter, there is an error message. We need to force it to delete the read-only file.
How to delete files recursively
If we want to delete files, including files in child folders, we need to use the -Recurse parameter. Let’s delete all the files in the c:\stuff\more folder, including all child files, but without deleting the ‘more’ folder itself.
Remove-Item -Path "c:\stuff\more\*" -Recurse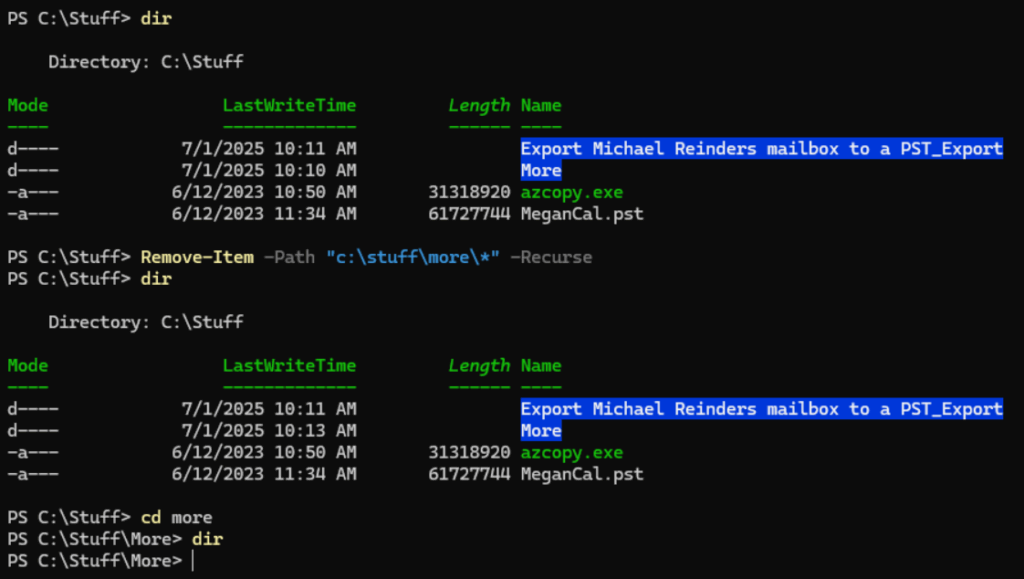
Using wildcards
Alright, we’ve already used wildcards, of course. But let me explain more about the subject. You can use the ‘*’ and ‘?’ wildcards to choose all characters, or a single character, respectively. For example, if you were to try ‘Remove-Item c:\stuff*.?og, it would delete all files with any filename and an extension that ends in any character plus og (e.g. LOG, BOG, TOG, POG, etc.).
This may be somewhat of an obscure example, but it gets the point across. Let’s remove any files whose filenames include the ‘001F’ string.
Remove-Item * -Include *001F*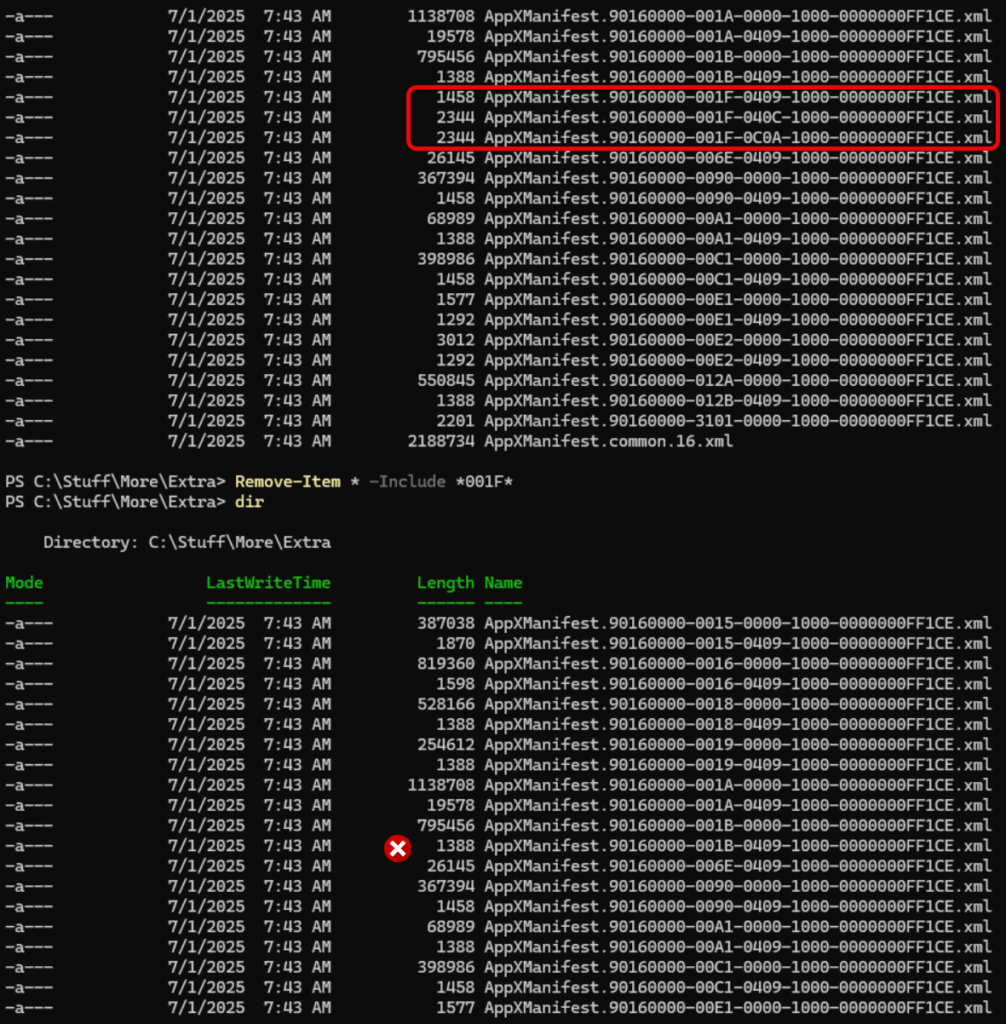
This is only a partial screenshot, but you can see the files that were in the directory originally but are now missing after running the command with the string -Include.
More advanced topics and examples
These examples will be helpful in your scripts and automation tasks, such as Power Automate (Desktop) and other such automation tools.
How to delete all read-only files with Get-ChildItem
Let’s start off with a nice script using Get-ChildItem. This will delete all read-only files recursively in a folder.
Get-ChildItem "C:\TargetFolder" -Recurse -Force |
Where-Object { -not $_.PSIsContainer -and $_.Attributes -band [System.IO.FileAttributes]::ReadOnly } |

ForEach-Object {
$_.Attributes = 'Normal' # Remove read-only attribute
Remove-Item $_.FullName -Force
}
Get-ChildItem first gathers all files including children in the TargetFolder. It only grabs the files with the ReadOnly attribute and then uses Remove-Item to delete those files using -Force, as they’re read-only.
Deleting files with special characters
Let me show you how to delete files with special characters in their names. Normally, Remove-Item and other cmdlets won’t see or act on them unless you use some magic.
This example shows you how to delete files with special characters like parentheses or brackets.
Get-ChildItem

Directory: C:\temp\Uploads

Mode LastWriteTime Length Name
---- ------------- ------ ----
-a--- 6/1/2018 12:19 PM 1362 myFile.txt
-a--- 6/1/2018 12:30 PM 1132 myFile[1].txt
-a--- 6/1/2018 12:19 PM 1283 myFile[2].txt
-a--- 6/1/2018 12:19 PM 1432 myFile[3].txt

Get-ChildItem | Where-Object Name -Like *[*

Directory: C:\temp\Uploads

Mode LastWriteTime Length Name
---- ------------- ------ ----
-a--- 6/1/2018 12:30 PM 1132 myFile[1].txt
-a--- 6/1/2018 12:19 PM 1283 myFile[2].txt
-a--- 6/1/2018 12:19 PM 1432 myFile[3].txt

Get-ChildItem | Where-Object Name -Like *[* | ForEach-Object { Remove-Item -LiteralPath $_.Name }

Get-ChildItem

Directory: C:\temp\Uploads

Mode LastWriteTime Length Name
---- ------------- ------ ----
-a--- 6/1/2018 12:19 PM 1362 myFile.txt
How to delete files by size
You can also use Get-ChildItem to find all files of a certain size or smaller/larger to quickly weed out the larger culprits in your loss of free space.
Get-ChildItem "c:\stuff" -Recurse | Where-Object { $_.Length -gt 30MB } | Remove-Item
You can see the MeganCal.pst file (about 60 MB in size) was removed. And all child files greater than 30MB were also deleted.
Removing registry keys
Here’s an example of deleting a registry key including all subkeys. If you happen to have an orphaned application key with lots of subkeys, subfolders, and other keys, you can use one command to remove them.
Remove-Item HKLM:\Software\MyCompany\OldApplication -RecurseYou don’t need to open Registry Edit, find the location, open subfolders, Select All, delete, go to the parent folder, Select All, delete….just one command and you’re done.
Logging
Here’s a cool example of executing a potentially high-impacting script but including logging to verify its authenticity, including error handling:
$targetPath = "C:\Logs\*.log"
$logPath = "C:\Logs\deletion-log.txt"
$timeStamp = Get-Date -Format "yyyy-MM-dd HH:mm:ss"

Get-ChildItem $targetPath -Recurse -Force |
Where-Object { -not $_.PSIsContainer } |
ForEach-Object {
    try {
        Remove-Item $_.FullName -Force -ErrorAction Stop
        $timeStamp - Deleted: $($_.FullName) | Out-File -FilePath $logPath -Append
    }
    catch {
        $timeStamp - ERROR deleting $($_.FullName): $($_.Exception.Message) | Out-File -FilePath $logPath -Append
    }
}
There are many more examples and use cases with Remove-Item. Again, this is a nice sampling of what you can do.
What is PowerShell Remove-Item?
The PowerShell Remove-Item cmdlet deletes one or more files or items. Because it supports a plethora of providers, it can remove:
- files
- folders
- registry keys
- variables
- functions
- and aliases.
Managing files and folders is a common IT Pro task. Like most cmdlets, Remove-Item can accept piped input from another cmdlet, like Get-ChildItem.
Why use PowerShell Remove-Item to delete files?
PowerShell has inherent advantages when compared to deleting files using other command-line tools or File Explorer. Sure, they all perform the same function, but PowerShell brings advanced automation and scripting capabilities.
One disadvantage of Remove-Item is that files, and other items removed with Remove-Item, will NOT end up in the Recycle Bin. After they’re gone, they’re gone! (I say essentially because you can use other software or hardware recovery methods to attempt to restore these files…)
Basic Remove-Item syntax and parameters
The most basic syntax is:
Remove-Item -Path Which files -ParametersIf you don’t specify a path, the cmdlet assumes the current working directory. Let me show you a quick table showing the most common parameters used.
| Parameter | Description |
|---|---|
-Path or positional 1 | Specifies the path to the item(s) to remove |
-Recurse | Deletes items in subdirectories |
-Force | Deletes read-only or hidden files |
-WhatIf | Shows what would happen without deleting |
-Confirm | Prompts for confirmation before deletion |
-Filter / -Include / -Exclude | Fine-grain control over matching file names |
Supported providers
PowerShell supports multiple providers, or location types, to use common cmdlets like Remove-Item. It’s not just used for your filesystems. You can also delete items from:
- the Registry
- Certificate Stores
- Environment Variables
- Aliases
- Functions
You can quickly list all available providers in your session with:
Get-PSProvider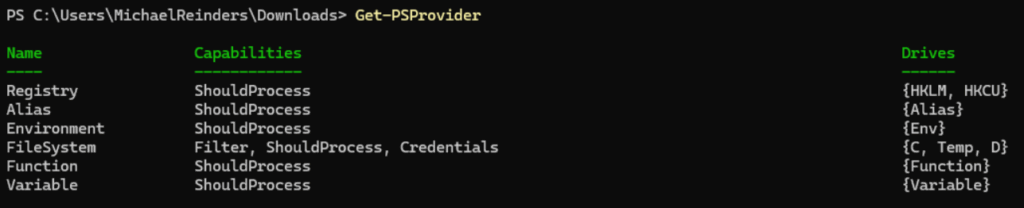
Frequently asked questions
How do I delete a file in PowerShell?
To delete a file in PowerShell, use the Remove-Item cmdlet. This is the primary command for removing files and folders in Windows PowerShell. For example:
Remove-Item "C:\path\to\file.txt"
To force removal without confirmation, add the -Force parameter:
Remove-Item "C:\path\to\file.txt" -Force
If you want to delete multiple files at once, you can use wildcards:
Remove-Item "C:\path\to\*.log"
Tip: If you’re writing a PowerShell script to delete files automatically, you can wrap
Remove-Itemin a.ps1file for scheduled or batch file cleanups.
How do I delete a file in a shell script?
In a Linux or macOS shell script, you can delete files using the rm command:
rm /path/to/file.txt
To delete multiple files or use patterns:
rm /path/to/*.log
If you want the script to delete files without asking for confirmation, use the -f flag:
rm -f /path/to/file.txt
This is the shell equivalent of using PowerShell’s
Remove-Itemfor file deletion.
How to delete a file in command?
On Windows Command Prompt (CMD), the del command is used to remove files:
del C:\path\to\file.txt
To delete multiple files:
del C:\path\to\*.log
If you want to remove a folder and all files inside, use:
rd /s /q C:\path\to\folder
For automation, you can combine CMD
delcommands in a batch script similar to a PowerShell file deletion script.
How do I securely delete files in PowerShell?
Using Remove-Item in PowerShell only deletes the file reference and doesn’t securely overwrite the data. For secure file deletion in PowerShell, you have two options:
- Overwrite before deleting: Use a script to write random data into the file, then run
Remove-Item. - Use a secure delete utility: Combine PowerShell with Sysinternals’
sdeletetool:
sdelete.exe -p 3 "C:\path\to\file.txt"
This method securely overwrites the file multiple times, making it unrecoverable. It’s ideal for sensitive data when using PowerShell to delete files permanently.
What is rm -RF?
rm -rf is a Linux/Unix command used to recursively and forcefully delete directories and files.
r= recursive, meaning it deletes subdirectories and their contents.f= force, meaning it skips confirmation prompts.
Example:
rm -rf /path/to/directory
Warning: This is a permanent deletion command similar to using
Remove-Item -Recurse -Forcein PowerShell. Always double-check the path before running it, especially in scripts.

Michael has been an IT Pro since 1998. He has worked predominantly in the Windows world including client and server operating systems, on-prem systems engineering (AD, DNS, etc.), and over the last ten years or so has embraced and immersed himself in...


