- Blog
- PowerShell
- Post
Error Handling With PowerShell Try Catch Blocks
PowerShell 7 has upped the game in helping you troubleshoot your functions, scripts, and modules.

Windows PowerShell has a robust error handling capability with PowerShell try catch blocks. And PowerShell 7 introduced new features, making troubleshooting even easier. In this article, I will show you how to use PowerShell’s built-in error handling features to help debug your scripts when there are problems.
Introduction to the PowerShell Try Catch Block
Try blocks provide a way to handle errors and ensure that your script doesn’t stop abruptly. When a mistake or exception occurs, it is referred to as the computer “throwing an exception.” With a try block in place, if an exception is thrown, the program interrupts its normal flow and searches for an exception handler to address the error.
The second part of a try block is the catch block, which outlines what should happen when an exception is thrown. In the catch block, you can specify how you want to handle the error, such as displaying an error message, logging the error, or taking corrective actions.
The last part of a Try block is called the Finally block. This block in a try-catch block is used to define a section of code that will always be executed regardless of whether an exception is thrown or not. This block is typically used to clean up resources or perform any necessary actions that should occur regardless of the outcome of the code in the try block. Finally blocks are not used very often, and I’ll discuss a typical usage a little later in this article.
Understanding PowerShell Try Catch error handling
First, it helps to have a good understanding of errors within PowerShell. A common operation is to test the network connection to another system using the Test-Connect cmdlet. The example is using a computer name of fakesystem, that isn’t going to work, and only 1 ICMP ping is being sent to simplify testing (default is 4 ICMP pings).
Test-Connection "fakesystem" -Count 1Adding a try-catch block to your code
As expected the operation failed, but it would be nice to output a nicer error message then that. To “catch” the error, we use a try-catch block. By wrapping our code in this block, any error will be caught and we can then output an appropriate message or take some other action. Let’s give this a try below. You should expect to see Error in the output.
Try {
Test-Connection "fakesystem" -Count 1
} Catch {
"Error"
}
Terminating vs. non-terminating PowerShell errors
Instead you see the same error message as before, …No such host is known…, but shouldn’t we see Error? The Test-Connection cmdlet outputs something called a non-terminating error. There are two types of errors, Terminating and Non-Terminating. Terminating errors stop execution whereas non-terminating writes to the error stream but does not stop the pipeline execution. The try-catch block only catches terminating errors.
Adding the -ErrorAction parameter to a cmdlet
How do we make Test-Connection throw a terminating error then? Thankfully there is a handy parameter available to most functions called, ErrorAction. You can configure the cmdlets error handling behavior to throw a terminating error by specifying Stop as the value.
Try {
Test-Connection "fakesystem" -Count 1 -ErrorAction 'Stop'
} Catch {
"Error"
}
Now when you run the above code, you will get Error as the output. The output of just what we define for the error message is much more concise and opens up the door to customized error messages. Often though, instead of catching all errors equally, maybe you want to customize how each exception type is handled. Try-catch can do this, but you first need to know what the exception is.
Inspect the global $Error variable
After running the above code, you can inspect the global $Error variable and as you can see below what exception type was thrown:
$Error[0].Exception.GetType().FullNameUsing multiple catch blocks
The name of a Try/Catch block suggests that there’s a try block and a catch block. However, it’s a misconception that you can only have one catch block. It is possible to have multiple catches to handle specific exceptions for the same code. You can have separate catch blocks for specific exceptions and a catch block to handle all remaining exceptions.
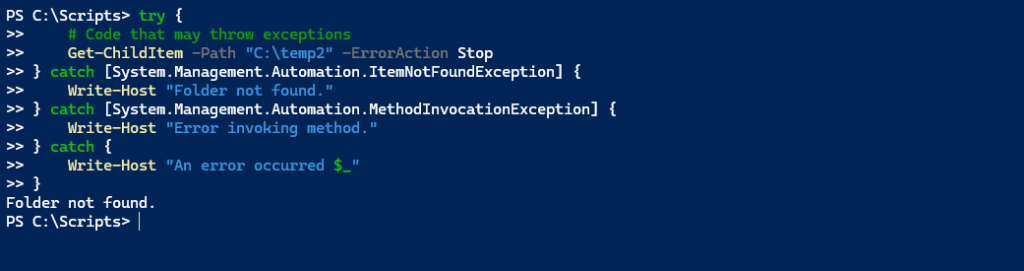
In this example below, There are three catch blocks for the one try block. The idea here is to be able to catch different types of errors with a single set of code. In the first catch block, we are looking for errors that throw an error type of [System.Management.Automation.ItemNotFoundException]. This the exception type for missing files and folders.
The second catch block is there to catch errors that throw an error type of ‘[System.Management.Automation.MethodInvocationException]‘ which occurs during the invocation of a method. The last catch block is simply designed as a catch all. If the error thrown is not one of the two previous exception types, then this last catch block will catch any remaining errors from the try block.
try {
    # Code that may throw exceptions
    Get-ChildItem -Path "C:\temp2" -ErrorAction Stop
} catch [System.Management.Automation.ItemNotFoundException] {
    Write-Host "Folder not found."
} catch [System.Management.Automation.MethodInvocationException] {
    Write-Host "Error invoking method."
} catch {
    Write-Host "An error occurred $_"
}
Using the finally block in your code
As previously stated, the Finally block in a try statement is responsible for executing code that should always be run, regardless of any errors. Think of the Finally block as a routine that always runs when the code is exiting the Try block. The finally block always runs, regardless of whether an exception occurs. So, it will run even if no exception happened.
There has been ongoing discussion among the PowerShell community regarding the reliability of the Finally block. There is one situation where the finally block may not be executed: when the program suddenly crashes due to an error. If you were execute a script and then something like CNTRL C to break out of the script, then the Finally block MAY NOT run depending on when you broke out of the script execution.
Let’s look at a typical Finally block in action.
try {
    # Code that may throw an error
    Get-ChildItem -Path "C:\temp2" -ErrorAction Stop
} catch [System.Management.Automation.ItemNotFoundException] {
    Write-Host "An error occurred: $_"
} finally {
    Write-Host ""
    Write-Host "The Finally block executed after the catch block caught the error."
}
Here’s an example of when you would use a Finally block in a real-world scenario. In this example, the try block attempts to open a file and write a message to it. Unfortunately, in this case, the file that it is trying to open doesn’t exist, causing an error to be thrown. The exception will be handled by the catch block.
However, if we use the System.IO.File file class, the handle can stay open even after the error is thrown. By using the finally block, the file handle is always closed, no matter what, to prevent resource leaks and ensure proper cleanup.
try {
    $file = [System.IO.File]::OpenWrite("C:\example.txt")
    Write-Output "File opened for writing."

    # Code that writes to the file
    $file.WriteLine("Hello, World!")
} catch {
    Write-Host "An error occurred: $_"
} finally {
    if ($file -ne $null) {
        $file.Close()
        Write-Output "File handle closed."
    }
Print an error message to handle a specific exception type
Now that we know the specific exception type is System.Net.NetworkInformation.PingException we can catch just this error. The code below will output Ping Exception and as you can tell we can chain multiple exception types with a default value at the end.
Try {
Test-Connection "fakesystem" -Count 1 -ErrorAction 'Stop'
} Catch [System.Net.NetworkInformation.PingException] {
"Ping Exception"
} Catch {
"Unknown Exception"
}
Customize the exception message output
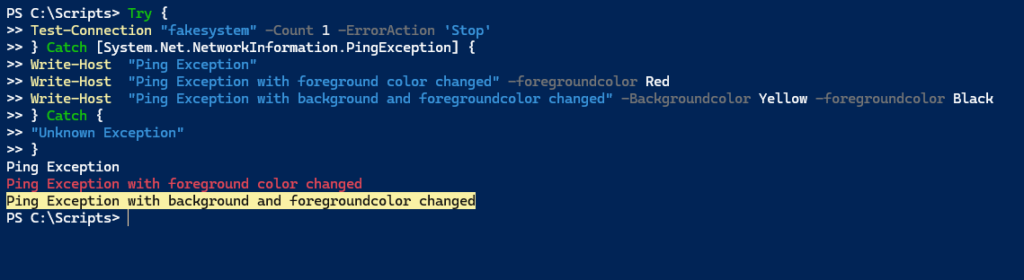
There are multiple ways to customize the exception message displayed when the catch block is invoked. With Write-Host, you can display messages on the console and add vibrant colors to make text more noticeable. We can show this by using the example mentioned earlier. I have included two more write-host messages below, each showing a different style to showcase the possibilities.
Try {
Test-Connection "fakesystem" -Count 1 -ErrorAction 'Stop'
} Catch [System.Net.NetworkInformation.PingException] {
Write-Host  "Ping Exception"
Write-Host  "Ping Exception with foreground color changed" -foregroundcolor Red
Write-Host  "Ping Exception with background and foregroundcolor changed" -Backgroundcolor Yellow -foregroundcolor Black
} Catch {
"Unknown Exception"
}
It’s important to remember that Write-Host sends output to the console host. Write-Host can only display the output on the screen and nothing more. In newer versions of PowerShell, Write-Output is preferred over Write-Host because of its more flexible in handling output. Also, you may prefer to log the output in a log file or only make it available in Verbose mode. Write-Host can not handle these types of scenarios. You can use other cmdlets for these particular scenarios.
You might also want to think about Write-Warning and Write-Error. Use these cmdlets to notify the user of a non-critical error. By using these cmdlets, you can print error messages in yellow or red text on the console without interrupting a pipeline or loop. Though it varies depending on your error action preference.
PowerShell 7 and new error handling functionality
All this is very cool and useful but how does PowerShell 7 help us here? As you’ve no doubt noticed, unless you are turning everything into terminating errors using ErrorAction ‘Stop’, this will quickly become difficult to manage.
PowerShell 7 has a brand new error view option called ConciseView. Set the preference variable $ErrorView to ‘ConciseView’ or to get the same view as before set the variable to ‘NormalView’. With ConciseView turned on (the default in PowerShell 7) let’s see what our output looks like now with the Test-Connection example.
Test-Connection "fakesystem" -Count 1The three ErrorView options for the $ErrorView variable
Below is a view of each of the three ErrorView options and how they display the error of the Test-Connection example.
The three ErrorView options for the $ErrorView variable The PowerShell Get-Error cmdlet
That is a whole lot easier to digest! What if you need to dive into the error to understand what’s going on though? With PowerShell 7 there is a brand new cmdlet named Get-Error. This cmdlet outputs a ton of very useful and interesting information.
If we run Get-Error with no arguments, it outputs all the information on the last error to be shown. In this case, that of our Test-Connection failure as shown below.
PowerShell 7 Get-Error cmdlet
Woah, that is a lot more than expected! What’s great about this is that it displays not only the basic exception but also the InnerException and a StackTrace which dives into the internals and displays a lot of useful information, especially if we don’t really know what went wrong.
How PowerShell 7 makes error handling easier
As you can tell, error handling in PowerShell is robust and can be well controlled. With the addition of a more concise view for errors in the console, and the additional added ability to easily dive into the underlying reasons for an error, PowerShell 7 has upped the game in helping you troubleshoot your functions, scripts, and modules!

Mike Kanakos is a 5-time Microsoft MVP (PowerShell) and Manager of the Enterprise Identity and Access Services team at Invisalign, where he leads an engineering team that specializes in enterprise identity and access management and automation. Mik...


