Windows Autopilot Deployment: A Step-by-Step Guide

Windows Autopilot is a new Microsoft tool that IT pros can use to pre-configure, reset, or repurpose Windows devices. It’s a great tool to automate the process of deploying Windows devices in an organization. In this Windows Autopilot deployment step-by-step guide, we’ll explain how to get started with Windows Autopilot and set up new devices before handing them out to users in your organization.
How does Windows Autopilot deployment work?
Windows Autopilot is a collection of technologies that help to get devices up and running from the Out of Box Experience (OOBE). After being powered up for the first time, all Windows devices start by allowing a user to create a username and password, or to sign in with a personal, work, or school Microsoft account. This is known as Windows Enrollment.
Included as part of Azure AD Premium, Windows Autopilot allows computers to be directed to the correct Mobile Device Management (MDM) platform during the OOBE, allowing IT admins to ensure that users follow a streamlined process for their new computer.
Is Windows Autopilot a Microsoft Intune feature?
As Windows Autopilot is a feature of Azure AD Premium, not Intune, it isn’t accurate to refer to it as “Microsoft Intune Autopilot. In most cases, the MDM that organizations choose to use is Intune, but it really could be any of the MDMs supported by Azure Active Directory.
When Microsoft announced Microsoft Endpoint Manager as an overarching product above both Microsoft Intune and Configuration Manager, there was much confusion. According to some, Intune became Endpoint Manager or just disappeared altogether.
The truth is, Microsoft Intune is still around: It’s the platform that handles Mobile Device Management for billions of devices around the world. Its counterpart, Configuration Manager, is typically responsible for the agent-based management of on-premises devices. Both Microsoft Intune and Configuration Manager devices can be found in a single unified portal, the Microsoft Endpoint Manager Admin Center.
For the purpose of this article, I’m going to assume that the MDM we’ll be using is Intune, but the techniques we’ll use will be relevant and similar across most supported MDMs.
Benefits of using Windows Autopilot for IT pros
With Windows Autopilot, IT pros can ship new Windows devices from OEMs such as Dell, HP, Lenovo, and many others directly to end-users. They can also ship devices directly to end-users from hardware resellers who might perform additional services such as asset-tagging or staging.
While it’s possible to stage devices using a feature called Autopilot Pre-provisioning, this is not the main use-case for Autopilot and it’s certainly not required. That said, you’ll often find resellers that will include Autopilot Pre-provisioning in their default offering, even though it adds limited value for most use-cases.
An additional benefit of Windows Autopilot is that users who set up their device via Windows Autopilot are not automatically granted Local Administrator permissions to their new device, as they would be if they simply logged in via the Out of Box Experience. Users who complete device enrollment via Autopilot are also able to skip the EULA and won’t be asked to select the user account type.
Licensing Requirements for Windows Autopilot
As I mentioned earlier, Autopilot comes as part of Azure AD Premium P1. It’s not licensed separately. If you plan to use Intune, which you probably do, then you’ll need an Intune user license too.
Microsoft makes most information about its licensing and retail pricing public, but it’s often rather difficult to be sure you’re on the right track. In this section, I’ll detail a few of the most common ways to license Windows Autopilot.
Option 1 – Microsoft 365 Business Premium
For small businesses with up to 300 desktop or laptop users, Microsoft 365 Business Premium is packed full of value.
The license costs around $16/user/month and includes both Azure AD Premium P1 and Intune as well as Microsoft Defender for Business and more. It is arguably more feature-rich than its Enterprise E3 counterpart, though it’s fairly limited in scalability.
Option 2 – Microsoft 365 Enterprise E3
For most organizations above ~300 users, Microsoft 365 Enterprise E3 is the most appropriate license for their users. It is now considered to be Microsoft’s standard license offering for enterprises. At a cost of around $26/user/month, one might expect it to be a significant improvement on the cheaper Business offering… but it’s not.
In fact, Microsoft 365 E3 must be coupled with Microsoft 365 E5 Security in order to match capability in terms of email threat protection and endpoint detection and response. That said, Microsoft 365 E3 does already come as standard with everything you need to get started with Windows Autopilot.
Option 3 – Azure AD Premium P1 + Microsoft Intune
While Microsoft will always make it more financially appealing to leverage their license bundles as above, there are always edge cases. With that in mind, I should point out that it’s possible to get started with Windows Autopilot with just Azure Active Directory Premium P1 and a Microsoft Intune license.
At around $6/user/month each, this pair of licenses will give just enough device management and security to let you configure auto-enrollment and Mobile Device Management for your Windows device estate. A bundled license package called Enterprise Mobility and Security (EMS) contains Azure Active Directory Premium P1 and Intune and is a little cheaper than the two individual licenses combined.
What about Microsoft Office 365 E3?
The similarity in the naming of “Office 365 E3” and “Microsoft 365 E3” is not ideal: Many IT admins understandably don’t realize the distinction and assume that because they have Microsoft Office 365 E3, they are able to get all features in Microsoft’s “standard” enterprise offering.
They are, unfortunately, wrong: A user with an Office 365 E3 license would not be able to use Autopilot, as this license does not include Azure AD Premium P1 or Microsoft Intune.
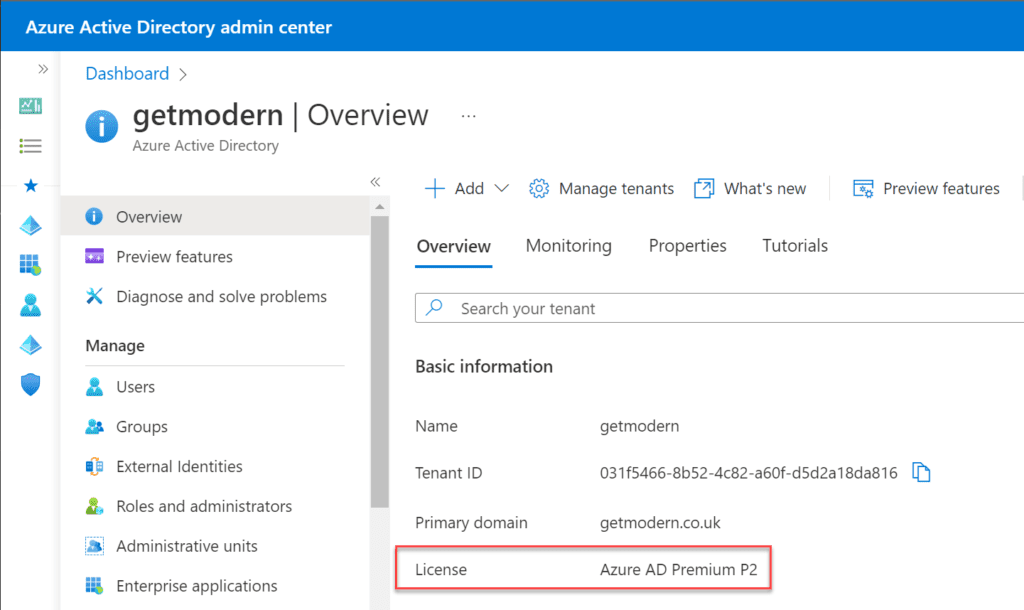
Verifying your Azure AD Premium subscription
With Azure AD Premium P1 being such a core requirement, it’s a good idea to be absolutely certain of your Azure AD Premium subscription status. It’s very simple to check it via your web browser:
- From the Azure Active Directory admin center, take a look at the Overview pane.
- Under “Basic Information”, note the “License” element, as shown below.
Windows Autopilot Limitations
Windows Autopilot is designed for a few very specific use cases, meaning there are always going to be things that Windows Autopilot cannot do. I have a couple of examples from my own personal experience:
Device Imaging (also known as Operating System Deployment, or OSD)
Windows Autopilot helps automate the device provisioning process right from the Out of Box Experience, which is the initial set-up screen users are presented with on a newly purchased device. If a device is able to display the Out of Box Experience screen, then it’s already been imaged and is ready to go. This will typically be an OEM curated image containing trial software, offers, and more.
Many organizations prefer to remove the OEM curated image, with the internal IT department replacing it with their own customized Windows Image (WIM). While this practice is still possible in the age of modern provisioning with Windows Autopilot, it’s often not required.
With the capability to dynamically provision devices and layers on apps, providing settings and customizations at deployment time has become more popular. IT admins are increasingly replacing the OEM-branded WIM with a “native” or vanilla image from Microsoft – primarily to ensure the removal of the included trial software or “bloatware”.
With its Windows Autopilot Deployment Program, Microsoft worked closely with OEMs when designing how Windows Autopilot would work. Each of the large manufacturers agreed to provide an “Autopilot-optimized” image on their devices, which is an option for all organizations to select when purchasing hardware. This optimized image contains no additional software or trials and is a great base for Windows Autopilot deployments.
So, while Windows Autopilot cannot help with device provisioning, it’s often not required; new devices can be used right out of the box, subject to the correct profiles assignment.
Proper configuration in Azure Active Directory and Intune is key
Your Windows Autopilot experience is only going to be as good as the configuration. Organizations need to ensure that they have everything lined up correctly – that includes the correct Autopilot profiles, deployed to the right device group, and installing the right apps.
During the initial setup within the Out of Box Experience, the device will contact Azure Active Directory, begin enrollment, and start the process to become ready for productive use. Users should expect to see full company branding on their login page, giving reassurance that this is a corporate device.
Creating a Windows Autopilot demo virtual machine with Hyper-V
It’s possible to test out most of the features of Windows Autopilot on your own computer, provided it can leverage Hyper-V capability.
Prerequisites
In order to be able to leverage Windows Autopilot, it’s vital that the following high-level prerequisites are met:
- Azure AD Premium P1 licenses must be assigned to all users who will log in to a Windows Autopilot device.
- Microsoft Intune licenses must be assigned to all users who will log in to a Windows Autopilot device.
- All users who are expected to log in to an Autopilot device must exist in Azure AD – whether that’s via Azure AD Connect synchronization or by virtue of being created in Azure AD.
- Azure AD Company Branding must be configured
Testing Windows Autopilot is simply a case of enabling Hyper-V and creating a Windows Virtual Machine – take a look at our Hyper-V tutorial on Petri.
Note – you’ll want to stop at the Out of Box Experience page as soon as the installation is completed. It’s important not to begin the process of signing in to the new Windows device.
What is the hardware ID (4K hardware hash)?
Any Windows 10 Professional device has the potential and capability to be a Windows Autopilot device, so it’s vital that we can identify which machines should be Autopilot-enrolled in your tenant.
We are able to identify every modern Windows device by its unique hardware ID, sometimes referred to as a hardware hash or 4K hardware hash (4K is simply the number of bytes that the hardware hash will always be output as). This is really just a combination of the computer’s serial number, Windows product ID, and device manufacturer.
It’s possible to capture the hardware hash via Powershell. This can be completed either within a running OS, or (more ideally) from within the Out of Box Experience itself! The only real requirement is that you have access to an administrative Powershell prompt, and global administrator access to the Azure AD environment.
If you decide to work from within the Out of Box Experience (which you should, really), then pressing Shift+F10 will provide you with a handy command prompt. From here, you can launch Powershell and get to work.
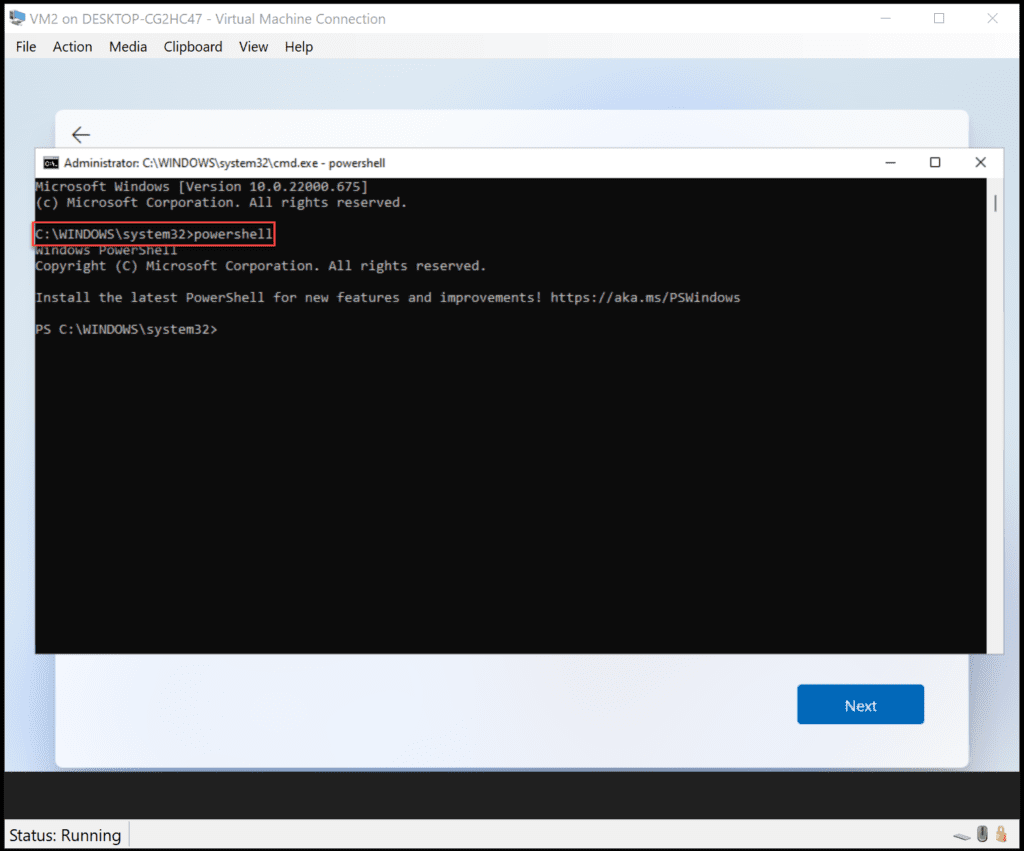
Assuming you’ve been able to launch Powershell correctly, now is a great time to run a few commands to get things started via the following Powershell script:
Set-ExecutionPolicy Bypass
Install-script Get-WindowsAutopilotInfo
Get-WindowsAutopilotinfo -Online
Once you’ve been able to execute the above commands and log in to your Azure AD environment with a global administrator account within the VM when prompted, it’s just a case of waiting a few minutes for the synchronization to complete.
Once complete, the hardware ID (or 4K hardware hash) will have been captured and uploaded to your tenant, resulting in an Autopilot device listed and ready for Autopilot assignment.
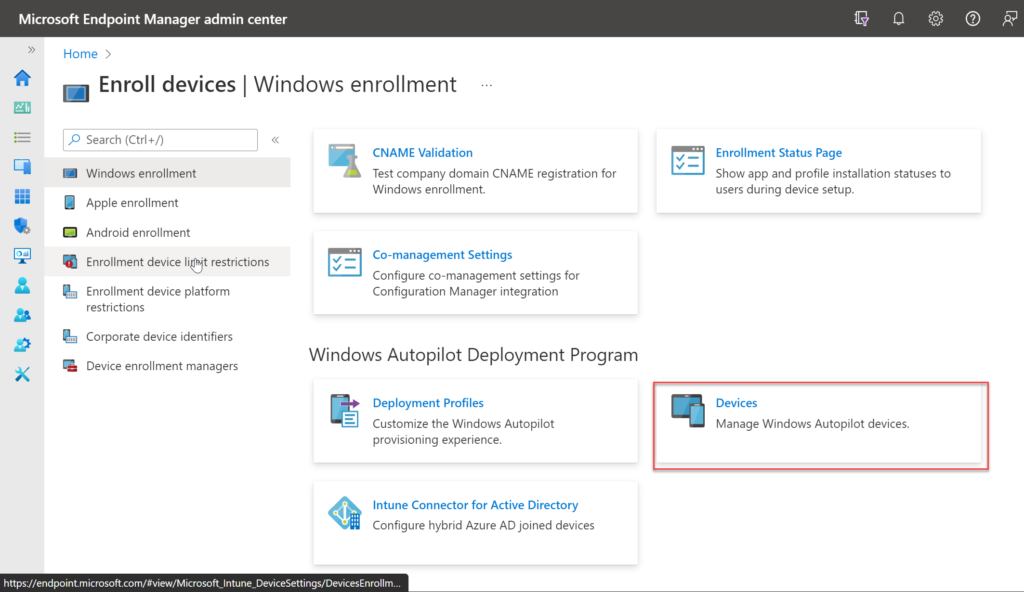
You can verify the uploaded devices from the Microsoft Endpoint Manager admin center.
- From the admin center, choose Devices.
- Choose Enroll Devices.
- In the Windows enrollment section, under Windows Autopilot Deployment Program choose Devices.
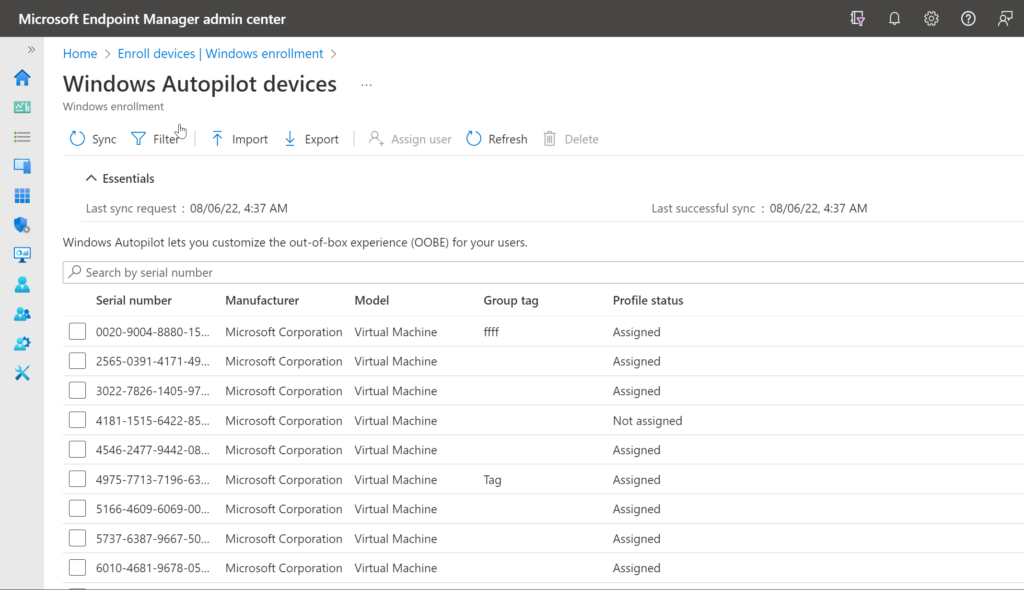
When first uploaded, devices will show that the Profile status is Not assigned. This will be updated to Assigned as soon as the Windows Autopilot Device has been added to an Autopilot deployment group, and an Autopilot Profile correctly assigned. We’ll cover this in the next few sections.
It’s worth noting that the use of the Get-WindowsAutopilotInfo -Online command serves to remove the need to obtain a separate hardware hash CSV file, which must then be uploaded to your tenant.
Creating a deployment group
When you add devices to the Autopilot devices list, it’s vital that they are added to an Autopilot deployment group (or Autopilot device group) so that the Autopilot profile can be targeted correctly.
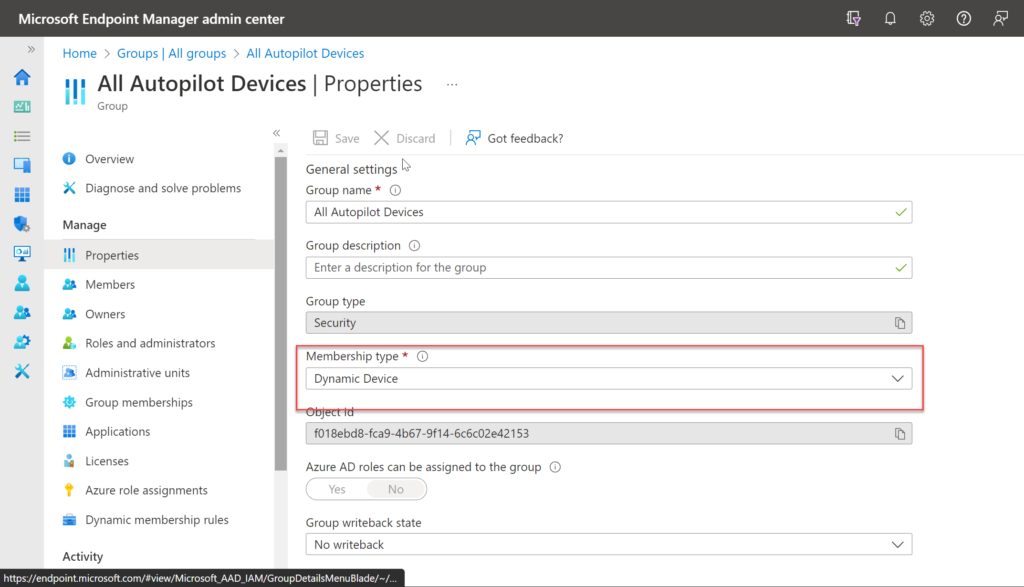
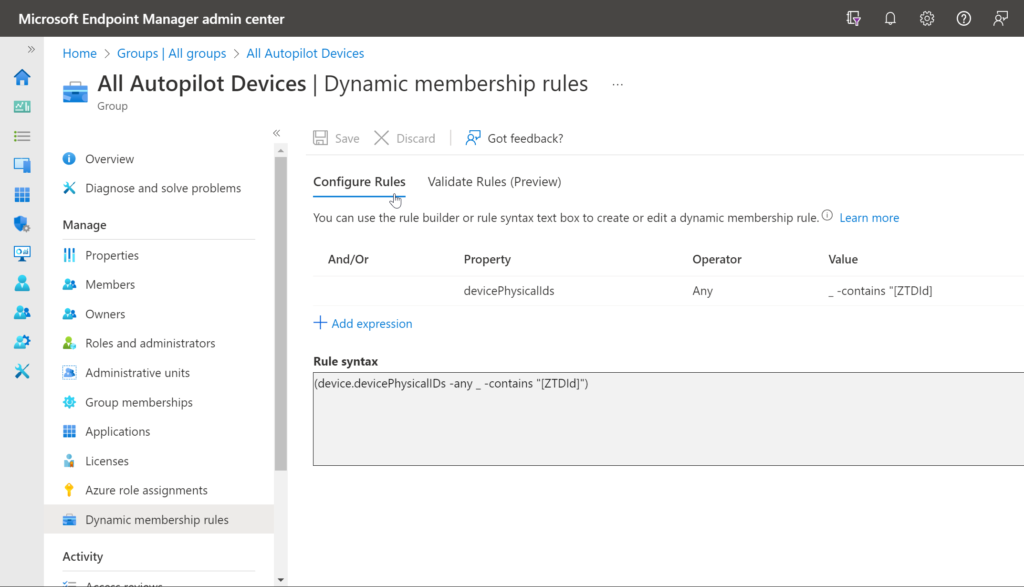
An Autopilot deployment group is simply an Azure AD security group. Take a look at this Microsoft docs page for more info on creating a new dynamic Autopilot group.
You simply need to specify a group type, a membership type (Assigned, Dynamic user, or Dynamic Device), a unique group name, and optionally a group description. The dynamic group rule must ensure that Autopilot devices are automatically added to the group when added to the devices list.
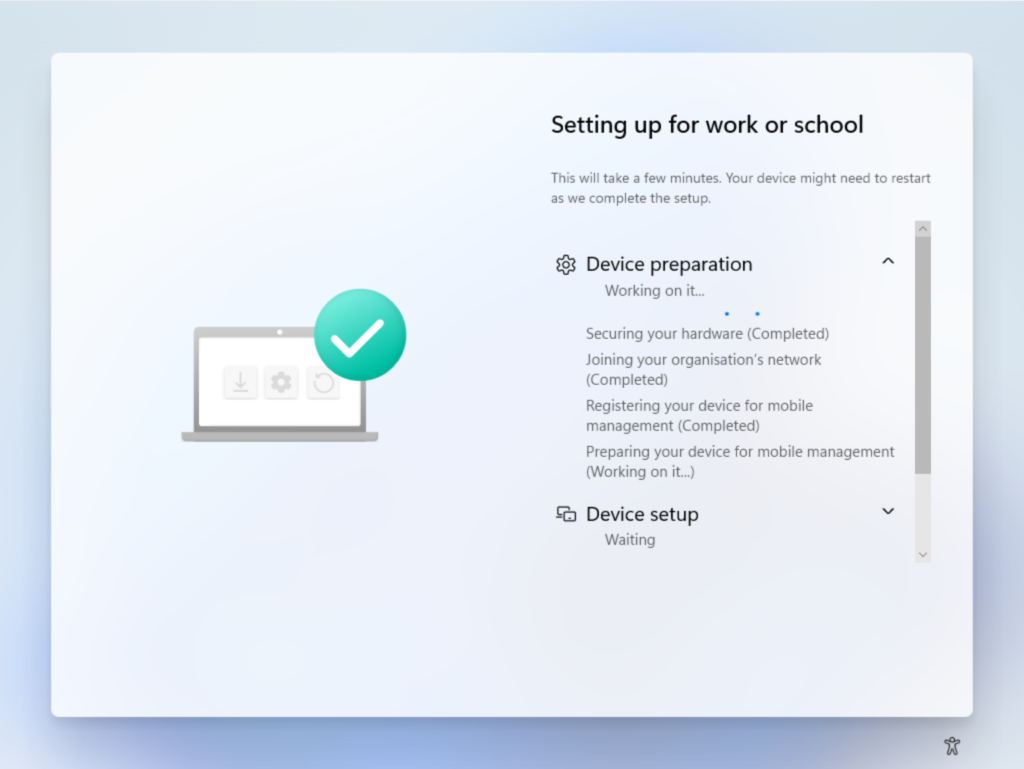
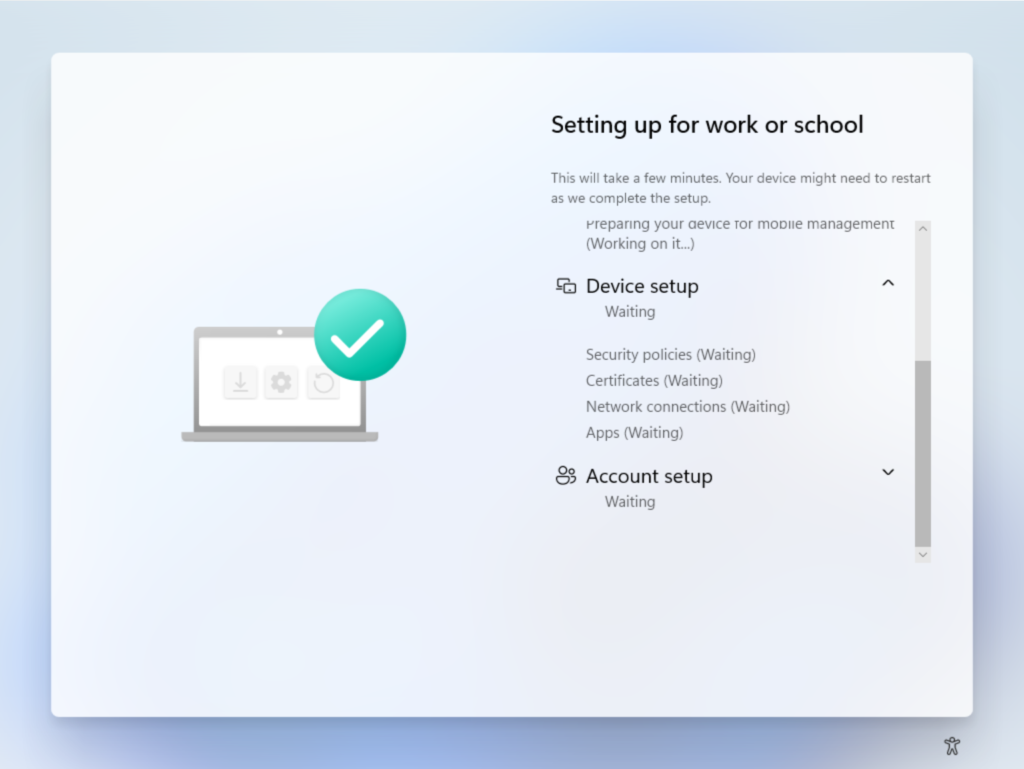
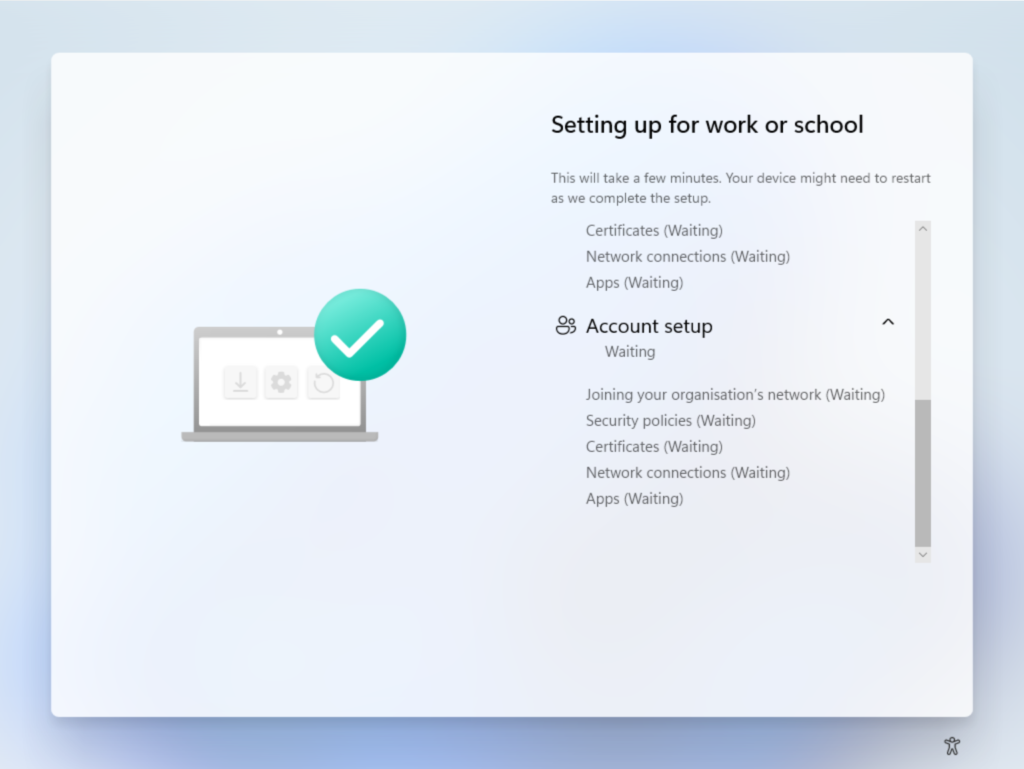
Configuring the Windows Autopilot Enrollment Status Page
When a user signs into a device for the first time, the Enrollment Status Page (ESP) displays the device’s configuration progress. The ESP also makes sure the device is in the expected state before the user can access the desktop for the first time. It locks the device until the configuration process is finished.
The ESP tracks the installation of applications, security policies, certificates, and network connections.
When deploying applications and tracking them via the ESP, it’s important to note that deploying both MSI and Win32 applications isn’t supported. Both MSI and Win32 installers use TrustedInstaller, which doesn’t allow simultaneous installations. If the MDM agent starts an MSI installation, there’s nothing stopping the Intune Management Extension plugin from starting a Win32 app installation by using the same TrustedInstaller.
In this situation, the installation of a Win32 app will fail and returns an error message, and the ESP will also fail. As a general rule, you shouldn’t mix line of business and Win32 apps in any type of Autopilot enrollment.
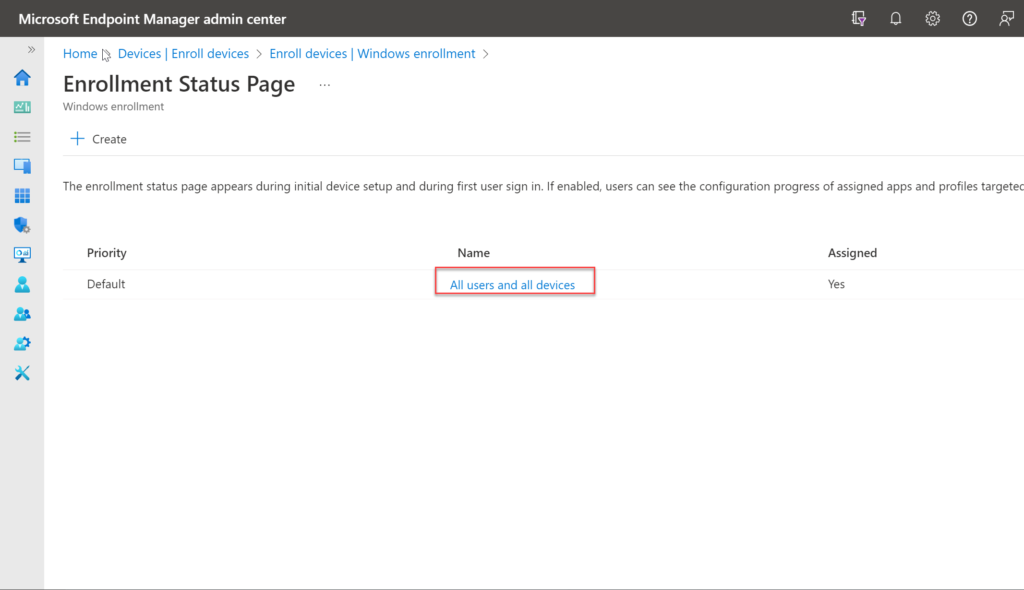
The ESP is enabled from the Microsoft Endpoint Manager admin center.
- From the admin center, choose Devices.
- Choose Enroll Devices.
- In the Windows enrollment section, under General choose Enrollment Status Page.
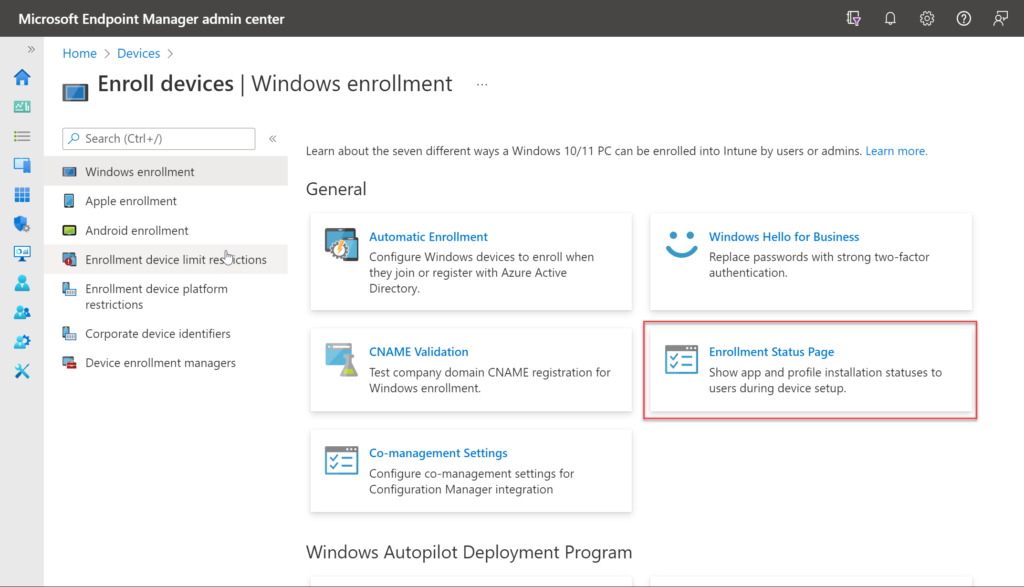
From here, we’re able to amend the default ESP or create our own.
Experiment with your own configuration to understand the best approach for your organization. A typical Enrollment Status Page will contain information about the Device preparation, Device setup and User Account setup stages of the Windows Autopilot process.

Each section of the Enrollment Status Page can be expanded to show additional detail:
Creating a Windows Autopilot deployment profile
After creating a device group, a Windows Autopilot deployment profile can be used to configure the Autopilot devices in a group. You can create Windows Autopilot deployment profiles from the Microsoft Endpoint Manager admin center:
- From the admin center, choose Devices.
- Choose Enroll Devices.
- In the Windows section, under Windows Autopilot choose Deployment Profiles.
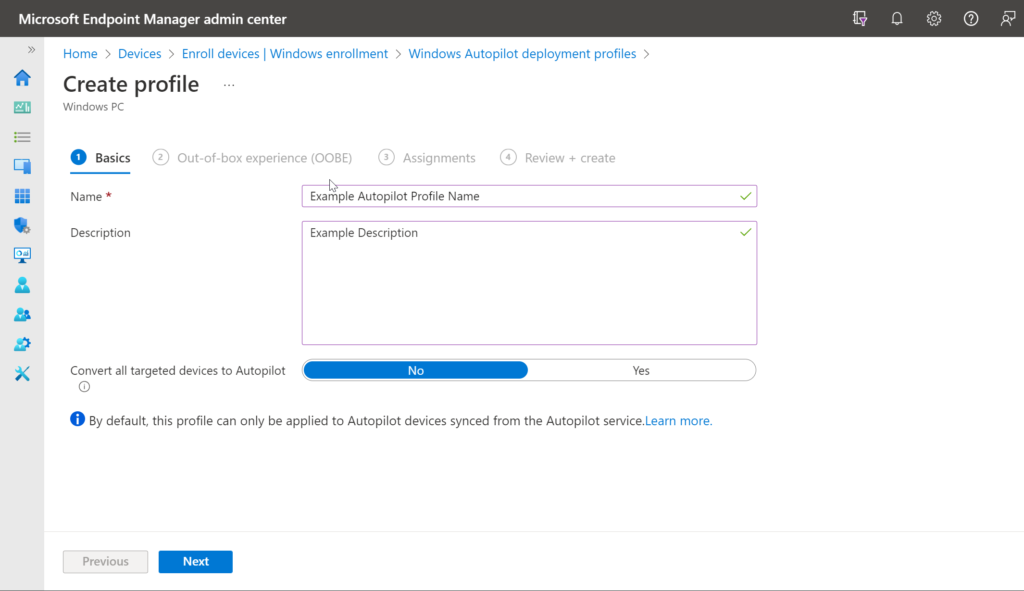
- Choose Create Profile > Windows PC.
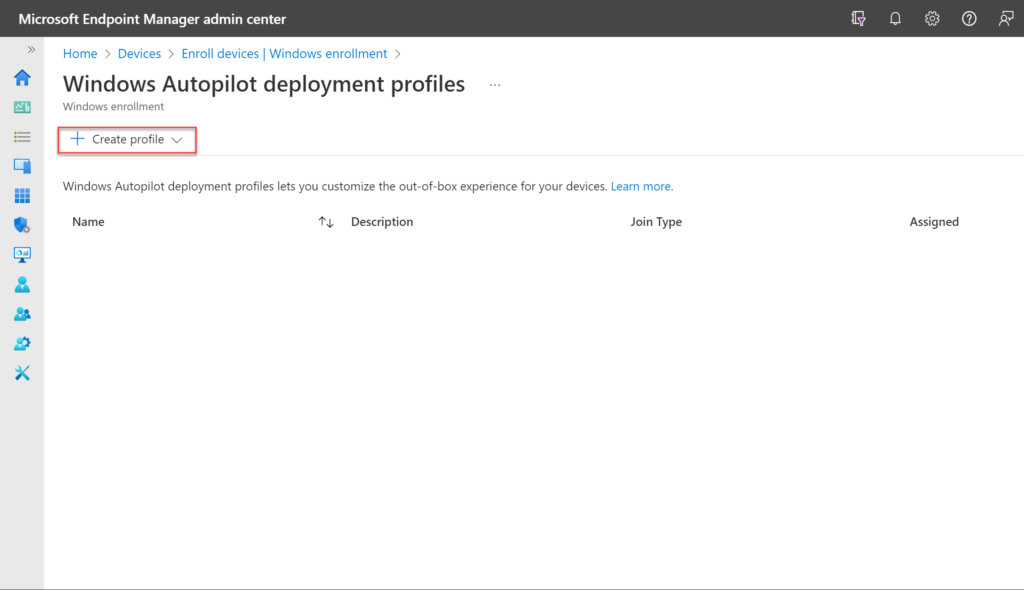
- From the Create Profile wizard, enter a Name and a Description, then leave the Convert all targeted devices to Autopilot set to No. Once you’re done, click Next.
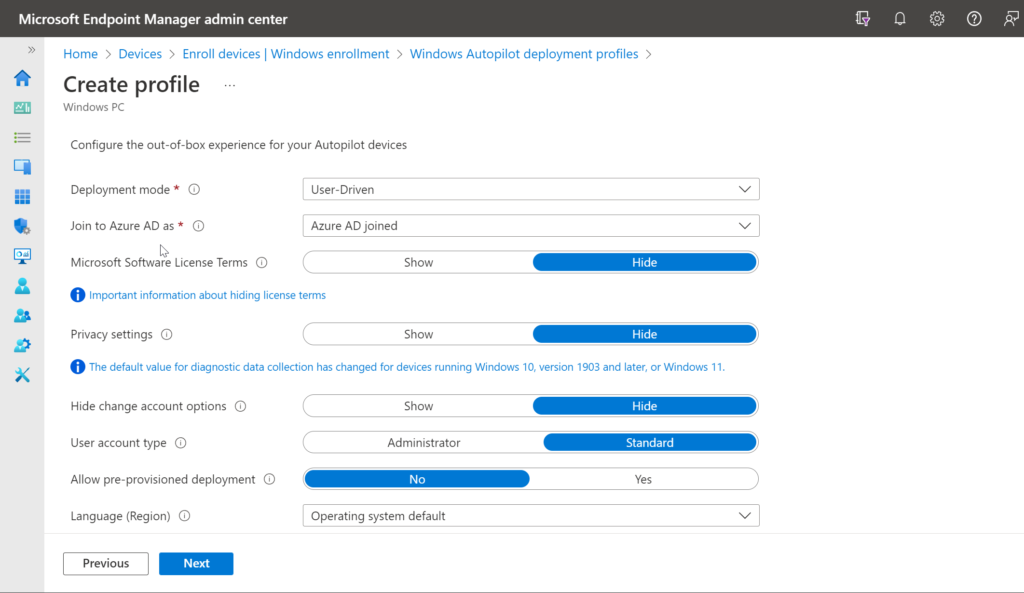
- On the Out of Box Experience pane that follows, leave Deployment mode as User-Driven, and leave Join to Azure AD as set to Azure AD joined.
- Leave the remaining settings to their default, but take a look at the tooltip at each setting to understand the impact. Once you’re done, click Next.
- On the Assignments pane, enter the name of the Autopilot Deployment Group created earlier and choose Select.
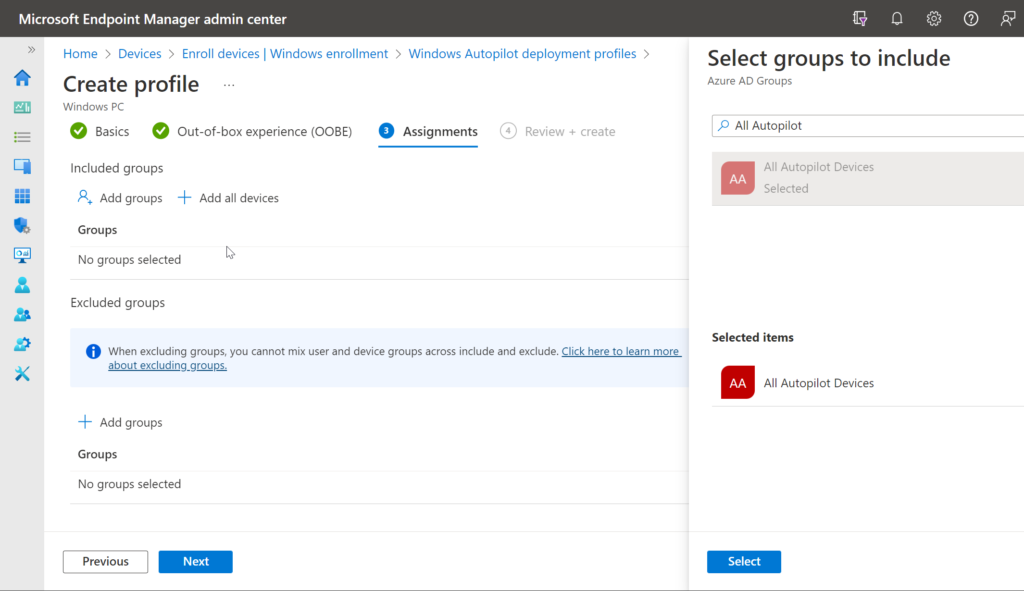
- If you want to exclude any groups, you can also add some by clicking on Select groups to exclude. Once you’re done, click Next.
- On the Review + Create page that follows, you can review all the different settings for your Windows Autopilot deployment profile. When you’re ready, click on Create.
Testing your Windows Autopilot Deployment Profile
This is it… you’re almost ready to start using Windows Autopilot for your Windows Autopilot deployments.
Now that we’ve collected the device info from our target VM, and deployed our Autopilot Profile, it’s simply a case of booting our VM to the Out-of-Box-Experience and allowing Autopilot to do its thing. Bare in mind that if you’ve not also deployed any apps to this device, the Autopilot workflow will be pretty uneventful! Let’s take a look.
As soon as the Autpilot device is switched on, it’ll show the Out of Box Experience:
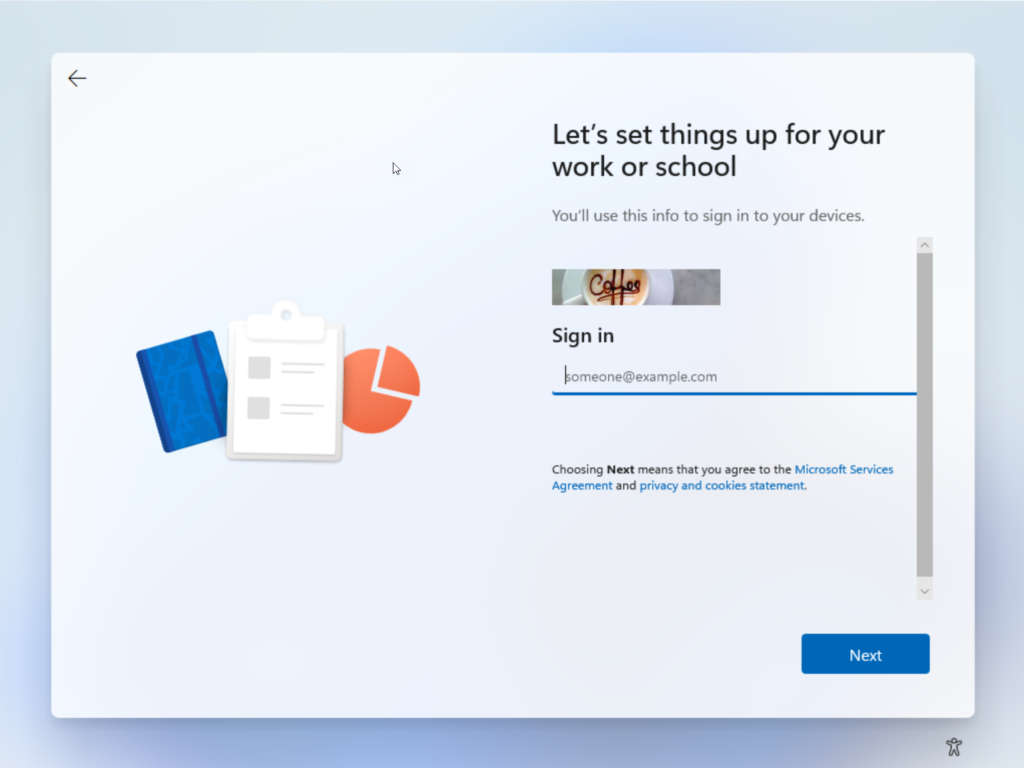
From here, the user simply enters their work email address and clicks Next, where they’ll be prompted to authenticate.
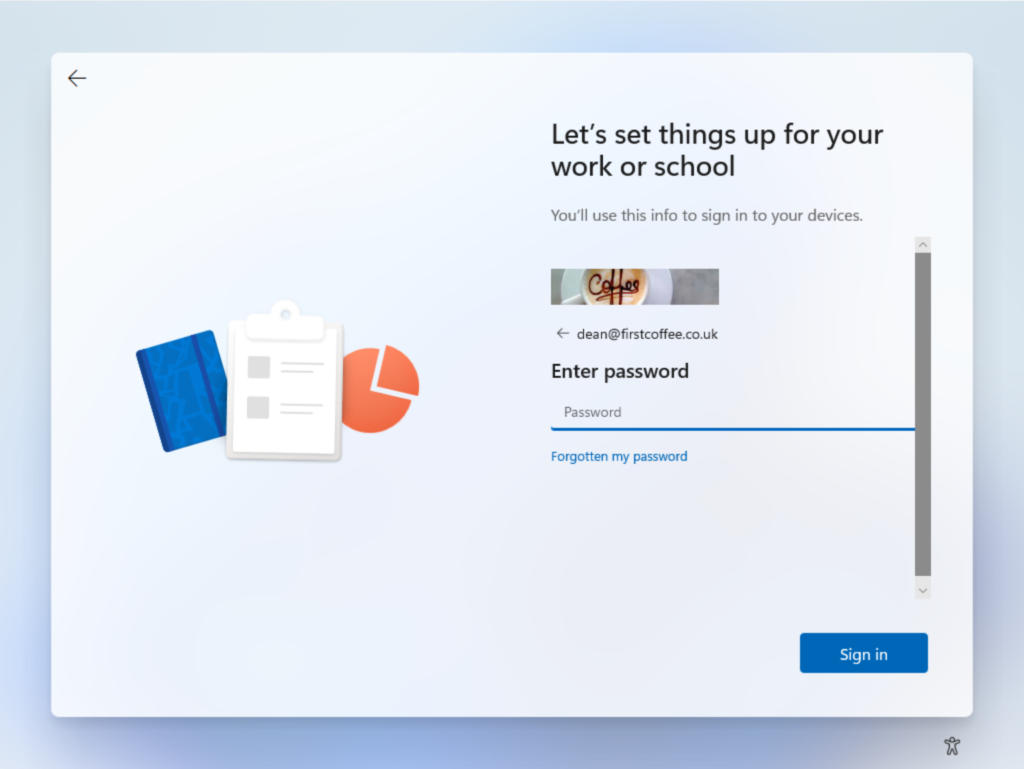
Once the user has entered their password and chosen Sign in, they’ll be required to complete a MultiFactor Authentication request to verify their identity.
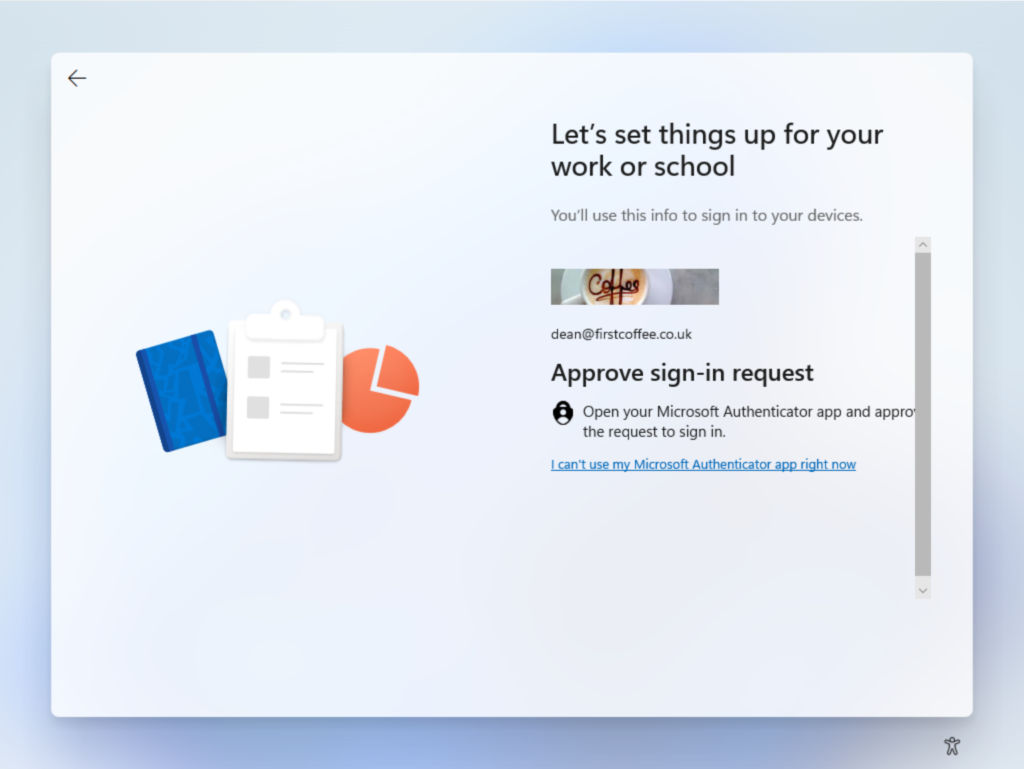
After the MFA prompt, the device will begin the process of configuring the device, asking the user to sit back and relax while the device is set up.

The next part of the process will see the Enrollment Status Page being shown to the end user, giving reassurance that some set up is actually taking place
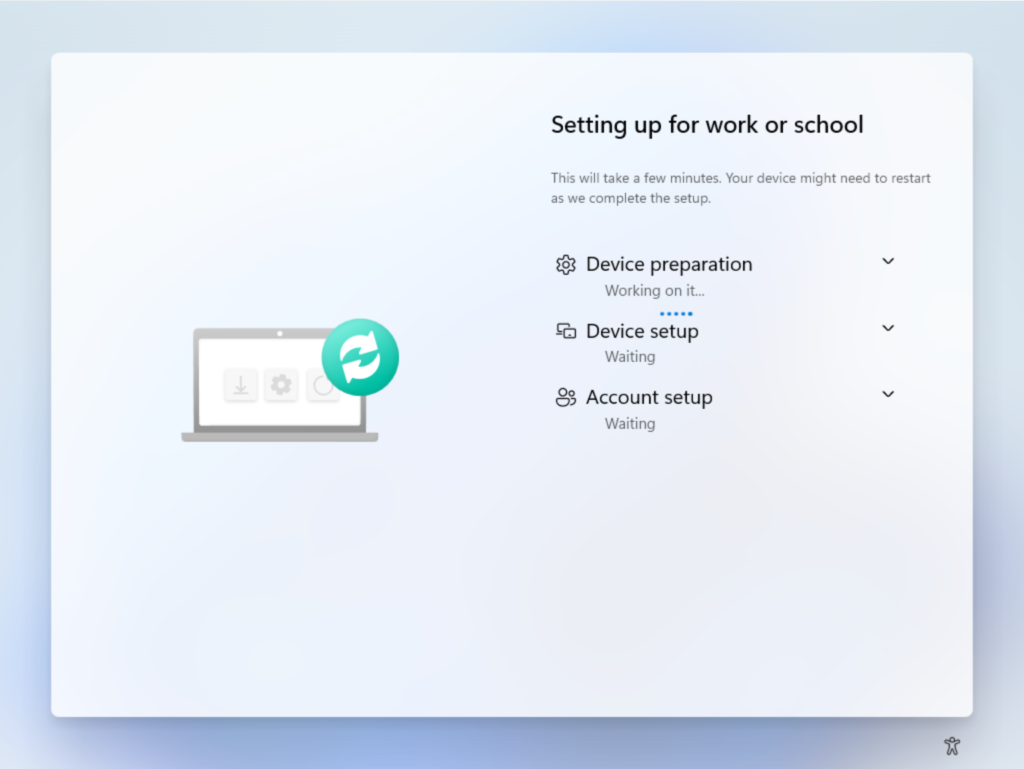
As each section is successfully completed, the ESP will show the status
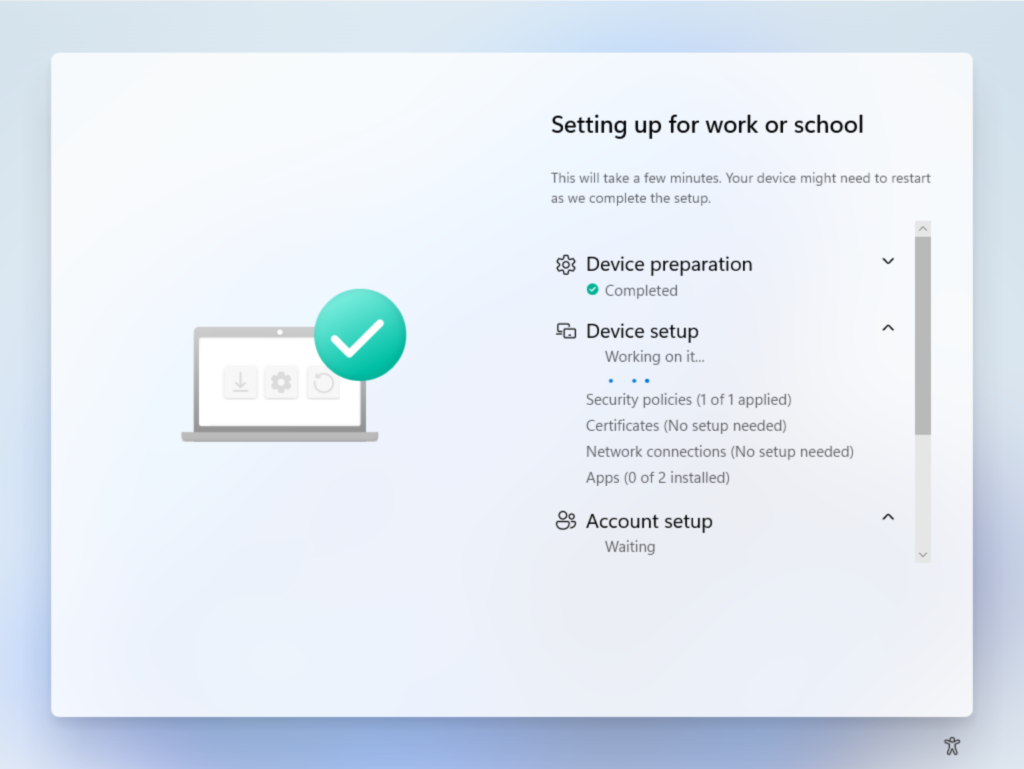
Finally, once all sections are complete, the user will be presented with their Windows desktop, ready to begin work. Their device will be Azure AD joined and enrolled into Intune, meaning ongoing management of settings and apps can be achieved through Microsoft Endpoint Manager.
At this point, it may be worth checking out why an organization would choose to use Windows Autopilot over not using Windows Autopilot. My Is Windows Autopilot Worth the Effort video will explain the details.
Conclusion
In my opinion, Autopilot has fundamentally changed how Windows deployment can be achieved, but it’s far from perfect. Gone are the days of unattend.xml and Windows Images – instead we’re toggling switches in the Intune portal. The concepts, however, are the same. Spend some time experimenting with the process and you’ll soon be an expert in Windows Autopilot.
If you want to better understand all the use cases where Windows Autopilot can be helpful, I invite you to watch my Ultimate Autopilot Guide video, which showcases how Windows Autopilot can be used in the real world.
FAQs
Can Windows Autopilot deployment be used with non-Windows devices or operating systems?
No, Windows Autopilot deployment is exclusively designed for Windows devices. It cannot be used to configure or deploy macOS, iOS, Android, or Linux devices. For these platforms, different deployment solutions and Mobile Device Management (MDM) tools should be used.
Does Windows Autopilot deployment work with older Windows versions like Windows 7 or 8?
Windows Autopilot deployment is specifically designed for Windows 10 and Windows 11 devices. It cannot be used with legacy Windows operating systems such as Windows 7, 8, or 8.1. Organizations still using older Windows versions need to upgrade their devices to utilize Windows Autopilot deployment features.
Can Windows Autopilot deployment be used in environments without internet connectivity?
Windows Autopilot deployment requires consistent internet connectivity during the deployment process as it relies on cloud-based services like Azure AD and Microsoft Intune. Offline or air-gapped environments cannot utilize Windows Autopilot deployment without modifications to their network infrastructure.
Is Windows Autopilot deployment compatible with third-party security software and endpoint protection?
Yes, Windows Autopilot deployment can work alongside third-party security solutions, but they must be properly configured in your deployment profile and MDM solution. It’s recommended to test compatibility and deployment sequence to ensure security software doesn’t interfere with the Windows Autopilot deployment process.
Can Windows Autopilot deployment be used to manage BYOD (Bring Your Own Device) scenarios?
While Windows Autopilot deployment is primarily designed for corporate-owned devices, it can be adapted for BYOD scenarios through specific configuration profiles. However, organizations need to carefully consider privacy implications and user consent when implementing Windows Autopilot deployment for personal devices.

Dean is a Microsoft Security MVP, Microsoft Certified Trainer, and co-organizer at the Workplace Ninjas UK.