Office 365 License Management Made Easy with Azure AD Groups
Group-based Office 365 License Management
On February 22, 2017, Microsoft announced the preview of a new feature to control the assignment of Office 365 licenses using Azure AD Groups. Using groups to control licenses is a good idea because it introduces some automation to simplify and streamline a process that is often tiresome and prone to error when administrator assign licenses to users one at a time.
Third-party products, like 4Ward365, IAmCloud, and Cogmotive highlight their license management capabilities because they reckon that more efficient use of licenses is a good way for tenants to save money. After all, if you buy some licenses from Microsoft, you should use them. If you do not, you end up paying good money monthly for functionality that no one uses.
And if you do not want to invest in a third-party product to control Office 365 licenses, you can write your own code. Most DIY license management projects leverage the cmdlets in the Azure Active Directory PowerShell module.
You need an account with an Azure AD Basic license (or above) to use the new feature, which Microsoft says they will eventually incorporate into plans like Office 365 E3. If you do not have the necessary license, you can sign up for a free trial of Enterprise Mobility and Security and try your hand at license assignment.
How Groups Control Licenses
The concept behind using groups to control licenses is simple. You buy a certain number of licenses of a specific type, such as 50 Office 365 E5 licenses. These form a pool of available licenses that administrators can assign to users. Traditionally, license assignment happens by editing user account properties through an interface like the Office 365 Admin Center, or programmatically by running cmdlets from the Azure Active Directory PowerShell module. These assignments are “direct” because they result from an administrator intervention.
The new functionality allows administrators to associate one or more groups with a pool of licenses. A background AAD process then assigns a license from the pool to each member of the group. Microsoft says that license assignment or revocation happens within minutes of users joining or leaving a group used for license control. A license assigned through this method is “inherited” because a user receives it due to their membership of the group. A user can both inherited and direct assignments, but Office 365 only takes a single license from the pool.
Setting up the Groups
I started by creating several groups to use to assign licenses. You can use any type of “security group” for this purpose, including an Office 365 group. The group can be cloud-based or synchronized to AAD from an on-premises directory, but it cannot be a distribution group because it has got to be able to control resources. In this case, Office 365 licenses.
I found that it is best to create the groups from the Office 365 Admin Center rather than the Azure portal as the portal generates some odd email address for the groups it creates. This is probably because the new Azure portal is still in preview and is not quite firing on all cylinders.
In any case, you might want to check and update group properties as necessary afterwards. For groups created through the Azure portal, I ran the Set-UnifiedGroup cmdlet to adjust their primary SMTP addresses, set the access type to private, and hide the groups from the GAL.
[PS] C:\> Set-UnifiedGroup -Identity "O365-E5 License Assignments" -AccessType Private -HiddenFromAddressListsEnabled $True -PrimarySmtpAddress [email protected]
Assignment by Group
After you assign the necessary license to your account and create the groups to control assignment, sign into the new Azure portal with a tenant administrator account to begin license management.
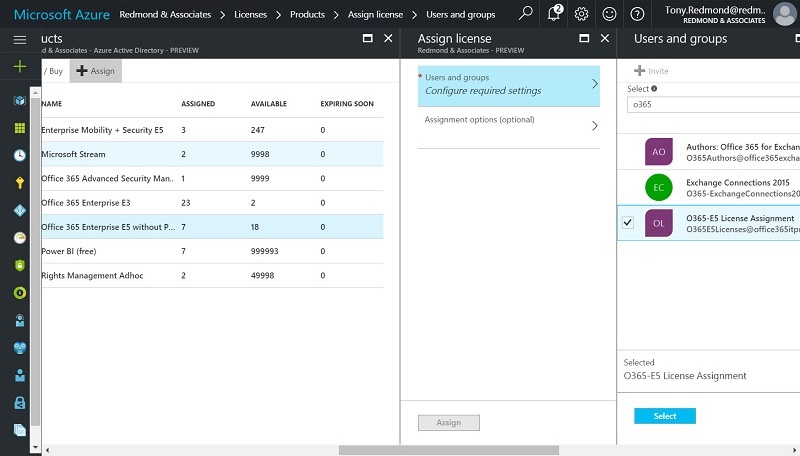
Connect to your Office 365 tenant and open the Active Directory instance for the tenant. Navigate to the Licenses tab and then click Products to reveal the set of licenses for the tenant. As you can see in Figure 1, my tenant has a range of licensed products, including two Office 365 plans (E3 and E5) and the trial Enterprise Mobility and Security E5 plan needed to use the group management feature.

Select the product that you want to manage and then click Assign. Two options are available:
- Configure required settings. This allows you to select one or more groups to control assignment to the selected product. In Figure 1, I have selected a group called “O365-E5 License Assignment”. Dynamic groups are supported for license management if you have the necessary AAD Premium licenses.
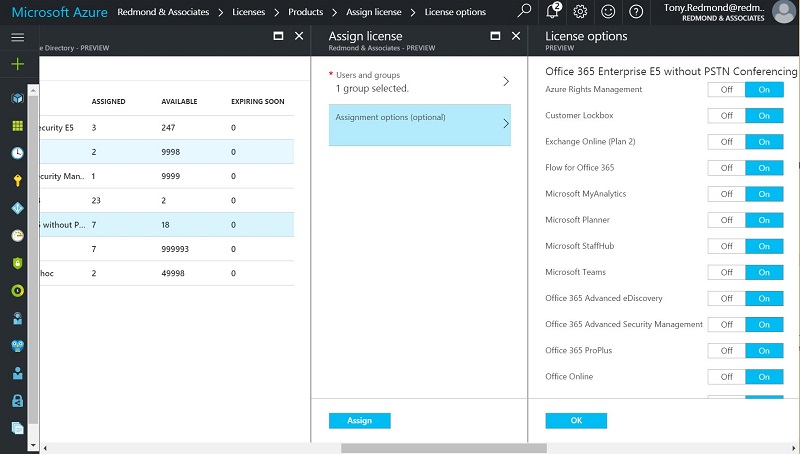
- Assignment options (optional). Many of the Office 365 plans include options that administrators can control individually. For instance, Figure 2 shows the options available within an Office 365 license that allow administrators to enable or disable applications such as Planner and StaffHub for the licensed accounts. Remember that these options vary over time as Microsoft adds functionality to plans, so you should review what options are enabled for a plan on a regular basis, especially after Microsoft launches a high-profile application like Teams.

Reviewing Group-Assigned Licenses
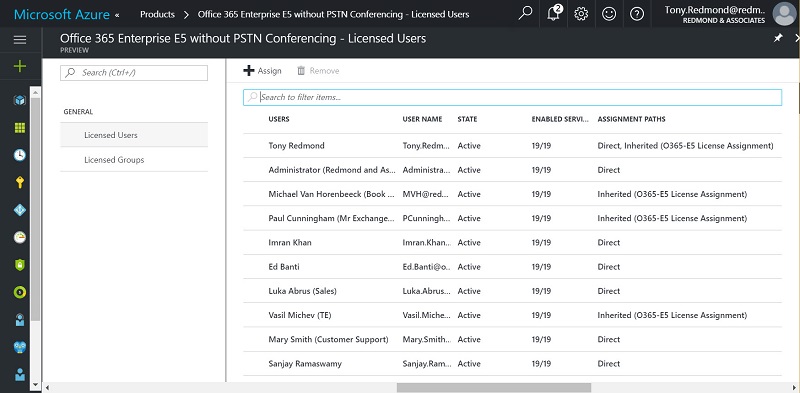
When you are happy that you have selected the right groups and options for the licenses, click Assign to begin the assignment process. After a few minutes, you can view the results of the assignment by clicking the selected product again. In Figure 3, we see a typical outcome where some user accounts have direct assignments, others have inherited assignments, and some have both. Note that 19 out of 19 services are enabled by the license, meaning that all the applications bunded into the E5 plan are available to users.

You can clean up the multiple assignments by editing user accounts to remove the direct licenses. This is easy to do by selecting the users with multiple assignments in the screen shown in Figure 3 and then clicking Remove. The Azure portal prompts whether you want to remove the direct assignments and if you do, that is what happens. Microsoft has some useful advice on how to migrate from direct to inherited license assignment.
Removing licenses is always a sensitive topic because if a user ends up without a license, they will not be able to sign into Office 365. For this reason, you might like to trial the removal process with a few less-sensitive accounts before you try any bulk removal.
One safeguard built into the feature is that if a user loses their license because they leave a group, Office 365 suspends their account rather than disabling it. This happens to avoid any possibility of data loss, but it is another thing to check out and confirm for your operational procedures covering common conditions like removing an account for an ex-employee.
Removing multiple assignments does not increase the number of available licenses in the pool because Office 365 does not double-count. All it means is that these users now receive their licenses through group assignment.
Whoops – No Licenses Available
Once you enable license assignment by group, anyone who joins a group will receive a license soon afterwards. That is, if a license is available in the pool. If the Azure portal cannot assign a license because none are available, you will receive a notification and then must figure out what to do next. The obvious solution is to buy some extra licenses, but there might be another solution, like reassigning licenses from other accounts or even making obsolete mailboxes inactive to free up their licenses.
The documentation explains how group-based licensing handles some other problem conditions, such as when groups attempt to assign licenses to users for conflicting Office 365 plans.
Great for Some Tenants
I am not yet certain that this kind of group-based license management will suffice for the largest Office 365 tenants as these enterprises often demand other features like integration into financial planning. However, I think that group-based license management will let many tenants avoid the need to assign licenses manually or through a hodgepodge of PowerShell scripts. There is lots of value in that prospect, especially if Microsoft includes this feature available to a wide array of Office 365 plans.
Follow Tony on Twitter @12Knocksinna.
Want to know more about how to manage Office 365? Find what you need to know in “Office 365 for IT Pros”, the most comprehensive eBook covering all aspects of Office 365. Available in PDF and EPUB formats (suitable for iBooks) or for Amazon Kindle.


