Managing Windows Server with Puppet

In today’s Ask the Admin, I’ll show you how to set up Puppet Enterprise Master in Azure and provision Windows Server so that it bootstraps with the Puppet agent installed and is configured to talk to your master.
In this article, I’m going to look at managing Windows Server using Puppet and PowerShell DSC. If you need a primer on Puppet and configuration management principles, read my recent article PowerShell DSC and Puppet — Why It Is Not Either/Or on Petri. In the article, I explain some DevOps principles pertaining to configuration management and why Puppet and PowerShell DSC are ideal partners when it comes to Windows Server config management.
Puppet Architecture
Puppet uses a client/server model or can be used in a stand-alone architecture. But for the purposes of these articles, I will discuss the most commonly deployed architecture, the client/server model. Puppet compiles catalogs that describe the desired state of each node. Catalogs are like the .mof files used by PowerShell DSC. Puppet automatically creates catalogs from files (manifests) that are written in Puppet’s own Ruby-based language. These files are built up from resources. Below you can see a resource that ensures the Windows time service is running:
service { 'w32time':
   ensure => 'running'
}
Resources can be grouped together to form classes, which might describe everything needed to configure a service or app. Nodes are devices where the Puppet agent is installed. You can target sets of nodes with different classes using node classification.
Puppet agents periodically send information about the configuration (facts) to the Puppet master and request a catalog. The master creates the node’s catalog and sends it to the agent. The node then checks each resource in the catalog and applies those that are not in the desired state. A report is then sent back to the Puppet master. Puppet master has a built-in public key infrastructure (PKI) for managing secure communications (HTTPS with client verification) between nodes and the server.
Provision Puppet Master in Azure
I’ve chosen to use Azure for these articles because you can quickly deploy all the infrastructure required without needing to know much about Linux. Azure has a template for automating the deployment of Puppet Enterprise master and an extension for bootstrapping the Puppet agent in Windows Server. If you don’t already have an account in Azure, you can sign up for a free 30-day trial here.
- Log in to Azure using your Microsoft account.
- Click Virtual machines under FAVORITES on the left.
- In the Virtual machines panel, click + Add.
- On the Compute panel, type Puppet into the Search compute box and press ENTER.
- Select Puppet Enterprise 2017.2 Template from the list.
- In the Puppet Enterprise 2017.2 Template panel, click Create.
- In the Basics panel, give the VM a name.
- Enter a username for the new VM.
- Make sure the Password is selected for Authentication type.
- Enter and confirm a password for the VM.
- Select Create new under Resource group and enter a name for the new resource group.
- Finally, select a location and click OK.
For more information about resource groups, see What Are Microsoft Azure Resource Groups? on Petri.

- On the Virtual Machine Settings panel, you can leave all the default settings. A new virtual network will be created for the Puppet master. All you need to do is click Configure subnets and accept the default configuration by clicking OK in the Subnets panel.
- Click OK in the Virtual Machine Settings panel to continue.

- Once the settings have been validated, click OK on the Summary panel.
- In the Create panel, click Create to accept the terms and conditions.
A tile for the new resource group will appear on the dashboard. The deployment usually takes around ten minutes. We need to wait for the deployment to complete before we can provision a VM running Windows Server. A notification will appear in the top right of the Azure management portal when provisioning is complete. The tile on the dashboard will also change to show the resources in the resource group.
Provision Windows Server with Puppet Agent
Before we can provision Windows Server with the Puppet agent, we need to get the DNS name of the Puppet master.
- On the dashboard, click the icon for the Puppet master VM in the resource group tile.
- In the VM panel, find the DNS name information for the VM, hover the mouse pointer to the right of the DNS name, and click the copy icon that appears.
- Close the VM panel.

- Click Virtual machines in the list of options on the left.
- In the Virtual machines panel, click + Add.
- On the Compute panel, type Windows Server 2016 into the Search compute box and press ENTER.
- Select Windows Server Datacenter from the list.
- In the Windows Server Datacenter panel, make sure that Resource Manager is selected as the deployment model, and then click Create.
- In the Basics panel, give the new VM a name, username, and password.
- Select Create new under Resource group and enter a name for the new resource group.
- Finally, select a location and click OK.
Creating a new resource group ensures that a new virtual network will be created for Windows Server. Using Windows Server on the same virtual network as the Puppet master will block Remote Desktop access to Windows Server because of the default Network Security Group (NSG) rules applied to the virtual network created by the Puppet master template.
- On the Choose a size panel, choose a VM size and click Select.
- In the Settings panel, click No extensions.
- In the Extensions panel, click Add extension.
- In the New resource panel, select Puppet Agent (preview) from the list.
- In the Puppet Agent (preview) panel, click Create.
- In the Install extension panel, paste the DNS name of the Puppet master server you previously copied to the clipboard and click OK.
- Click OK in the Extensions panel.
- Click OK in the Settings panel.
- Once the settings have been validated in the Create panel, click Create to accept the terms and conditions.

The VM will take several minutes to provision. You’ll receive a notification once the process has completed and be taken directly to the new virtual machine’s configuration panel.
Let’s pick up where we left off. The first step is to log into the Puppet master. There are two ways to log into the master. Most of the time you will use Secure Shell (SSH). But there’s also the Puppet Console, which you can open in a browser. The console provides a dashboard that gives an overview of the status of all your nodes. You can also perform some basic tasks in the console.
Log Into Puppet Master Using Secure Shell
Before using Secure Shell (SSH), you’ll need an SSH client. If you are using the Windows 10 Fall Creators Update, there’s a beta client built in to the OS. To install it, open a PowerShell prompt with administrator privileges and run the command below:
Add-WindowsCapability -Online -Name OpenSSH.Client~~~~0.0.1.0
If you are using another version of Windows, you can download Putty, which is the most commonly-used free SSH client.
To log into the Puppet master, open a command prompt and type ssh, followed by the username of the Puppet master server, which you entered when provisioning the VM. After the username, add an ampersand followed by the DNS name of the Puppet master server. You find the DNS name of the server in the Overview section of the VM’s configuration panel in the Azure management portal.
ssh [email protected]
Enter the password you provided when provisioning the Puppet master VM in Azure. If you are prompted with a security warning, type yes and press ENTER to continue. You should see the command prompt change to indicate that you are now connected to the remote server.
Now we’ll use the set_console_admin_password.rb script to change the admin user’s password for the Puppet Console. Paste the two commands below into the shell window, replacing <password> with the password you’d like to use for the Puppet Console. Note that sudo is used here to give us root access to change the /opt/puppetlabs/puppet/bin/ruby directory. You’ll be asked to enter your password again to get root access.
sudo /opt/puppetlabs/puppet/bin/ruby
/opt/puppetlabs/server/data/enterprise/modules/pe_install/files/set_console_admin_password.rb <password>
If you don’t get any errors, it means the script successfully changed the password.

Log Into Puppet Console
Let’s try logging in to the Puppet Console. Open a browser and use the Puppet master’s DNS name to open the console. Don’t forget to add https:// to the beginning of the DNS name.
https://petmaster.ukwest.cloudapp.azure.com
Because the browser doesn’t trust the server’s certificate, you’ll need to bypass any security warnings displayed in the browser and continue to the web page. When you get to the login screen, type admin in the Username field and the password you set using the Ruby script in the steps above.

Accept Node Certificate
In the console, click Unsigned Certs in the left pane.

This is where we’ll accept the server certificate installed on the Windows Server node. On the right, you’ll see the Windows Server agent node listed. Click Accept to add the node to the list of accepted servers.

Check Agent/Master Connectivity
Log into Windows Server using the username and password you provided when you provisioned the VM. Open a command prompt and type the following command to trigger the agent:
puppet agent -t

If the agent connects, you’ll see a message saying how long the agent took to apply the catalog it downloaded from the master. If this is the first time the agent has run, you’ll see a lot of additional messages. If you don’t see them, don’t worry. It means the agent has already run at least once because it was automatically triggered.
The first task is to log into Puppet master using Secure Shell. I’m going to use the beta OpenSSH client built into the Windows 10 Fall Creators Update but you can use any SSH client. If you need a reminder about how to log in to Puppet master using SSH, check out ‘Log in to Puppet Master using Secure Shell’ in part 2 of this series.
Install the Puppet on Windows Module Pack
All Puppet commands must be executed with root access. This can be achieved by adding sudo to the beginning of every command. But I prefer to change to sudo interactive mode like this:
sudo -i
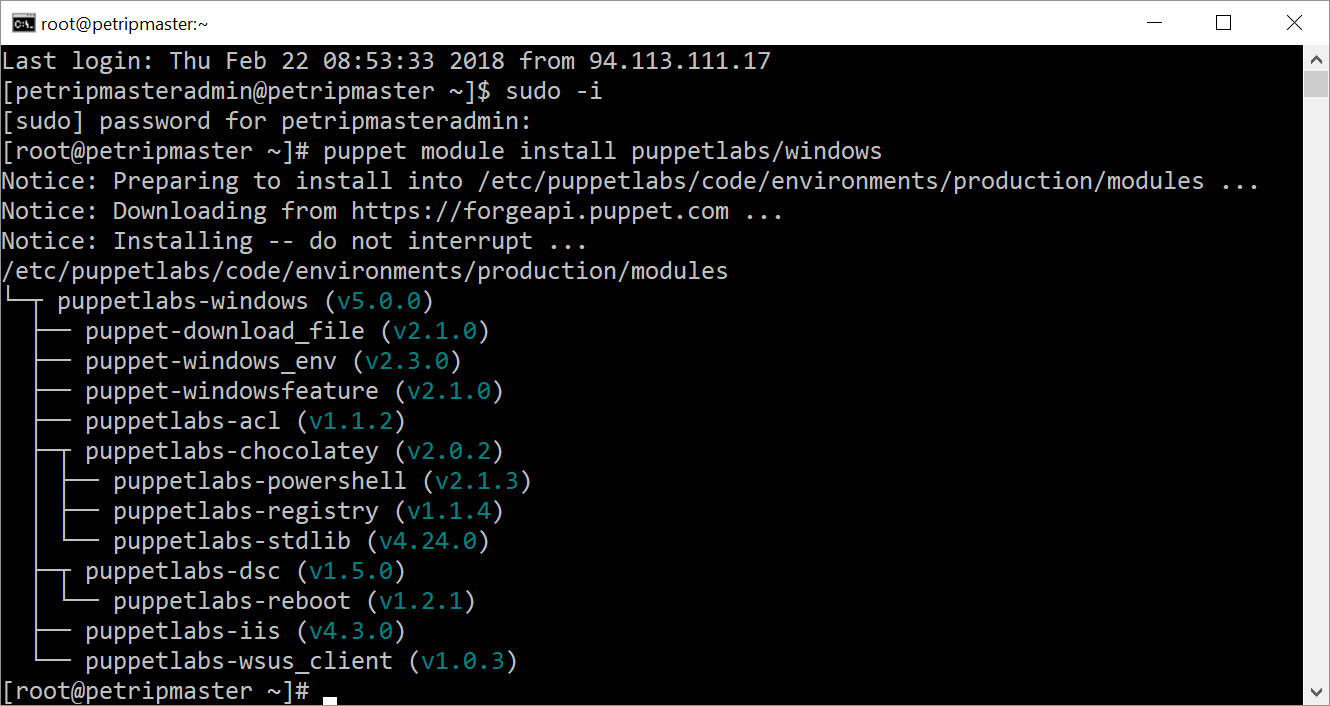
You’ll need to confirm your password to continue. Before we can administer Windows Server using Puppet, we’ll need to install some Windows modules on Puppet master. The easiest way to do that is to install the Puppet on Windows module pack, which includes 11 modules that are supported by Puppet Labs:
- ACL
- Chocolatey
- DSC
- PowerShell
- Reboot
- Registry
- WSUS client
- Windows environment
- Download_file
- IIS
- Windowsfeature
To install the module pack on Puppet master, use the command as shown below. It might take a few minutes for the pack to download.
puppet module install puppetlabs/windows
Edit the Site Manifest
Puppet uses a manifest to apply catalogs to nodes. A manifest is a program that contains Puppet DSL (domain-specific language) code. The site manifest is the starting point that Puppet master uses to apply catalogs. You can have more than one manifest, but for the purposes of this article, we will put all our code into the site manifest.
Before editing the site manifest, we need to change the working directory to the manifest folder using the change directory command.
cd /etc/puppetlabs/code/environments/production/manifests
The main site manifest (site.pp) is located in the manifest directory. We can open it using vi as shown here:
vi site.pp
When you open a file using vi, by default, you are working in command mode. In this mode, you can move around using the cursor but not make changes to the file. To edit the file, change to insert mode by pressing the INSERT key on your keyboard. Scroll down to the bottom of the file using the arrow keys and then press INSERT.
At the bottom of the file, you’ll see a section called node default {}. Any resources contained in this section will be applied to all nodes connected to the Puppet master. Let’s edit this section to add a simple file resource. Add the following code between the braces of the node default section. You can delete the commented-out example code that is in the file by default.
file { 'c:/petri.txt':
  ensure   => present,
  content  => 'The Petri IT Knowledgebase'
 }
So the final code will look like this:
node default {
  file { 'c:/petri.txt':
    ensure   => present,
    content  => 'The Petri IT Knowledgebase'
   }
}

Once you have the code in place, press ESC to exit insert mode. To save to file, press SHIFT+Q. Then after the semicolon, type wq, and press ENTER. The ‘wq’ represents write and quit respectively.
That’s it! The next time the Puppet agent runs on Windows server, you should find a new file in the root of the system drive. If you want to trigger the agent manually, log into Windows Server and run puppet agent -t on the command line.
Managing Files and Folders
For the time being, I’m going to make life simple and add resources directly to the site manifest (site.pp). In a production environment, you’d probably create classes that contain a series of resources and then call those classes from the site manifest. But it is not obligatory to create classes.
In part two of this series, I showed you how to add a file resource to the manifest that added a text file to the root of the system drive:
  file { 'c:/petri.txt':
    ensure   => present,
    content  => 'The Petri IT Knowledgebase'
   }
But what if you want to delete a file instead of adding one? All you need to do is change ‘ensure’ from present to absent.
file { 'c:/petri.txt':
    ensure   => absent,
   }
Backward and Forward
Notice that I’m using a forward slash in the Windows file path. Puppet uses forward slashes by default. Just like PowerShell, single quotes should be used to define strings if they don’t contain variables that need enumerating. Strings that will be parsed directly by Windows, like the file path to an executable that will run as part of a scheduled task, must use forward slashes. For strings with variables, use double quotes. Double-quoted strings must use double backslashes to represent a single backslash.
"C:Program Files$file"
If you need to represent a single backslash at the end of a single-quoted string in Puppet 4.0 (or later), it needs to be represented by double backslashes.
'C:Program Files(x86)'
Creating Folders and Multiple Items
If you want to add multiple files at the same time, you can use square brackets as shown below to add two or more files using one resource:
file {['c:/petri.txt', ‘c:/petri2.txt', 'c:/petri3.txt']:
  ensure   => present,
}
Folders can be created by replacing present with directory:
file {['c:/petri', ‘c:/petri2', 'c:/petri2/petri3']:
  ensure   => directory,
}
Changing Permissions on Files and Folders
Permissions can be set on files or folders by creating an access control list (acl) resource. In the resource below, I’m adding two access control entries (ACE). One is for a user account (petriuser) and a second is for the local Users group. Each identity section can contain only contain one user or group.
acl {'c:/petri':
  permissions => [{identity => 'petriuser', rights => ['full']},{identity => 'Users', rights =>['read','execute']}],
}
More complex options can be specified as shown below. In this example, I disable the permissions inheritance flag on the folder and remove all existing ACEs. ACEs should be listed in the correct order in the resource, otherwise, you might get errors. For more information on orderings ACEs in ACLs, see Microsoft’s website here.
acl {'c:/petri':
  purge => true,
  permissions => [
   { identity => 'Administrators', rights => ['full'] },
   { identity => 'S-1-5-11', rights => ['write','read','execute'] },
   { identity => 'Users', rights => ['read','execute'] }
   { identity => 'Everyone', rights => ['read'] }
  ],
owner => 'Administrators',
group => 'Users',
inherit_parent_permissions => false,
}
Manifest Notes
When you are editing the site manifest, make sure that any code you copy uses ‘straight’ quotes and not curved quotes. Yes, that’s right. Puppet doesn’t parse curved quotes. Take a look at the screenshot below and you’ll see all the single quotes are perfectly vertical, unlike the way Microsoft Word formats single quotes.

Once you’ve saved your manifest file, run the Puppet parser to validate the manifest’s syntax. By default, the parser validates the site manifest. If there are no errors, you should be good to go.
puppet parser validate
Finally, log into your Windows Server node, type puppet into the search box on the taskbar, and select Run Puppet Agent from the results.

Just because you can do something, doesn’t mean that you should. And while Puppet can create local user accounts in Windows, you should always try and use Active Directory for user management and authentication. There might be some situations where you want to use Puppet to manage local users and groups. For example, where a server is not a member of an Active Directory domain. Or you might want to add Active Directory users or groups to a member server using Puppet instead of Group Policy.
Create a Local User Account
Let’s start by looking at how to create a new local user. The built-in Puppet user and group resources know how to manage Windows local users and groups. The resource below creates a new local user, petriuser1 and sets the password for the account. Make sure you create a password that meets the complexity requirements set in policy on the Windows device.
user { 'petriuser1':
   ensure => present,
   password => 'Petri!Kn0Wledge'
}
When you are creating a new user, you can also add it to a group straight away:
user { 'petriuser1':
   ensure => present,
   password => 'Petri!Kn0Wledge',
   groups => 'Administrators'
}

Managing Group Membership
Using the group resource, you can either add or remove users from an existing group or create a new group. The resource below makes sure that petagentadmin and petriuser1 are both members of the Administrators group:
group { 'Local Admins':
    name => 'Administrators',
    ensure => present,
    members => ['petagentadmin','petriuser1'],
    auth_membership => false,
}

The auth_membership parameter’s default setting is false. When set to false, any existing members of the group are preserved. If you want to purge the group, set auth_membership to true. To add a domain user to a local group, you need to specify the username and the domain together. In the resource below, I’m adding a user called testuser1 from the Petri domain to the local Administrators group:
group { 'Local Admins':
    name => 'Administrators',
    ensure => present,
    members => 'petritestuser1',
    auth_membership => false
}
To delete a local user, change the ensure parameter to absent. The same applies when deleting groups.
user { 'petriuser1':
   ensure => absent,
}
The auth_membership parameter can also be set in a user resource. If set to inclusive, Puppet will make sure the user only belongs to the groups specified in the manifest and remove the user from any groups that are not specified. In the resource below, petriuser1 will be added to Administrators and removed from any other local groups that it is a member of.
user { 'petriuser1':
   ensure => present,
   password => 'Petri!Kn0Wledge',
   groups => 'Administrators',
   auth_membership => inclusive
}
Puppet Package Providers
There are two ways you can manage software using Puppet. The built-in package provider allows you to install software using executables (.exe files) and Windows Installer (.msi) packages. It’s possible to change the default provider and use Chocolatey, which is an open source package manager for Windows. The open source version of Chocolatey is free. Chocolatey for Business (C4B) must be licensed and it adds features for organizations that want a centralized software management solution, such as Package Builder. For more information on Chocolatey, see Package Management in Windows Using Chocolatey and Managing Windows Software Using Chocolatey on Petri.
Built-in Package Provider
Let’s look at how to install software using Puppet’s built-in package provider. To complete the instructions below, you’ll need an .exe or .msi file of the software you want to install. Here I’m using Git as an example. In the code below, I’m installing Git from a local file location on the node but you can also specify a network file share. Note that any install options you specify must be supported by the .exe or .msi installer package. They are not specific to Puppet.
package {'Git':
  ensure => installed,
  source => 'C:tempGit-2.16.2-64-bit.exe',
  install_options => ['/VERYSILENT']
}
If you want to install a specific version of a package, or the latest version, you must give the exact version number in the ensure parameter. The built-in package provider doesn’t support using latest as a value for the ensure parameter with .exe or .msi files on Windows.
package { 'Git':
  ensure => '2.16.2',
  source => 'C:tempGit-2.16.2-64-bit.exe',
  install_options => ['/VERYSILENT'],
}
Installing Software Using Chocolatey
The Chocolatey provider is installed as part of the Puppet on Windows module pack. Chocolatey can be used to install packages from Chocolatey’s own Internet repository or you can install software from your own local repository.

The code below uses ‘include chocolatey’ to install chocolatey on the node. And then it installs Git from Chocolatey’s Internet repository. When using the Chocolatey provider for Puppet, the value of the ensure parameter can be set to latest.
include chocolatey

package { 'git':
  ensure   => installed,
  provider => chocolatey,

}

If you want to install a package from something other than Chocolatey’s own Internet repository, you need to specify the repo using the source parameter. In the example below, I’m using a local file share as my repository. Note that there are three backslashes at the start of the file path to represent two literal backslashes in Windows.
package {'GoogleChrome':
  ensure => installed,
  source => 'filesrv1soft'
}
When installing software from a local repository, make sure that any dependent packages are also present in the repository. Google Chrome doesn’t have any dependencies. Other packages, like Git, have one or more dependencies. There are a couple of ways to determine a package’s dependencies. The easiest is to go to the package in Chocolatey’s Internet repository, scroll down, and see the list of dependencies. Alternatively, you can open a package using NuGet Package Explorer to view dependencies.
Removing Software
Uninstalling software is very easy. Whether you are using Chocolatey or Puppet’s built-in provider, you just set the value of ensure to absent.
package {'GoogleChrome':
  ensure => absent,
}
Using DSC and Puppet to Install Active Directory
First, let’s talk about the good news. Installing and configuring Active Directory using Puppet doesn’t differ much from using PowerShell DSC. In fact, the DSC code just needs a little tweaking to work in Puppet. The manifest will use three DSC resources: file, windowsfeature, and xaddomain. The first two resources are built-in to Windows. But xaddomain is part of the xActiveDirectory module, which can be found in the PowerShell DSC Resource Kit on GitHub. But there’s more good news. The Puppet agent automatically makes sure all the latest resources from the resource kit are installed on each node. So, there’s no need to manually download and install the resource kit modules on your Puppet nodes.
Let’s create an NTDS directory for the Active Directory (AD) database and logs using the file resource. Ideally, the database and logs should be on separate volumes. But I’m going to keep it simple in this demonstration and put everything in the NTDS directory on the system drive.
dsc_file  {'adfile':
            dsc_destinationpath => 'c:NTDS',
            dsc_type => 'Directory',
            dsc_ensure => 'Present',
        } ->
To indicate that this is a PowerShell DSC resource as opposed to a Puppet resource, prefix the DSC resource name with ‘dsc_’. Any required DSC parameters should be similarly prefixed. As you can see, there are three parameters which are used to create the NTDS directory. The resource name, in this case, ‘adfile’, can be anything you like. Finally, while resources in a Puppet manifest should run in the order in which they appear, Puppet recommends explicitly specifying the order if it’s important. The resource is followed by a chaining arrow that ensures it runs before the next resource starts.

The next two resources install the AD Domain Services server role and the Remote Server Administration Active Directory Tools using windowsfeature. I used Get-WindowsFeature to determine what the exact role and feature names should be in the name parameter.
dsc_windowsfeature  { 'addsinstall':
            dsc_ensure => 'Present',
            dsc_name => 'AD-Domain-Services',

        }
dsc_windowsfeature  {'addstools':
            dsc_ensure => 'Present',
            dsc_name => 'RSAT-ADDS',
        }
The bulk of the configuration work is carried out using the xaddomain resource. The subscribe parameter ensures that xaddomain doesn’t run before the AD Domain Services role is installed. It’s important that the name of the resource is specified starting with a capital letter. The domainadministratorcredential parameter is required but isn’t used. This will be the first domain controller (DC) in a new forest and the local administrator username and password is used instead.
dsc_xaddomain   { 'firstdc':
	    subscribe => Dsc_windowsfeature['addsinstall'],
            dsc_domainname => 'ad.contoso.com',
	    dsc_domainadministratorcredential => {
               'user' => 'pagent',
               'password' => Sensitive('Test12341234')
	    },
	    dsc_safemodeadministratorpassword   => {
		'user' => 'pagent',
		'password' => Sensitive('Test12341234')
            },

            dsc_databasepath => 'c:NTDS',
            dsc_logpath => 'c:NTDS',

        }
Both the domainadministratorcredential and safemodeadministratorpassword parameters are protected using Sensitive, which is optional to ensure that the password doesn’t appear in cleartext anywhere in Puppet’s logs. Puppet passes credentials to Windows Server using the MSFT_Credential object, which ensures that the data is encrypted. If you don’t want to include the password in the Puppet manifest, you should include it in a Hiera configuration file and encrypt the text block using eyaml.

Finally, a reboot resource is used to restart the node when a reboot is pending. The message parameter is optional.
reboot {'dsc_reboot':
	message => 'DSC has requested a reboot',
	when => pending,
}
Download the complete code here and paste it into your Puppet manifest file. The easiest way to test it in an isolated environment is to paste the code into the site.pp manifest file. Once the updated site.pp manifest is saved, it will apply to your test node and reboot the server.
When the server reboots it will have a different name, which means you’ll need to reregister the node in the Puppet console. You’ll need to either trigger the Puppet agent on the node, using puppet agent -t at the command line or wait for it to run automatically before you can accept the server again in the Puppet console.
Russell Smith, the Editorial Director at Petri IT Knowledgebase, has over two decades of hands-on experience in IT, in both small business settings and government IT infrastructure projects. Russell started writing for Windows IT Pro Magazine in t...


