Manage Flexible Single Master Operation (FSMO) Roles Using PowerShell
In this easy Ask the Admin, I’ll show you how to use PowerShell to view, transfer and seize Active Directory FSMO roles.
Active Directory administration using the provided management tools from Microsoft has always been a little messy. However, the Active Directory Administrative Center (ADAC) that’s included in newer versions of Windows Server helps rectify that situation. With that said, there are some tasks, such as managing FSMO roles, that are not possible to do in ADAC.
Rather than navigate the legacy management consoles to manage FSMO roles, I recommend having a look at a few simple PowerShell cmdlets that can help you achieve your goals. The cmdlets in this article are supported on Windows Server 2008 R2 and later. Windows PowerShell can be incredibly useful when administrating Group Policy and Active Directory, so I’ll show you how to manage FSMO roles with PowerShell.
If you need a primer on Active Directory Flexible Single Master Operation roles, see Daniel Petri’s article “Understanding FSMO Roles in Active Directory.” To understand the difference between transferring and seizing FSMO roles using NTDSUTIL, click the following links for more information “Seizing FSMO Roles” and “Transferring FSMO Roles.”
Determine FSMO Role Locations with PowerShell
1. The first thing you probably would like to do is establish which domain controllers (DCs) hold the FSMO roles in your forest. Although it’s quite likely all five roles will be installed on the first domain controller in the forest, that might not necessarily be the case.
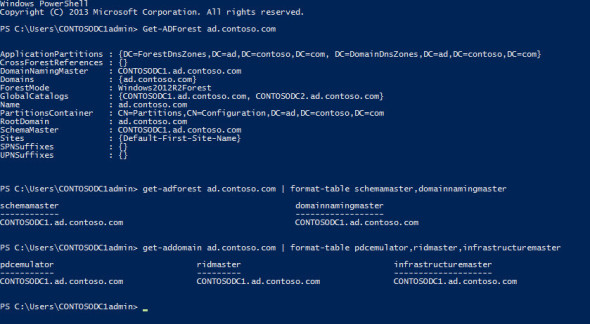
2. Log in to Windows Server 2012 R2 and open a PowerShell prompt with enterprise administrator credentials. In the PowerShell prompt, type get-adforest ad.contoso.com and press ENTER, replacing ad.contoso.com with the name of your domain.
3. In the command output, you’ll see the name of the domain controller that holds the 2 forest-level FSMO roles: SchemaMaster and DomainNamingMaster; along with other information about the forest. To present the information in a more easily readable format, we can pipe the results to the format-list cmdlet as follows:
get-adforest ad.contoso.com | format-list schemamaster,domainnamingmaster
Similarly, we can do the same to find out which DC holds the three domain-level FSMO roles:
get-addomain ad.contoso.com | format-list pdcemulator,ridmaster,infrastructuremaster
Manage FSMO roles using PowerShell. (Image: Russell Smith)
Transfer or Seize FSMO Roles with PowerShell
Now that we know exactly which DC holds the five FSMO roles, I’m going to transfer the PDCEmulator role from contosodc1 to contosodc2. Then as a final step, I’ll shutdown the DC and seize the role back to its original location.
1. In the following command, contosodc2 represents that DC, which I will transfer the PDCEmulator role. You can transfer more than one role at a time by adding the roles using a comma-delimited list to the –operationmasterrole parameter. For example, to move all 5 FSMO roles simultaneously: –operationmasterrole pdcemulator,ridmaster,infrastructuremaster,schemamaster,domainnamingmaster
move-addirectoryserveroperationmasterrole -identity contosodc2 –operationmasterrole pdcemulator
2. You will be asked to confirm the operation. Once the cmdlet has completed, use the get-addomain cmdlet as shown above to confirm that the role has been successfully transferred.
3. Now I’m going to shut down contosodc2 and seize the role back to contosodc1. Once the DC holding the PDCEmulator role has been shut down, run the following command to seize the role back, noting the addition of the –force parameter:
move-addirectoryserveroperationmasterrole -identity contosodc1 –operationmasterrole pdcemulator -force
4. You will again be asked to confirm the operation. Remember that once a FSMO role has been seized, the DC from which the role was seized should never be connected to the domain again. You should always proceed with caution when seizing FSMO roles, and in general only seize a role as a last resort.


