Avoiding Disk Performance Issues in Storage Spaces
The big benefit of Storage Spaces — Microsoft’s new storage-pooling technology that was introduced in Windows 8 and Windows Server 2012 — is that you get better value from disks obtained from potentially any source. There is a potential risk to this benefit. When you pay for a disk from a traditional SAN vendor, that disk has been heavily tested. You can face performance issues if you just unpack the disks, shove them into your JBOD, and deploy Storage Spaces without a little bit of work. In this article, I will suggest a process for you to follow to ensure that you get the best possible result and avoid disk performance problems in Storage Spaces.
Some will read this list and think “wow, there’s too much work to get Storage Spaces working.” To be quite frank, there is a bit of work involved to get a good storage solution. But I’ve seen good SAN engineers install SANs, and they’ll do most, if not all, of the following steps.
Storage Spaces Hardware Compatibility List
This first suggestion should be pretty obvious; make sure that your JBOD of choice is listed in the Windows Server Catalog for your version of Windows Server (such as Windows Server 2012 R2). But that is not enough; you also need to ensure that the JBOD is supported by Storage Spaces for your version of Windows Server. Don’t assume that it is – if the JBOD is not in that rather exclusive list, then Microsoft does not support it, no matter what the manufacturer might say.
Then you need to look at the disks. Make sure that the specific model of HDD and/or SSD that you want to use in your storage pool(s) is also listed. Use the search bar on the Windows Server Catalog site to search for the manufacturer’s model number.
Your Storage Spaces “controllers” are one or more Windows Servers that attach directly to Storage Spaces via a SAS connection. This should be a dual interface SAS connection. This SAS adapter should also be supported by Microsoft for your version of Windows Server.
Your JBOD manufacturer might also have their own HCL of third-party disks (SSD and HDD) and SAS adapters that they support. It is a good idea to stick to this HCL so that you stay within a tested configuration.
Server Firmware and Drivers
You just took delivery of one or more servers that will connect to the JBOD. You install Windows Server and you’re ready to try out this exciting new storage technology. Hold on to those horses! You are not nearly ready yet. There are two types of update that you need to do to the server.
First you need to install the latest stable version of the manufacturer’s drivers. The Microsoft-supplied drivers are generic and potentially unstable or under-performing.
After that you will need to install the latest firmware for the server. It might have just come out of the factory, but it’s not unusual for new hardware to have old firmware.
Most enterprise-class server manufacturers supply a combined solution for updating drivers and firmware. Some make them freely available. Others shamefully hide these updates behind paywalls, forcing you into extended support contracts.
SAS Adapter Firmware and Drivers
You will enable and configure MPIO to team these interfaces in a teamed configuration. Your SAS cards might be new, but like with the servers, don’t assume that the firmware is up to date. Download the latest firmware from the support site of the adapter’s manufacturer and install it on any servers that will be connected via SAS to the JBOD.
Note that servers that will connect to the JBOD via SMB 3.0 are not affected.
MPIO has different kinds of algorithms for teaming the interfaces. You can use PowerShell to specify a preferred load balancing policy. You should consult with your JBOD manufacturer for the best practice. The DataON JBODs that I work with are configured to use the “least blocks” policy:
Set-MSDSMGlobalDefaultLoadBalancePolicy –Policy LB
SAS Cabling
If you are building a Storage Spaces configuration with multiple JBODs then you should try to avoid tray daisy chaining. This introduces bottlenecks and dependencies. Instead, try to have two SAS interfaces per JBOD per server. So, if a server is connecting to four JBODs, the server should have eight SAS interfaces, and connect directly to each JBOD. You can use either dual port or quad port (full height PCI slots) SAS adapters.
Disk Position in the JBOD
Some JBOD manufacturers will have guidance on the best position in the tray for HDDs and SSDs. For example, they might recommend placing HDDs on the left, starting at slot 1 and working up from there, and placing SSDs in slot 24 and working down from there. You will add disks over time and the HDDs and SSDs will meet somewhere in the middle.
Disk Firmware
Disks have firmware. And sometimes, those disks can have out-of-date firmware that does not support your operating system, or it may even have a bug. I have experienced a very weird issue with a brand of SSDs where, when inserted in the JBOD, the performance of the SAS-attached servers degraded to the point of being unusable. It turned out that the SSD manufacturer was shipping disks without out-of-date firmware.
Download the latest firmware and utility for deploying that firmware and ensure that each disk is up to date.
Erase the Disks
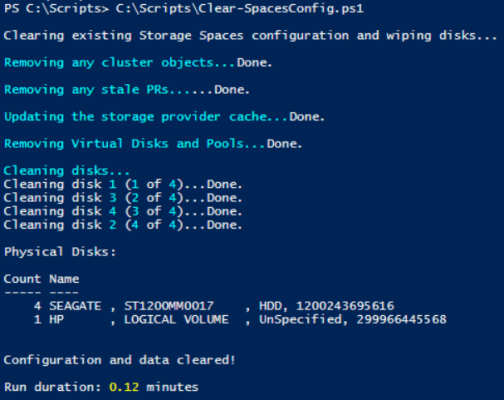
Disks can be supplied via many routes in “the channel.” Some of those routes might include additional testing. That testing might include stress tests that leave behind odd partitions that can confuse Windows. It is a good idea to use a handy PowerShell script called Clear-SpacesConfig.PS1 from the TechNet Gallery to erase the disks. Note that this script will also completely erase any found Storage Spaces or clustering configurations that are found on the JBOD and server.
Assessing Disk Performance
Not all disks are made equal. A factory can produce thousands of disks in a day, and a few of those disks can vary from the norm of expected performance. Just one of those disks in a RAID array or a Storage Pool can degrade performance and leave you wondering why the performance of your infrastructure is in the toilet. You must remember that a virtual disk that resides in a storage pool exists on each disk in that pool, so one bad egg can ruin the entire cake. The same is true in a disk group in a SAN.
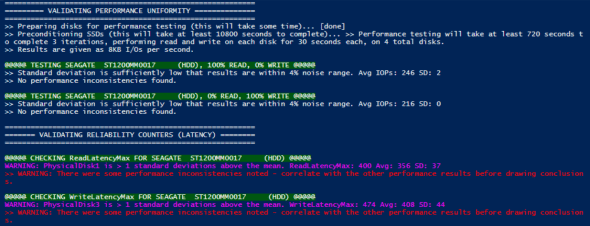
Your disks might have been stress tested by someone in the channel, but you can also run your own tests. A very useful script called Validate-StoragePool.PS1, in combination with SQLIO, can be used to test each disk. I strongly recommend that you run this tool overnight to test each of your disks to make sure that you have no bad units in your pool.
After the test it would be a good idea to run Clear-SpacesConfig.PS1 to erase the disks again. This only takes a few seconds.
Deploy Storage Spaces
Now you’re at a point where you’ve implemented the best practices and done all the tests. Now you can geek out and configure your first storage pool.


