Robocopy Commands: Complete Guide with Examples for Windows Admins

Robocopy is a powerful command-line tool for Windows that allows users to synchronize files and folders from one location to another.
Most common Robocopy commands
Use these copy-paste-ready examples for the most common Robocopy tasks. Keep each command on one line, and test destructive jobs with /L before you run them.
# Mirror a folder
robocopy C:\Source D:\Backup /MIR

# Copy including permissions
robocopy C:\Source D:\Backup /E /COPYALL

# Restartable mode for unstable connections
robocopy C:\Source D:\Backup /Z

# Exclude folders
robocopy C:\Source D:\Backup /E /XD temp logs
Test a Robocopy command safely with /L
The /L switch shows what would be copied, deleted, or changed without making any modifications.
Robocopy C:\Source D:\Backup /MIR /LRobocopy commands by use case
Robocopy mirror command
Use this when you want the destination to exactly match the source, including deletions.
robocopy C:\Source D:\Backup /MIRQuick note: /MIR is powerful and destructive—test first with /L if you are unsure.
Robocopy copy only new or changed files
Use this to avoid re-copying unchanged data and reduce transfer time.
robocopy C:\Source D:\Backup /E /XOQuick note: /XO skips older source files, so newer destination files are left alone.
Robocopy copy permissions
Use this for migrations where NTFS ACLs, owner, and auditing data matter.
robocopy C:\Source D:\Backup /E /COPYALLQuick note: /COPYALL is equivalent to /COPY:DATSOU.
Resume interrupted copies
Use restartable mode when you are copying over a flaky VPN, WAN, or unstable share.
robocopy C:\Source \\Server\Share /E /Z /R:5 /W:10Quick note: /Z resumes partial transfers, while /R and /W control retry behavior.
Exclude files and folders
Use filters to skip logs, temp data, or other paths you do not want in the destination.
robocopy C:\Source D:\Backup /E /XF *.log *.tmp /XD temp logsQuick note: /XF excludes files and /XD excludes directories.
Logging and troubleshooting
Use a log when you need an audit trail, easier troubleshooting, or quieter console output.
robocopy C:\Source D:\Backup /E /LOG:C:\Logs\robocopy.log /TEE /R:3 /W:5Quick note: /TEE writes output to both the screen and the log file.
Robocopy vs Xcopy vs File Explorer: Which should I use?
Robocopy is useful when you need to perform file operations in bulk and it can significantly outperform File Explorer and XCopy.
| Tool | Best for |
| File Explorer | Simple manual copies |
| Xcopy | Legacy scripts |
| Robocopy | Large-scale, reliable, repeatable file transfers |
Robocopy switches by category
Copy behavior: /E includes all subfolders, /MIR mirrors source to destination, and /MOV moves files after a successful copy.
Performance: /MT:n adds multithreading, /Z enables restartable mode, and /J helps with large files.
Filtering: /XF excludes files, /XD excludes directories, and /MAXAGE or /MIN narrow what gets copied.
Logging: /LOG writes to a file, /TEE shows output on screen and in the log, and /L previews actions without making changes.
Robocopy command cheat sheet
Real-world Robocopy examples for admins
Backup a file server to another drive
robocopy D:\Data E:\ServerBackup /MIR /COPYALL /R:3 /W:5 /LOG:E:\Logs\server-backup.log /TEEWhy it works: /MIR keeps the backup aligned with the source, /COPYALL preserves file metadata and permissions, and the logging switches create a reviewable record.
Migrate data between servers
robocopy \\OldServer\Share \\NewServer\Share /E /COPYALL /MT:16 /Z /R:5 /W:10 /LOG:C:\Logs\migration.logWhy it works: /E brings the full folder tree, /COPYALL keeps permissions intact, /MT:16 improves throughput, and /Z protects against interruptions during long transfers.
Sync folders over a slow network
robocopy C:\Source \\BranchOffice\Data /E /Z /IPG:10 /R:5 /W:15 /LOG:C:\Logs\slow-link-sync.logWhy it works: /Z resumes interrupted copies, /IPG:10 reduces network pressure on slow links, and the retry settings make the job more resilient.
What is Robocopy?
Robocopy stands for “Robust File Copy.” It is a powerful (and potentially scary) command-line utility to copy or move files from one place to another. It is a favorite amongst many IT Pros, mostly due to its overwhelming number of useful features and switches.
It was built to be more robust (hence the name) than Xcopy or the original copy command. Robocopy was first released with the Windows NT 4.0 Resource Kit (!). It has been a standard ‘feature’ in Windows since Windows Vista and Windows Server 2008.
Robocopy vs Xcopy: Key differences
The biggest difference between Robocopy and Xcopy is the bewildering number of features, switches, flags, etc. There have also been several performance enhancements to Robocopy, making it a more pseudo-like backup utility compared to Xcopy.
How Robocopy copies, mirrors, and syncs files
As I’ve already stated several times, Robocopy contains a robust set of options, switches, and flags to be as meticulous as you need for all your file transfer tasks that land on your plate. Let’s go through all these lovely options together!
Robocopy is like a Swiss Army Knife for system administrators who need perform any kind of file operations on Windows. You can use it to:
- Copy files from one folder to another on the same device
- Copy files across a network and resume the operation if there’s a network failure (hence the name Robust File Copy)
- Perform and monitor backups
- Keep two folders synchronized
- Copy file attributes, NTFS permissions, auditing info, and more
- Skip NTFS junction points
- Perform copy operations with multithreading for increased performance
- Copy files if the administrator doesn’t have access rights
Note: You can find a full list of all Robocopy options on Microsoft’s docs.microsoft.com article as part of the tool’s main documentation site. The lists in this article are just a subset of the available options that are most commonly used.
Robocopy copy options
Why don’t we just let you utilize this lovely table to get a handle on the complete, but always growing, number of options around the basics of copying? Enjoy. (POP quiz in about 10 minutes!) 🙂
| Option | Description |
| /s | Copies subdirectories. This option automatically excludes empty directories. |
| /e | Copies subdirectories. This option automatically includes empty directories. |
| /lev:<n> | Copies only the top n levels of the source directory tree. |
Robocopy file selection and filtering options
Alright, now we’ll present another nice table of all the ‘File Selection’ options in Robocopy.
| Option | Description |
| /a | Copies only files for which the Archive attribute is set. |
| /m | Copies only files for which the Archive attribute is set, and resets the Archive attribute. |
| /xc | Excludes changed files. |
| /xn | Excludes newer files. |
| /xo | Excludes older files. |
Robocopy retry options
Here is a good set of options to help keep your Robocopy command more robust and reliable.
| Option | Description |
| /r:<n> | Specifies the number of retries on failed copies. The default value of n is 1,000,000 (one million retries). |
| /w:<n> | Specifies the wait time between retries, in seconds. The default value of n is 30 (wait time 30 seconds). |
| /reg | Saves the values specified in the /r and /w options as default settings in the registry. |
| /tbd | Specifies that the system will wait for share names to be defined (retry error 67). |
Robocopy logging options
For the next set, let’s go over the list of Logging options available in Robocopy.
| Option | Description |
| /l | Specifies that files are to be listed only (and not copied, deleted, or time stamped). |
| /x | Reports all extra files, not just those that are selected. |
| /v | Produces verbose output, and shows all skipped files. |
| /ts | Includes source file time stamps in the output. |
Robocopy examples
Let’s have a look at how to actually use Robocopy with some practical examples.
Copying files and folders with Robocopy
Alright, it looks like I bombarded you with all these options, switches, and flags, Oh my! Let’s get to some examples of copying files with Robocopy.
I am using a Windows 11 client machine in my Windows Server 2022 Active Directory domain lab environment.
The following command will (not really) back up the files in the first location to the file server (G: drive). I used the /quit switch to verify that what Robocopy intends to do is correct.
Robocopy c:\Backup_Files g:\folder01 /quit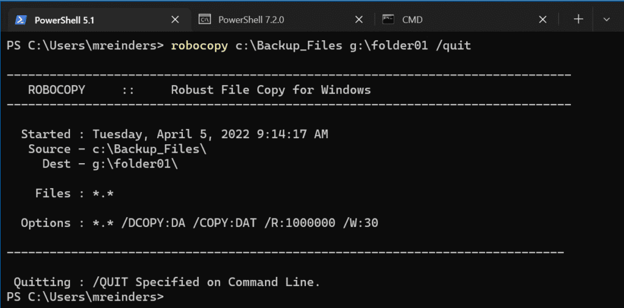
Our first Robocopy command – playing it safe…
This command shows the Source and Destination ‘root’ locations, what files to backup, and then the options it will use. Everything looks good, now let’s run it!
Robocopy c:\Backup_Files g:\folder01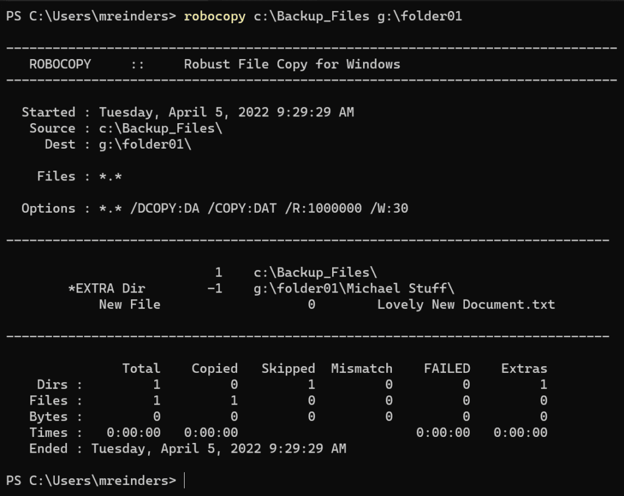
We copied a whole file with this command!
Notice that only one file was copied, the single TXT file in the root of c:\Backup_Files. This is because subdirectories are not backed up by default. So, the next step is to include subdirectories.
Move files and folders with Robocopy /MOVE
Instead of copying the files, we can move them using the /move switch.
robocopy c:\Backup_Files g:\folder01 /move /e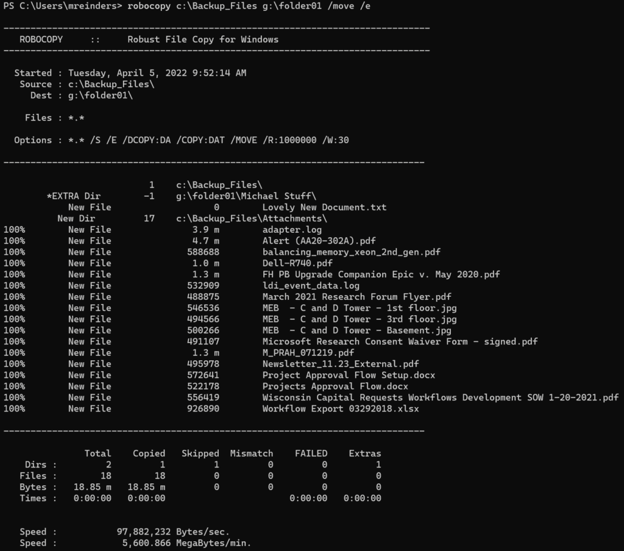
I checked my C: drive and the files are indeed gone. They are now on the G: drive.
Filter files and folders with Robocopy
I doubt you won’t always want to copy ALL the files from one place to another. You will want to filter what files get copied.
Next, I’ll go through the most prevalent switches to select files by name, type, size, etc., all by using wildcard characters.
Select files by name or file type
We can use wildcards to choose specific filenames. As you can see, the command below with the asterisk only copied the files starting with the letter ‘m’.
robocopy c:\Backup_Files g:\folder01 m* /e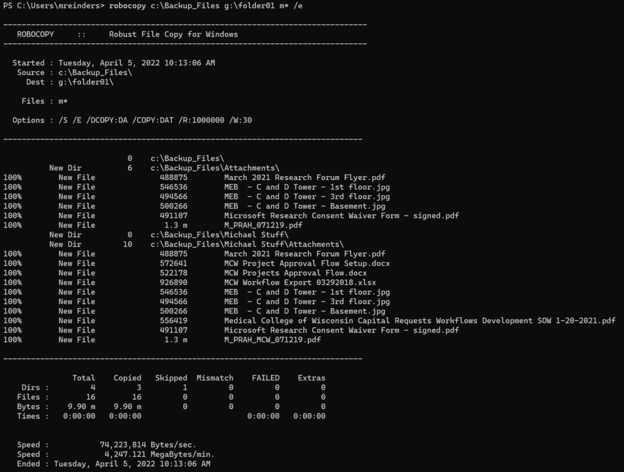
We can also choose to copy only PDF files with the command below.
robocopy c:\Backup_Files g:\folder01 *.pdf /eCopy files by file size with Robocopy /MAX
To address the need to choose files by size, let’s use this command with the /max switch to only copy files under 1MB.
robocopy c:\Backup_Files g:\folder01 /e /max:1000000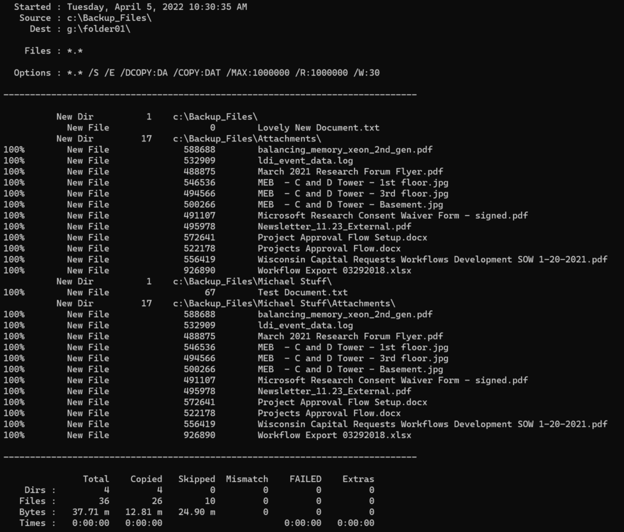
Here, 26 files under 1MB were copied and 10 were skipped because they were larger.
Copy files by date with Robocopy /MAXAGE
If we only wish to copy files that are less than a year and a half old, we can use the /maxage switch.
robocopy c:\Backup_Files g:\folder_01 /e /maxage:547There were 4 files skipped here because they were older than 1.5 years old (or 547 days).
Mirror folders with Robocopy /MIR
We can use the powerful and potentially impactful /mir (MIRror) command to keep two locations in sync. Each time you run this command, anything not exactly the same in both the source and destination will be rectified.
In practice, if you delete a file from the source, it will also be deleted in the destination (gone from both!). Moreover, if someone deletes a file in the destination, it will be also deleted in the source (gone from both!). Yes, powerful and scary, so use this command with care.
Use the /MIR switch for:
- backups
- replicas
- migration staging
Avoid /MIR when:
- the destination contains user-created files
- multiple teams write to both locations
- you need one-way copy protection
robocopy c:\Backup_Files g:\folder_01 /e /mir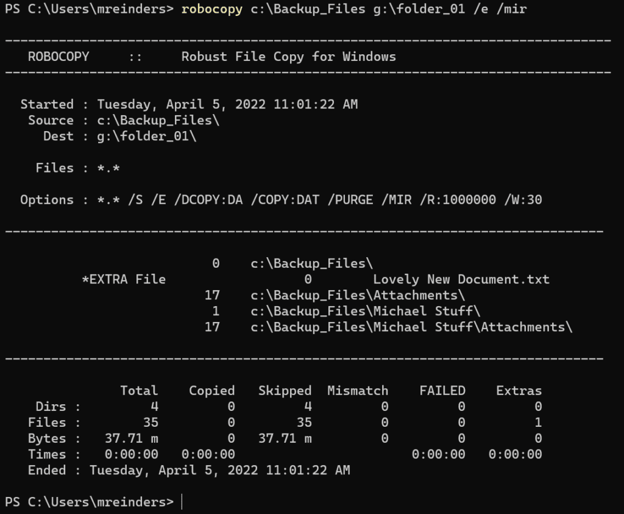
I ran the command, and it did nothing as both locations were the same. I deleted one file from the source and ran it again.
As you can see above, there was an ‘EXTRA File’ found. So, naturally, Robocopy deleted it also in the destination. Interesting choice of words, wouldn’t you say?
Monitor folders with Robocopy /MON and /MOT
If you have a dire need for a ‘should be good enough for our needs right now’ backup service in a pinch, Robocopy has a few tricks up its sleeve. You can use the /mon and /mot switches to monitor for changes. After a specified number of file changes and amount of time, Robocopy will make another pass and get your files backed up again.
robocopy c:\Backup_Files g:\folder_01 /e /mon:3 /mot:5
As you can see at the bottom of this capture, the ‘Monitor’ is running, waiting for both 5 minutes and 3 file changes to take place. Using my DeLorean, I made at least three changes and went five minutes in the future…
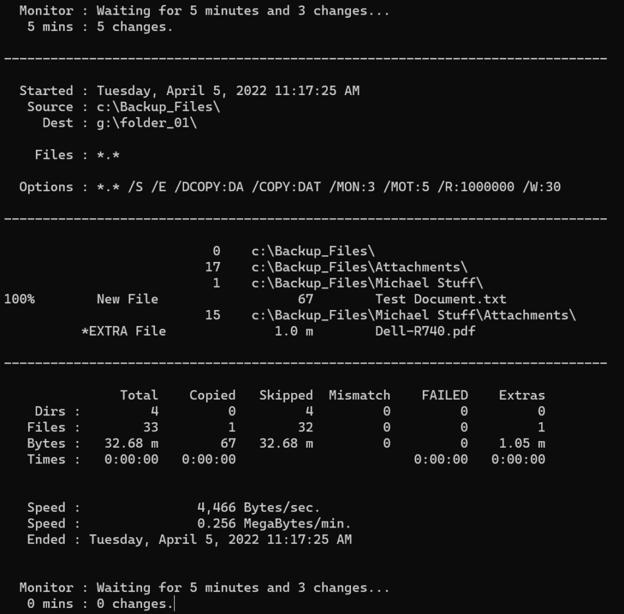
You’ll notice Robocopy ran again and copied a file, skipped most, and also found an extra file in the destination. Pretty slick!
Copy files over a network with Robocopy
There are a few specific switches and options to help IT Pros when doing larger file copies over a Local Arean Network (LAN) or a Wide Area Network (WAN). Here are the core options:
| Parameter | Description |
| /zb | This switch will copy files in restartable mode, letting it pick up from an interrupted copy session if a network path is slow, or unreliable. The ‘B’ option helps you overcome locked down ‘read’ permissions on the source by letting you at least copy ALL files. |
| /copyall | To ensure your files are able to be opened and changed in your new fileserver, for example, use this so all file permissions are copied along with the files. You’ll want your users to be able to seamlessly access all their files after your new fileserver is in place! |
| /rh | This will restrict Robocopy from running during certain hours. If you have a huge fileserver migration project and you don’t want your network connection (especially a WAN) to be saturated during business hours, use this little wonder. |
| /mt | Use this to help boost the number of threads Robocopy will instruct the CPU to use, to help the performance of your copies. |
Save and reuse Robocopy jobs with /SAVE and /JOB
You can save a rather complex Robocopy command for later use using the /save switch at the end. Here is an example.
robocopy c:\Backup_Files g:\folder_01 m* /e /max:1000000 /maxage:400 /save:"c:\Temp\BackupJob1"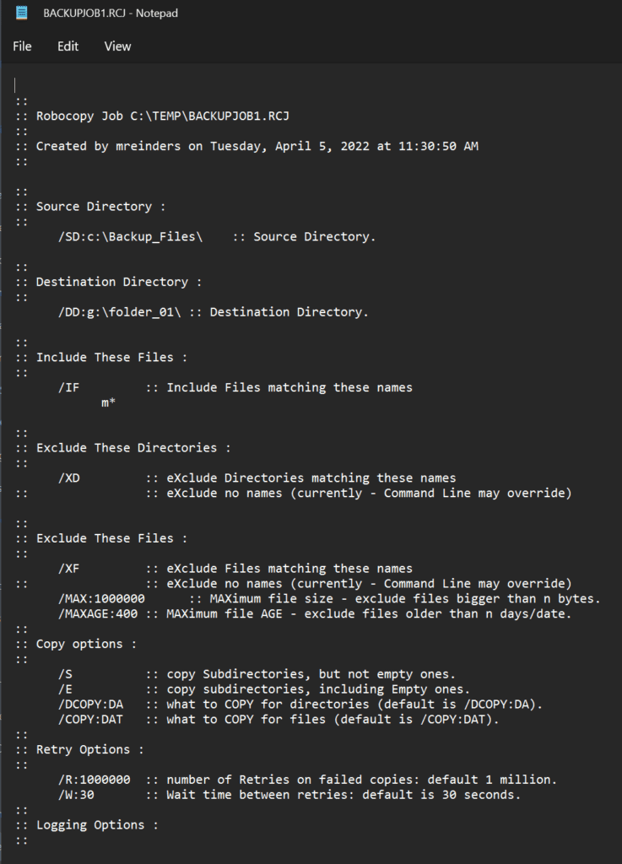
The image above is the output of the text file Robocopy creates. Now, to run this specific Job/string in the future, you utilize the /job switch as so.
robocopy /job:"c:\temp\BackupJob1.rcj"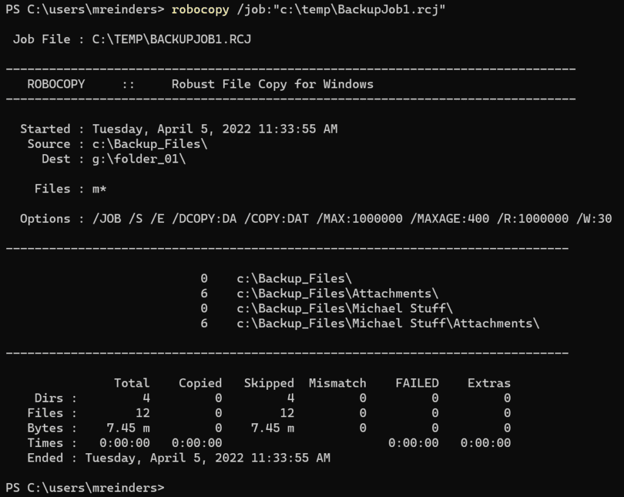
Voila!
Robocopy vs PowerShell: Which is better for file copies?
Although you inherently get a lot of power in using PowerShell to handle the same basic copy/move file tasks mentioned here, again, the number of options available to you with Robocopy makes it the perfect choice if you want to handle file copy tasks efficiently and safely. Robocopy is a wonderful option for new file server creation and migration projects as well.
There are advantages and disadvantages in using Robocopy for your file operation and migration projects – the same can be said for PowerShell. Robocopy is a lean, mean, command-line program that runs compiled binary code. This is the main reason it is so fast, especially when using /mt:16 or more to utilize more application threads in Windows.
But where Robocopy is fast, PowerShell is certainly more robust in terms of how many tasks you can get done in a single PowerShell line of cmdlets or in a script. Being able to grab current file status, pipe that to another cmdlet to perform another function on a subset of those files, and output the results to a log file…the possibilities, as with everything PowerShell, are endless.
A good number of PowerShell’s file operation cmdlets are poorly implemented, or use unoptimized code. If you use the same .NET methods that PowerShell is using, you can get much higher performance, which can be quite perplexing.
Robocopy vs PowerShell performance comparison
To demonstrate, albeit on a small scale, the performance difference between Robocopy and PowerShell. I copied about 2000 files consisting of around 600 MB. Granted – this is not very scientific, but I just wanted to show the differences between the two. When you see the time savings Robocopy offers, at this very small scale, you can see where seconds saved here can amount to hours saved on larger-scale projects and file server migrations!
Let’s see how things go.
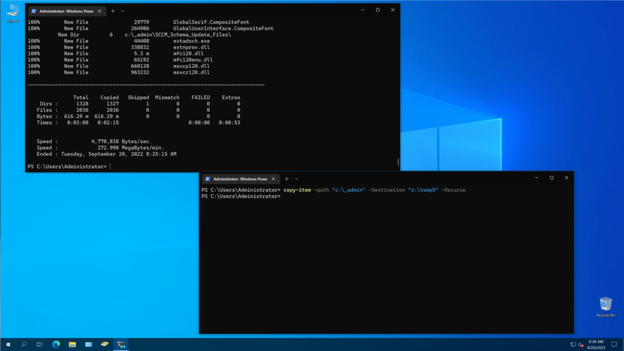
Robocopy is the winner!
Advanced Robocopy options and troubleshooting
There are a few more features and attributes of Robocopy. Let me go through them here with you one by one.
Robocopy exit codes and what they mean
When Robocopy runs, there are exit codes written out to the console or the log output file that explain if there were any errors or warnings along the way. Here are the most common exit codes:
| Error / Exit Code | Meaning |
| 0 | No errors have occurred, and no copying was performed. Both the source and destination are in perfect sync. |
| 1 | One oe more files were copied successfully. This should be the most common exit code for your projects. |
| 2 | Some Extra files or folders were detected. No files were copied though. You’ll see the details in the log output. |
| 4 | Some Mismatched files or folders were found. You may need to examine the log file for details to aleviate. |
| 8 | Some files or folders could not be copied. Check these errors in the log output. |
| 16 | This is a serious error. Robocopy did not copy any files. Usually due to permissions or an error in the source and destination directories. |
Exit Codes returned by Robocopy
Robocopy and long file paths
When you’re copying files, you’ll occasionally run into the file path of either your source or destination locations exceeding the NTFS 256-character limit. However, Robocopy will utilize UNC pathnames exceeding 256 characters.
But, it is best to attempt to shorten your destination file paths to avoid potential issues in the future accessing those paths and files using Windows Explorer.
Robocopy file attributes explained
Here is a quick table explaining what those lovely file attributes mean. I wasn’t aware of all of these myself.
| Letter Attribute | What they Mean |
| R | Read Only |
| A | Archive |
| S | System |
| H | Hidden |
| C | Compressed |
| N | Not content indexed |
| E | Encrypted |
| T | Temporary |
| O | Offline |
Robocopy with junctions and symbolic links
When you use Robocopy /S, it will follow the source and copy the contents to a standard folder. This works with Directory Symbolic Links, Junctions, and Hard Links. This is typical of most backup software algorithms.
To exclude Junction points from being copied, you can use /XJ, /XJD, or /XJF. This prevents the source files from being copied. The Junction Point will not be copied, with or without the use of these flags.
Robocopy and deduplicated files in Windows Server
Be careful when using the /MIR to mirror a system drive on Windows Server 2016, 2019, 2022, etc. Robocopy will try to delete the deduplication files from the \System Volume Information hidden folder if you also run in backup mode using /B or /ZB. It will have permission to delete those files. Either exclude the \System Volume Information folder with /XD or just don’t use /MIR!!!! 😉
Improve Robocopy performance with /MT and /IPG
By default, Robocopy will use 8 threads during the file compare, and copy steps. You can use /MT:16 to start your testing in finding the most optimal number of threads to give you the greatest efficiency and performance during larger projects.
Use /IPG to reduce Robocopy network impact
If you are running on a particularly slow network, or high latency network, you can limit network bandwidth by using the Inter-Packet Gap switch – /IPG:n. This will tell Robocopy to send packets of 64 KB with a delay of n milliseconds.
Robocopy file classes explained
The following table explains the file classes that can be used to include/exclude files during your file copy operations.
| File Class | In source folder | In destination folder | Source/destination File last modified times | Source/Destination File Sizes | Source/destination File attributes |
| Lonely | Yes | No | n/a | n/a | n/a |
| Tweaked | Yes | Yes | Equal | Equal | Different |
| Same | Yes | Yes | Equal | Equal | Equal |
| Changed | Yes | Yes | Equal | Different | n/a |
| Newer | Yes | Yes | Source > Destination | n/a | n/a |
| Older | Yes | Yes | Source < Destination | n/a | n/a |
| Extra | No | Yes | n/a | n/a | n/a |
| Mismatched | Yes | Yes | n/a | n/a | n/a |
Copy NTFS permissions with Robocopy
There are a few notes to make about NTFS permissions. Using /B, backup mode will allow Robocopy to override file and folder permission Access Control Lists (ACLs).
When you see ERROR 5, it will often be accompanied by a standard ‘Access is denied.’ This means the account you’re logged in with doesn’t have the necessary permissions in either the source or destination locations to read or write (or update). It is best to use /B to circumvent this issue. You essentially won’t need to worry about source permissions.
Robocopy will copy security information (ACLs) for files and folders, but will not copy security changes unless the file has also changed. Simply use the /SEC switch to refresh any and all ACL changes regardless if the file(s) were changed.
Use Robocopy Low Free Space Mode /LFSM
Microsoft engineers added the Low Free Space Mode /LFSM:n switch to assist IT Pros with larger file copy projects, especially pushing them to Azure File Sync cloud storage locations. The switch works best for tiered storage destinations which might run out of free space before the Robocopy command finishes.
Robocopy will pause whenever a file copy would cause the destination volume’s free space to go below a percent value of its total size. You use the n variable for this amount. The default is 10%.
Remember – the /LFSM switch is NOT compatible with /MT, /B, /ZB, and /EFSRAW options.
Common Robocopy problems and edge cases
When using the /MOVE or /PURGE switches to delete empty folders by setting the source and destination to the same folder, this does not always work with nested empty folders. It will only work if Windows Explorer is closed. You may need to reboot your server or workstation to make sure things are ‘clean’ in Explorer land.
Be careful when copying files larger than 2 GB from some iSCSI or SAN volumes. The operation may stall out filling up all available RAM. When the RAID controller’s settings are set to write-through caching vs write-back caching. Using other file copy utilities may be faster in this scenario as they will copy in larger blocks. But, lots of small files will slow them down where Robocopy normally shines. Use the /IPG switch (above) to alleviate this issue.
If you use the /FAT option to copy files into a directory with long filenames, and any short filenames happen to match in source and destination, those files will be replaced, which is logical. However, those files will retain their long filenames from the source even if they don’t match the long filenames of the source file. This needs to be examined carefully.
Final recommendations for using Robocopy
Robocopy is a wonderful file copy utility every IT Pro should keep in their arsenal. It is continually being enhanced with new features, even on Windows 11, and we hope this guide gives you some ideas about how to integrate Robocopy into your workflow.

Michael has been an IT Pro since 1998. He has worked predominantly in the Windows world including client and server operating systems, on-prem systems engineering (AD, DNS, etc.), and over the last ten years or so has embraced and immersed himself in...


